Sharing is caring!
Introduction
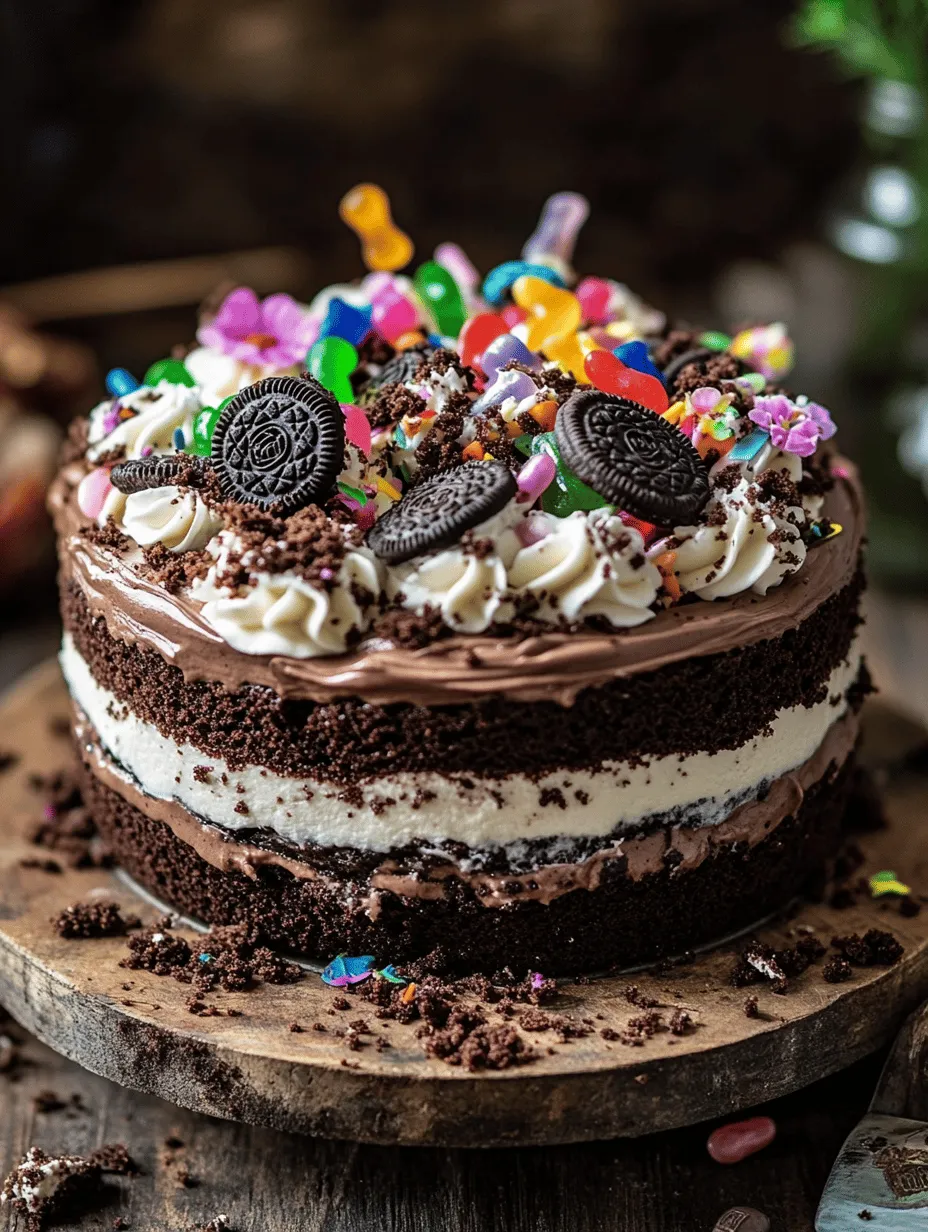
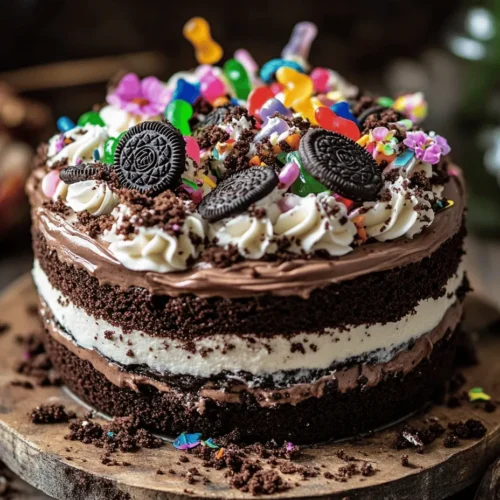
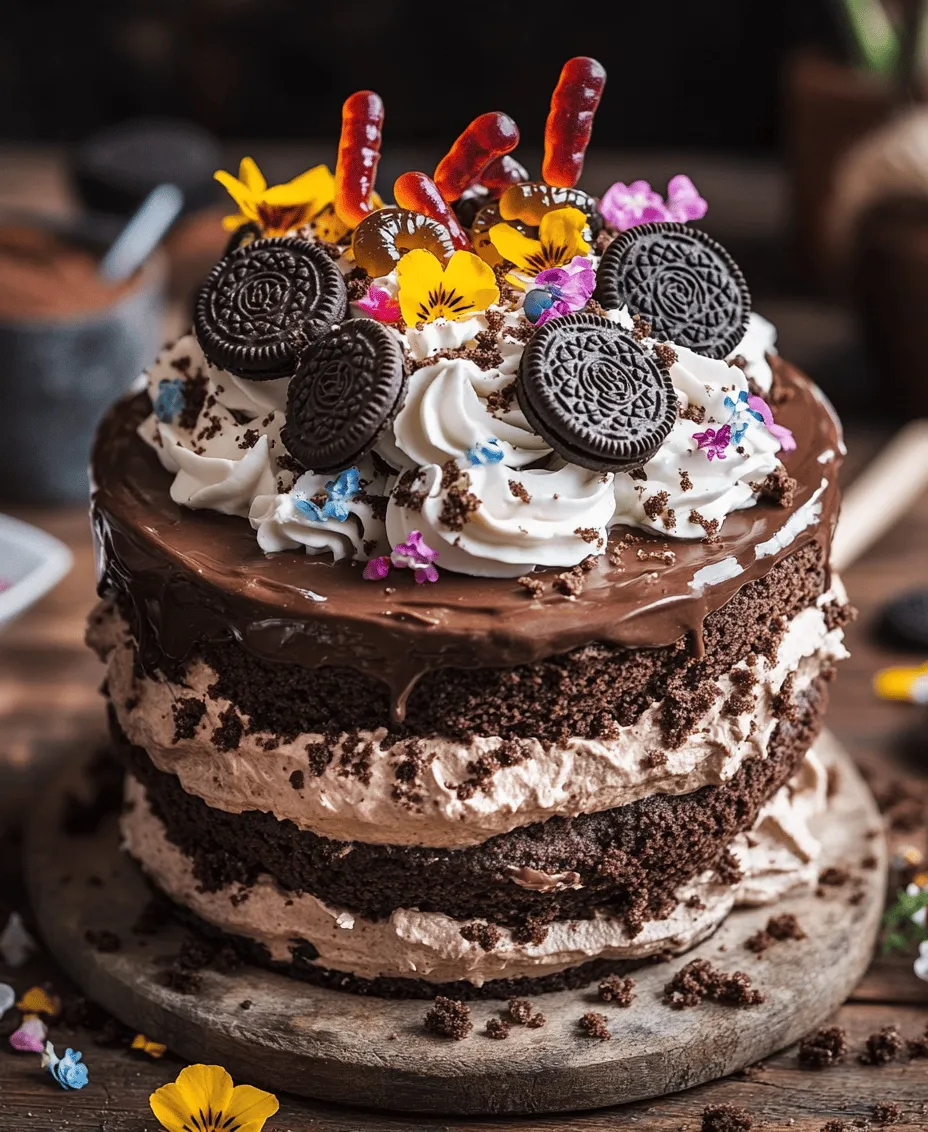
When it comes to birthday celebrations, the cake is often the centerpiece that brings joy and excitement to the occasion. Enter the Chocolatey Birthday Dirt Cake—a playful and whimsical dessert that not only pleases the palate but also brings a smile to the faces of both children and adults alike. This delightful cake takes inspiration from the classic dessert concept of “dirt cake,” traditionally made with layers of chocolate pudding, crushed cookies, and gummy worms. However, this version elevates the fun factor by incorporating a rich chocolate cake as its base, making it a standout choice for any birthday party.
Chocolate desserts are universally adored, and it’s no wonder they are a popular choice for special occasions. The Chocolatey Birthday Dirt Cake combines the rich flavors of chocolate with the light and creamy textures of pudding, creating an irresistible treat that celebrates the joy of birthdays. What makes this cake even more appealing is its ease of preparation—using common ingredients that you probably already have in your pantry.
In this article, we will guide you through the delightful world of the Chocolatey Birthday Dirt Cake, highlighting its ingredients, significance, and step-by-step preparation instructions. Whether you are hosting a birthday party or simply looking for a fun dessert to share with friends, this cake is sure to be a hit.
Understanding the Ingredients
To create this delightful Chocolatey Birthday Dirt Cake, you will need a handful of essential ingredients, each playing a crucial role in the cake’s flavor and texture. Let’s take a closer look at these components and understand their significance.
– Chocolate Cake Mix: The foundation of this cake, chocolate cake mix offers a convenient way to achieve that rich chocolate flavor without the need for complex baking from scratch. It provides moisture, tenderness, and a deep chocolate taste that pairs perfectly with the creamy pudding layers.
– Instant Chocolate Pudding Mix: This ingredient is essential for creating the luscious pudding layer that adds creaminess to the cake. Instant pudding mix is quick and easy to prepare, requiring only the addition of cold milk. It enhances the overall texture of the cake and contributes to the delightful chocolate flavor.
– Whole Milk: Whole milk is vital for achieving the right consistency in the pudding. It adds creaminess and depth of flavor, ensuring that the pudding layer is smooth and rich. Skim or low-fat milk can be used, but whole milk will yield the best results.
– Whipped Topping: This ingredient is key to adding lightness and volume to the cake. Whipped topping gives the dirt cake its signature airy texture, balancing out the density of the chocolate cake and pudding layers. It also adds a touch of sweetness that complements the other flavors.
– Oreo Cookies: The iconic Oreo cookies serve as the signature “dirt” effect in this cake. Crushed Oreos mimic the look of dirt, adding a fun and playful element to the dessert while also contributing a delightful chocolate flavor. They are a must-have for capturing the essence of a dirt cake.
– Gummy Worms: To complete the playful theme, gummy worms are a fun decorative element that adds a whimsical touch to the cake. They are perfect for birthdays, sparking joy and laughter among guests of all ages. You can arrange them crawling out of the “dirt,” creating a delightful visual.
– Optional Decorations: While the base ingredients create a fantastic cake, optional decorations like additional crushed Oreos, chocolate sprinkles, or even edible flowers can enhance the cake’s appearance. Personalizing the decorations can make the cake even more festive and visually appealing for your celebration.
With an understanding of the ingredients, you’re well on your way to creating a Chocolatey Birthday Dirt Cake that not only tastes amazing but also adds a playful element to your festivities.
Step-by-Step Instructions
Now that we’ve covered the essential ingredients for the Chocolatey Birthday Dirt Cake, let’s dive into the detailed preparation instructions. This cake is divided into sections for clarity, ensuring a smooth baking experience.
Preparing the Chocolate Cake
1. Preheat the Oven and Prepare the Pan: Start by preheating your oven to 350°F (175°C). While the oven is heating, prepare a 9×13-inch baking pan by greasing it lightly with cooking spray or butter. This step is essential for ensuring that your cake comes out easily once it is baked.
2. Mixing the Cake Batter: In a large mixing bowl, combine the chocolate cake mix with the required ingredients listed on the package. Typically, this will include water, eggs, and oil. Use a whisk or electric mixer to blend the ingredients until the batter is smooth and free of lumps. Be careful not to overmix, as this can lead to a denser cake.
3. Baking the Cake: Pour the cake batter into the prepared baking pan and spread it evenly with a spatula. Place the pan in the preheated oven and bake according to the package instructions, usually around 25-30 minutes. To check for doneness, insert a toothpick into the center of the cake; it should come out clean or with a few moist crumbs attached.
4. Cooling the Cake Completely: Once the cake is baked, remove it from the oven and allow it to cool in the pan for about 10-15 minutes. After that, carefully transfer the cake to a wire rack to cool completely. This step is crucial as it prevents the cake from becoming soggy when layered with pudding.
Creating the Pudding Layer
1. Prepare the Pudding Mix: While your cake is cooling, take a medium-sized mixing bowl and pour in the instant chocolate pudding mix. Add the whole milk to the bowl and whisk together until the mixture is smooth and thickened. This should only take a couple of minutes. Set aside for a few minutes to allow it to firm up even more.
2. Incorporating Whipped Topping: Once the pudding has thickened, gently fold in the whipped topping using a spatula. This will lighten the pudding mixture and make it fluffy, creating a beautiful contrast to the dense chocolate cake. Be careful not to deflate the whipped topping too much; the goal is to maintain that airy texture.
With the cake baked and cooled, and the pudding layer prepared, you’re now ready to assemble your Chocolatey Birthday Dirt Cake! Follow along as we continue with the assembly and decoration in the next section of this article.
Stay tuned for the next part, where we’ll delve into the fun task of layering the cake, adding the “dirt,” and decorating it to perfection. This cake is not only a feast for the taste buds but also a visual delight that will make any birthday celebration unforgettable.
Preheat the Oven and Prepare the Pan: Start by preheating your oven to 350°F (175°C). While the oven is heating, prepare a 9×13-inch baking pan by greasing it lightly with cooking spray or butter. This step is essential for ensuring that your cake comes out easily once it is baked.” />
Mixing Instant Pudding with Milk
To create the creamy filling for your Chocolatey Birthday Dirt Cake, begin by mixing your chosen instant pudding mix with cold milk. This step is crucial because it sets the stage for the pudding layer’s velvety texture. In a large mixing bowl, whisk together two cups of cold milk and one package of chocolate instant pudding mix. Use a wire whisk or an electric mixer on medium speed for about two minutes, until the mixture thickens significantly. This thickening is not just a visual cue; it ensures a rich and decadent flavor that balances the sweetness of the cake and the crunchiness of the Oreos.
Incorporating Whipped Topping
Once your pudding is thickened, it’s time to fold in the whipped topping. This step transforms your pudding into a luxurious mousse-like filling. Gently add an 8-ounce tub of thawed whipped topping to the pudding mixture, using a spatula to fold it in carefully. The goal here is to maintain the light and airy texture of the whipped topping while fully incorporating it into the pudding. This combined mixture will serve as the heart of your dirt cake, offering a delightful contrast to the crunchy layers of Oreos.
Crushing the Oreos
Crushing the Oreos is an integral part of building your Chocolatey Birthday Dirt Cake. The texture of crushed Oreos mimics the look of dirt, creating an inviting presentation. To crush the Oreos effectively, there are a few techniques you can use. One popular method is to place the Oreos in a zip-top bag and use a rolling pin to crush them into fine crumbs. This method keeps the mess contained and allows you to control the coarseness of the crumbs.
Another option is to use a food processor, which can quickly pulverize the cookies into fine crumbs. Just be careful not to over-process; you want the texture to resemble dirt rather than powder. Reserve about half a cup of the crushed Oreos for decoration on top of the cake, ensuring that your cake has that authentic “dirt” look.
Assembling the Cake
Now that you have your pudding mixture and crushed Oreos ready, it’s time to assemble the cake. Start by selecting a suitable serving dish or cake pan, ideally a clear glass bowl or trifle dish, to showcase the beautiful layers. Begin with a layer of crushed Oreos at the bottom, creating the “dirt” base.
Next, spoon half of the pudding mixture over the Oreos, spreading it evenly to ensure every bite contains that creamy goodness. Repeat this layering process: add another layer of crushed Oreos followed by the remaining pudding mixture. Finally, finish with a generous layer of crushed Oreos on top. This layering technique not only enhances the flavor but also creates an eye-catching presentation that will impress your guests.
Decorating the Cake
Decorating your Chocolatey Birthday Dirt Cake is where you can really let your creativity shine. To achieve an appealing “dirt” look, sprinkle the reserved Oreo crumbs generously over the top of the cake. This layer of crumbs should be thick enough to resemble dirt, adding to the cake’s whimsical charm.
For an extra touch of fun, consider adding gummy worms crawling over the top. These can be arranged playfully to give the cake a delightful and inviting appearance, especially for a birthday celebration. You can also use edible flowers or chocolate sprinkles for additional decorations, allowing your imagination to run wild.
Serving Suggestions
Once your cake is assembled and decorated, it’s important to chill it properly before serving. Refrigerate the cake for at least four hours, or ideally overnight. Chilling allows the flavors to meld together and the pudding to set, making it easier to slice and ensuring a refreshing treat for your guests.
When it comes to presenting your Chocolatey Birthday Dirt Cake at a party, consider serving it in individual cups for a fun twist. This approach makes it easy for guests to grab a serving and enjoy without the need for slicing. Pair the cake with a selection of beverages like milk, chocolate milk, or a light fruit punch to balance the richness of the dessert. For a more festive touch, consider serving with a scoop of vanilla ice cream on the side.
Nutritional Information
As with any dessert, it’s essential to consider the nutritional aspects of your Chocolatey Birthday Dirt Cake. With ingredients like instant pudding, whipped topping, and Oreos, this cake is undoubtedly indulgent. A standard serving size of this cake contains approximately 320 calories, with a good balance of carbohydrates and fats primarily from the cookies and whipped topping.
While this dessert is meant to be a treat, it’s important to keep portion sizes in check, especially if serving at a larger gathering. Enjoying this cake in moderation allows everyone to indulge in a sweet experience without overdoing it.
Conclusion
Making and serving a Chocolatey Birthday Dirt Cake is not just about the delicious flavors; it’s about the fun and creativity that comes with it. This cake captures the whimsical spirit of childhood celebrations, making it a perfect centerpiece for birthdays and other festive occasions.
Encourage your guests to embrace their creativity by personalizing their servings with additional toppings or decorations. Whether you’re celebrating a birthday or simply looking for a unique dessert for a gathering, this dirt cake is sure to delight friends and family alike. Share your experiences with this delightful recipe and inspire others to create their unique versions of this charming cake for any celebration!
Birthday Dirt Cake
Celebrate birthdays with a delightful twist! The Chocolatey Birthday Dirt Cake combines rich chocolate cake, creamy chocolate pudding, and crushed Oreos for a fun dessert everyone will love. Topped with gummy worms, this whimsical treat is as visually appealing as it is delicious. Perfect for parties or just to share, you'll find it's easy to make using simple ingredients. Get ready to impress your guests! #BirthdayCake #ChocolateDessert #DirtCake #PartyFood #BakingFun
1 package (15.25 oz) chocolate cake mix (plus ingredients called for on the box)
1 package (3.9 oz) instant chocolate pudding mix
3 cups whole milk
1 tub (8 oz) whipped topping (like Cool Whip), thawed
1 package (15 oz) Oreo cookies
1 cup gummy worms
Optional: Edible flower decorations or sprinkles for garnish
Prepare the Cake: Preheat the oven as per the instructions on the chocolate cake mix box. Prepare the cake batter as directed and bake in two 9-inch round pans. Cool completely on a wire rack.
Make the Pudding Layer: In a large mixing bowl, combine the instant chocolate pudding mix with the whole milk. Whisk for about 2 minutes until it thickens. Fold in the whipped topping carefully until well combined.
Crush the Oreos: Place the Oreo cookies in a zip-top bag and crush them into fine crumbs using a rolling pin or your hands. Set aside about 1/2 cup of crumbs for topping.
- Once the cakes are fully cooled, place one layer on a serving platter.
- Spread half of the pudding mixture over the first cake layer.
- Sprinkle a layer of crushed Oreos over the pudding.
- Place the second cake layer on top and repeat with the remaining pudding mixture and crushed Oreos.
Decorate: Top the entire cake with the reserved Oreo crumbs, creating a dirt effect. Decorate with gummy worms squiggling out of the dirt and sprinkle any additional edible flowers or sprinkles to enhance the visual appeal.
Chill and Serve: Refrigerate the cake for at least 2 hours to set before slicing and serving. Enjoy your Birthday Dirt Cake as a fun, delightful centerpiece for your celebration!
Prep Time: 30 minutes | Total Time: 3 hours | Servings: 12