Introduction
Fried rice balls, often referred to as arancini in Italian cuisine and onigiri in Japanese culture, are a delightful culinary creation that embodies comfort and versatility. These little spheres of joy combine the warm, familiar flavors of rice with a crispy, golden exterior, making them an irresistible snack or appetizer. As simple as they are delicious, fried rice balls can be a perfect addition to any gathering, whether you’re hosting a casual get-together, a festive party, or simply looking for a fun family meal.
The appeal of fried rice balls transcends cultural boundaries, allowing people from various backgrounds to enjoy their unique flavors and textures. In Italy, arancini are often stuffed with rich ragù or melty cheese, while Japanese onigiri may be filled with savory ingredients like pickled plum or grilled salmon. This adaptability not only speaks to their cultural significance but also invites creativity in the kitchen, as home cooks can personalize their rice balls with an array of ingredients.
In this guide, we’ll embark on a culinary adventure to uncover the secrets of making the ultimate fried rice balls. From the essential ingredients to step-by-step instructions, you’ll learn everything you need to know to achieve that perfect crispy exterior and tantalizing interior. Let’s dive into the world of fried rice balls and discover why they are a beloved dish across the globe.
The Appeal of Fried Rice Balls
Fried rice balls are universally loved for their delightful blend of textures and flavors. The contrast between the crunchy outer layer and the soft, flavorful filling makes for a satisfying bite that keeps you coming back for more. Whether you’re enjoying them as an appetizer, snack, or part of a main course, the joy of biting into a warm fried rice ball is undeniable.
The cultural significance of rice balls can be seen in their varying forms around the world. In Italy, arancini are a staple of Sicilian cuisine, often prepared using leftover risotto, which is molded into balls, stuffed, breaded, and then fried to perfection. This technique not only helps reduce food waste but also creates a delicious dish that showcases the flavors of Italian cooking.
In Japan, onigiri represents a different yet equally cherished tradition. These rice balls are typically shaped by hand and filled with ingredients that provide a burst of flavor, such as seasoned seaweed or fish. Onigiri is often enjoyed as a portable snack or lunch option, making it a practical choice for those on the go.
The true beauty of fried rice balls lies in their adaptability. You can customize them to suit your palate, whether you prefer a classic Italian flavor profile or a Japanese twist. The possibilities are endless, and this makes fried rice balls a creative outlet for chefs of all skill levels. By experimenting with various fillings and seasonings, you can create a dish that reflects your personal taste and culinary style.
Ingredients Breakdown
To craft the perfect fried rice balls, it’s essential to gather the right ingredients. Below is a comprehensive list of what you will need, along with explanations of the roles each ingredient plays in achieving the ideal flavor and texture.
Key Ingredients
1. Day-Old Rice: The cornerstone of any fried rice ball recipe, day-old rice is crucial for achieving the right texture. Freshly cooked rice tends to be too moist and sticky, making it difficult to shape into balls. Day-old rice, on the other hand, has dried out slightly, making it firmer and easier to mold.
2. Parmesan Cheese: This cheese adds a rich umami flavor that elevates the overall taste of the rice balls. Its sharpness complements the other ingredients beautifully, delivering a savory punch with every bite.
3. Mozzarella Cheese: Known for its gooey texture, mozzarella cheese is often used as a filling for fried rice balls. When fried, it melts deliciously, providing a creamy contrast to the crispy exterior.
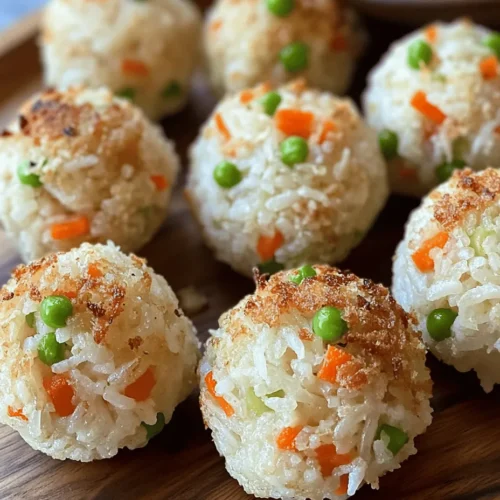
4. Peas and Carrots: These vegetables not only add a pop of color but also contribute essential nutrients to the dish. Their natural sweetness complements the savory flavors of the rice balls, making them a delightful addition.
5. Seasonings: Salt, pepper, garlic powder, and onion powder are key seasonings that enhance the flavor profile of the rice balls. They help to elevate the dish, making it more aromatic and delicious.
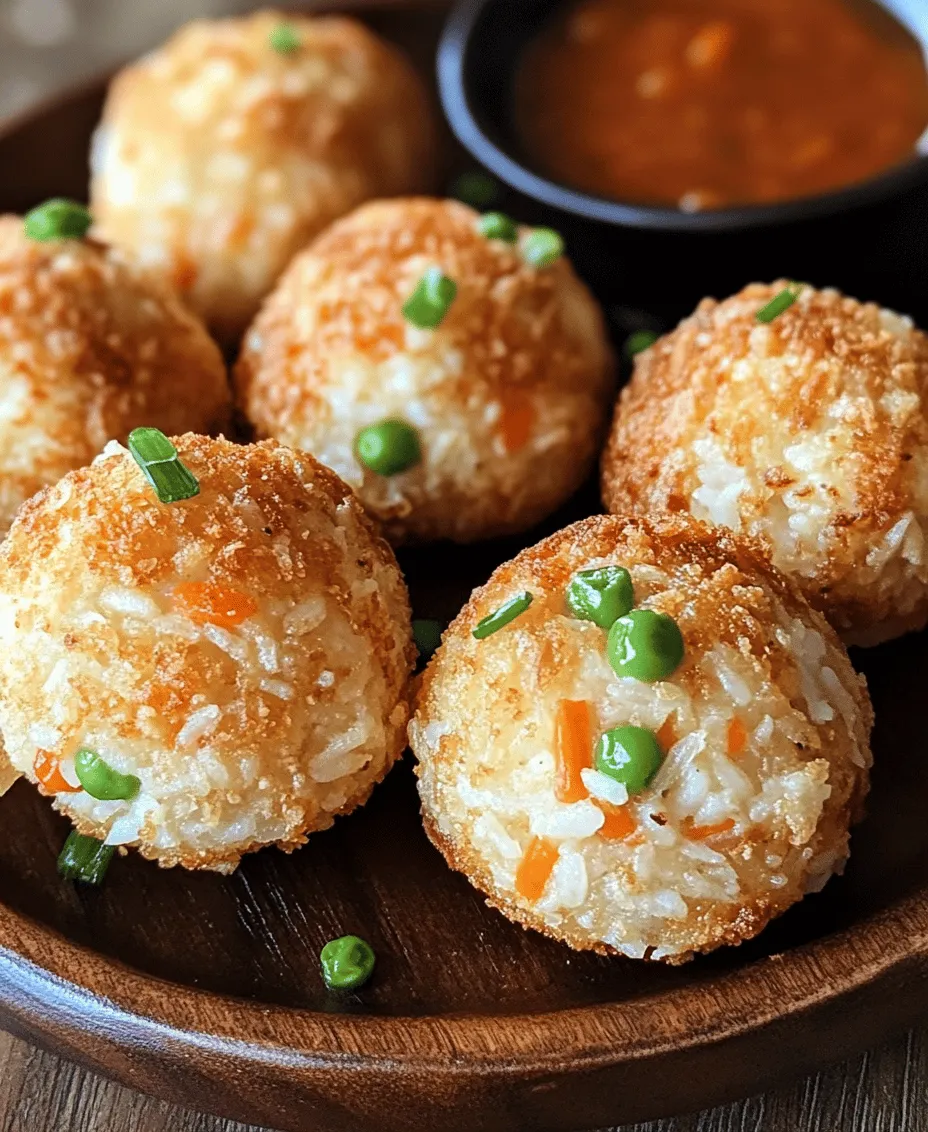
6. Breadcrumbs: Used for coating the rice balls before frying, breadcrumbs provide the necessary crunch that defines a good fried rice ball. Opt for panko breadcrumbs for an extra crispy texture.
7. Eggs: Eggs act as a binding agent, helping to hold the rice mixture together and ensuring that the fried rice balls maintain their shape during cooking.
8. Oil for Frying: A neutral oil, such as vegetable oil or canola oil, is ideal for frying the rice balls. The oil should be hot enough to create a crispy outer layer while ensuring the interior is heated through.
With these ingredients in hand, you are well on your way to creating delectable fried rice balls that will delight your family and friends.
Step-by-Step Instructions
Now that you have gathered all the necessary ingredients, let’s dive into the step-by-step process of making fried rice balls. These instructions will guide you through each stage, ensuring your rice balls turn out perfectly crispy and delicious.
Step 1: Prepare the Rice Mixture
– Begin by cooking your rice: If you don’t have day-old rice, cook fresh rice according to package instructions. Once cooked, spread it out on a baking sheet to cool and dry out.
– Combine the rice with cheese and vegetables: In a large mixing bowl, combine the day-old rice, grated Parmesan cheese, diced mozzarella, peas, and carrots. Season with salt, pepper, garlic powder, and onion powder. Mix everything thoroughly until well combined.
Step 2: Form the Rice Balls
– Shape the mixture into balls: With clean hands, take a handful of the rice mixture and form it into a ball, approximately the size of a golf ball. Make sure to press firmly so that the mixture holds together.
– Add cheese filling (optional): If you want a cheesy surprise in the center, create a small indentation in the center of the ball, place a small cube of mozzarella cheese inside, and mold the rice mixture around it to seal the cheese inside.
Step 3: Prepare for Frying
– Coat the rice balls: Set up a breading station by placing flour, beaten eggs, and breadcrumbs in three separate shallow bowls. Roll each rice ball in flour, dip it in the beaten eggs, and finally coat it with breadcrumbs. Ensure each ball is evenly coated for the best crunch.
Step 4: Fry the Rice Balls
– Heat the oil: In a deep skillet or frying pan, pour enough oil to submerge the rice balls halfway. Heat the oil over medium-high heat until it reaches around 350°F (175°C).
– Fry the rice balls: Carefully place a few rice balls into the hot oil, ensuring not to overcrowd the pan. Fry them for about 3-4 minutes on each side or until they are golden brown and crispy. Use a slotted spoon to turn them gently, allowing for even cooking.
– Drain excess oil: Once cooked, remove the rice balls from the oil and place them on a paper towel-lined plate to drain excess oil.
By following these steps, you’ll create a batch of crispy fried rice balls that are sure to impress! The next part of our guide will delve deeper into tips for achieving the best results and common questions about this beloved dish, ensuring your fried rice ball experience is nothing short of delightful.
Mixing the Ingredients
To start crafting your delicious fried rice balls, the first step is to mix all your chosen ingredients in a large bowl. This step is vital for ensuring that every bite of your rice ball is packed with flavor. Begin by adding your cooked rice, which should ideally be a day old for easier handling and better texture. Freshly cooked rice can be too sticky and wet, making it difficult to shape.
Next, incorporate your chosen mix-ins such as finely chopped vegetables, proteins like cooked chicken or shrimp, and spices or herbs for flavor. Consider options like green onions, bell peppers, or peas for their vibrant colors and textures.
When mixing, use a fork or your hands to gently combine the ingredients, being careful not to mash the rice. You want the mixture to be cohesive yet still chunky, allowing for delightful bursts of flavor as you bite into the fried rice balls. Make sure that the ingredients are evenly distributed throughout the rice; this will enhance the overall taste and ensure that you get a bit of everything in each rice ball.
Shaping the Rice Balls
Once your mixture is well combined, it’s time to shape the rice balls. The key to perfect rice balls lies in achieving the right texture and consistency. Take a handful of the rice mixture, about the size of a golf ball, and gently compress it into a tight ball using your palms.
If the rice is too dry and crumbly, you can add a little water or an egg to help bind the ingredients together. Conversely, if the mixture feels too wet, add a sprinkle of breadcrumbs or additional rice to balance it out. You want your rice balls to hold their shape without falling apart, so aim for a firm yet moist consistency.
For a more uniform look, you might consider using an ice cream scoop or a measuring cup to portion out the rice. This ensures that each rice ball is roughly the same size, promoting even cooking and a polished presentation.
Coating with Breadcrumbs
Now that your rice balls are formed, it’s time to give them a crispy exterior with breadcrumbs. A well-coated rice ball is essential for that satisfying crunch. Start by preparing your breadcrumbs. You can use store-bought breadcrumbs or make your own by toasting slices of bread and grinding them into crumbs. Homemade breadcrumbs often yield a fresher flavor and a coarser texture, which can enhance the crunchy outer layer.
To coat the rice balls, first, set up a breading station with three shallow bowls: one with flour, one with beaten eggs, and one with breadcrumbs. Begin by rolling each rice ball in the flour to create a dry surface. This step helps the egg wash stick better.
Next, dip the floured rice ball into the beaten eggs, ensuring it’s fully coated. Finally, roll the rice ball in the breadcrumbs, pressing gently to ensure an even coating. This three-step process not only adds flavor but also contributes to a delightful crunch when fried.
Frying Techniques
Frying your rice balls properly is crucial for achieving a golden, crispy exterior. Start by heating oil in a deep skillet or frying pan. Ideally, you want to use an oil with a high smoke point, such as canola or vegetable oil. Heat the oil to about 350°F (175°C). If you don’t have a thermometer, you can test the oil by dropping in a small piece of bread; if it sizzles and turns golden within a minute, the oil is ready.
When frying, avoid overcrowding the pan. Fry the rice balls in batches, allowing enough space for them to float and cook evenly on all sides. Overcrowding can lower the oil temperature, leading to soggy rice balls rather than crispy ones. Fry each batch for about 3-4 minutes, turning occasionally until they are golden brown.
Once fried, place the rice balls on a plate lined with paper towels to absorb any excess oil. This step helps maintain their crispness, so don’t skip it!
Perfecting the Fry: Tips for Crispy Texture
Achieving that perfect crispy texture on your fried rice balls involves a few key factors:
1. Oil Choice: As mentioned, opt for oils with high smoke points. Canola, peanut, and sunflower oils are excellent choices for frying because they withstand high temperatures without burning.
2. Temperature Control: Maintaining the right oil temperature is crucial. If the oil is too hot, the rice balls may burn on the outside while remaining uncooked inside. Too low, and they will absorb more oil, leading to greasiness. Use a thermometer for accuracy if possible.
3. Timing: Don’t rush the frying process. Allow each batch enough time to develop that golden brown crust. If you find that the balls are browning too quickly, reduce the heat slightly.
4. Avoid Common Pitfalls: To prevent sogginess, ensure that the rice balls are not too wet before frying. If you have leftovers, reheating them should be done in an oven or air fryer to maintain their crispiness rather than the microwave, which can make them soggy.
Serving Suggestions
Fried rice balls are incredibly versatile and can be served in many delightful ways. Here are some serving suggestions that elevate your dish:
– Dipping Sauces: Pair your fried rice balls with a variety of dipping sauces to enhance their flavor. Classic marinara sauce adds a tangy contrast, while sweet chili sauce brings a delightful sweetness. Soy sauce can provide a savory kick, perfect for those who enjoy Asian flavors.
– Accompaniments: Consider serving your rice balls alongside fresh salads or vegetable sides. A crisp green salad with a light vinaigrette can balance the richness of the fried rice balls. Grilled vegetables or a zesty coleslaw can also complement the dish beautifully.
– Presentation Ideas: For entertaining, arrange the fried rice balls on a large platter, garnished with fresh herbs like parsley or cilantro. You can also serve them in small individual cups with dipping sauces for a fun, interactive dining experience.
Nutritional Insights
Fried rice balls can be a delicious indulgence, but it’s essential to be aware of their nutritional value. Each rice ball typically contains approximately 100-150 calories, depending on the ingredients used. The protein content will vary based on your mix-ins; for example, adding chicken or shrimp increases the protein significantly.
If you’re looking to make your fried rice balls healthier, consider the following dietary modifications:
– Gluten-Free: Substitute regular breadcrumbs with gluten-free breadcrumbs or crushed rice crackers to accommodate gluten-sensitive individuals.
– Vegetarian Options: Use plant-based proteins such as tofu or chickpeas instead of meat, and load up on vegetables to create a filling and nutritious snack.
– Baking Alternative: For a lighter version, you can bake the rice balls in a preheated oven at 400°F (200°C) for about 20-25 minutes, or until golden, turning halfway through. This method reduces the amount of oil used.
Conclusion
Making crispy fried rice balls is a joyful culinary adventure that allows for creativity in the kitchen. With the flexibility to customize flavors and ingredients, these delightful bites can satisfy a range of palates and dietary preferences. Whether enjoyed as a snack, appetizer, or part of a meal, fried rice balls bring comfort and satisfaction.
Encouraging readers to experiment with different fillings and dipping sauces can lead to exciting variations of this classic dish. The satisfaction of preparing these tasty treats at home, sharing them with friends and family, or indulging in them alone makes this recipe a must-try for any home cook. So gather your ingredients, roll up your sleeves, and dive into the delicious world of fried rice balls!