
Introduction
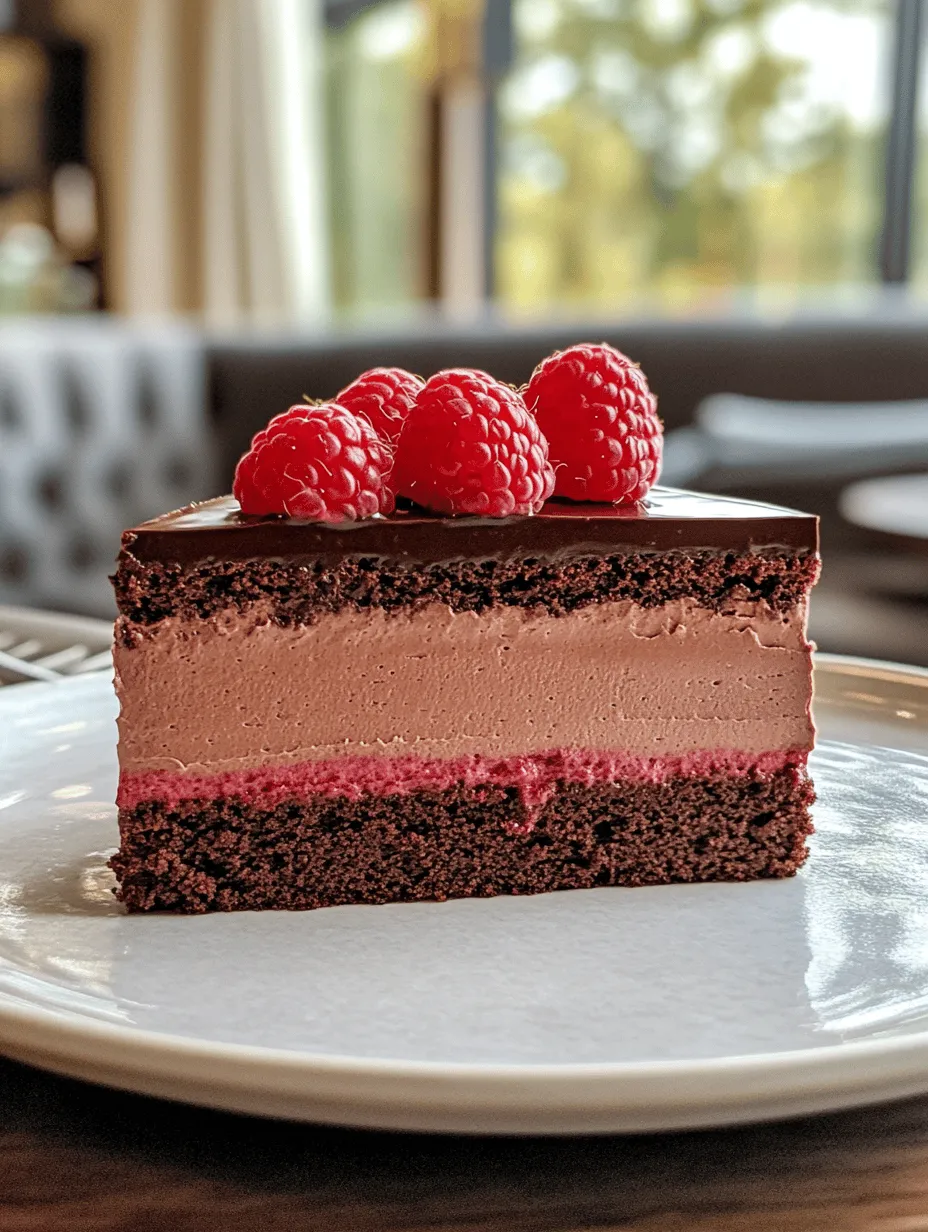
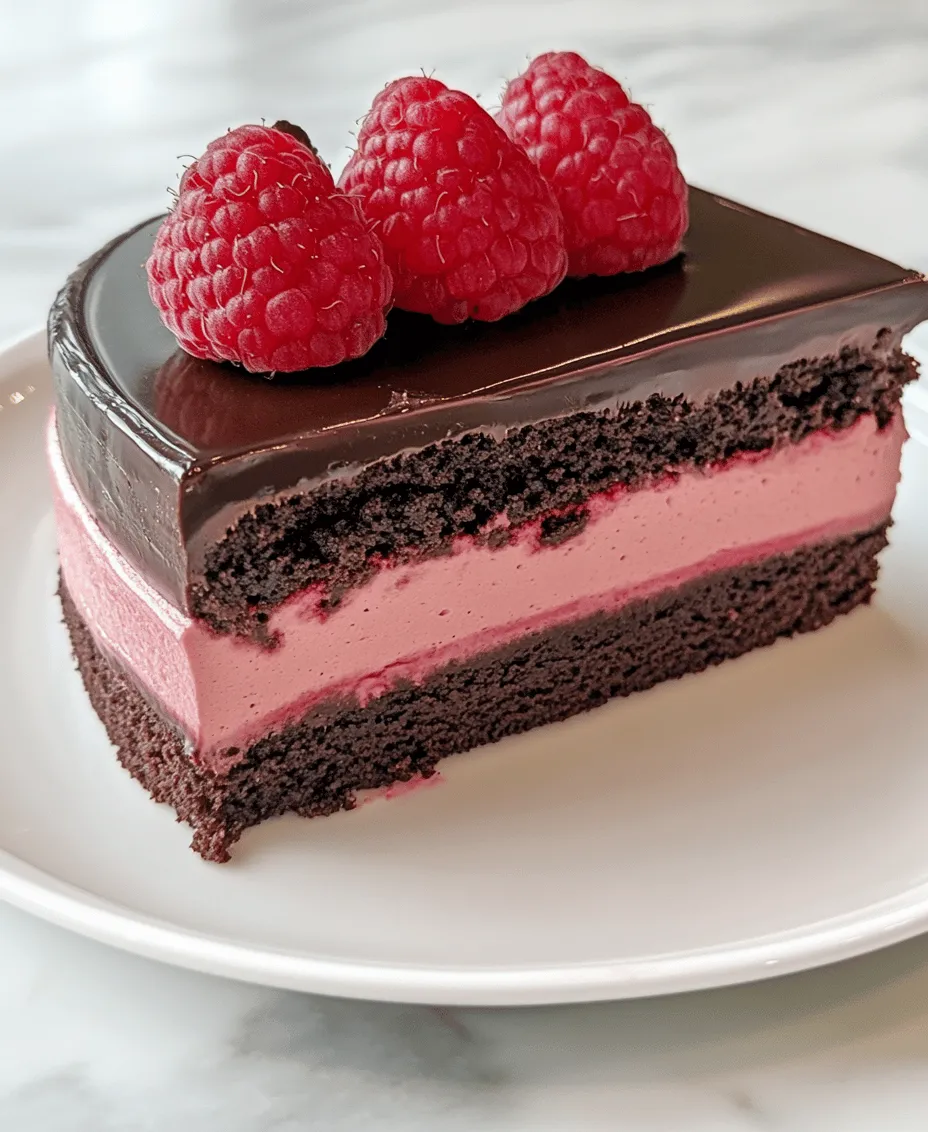
Explore the delightful world of desserts with our Decadent Chocolate Raspberry Mousse Cake, a perfect combination of rich chocolate and tart raspberries. This cake not only serves as a showstopper for any occasion but also satisfies the sweet tooth in the most indulgent way possible. Imagine a velvety chocolate cake layered with a luscious raspberry mousse, all topped with a silky chocolate ganache—each bite is a symphony of flavors and textures that will leave your guests in awe.
Chocolate mousse cake recipes have become increasingly popular for their rich flavors and striking presentation. The marriage of chocolate and raspberry is not only visually appealing but also creates a flavor profile that is both sweet and slightly tangy, making it an ideal dessert for celebrations, dinner parties, or simply treating yourself after a long day. In this article, we’ll take you step-by-step through the recipe, highlighting the unique characteristics of each component, from the moist chocolate cake base to the airy raspberry mousse, and finishing with a luscious chocolate ganache. Prepare to impress your guests and treat yourself to a slice of heaven!
Understanding the Components of the Cake
To create the perfect Decadent Chocolate Raspberry Mousse Cake, it is essential to understand the individual components that come together to create this culinary masterpiece. Each layer contributes to the overall experience of the cake, making it critical to pay attention to ingredients, techniques, and presentation.
The Chocolate Cake Base
The foundation of this cake is a rich and moist chocolate cake that provides a robust base for the delicate raspberry mousse. The ingredients you choose will significantly impact both the flavor and texture of the cake.
Ingredients Overview
1. All-Purpose Flour: This provides the structure of the cake. When combined with the other ingredients, it helps create a stable base that can support the mousse layer on top.
2. Cocoa Powder: Unsweetened cocoa powder is essential for imparting a deep chocolate flavor. It’s important to choose high-quality cocoa for the best taste.
3. Sugar: Granulated sugar not only sweetens the cake but also helps retain moisture, ensuring a tender crumb.
4. Baking Powder and Baking Soda: These leavening agents help the cake rise, creating a light and airy texture.
5. Eggs: Eggs provide moisture and richness while also acting as a binding agent that holds the cake together.
6. Boiling Water: This might seem unusual, but adding boiling water to the batter enhances the cocoa flavor and increases moisture, resulting in a richer cake.
Baking Tips
– Accurate Measurements: Baking is a science, and precision is crucial. Use a kitchen scale for the best results, especially when measuring flour and sugar.
– Greasing and Flour Dusting: Properly greasing and flouring your cake pans will help prevent sticking. Use a generous amount of butter to coat the pans and dust them with flour, tapping out the excess.
– Mixing Techniques: It’s important to mix the dry ingredients thoroughly before adding wet components. This ensures even distribution of leavening agents and prevents clumping.
– Oven Temperature: Preheat your oven to the appropriate temperature to ensure even baking. An oven thermometer can be beneficial for accuracy.
The Raspberry Mousse Filling
Once you have a solid chocolate cake base, it’s time to create the raspberry mousse that will add a delightful contrast in flavor and texture.
Raspberry Selection
Choosing the right raspberries is crucial for the success of your mousse. Look for fresh, ripe raspberries that are plump and fragrant. Avoid any berries that are overly soft or have begun to mold. If fresh raspberries are unavailable, you can use frozen raspberries, but be sure to thaw and drain them before use to avoid excess moisture.
Creating the Mousse
1. Raspberry Puree: Start by blending the fresh raspberries in a food processor until smooth. Strain the puree through a fine-mesh sieve to remove the seeds, leaving you with a silky texture.
2. Whipping Cream: The key to a light and airy mousse is properly whipped cream. Begin by chilling your mixing bowl and beaters to help the cream whip faster and achieve stiff peaks. Be careful not to overwhip, as this can result in a grainy texture.
Incorporating Chocolate and Gelatin
1. Melting Chocolate: Choose high-quality dark chocolate for the mousse. Melt it gently over a double boiler or in the microwave, stirring until smooth.
2. Stabilizing the Mousse: If you want a firmer mousse, consider incorporating gelatin. Bloom the gelatin in cold water before heating it slightly to dissolve. Mix it into the raspberry puree before folding it into the whipped cream.
3. Balancing Flavors: When combining the raspberry puree with the melted chocolate, ensure that the chocolate isn’t too hot, as this can cause the cream to deflate. Fold the mixtures gently to maintain the mousse’s lightness.
The Chocolate Ganache Topping
The final touch to this cake is the chocolate ganache, which adds a luxurious finish and extra depth of flavor.
Making the Ganache
1. Heating Cream: Heat heavy cream in a saucepan until it begins to simmer. The heat changes the properties of the cream, allowing it to emulsify with the chocolate.
2. Melting Chocolate: Pour the hot cream over chopped chocolate in a heatproof bowl. Let it sit for a few minutes, then stir until smooth. The ganache should be glossy and thick, perfect for pouring over the cake.
Tips for Pouring Ganache
1. Cooling Time: Allow the ganache to cool slightly before pouring it over the cake. This will ensure that it doesn’t run off too quickly and creates a beautiful finish.
2. Using a Turntable: If you have one, a turntable can be a useful tool for pouring ganache evenly over the cake. It allows you to rotate the cake smoothly, ensuring a consistent layer.
3. Drip Effect: For a decorative touch, let some ganache drip over the edges of the cake. This creates a stunning visual effect that highlights the layers below.
Step-by-Step Instructions for the Decadent Chocolate Raspberry Mousse Cake
With a solid understanding of each component, you’re now ready to dive into the step-by-step instructions to assemble your Decadent Chocolate Raspberry Mousse Cake.
Step 1: Baking the Chocolate Cake
1. Preparation and Mixing: Preheat your oven to 350°F (175°C). Grease and flour two 9-inch round cake pans. In a large mixing bowl, combine the dry ingredients: flour, cocoa powder, baking powder, baking soda, and sugar. Mix well.
2. Adding Wet Ingredients: In a separate bowl, whisk together the eggs, boiling water, and oil. Gradually add this mixture to the dry ingredients, mixing until just combined. Be careful not to overmix, as this can lead to a dense cake.
3. Baking Process: Divide the batter evenly between the prepared pans. Bake for 30-35 minutes, or until a toothpick inserted into the center comes out clean. Allow the cakes to cool in the pans for 10 minutes before transferring them to a wire rack to cool completely.
Step 2: Preparing the Raspberry Mousse
1. Making the Raspberry Puree: While the cake is cooling, prepare your raspberry puree by blending the fresh raspberries and straining them to remove the seeds.
2. Whipping the Cream: In a chilled bowl, whip the heavy cream until stiff peaks form. Be careful not to overwhip, as this can lead to a grainy texture.
3. Melting the Chocolate: Melt your high-quality dark chocolate over a double boiler or in the microwave. Allow it to cool slightly before adding it to the raspberry puree.
4. Combining Ingredients: Gently fold the raspberry puree into the whipped cream, followed by the melted chocolate. If you’re using gelatin, ensure it’s fully dissolved and incorporated at this stage.
Stay tuned for the next part of this article, where we will guide you through assembling the cake, adding the decadent ganache, and presenting your masterpiece. Each step is designed to ensure that your Decadent Chocolate Raspberry Mousse Cake turns out perfectly, ready to impress anyone lucky enough to have a slice.
Pureeing the Raspberries
To create the luscious raspberry mousse that perfectly complements the rich chocolate layers of your cake, start by pureeing the fresh raspberries. This process is simple yet crucial, as it ensures a smooth consistency that will integrate beautifully into your whipped cream.
Begin by placing the fresh raspberries in a blender or food processor. Pulse the berries until they break down into a smooth puree. If you prefer a seedless mousse, this is the moment to strain the puree through a fine-mesh sieve. Use a spatula to press the mixture against the sieve, extracting as much of the vibrant raspberry liquid as possible while leaving the seeds behind. This step may take a bit of time, but the result is a silky raspberry puree that elevates your mousse cake to a new level of sophistication.
Whipping the Cream
Now, it’s time to whip the heavy cream to soft peaks. Start with a chilled mixing bowl and beaters; this ensures that the cream whips up faster and achieves the desired texture. Pour the heavy cream into the bowl and begin beating at medium speed. Gradually increase to high speed as the cream thickens. Watch closely for soft peaks to form – this means that the cream will hold its shape but still have a billowy texture.
Once your cream reaches soft peaks, gently fold in the raspberry puree. Use a spatula to lift the cream from the bottom of the bowl and fold it over the puree. This technique minimizes the deflation of the whipped cream, ensuring your mousse retains its light and airy quality. Continue folding until the mixture is fully combined, displaying a beautiful pastel pink hue.
Step 3: Assembling the Cake
Layering Techniques
With your chocolate cake layers and raspberry mousse prepared, it’s time to assemble the cake. Start with the first layer of chocolate cake on a serving platter or cake stand. Use a spatula to spread a generous layer of the raspberry mousse on top, ensuring even coverage to avoid any crumbling when slicing.
Next, carefully place the second layer of chocolate cake on top of the mousse. Repeat the process, adding another layer of mousse. If you’re using multiple layers, continue alternating between cake and mousse until all layers are stacked. A helpful tip is to use a cake leveler or knife to trim the tops of the cake layers if they have domed during baking, ensuring a flat surface for stacking.
Chilling for Texture
After assembling the cake, it’s essential to chill it in the refrigerator for at least 2-3 hours. This chilling time allows the mousse to set properly, creating a firm structure that holds its shape when sliced. It also enhances the overall flavor as the layers meld together. If you have time, chilling the cake overnight is ideal, as it will allow the mousse to develop its full flavor.
Step 4: Making the Chocolate Ganache
Heating and Mixing
While your cake is chilling, you can prepare the glossy chocolate ganache that will adorn the top. Begin by heating heavy cream in a small saucepan over medium heat. Stir occasionally and keep a close eye on it; you want the cream to heat just until it’s steaming but not boiling. Boiling can lead to separation and an undesirable texture.
Once the cream is heated, remove it from the heat and add chopped chocolate. Use a high-quality dark chocolate for the best flavor. Let the mixture sit for a minute to allow the chocolate to soften, then whisk until the chocolate is fully melted and the ganache is smooth and glossy.
Setting the Ganache
Before pouring the ganache over the chilled cake, it’s important to let it cool slightly. Allow it to sit at room temperature for about 10-15 minutes, until it thickens slightly but is still pourable. This step is crucial; pouring ganache that is too hot can melt the mousse underneath, ruining the perfect layers you have created.
Step 5: Final Touches and Garnishing
Garnishing Options
Once your ganache has reached the right consistency, carefully pour it over the top of the cake, allowing it to drip down the sides for an elegant finish. For added flair, consider garnishing with fresh raspberries, chocolate shavings, or a dusting of cocoa powder. Edible flowers can also add a touch of whimsy and color, making your cake a stunning centerpiece for any occasion.
Cutting and Serving
When it comes time to serve your Decadent Chocolate Raspberry Mousse Cake, it’s important to cut it properly for the best presentation. Use a sharp, warm knife – dipping the knife in hot water and wiping it dry can help achieve clean cuts. This technique minimizes the mess, allowing you to present beautiful, defined layers with each slice.
Serve the cake on its own or with a dollop of whipped cream or a scoop of vanilla ice cream for an extra indulgent treat.
Nutritional Information and Serving Suggestions
Nutritional Breakdown
This decadent dessert, while indulgent, can be enjoyed in moderation. A typical slice of the Decadent Chocolate Raspberry Mousse Cake contains approximately 350-450 calories, depending on the size of the slice and the specific ingredients used. Key ingredients like dark chocolate provide antioxidants, while raspberries are rich in vitamins and fiber, making this cake a more wholesome treat than typical dessert options.
Perfect Pairings
To elevate your dessert experience, consider pairing your chocolate raspberry mousse cake with complementary beverages. A rich cup of coffee or espresso enhances the chocolate flavors beautifully. For those who prefer wine, a dessert wine such as a late-harvest Riesling or a fruity Pinot Noir will harmonize with the raspberry notes. If tea is more to your liking, opt for a fruit-infused blend, such as hibiscus or berry-flavored teas, which will complement the cake’s tartness.
Conclusion
Indulging in a slice of Decadent Chocolate Raspberry Mousse Cake is a culinary experience that combines rich flavors and delightful textures. This cake not only satisfies the palate but also showcases the art of baking and dessert creation. With its layers of moist chocolate cake, light raspberry mousse, and glossy ganache, it is sure to become a favorite in your dessert repertoire. Whether for a celebration or a personal treat, this recipe invites you to enjoy the sweet moments in life. It’s more than just a dessert; it’s an invitation to savor the joys of baking and sharing with loved ones. Enjoy the process, and happy baking!