
Introduction
If you’re searching for a delightful treat that perfectly blends sweet and savory flavors, look no further than Strawberry Kiss Cookies. These cookies are an enchanting combination of luscious strawberries, rich chocolate, and a buttery cookie base. Imagine the soft, melt-in-your-mouth texture of a cookie that surprises you with bursts of strawberry flavor and a chocolatey finish. Whether you’re a seasoned baker or a novice in the kitchen, this recipe is sure to impress and satisfy your sweet tooth.
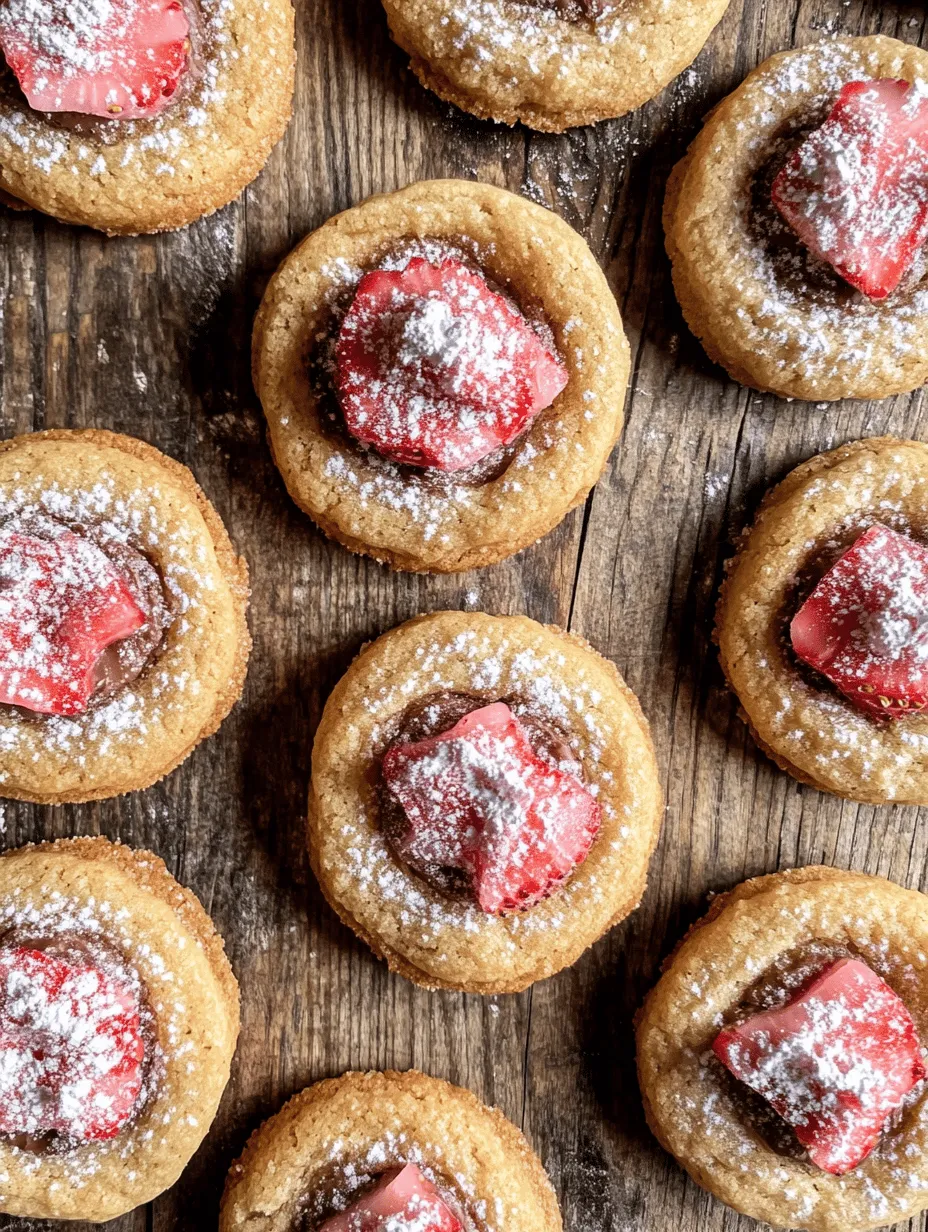
Strawberry Kiss Cookies are not just another dessert; they are an experience. The vibrant pink hue from the freeze-dried strawberries combined with the glossy chocolate kisses creates a visually appealing treat that is perfect for any occasion. Whether you’re planning a festive holiday gathering, a birthday party, or simply a casual get-together with friends and family, these cookies will be the star of the show. Bake a batch to share, or keep them all for yourself—no one will judge you for indulging in these delicious bites!
Understanding the Ingredients
To create the perfect Strawberry Kiss Cookies, it’s essential to understand the role each ingredient plays in this delicious recipe. Each component contributes to the overall flavor, texture, and appearance of the cookies, making them a delightful treat you’ll crave again and again.
Unsalted Butter
Unsalted butter is preferred for baking because it allows you to control the amount of salt in the recipe. It also provides a rich flavor and a tender texture to the cookies. When creamed with sugar, unsalted butter creates air pockets that help the cookies rise, resulting in a light and fluffy texture.
Powdered Sugar
Powdered sugar is a key ingredient that contributes to the cookies’ texture and sweetness. Its fine texture allows for easy incorporation into the dough, creating a smooth mixture. Unlike granulated sugar, powdered sugar dissolves more completely, ensuring a tender crumb in the final cookie.
Egg
The egg serves as the binding agent in the cookie dough, helping to hold all the ingredients together. It also impacts the cookie’s structure, providing moisture and richness. The proteins in the egg help the cookies set as they bake, resulting in a soft yet sturdy cookie.
Vanilla Extract
Vanilla extract is a staple in many baking recipes, and it adds depth and warmth to the flavor profile of the cookies. It enhances the sweetness and provides a fragrant aroma that makes these cookies irresistible. Always opt for pure vanilla extract if possible, as it offers a more robust flavor than imitation vanilla.
All-Purpose Flour
All-purpose flour is the foundation of the cookie, providing the necessary structure for the dough. It combines with the other ingredients to create a cohesive mixture that can hold its shape during baking. The right balance of flour is crucial; too much can lead to dry cookies, while too little can result in a dough that spreads too much.
Baking Soda
Baking soda acts as a leavening agent, helping the cookies rise and become fluffy. It reacts with the acidity in the other ingredients, creating carbon dioxide bubbles that lighten the dough. Properly measuring the baking soda is essential, as too much can result in a soapy taste, while too little can lead to dense cookies.
Salt
Salt might seem like a minor ingredient, but it plays a crucial role in enhancing the flavor and balancing the sweetness of the cookies. Just a pinch can elevate the overall taste, making the strawberry and chocolate flavors pop.
Freeze-Dried Strawberries
Freeze-dried strawberries are the star ingredient that sets these cookies apart. They maintain the bright strawberry flavor while providing a unique texture that contrasts beautifully with the soft cookie base. The freeze-drying process concentrates their flavor, making them a potent addition to your dough. Plus, they add a lovely pink hue to the cookies, making them visually appealing.
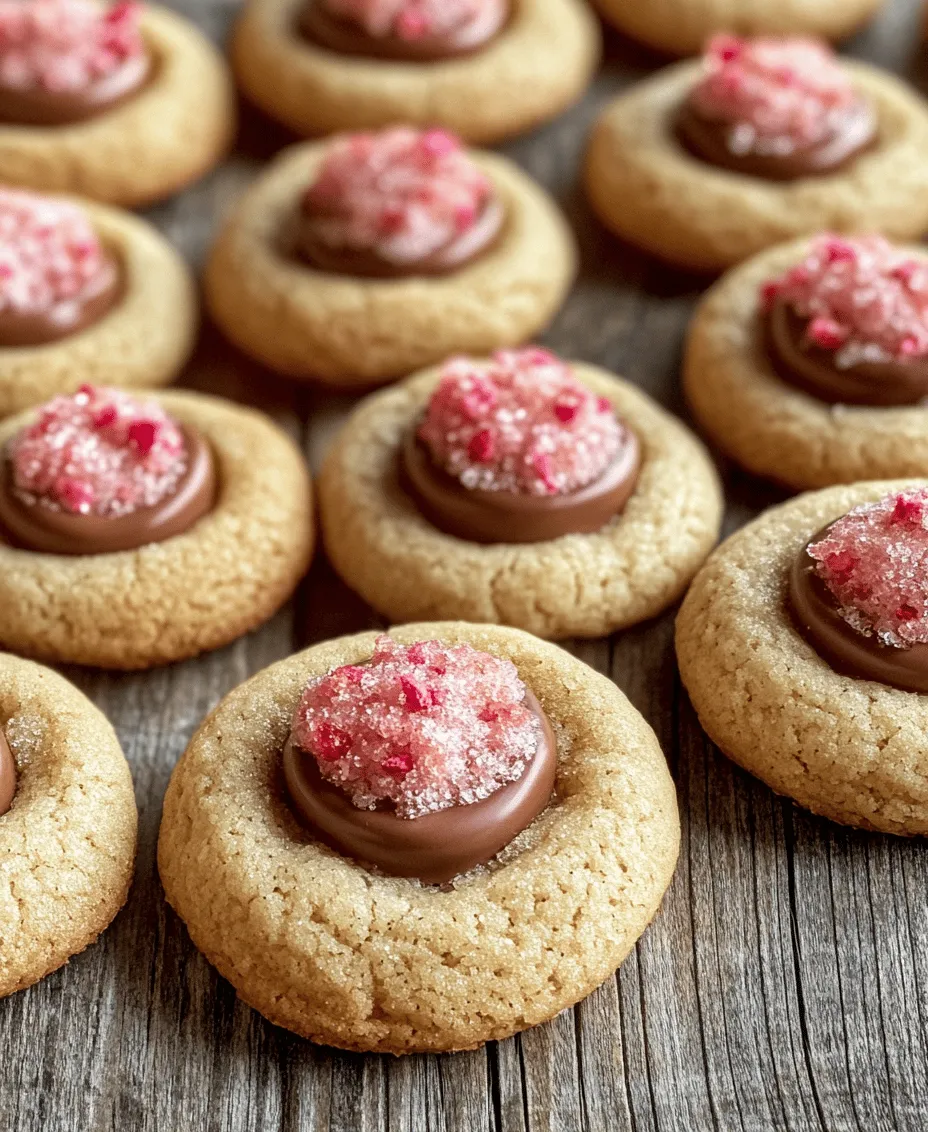
Chocolate Kisses
No Strawberry Kiss Cookie would be complete without the classic finishing touch—chocolate kisses. These delightful chocolate treats melt just slightly when placed atop the warm cookies, adding a rich, creamy finish that perfectly complements the strawberry flavor. They provide a sweet surprise in every bite, making these cookies even more irresistible.
Step-by-Step Guide to Making Strawberry Kiss Cookies
Now that you understand the importance of each ingredient, let’s dive into the step-by-step process of making these delicious Strawberry Kiss Cookies.
Preparing the Dough
The first step in creating your Strawberry Kiss Cookies is preparing the dough. Begin by preheating your oven to 350°F (175°C). This ensures that your cookies bake evenly and achieve that perfect golden-brown color.
Creaming Butter and Sugar
In a large mixing bowl, start by creaming together unsalted butter and powdered sugar. Use an electric mixer on medium speed to combine the two until the mixture is light and fluffy. This process typically takes 2-3 minutes. Creaming is essential as it incorporates air into the dough, leading to a lighter texture in the final cookies.
Mixing in the Egg and Vanilla
Once your butter and sugar mixture is fluffy, it’s time to add in the egg and vanilla extract. Beat the mixture on low speed until everything is well combined. The egg will help bind the ingredients together, providing moisture and richness to the dough. The vanilla extract will infuse the mixture with its warm, sweet flavor.
Combining Dry Ingredients
Next, it’s time to combine the dry ingredients. In a separate bowl, whisk together all-purpose flour, baking soda, salt, and freeze-dried strawberries. This helps to evenly distribute the baking soda and salt throughout the flour, ensuring that your cookies rise properly and have a balanced flavor. The freeze-dried strawberries should be broken into smaller pieces, allowing them to mix well into the dough.
Achieving the Right Consistency
Gradually add the dry ingredients to the wet mixture, stirring until just combined. Be careful not to overmix, as this can lead to tough cookies. Your dough should be soft but not overly sticky. If it feels too loose, you can add a little more flour to achieve the desired consistency.
Chilling the Dough
Chilling the dough is a crucial step that shouldn’t be skipped. After preparing your cookie dough, cover the bowl with plastic wrap and place it in the refrigerator for at least 30 minutes. Chilling the dough helps it firm up, which is essential for maintaining the cookies’ shape while they bake. It also enhances the flavors as the ingredients have time to meld together.
Once your dough is chilled, you’ll be ready to scoop and bake your Strawberry Kiss Cookies, creating a delightful treat that will impress everyone who tries them. Stay tuned for the next steps in this delicious baking adventure!
Preheating the Oven
Before diving into the cookie-making process, it’s essential to preheat your oven. Preheating is not just a suggestion; it’s a crucial step in the baking process. When you preheat your oven, you ensure that the temperature is consistent throughout, which is vital for even baking. Cookies like Strawberry Kiss Cookies rely on precise temperature control to achieve that perfect texture—crispy on the outside, soft and chewy on the inside.
By preheating your oven to 350°F (175°C), you allow the cookies to start baking as soon as they are placed inside. This initial blast of heat helps the cookies rise properly, contributing to their overall structure. If you place your cookies in an oven that hasn’t reached the desired temperature, they may spread too much, resulting in flat and uneven cookies. Therefore, preheating is a simple yet effective step that greatly influences the outcome of your baking.
Shaping and Baking the Cookies
Forming the Cookies
Once your oven has reached the correct temperature, it’s time to form your cookies. Begin by using a cookie scoop or a tablespoon to portion out the dough. This ensures that each cookie is uniform in size, allowing them to bake evenly. Roll each portion of dough into a smooth ball using your hands. Aim for about one tablespoon of dough per cookie—this size works well for a delightful balance of cookie and chocolate.
When spacing the dough balls on your baking sheet, leave at least two inches of space between each cookie. This space is essential because the cookies will spread as they bake. If they are too close together, they may merge into one giant cookie, rather than staying distinct and delicious.
Flattening the Cookies
After forming the cookie balls, the next step is to flatten them slightly. This step might seem trivial, but it plays a significant role in achieving even baking. Flattening the cookies allows for more surface area to interact with the heat of the oven, which promotes even cooking throughout. Use your palm or the bottom of a glass to gently press down on each cookie ball until it’s about half an inch thick. Ensure you don’t flatten them too much; you want them to retain some height for that soft, chewy texture.
Baking Process
Now that your cookies are formed and flattened, it’s time to place them in the oven. Bake the cookies for approximately 10 to 12 minutes, but keep a close eye on them as baking times can vary depending on your oven’s accuracy and the size of your cookies.
The cookies are done when the edges are lightly golden, and the centers look slightly underbaked. Remember, they will continue to cook a bit after being removed from the oven due to residual heat. To avoid overbaking, it’s better to err on the side of caution; you can always put them back in for another minute if needed, but once they are overbaked, there’s no going back.
Finishing Touches
Adding Chocolate Kisses
As soon as you remove the cookies from the oven, it’s time for the pièce de résistance—adding the chocolate kisses. While the cookies are still warm, gently press one chocolate kiss into the center of each cookie. The warmth from the cookie will slightly melt the chocolate, creating a deliciously gooey center that adds a delightful contrast to the soft cookie.
For a beautiful presentation, you can also use a variety of flavored kisses, such as caramel or mint, to add a unique twist to your Strawberry Kiss Cookies. This small touch not only enhances the flavor but also makes your cookies visually appealing.
Cooling and Dusting
After adding the chocolate kisses, it’s important to let the cookies cool on the baking sheet for about 5 minutes. This brief cooling period allows them to firm up slightly, making them easier to transfer to a wire rack. Using a spatula, carefully move the cookies to the wire rack to cool completely.
Once cooled, consider dusting your Strawberry Kiss Cookies with powdered sugar for an elegant finish. This simple step not only adds a touch of sweetness but also enhances the visual appeal of the cookies, making them perfect for serving at gatherings or gifting to friends and family.
Creative Ideas for Presentation and Gifting
Strawberry Kiss Cookies make not just a delicious treat but also a fantastic gift. To present them stylishly, consider placing them in a decorative tin or a clear cellophane bag tied with a pretty ribbon. You can even create a personalized label with a heartfelt message to add a special touch.
For occasions like birthdays, holidays, or just because, these cookies make excellent gifts. You can customize them by adding colored sprinkles or themed decorations to match the event. For example, red and green sprinkles for Christmas or pastel colors for Easter.
Additionally, consider pairing your cookies with a complementary treat, such as homemade fudge or a small jar of jam, to create a unique gift basket. This thoughtful gesture is sure to delight anyone who receives it.
Nutritional Information and Serving Suggestions
When indulging in Strawberry Kiss Cookies, it’s helpful to be mindful of the nutritional content. On average, each cookie contains approximately 120 calories, with 5 grams of fat, 20 grams of carbohydrates, and 1 gram of protein. This breakdown can vary slightly based on the size of the cookies and the specific ingredients used, so be sure to adjust based on your preferences.
For serving suggestions, these cookies pair wonderfully with a variety of beverages. Consider enjoying them with a hot cup of coffee for a delightful afternoon pick-me-up, or pair them with a glass of cold milk for a classic combination that never disappoints. They also make a sweet addition to tea parties or dessert platters at gatherings.
Conclusion
Baking Strawberry Kiss Cookies is not just about creating a delicious treat; it’s an experience that offers joy in the kitchen and beyond. The process of mixing, shaping, and baking these delightful cookies can be a wonderful activity to share with family and friends. Plus, the final product—soft, chewy cookies with the sweet surprise of melted chocolate—is sure to bring smiles to everyone who tries them.
We encourage you to give this recipe a try and immerse yourself in the sweet experience of baking. Whether you’re celebrating a special occasion or simply indulging in a cozy night at home, Strawberry Kiss Cookies are versatile enough to fit any moment. Enjoy the delightful flavors, share them with loved ones, and relish in the joy that comes from creating something delicious. Happy baking!