Introduction
Easter is a time of joy, renewal, and celebration, bringing families and friends together to honor traditions and create new memories. Among the various festivities associated with this holiday, the food plays a central role in creating a vibrant atmosphere. From hearty main dishes to delightful desserts, every dish adds to the celebration’s spirit. One dessert that stands out during Easter festivities is the Easter No-Bake Mini Cheesecakes—a delightful treat that promises to be a crowd-pleaser at any gathering.
These mini cheesecakes are not only visually stunning but also incredibly easy to make, making them the perfect addition to your Easter dessert table. With their creamy texture and rich flavor, they encapsulate the essence of traditional cheesecakes while offering the convenience of a no-bake recipe. This means you can spend less time in the kitchen and more time enjoying the company of loved ones.
In this article, we will explore the joys of no-bake cheesecakes, delve into the essential ingredients that make these mini delights irresistible, and guide you through the first steps of crafting your very own Easter No-Bake Mini Cheesecakes.
Understanding No-Bake Cheesecakes
No-bake cheesecakes are a delightful twist on the classic cheesecake, offering a light and creamy texture without the need for baking. Unlike traditional cheesecakes, which require time in the oven to set, no-bake cheesecakes rely on the chilling process to achieve their delicious consistency. This unique approach not only simplifies the preparation but also allows for a wide array of flavor variations.
One of the main advantages of no-bake cheesecakes is their simplicity. With minimal ingredients and straightforward instructions, even novice bakers can create a stunning dessert. This is especially beneficial during the busy holiday season when time is often limited. No-bake cheesecakes can be whipped up in a matter of minutes, allowing you to focus on other aspects of your Easter celebration.
Additionally, the versatility of no-bake cheesecakes is a significant draw. They can be flavored with fruits, chocolates, or extracts, and topped with an assortment of decorations, making them suitable for any occasion. For Easter, vibrant fruit purees and colorful edible decorations enhance their festive presentation, making them a delightful centerpiece for your dessert spread.
Ingredients Breakdown for Easter No-Bake Mini Cheesecakes
To create the perfect Easter No-Bake Mini Cheesecakes, it is essential to use high-quality ingredients that contribute to both flavor and texture. Here’s a breakdown of the key components that make this dessert so special:
Graham Cracker Crumbs
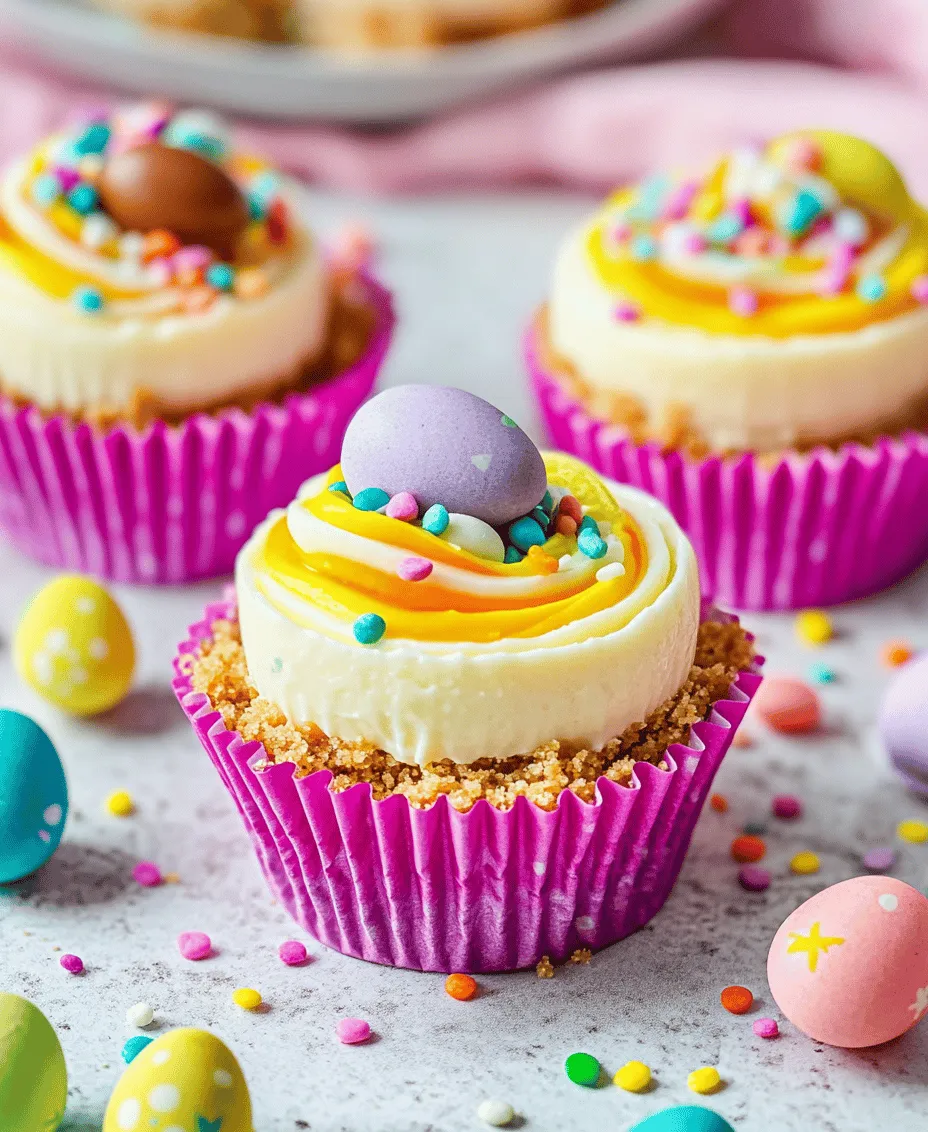
The foundation of any cheesecake is its crust, and in our recipe, we will use graham cracker crumbs. These crumbs provide a sweet, slightly crunchy base that perfectly complements the creamy filling. The flavor of graham crackers adds a nostalgic touch to the dessert, reminiscent of classic cheesecakes enjoyed at family gatherings. When combined with butter and sugar, they create a delicious crust that holds the filling beautifully.
Unsalted Butter
Unsalted butter plays a crucial role in binding the graham cracker crumbs together, giving the crust its structure. It also enhances the overall flavor of the crust, providing a rich and buttery taste that balances the sweetness of the cheesecake filling. Using unsalted butter allows for better control over the sweetness of the dessert, ensuring that the flavors meld harmoniously.
Cream Cheese
The star ingredient of any cheesecake is cream cheese, and in our no-bake version, it serves as the base for the filling. Cream cheese brings a smooth, creamy texture that is essential for achieving the classic cheesecake experience. Its slightly tangy flavor adds depth to the dessert, creating a delightful contrast to the sweetness of the other ingredients.
Heavy Whipping Cream
To achieve the light and fluffy consistency that no-bake cheesecakes are known for, heavy whipping cream is a must. When whipped, it incorporates air into the mixture, resulting in a luscious filling that melts in your mouth. The rich creaminess of the heavy whipping cream elevates the cheesecake, making it feel indulgent and satisfying without being overly heavy.
Fruit Puree
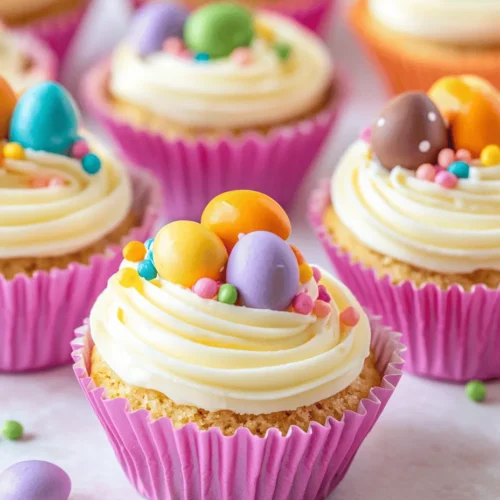
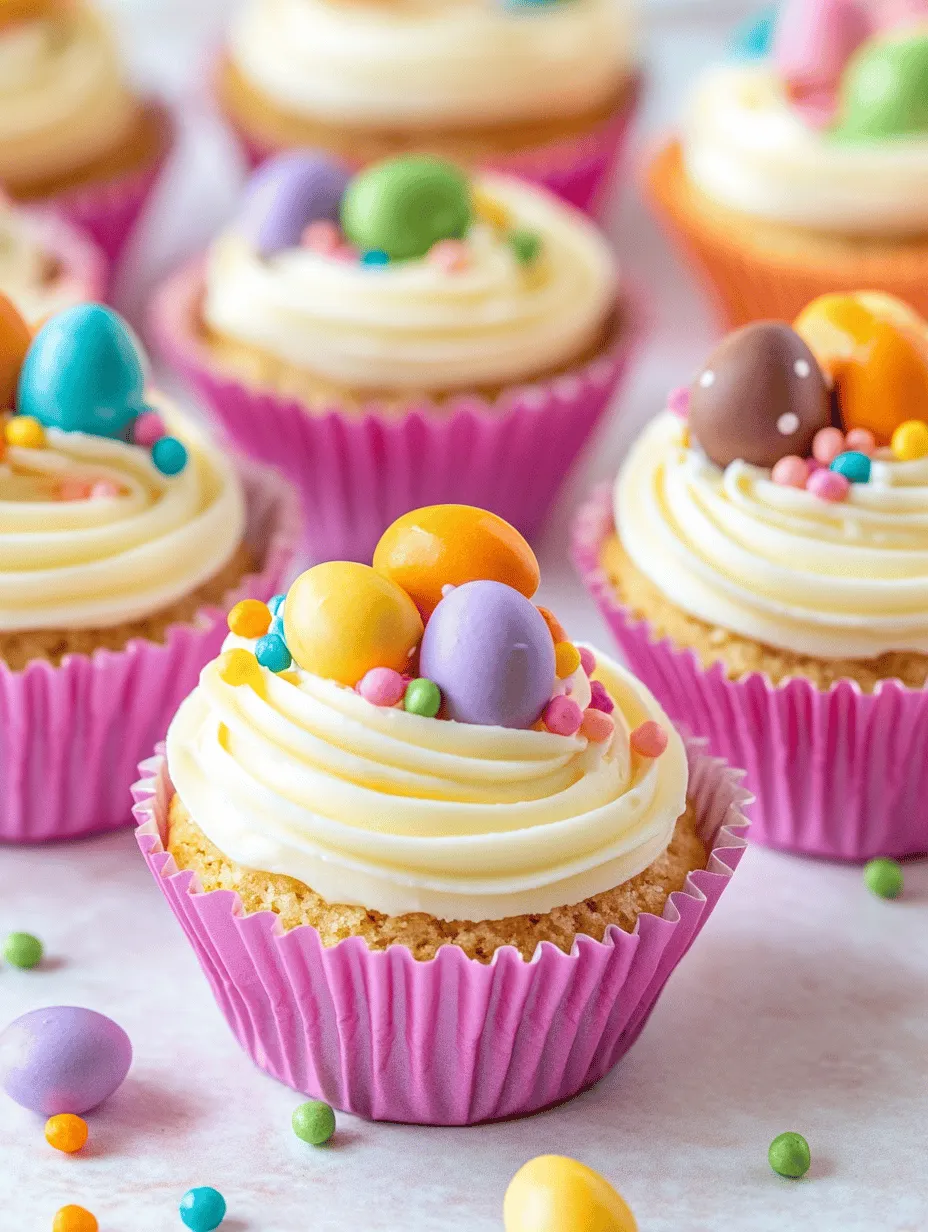
For our Easter No-Bake Mini Cheesecakes, fruit puree serves two essential purposes: flavor and aesthetics. The use of fruit puree, such as strawberry, raspberry, or passion fruit, not only adds vibrant color to the cheesecakes but also infuses them with fresh, fruity flavors that complement the creamy filling. The bright hues of the fruit puree enhance the festive presentation, making these mini cheesecakes a visual delight on your Easter dessert table.
Edible Decorations
Presentation is key when it comes to holiday desserts, and edible decorations elevate the visual appeal of your Easter No-Bake Mini Cheesecakes. Consider using pastel-colored sprinkles, candied flowers, or fresh fruit slices to adorn the top of each cheesecake. These decorative elements not only add a burst of color but also create a festive atmosphere that aligns perfectly with the Easter celebration.
Step-by-Step Guide to Making Easter No-Bake Mini Cheesecakes
Preparing the Crust
Now that we’ve explored the essential ingredients, let’s dive into the first steps of creating your Easter No-Bake Mini Cheesecakes, starting with the crust.
1. Gather Your Ingredients: To begin, gather the graham cracker crumbs, unsalted butter, and sugar. You will need approximately 1 cup of graham cracker crumbs, 4 tablespoons of melted unsalted butter, and 2 tablespoons of granulated sugar.
2. Melt the Butter: In a microwave-safe bowl, melt the unsalted butter until completely liquefied. This should take about 30 seconds to one minute, depending on your microwave. Be sure to keep an eye on it to avoid overheating.
3. Mix the Crust Ingredients: In a medium mixing bowl, combine the graham cracker crumbs and granulated sugar. Pour the melted butter over the crumb mixture and stir until all the crumbs are evenly coated. The mixture should resemble wet sand, with no dry crumbs remaining.
4. Press the Mixture into Mini Cheesecake Molds: Prepare your mini cheesecake molds or muffin tin by lining them with paper liners for easy removal. Using a tablespoon or your fingers, press the crumb mixture firmly into the bottom of each mold. Ensure that the crust is evenly distributed and compressed to create a solid base for the cheesecake filling.
5. Chill the Crust: Once the crusts are prepared, place the molds in the refrigerator to chill while you prepare the cheesecake filling. This will help the crust set and hold its shape when you add the filling.
By following these steps, you have successfully prepared the crust for your Easter No-Bake Mini Cheesecakes. In the next section, we will delve into the delicious cheesecake filling and how to assemble these delightful treats. Stay tuned for a step-by-step guide on creating a luscious cheesecake filling that will elevate your mini cheesecakes to new heights.
Tips for Achieving the Right Consistency for the Crust
When creating your no-bake mini cheesecakes, achieving the ideal crust consistency is crucial for a successful dessert. The crust should be firm enough to hold its shape but still have a slight crumble when you bite into it. Here are some essential tips:
1. Use the Right Ratio: The classic combination of crushed graham crackers, melted butter, and a touch of sugar typically works best. A common ratio is 1 cup of crushed crackers to 1/4 cup of melted butter. Adjust this ratio slightly depending on your preference for a firmer or softer crust.
2. Crush Evenly: Ensure that the graham crackers are crushed into fine crumbs. Large pieces can compromise the texture. A food processor works wonders for achieving uniformity. Alternatively, place the crackers in a zip-top bag and crush them with a rolling pin, but make sure there are no large chunks.
3. Moisten the Mixture: When mixing the crumbs with melted butter and sugar, ensure that all the crumbs are evenly coated. The mixture should feel like wet sand and hold together when squeezed in your hand. If it’s too dry, add a touch more melted butter.
4. Press Firmly: When forming your crust in the mini cheesecake cups or pans, press the crumb mixture firmly to create a solid base. Use the back of a measuring cup or your fingers to compact it well. This step is vital for ensuring that the crust sets properly.
5. Chill Before Filling: After preparing the crust, refrigerate it for at least 15-30 minutes before adding the cheesecake filling. This chilling period allows the butter to firm up, creating a sturdier base that won’t crumble when you serve the cheesecakes.
Creating the Cheesecake Filling
The cheesecake filling is the star of this dessert, and mastering its preparation is key to achieving a smooth and delightful end result. Follow these steps to create a luscious cream cheese mixture:
1. Soften the Cream Cheese: Start with 16 ounces of cream cheese. Let it sit at room temperature for about 30 minutes to soften. This step is crucial, as softened cream cheese blends easily without lumps.
2. Beat Until Smooth: In a mixing bowl, use an electric mixer on medium speed to beat the softened cream cheese until it is creamy and smooth. This process should take about 1-2 minutes. Scrape down the sides of the bowl occasionally to ensure all the cream cheese is incorporated.
3. Add Sugar and Flavorings: Once the cream cheese is smooth, gradually add 1/2 cup of powdered sugar and 1 teaspoon of vanilla extract. Continue to beat until the mixture is well combined and smooth.
4. Whip the Cream: In a separate bowl, pour in 1 cup of heavy whipping cream. Using a clean mixer, whip the cream on high speed until stiff peaks form. This means that when you lift the beaters out of the cream, the peaks should stand straight up without drooping.
5. Fold the Whipped Cream: Gently fold the whipped cream into the cream cheese mixture using a spatula. This step should be done carefully to maintain the light and airy texture of the whipped cream. Use a gentle up-and-over motion to combine the two mixtures until no streaks remain.
Assembling the Mini Cheesecakes
Now that you have your crust and filling ready, it’s time to assemble the mini cheesecakes:
1. Divide the Filling: Spoon or pipe the cheesecake filling evenly into the prepared crusts. You can use a piping bag for a neat application or a spoon for a more rustic look. Aim to fill each cup to the top, ensuring a generous amount of filling.
2. Smooth the Tops: Once filled, use a small offset spatula or the back of a spoon to smooth the tops of the cheesecakes. This step not only makes for a beautiful presentation but also prepares the surface for any garnishes you may want to add.
3. Add Fruit Puree for Decoration: If you’d like to add an artistic touch, consider swirling fruit puree on top of the cheesecakes. Simply spoon a small amount of fruit puree (like raspberry or strawberry) onto the surface and use a toothpick or skewer to create swirls. This adds both visual appeal and extra flavor.
Chilling and Serving
Chilling the mini cheesecakes is essential for ensuring they set properly. Here’s how to do it:
1. Chill the Cheesecakes: Place the assembled mini cheesecakes in the refrigerator for at least 4 hours, or overnight if possible. This time allows the filling to firm up and develop its flavors.
2. Garnish for Presentation: When you are ready to serve, consider garnishing the cheesecakes with fresh fruit, whipped cream, or chocolate shavings. A sprig of mint can also add a pop of color and freshness.
3. Serve on a Beautiful Platter: Arrange the mini cheesecakes on a decorative serving platter for an elegant presentation. You can also use individual dessert cups or jars for a charming touch, especially for gatherings.
Creative Variations and Flavor Options
One of the best aspects of no-bake mini cheesecakes is their versatility. Here are some creative variations you may want to try:
1. Fruit Puree Options: While raspberry and strawberry are classics, consider experimenting with other fruit purees such as mango, blueberry, or passion fruit. Each fruit will provide a unique flavor profile and visual appeal.
2. Alternative Flavor Combinations: Add zest or juice from citrus fruits like lemon or lime for a refreshing twist. You can also incorporate flavored extracts, such as almond or coconut, to give your cheesecakes a distinctive taste.
3. Unique Crust Options: Instead of the traditional graham cracker crust, try using chocolate cookies (like Oreos) for a rich, chocolatey base. Alternatively, crushed nuts combined with melted butter can create a gluten-free crust that adds a delightful crunch.
4. Thematic Decorations: For occasions beyond Easter, consider using different themes for your cheesecake decorations. For instance, during the summer, you could top them with fresh berries and a sprinkle of edible flowers for a garden party vibe.
Nutritional Information
Understanding the nutritional content of your desserts is essential, especially for those mindful of their dietary intake. Here’s a general breakdown of the nutritional information for one serving of an Easter No-Bake Mini Cheesecake (assuming you make 12 servings):
– Calories: Approximately 180
– Total Fat: 12g (Saturated Fat: 7g)
– Cholesterol: 40mg
– Sodium: 100mg
– Total Carbohydrate: 15g (Dietary Fiber: 1g, Sugars: 10g)
– Protein: 2g
For those with dietary restrictions, consider these substitutions:
– Gluten-Free: Use gluten-free graham crackers or nuts for the crust.
– Dairy-Free: Substitute cream cheese with a dairy-free alternative and use coconut cream in place of heavy cream.
– Lower Sugar: Reduce the amount of powdered sugar in the filling or use a sugar substitute that measures like sugar.
Conclusion
Easter No-Bake Mini Cheesecakes are a delightful and simple dessert that can serve as the perfect centerpiece for your Easter gatherings or any celebration. Their ease of preparation combined with the ability to customize flavors and toppings makes them a favorite among both novice and experienced bakers.
These mini cheesecakes not only satisfy your sweet tooth but also allow for creativity and personalization, making them an enjoyable project for anyone looking to embrace the festive spirit of the season. So gather your ingredients, unleash your creativity, and enjoy the deliciousness of these charming desserts with family and friends.