
Introduction
There’s something wonderfully nostalgic about thumbprint cookies. With their tender texture and delightful jam-filled center, they evoke memories of childhood baking sessions, warm kitchens, and the sweet aroma that fills the air as cookies bake. Whether savored during the holidays or enjoyed as a simple afternoon treat, thumbprint cookies carry with them a charm that transcends generations.
In the realm of homemade treats, few things hold as much significance as the cookies we bake ourselves. Each batch represents not just a recipe, but a moment in time shared with loved ones. As we gather in the kitchen, mixing and measuring, we create memories that linger far beyond the last crumb. Among these cherished recipes, Heart Jam Thumbprint Cookies stand out. Perfect for special occasions like Valentine’s Day or anniversaries, yet simple enough to brighten any day, these cookies are a delightful fusion of flavor and love.
With their heart-shaped shape and vibrant jam filling, Heart Jam Thumbprint Cookies are not just a feast for the palate; they are a treat for the eyes and a testament to the joy of baking. Let’s delve deeper into the world of thumbprint cookies and discover how to create these delightful gems.
The Allure of Thumbprint Cookies
The history of thumbprint cookies is as rich and varied as the flavors we can fill them with. Originating in various cultures around the world, this beloved cookie has taken on many forms. In Poland, they’re known as “kolaczki,” while in Sweden, they are fondly referred to as “hallongrottor,” or raspberry caves. Regardless of the name, the essence remains the same: a simple, buttery cookie filled with a sweet fruit preserve that brings joy to those who indulge.
One of the most appealing aspects of thumbprint cookies is their versatility. You can fill these delightful rounds with an array of delicious jams, jellies, or even chocolate. This adaptability allows bakers to get creative, experimenting with flavors like raspberry, apricot, or even lemon curd, each providing a unique twist to the classic recipe. This variety makes thumbprint cookies suitable for every palate and occasion, whether it’s a holiday gathering, a picnic, or just a cozy night in.
Moreover, baking and sharing cookies creates profound emotional connections. Each bite is a reminder of love and care, whether it’s a batch made for a family gathering or cookies gifted to a neighbor. The act of baking becomes a way of expressing affection, reinforcing bonds and creating cherished memories with every batch.
Ingredients Breakdown
Now that we’ve established the allure of thumbprint cookies, let’s take a closer look at the ingredients that make Heart Jam Thumbprint Cookies so special. Each element plays a crucial role in creating the perfect cookie:
– Unsalted Butter: The foundation of any great cookie, unsalted butter, is vital for achieving the right texture. When softened, it creams beautifully with sugar, resulting in a tender crumb and rich flavor. Using unsalted butter also allows for better control over the overall saltiness of the cookies.
– Granulated and Brown Sugar: These two sugars bring a harmonious balance of sweetness to the cookies. Granulated sugar contributes to the cookie’s crisp edges, while brown sugar adds moisture and a subtle caramel flavor. This combination ensures a delightful contrast in texture and taste.
– Egg Yolk: The egg yolk enriches the dough, adding moisture and fat, which results in a tender cookie. It also helps bind the ingredients together, creating a cohesive dough that holds its shape during baking.
– Vanilla Extract: A splash of pure vanilla extract elevates the flavor profile, enhancing the sweetness and adding depth to the cookies. It’s a small addition that makes a significant difference in the overall taste.
– All-Purpose Flour: This is the primary structure-building ingredient in our cookie dough. The right amount of flour ensures that the cookies hold their shape while still being soft and chewy.
– Baking Powder and Salt: Baking powder acts as a leavening agent, ensuring that the cookies rise and become light and airy. A pinch of salt is essential to balance the sweetness and enhance the flavors of the other ingredients.
– Fruit Jam: The star of our thumbprint cookies, the fruit jam adds sweetness and a burst of flavor. Choosing high-quality jams or homemade preserves allows for personalization and elevates the overall experience. Popular choices include raspberry, strawberry, or even unique flavors like elderberry or fig.
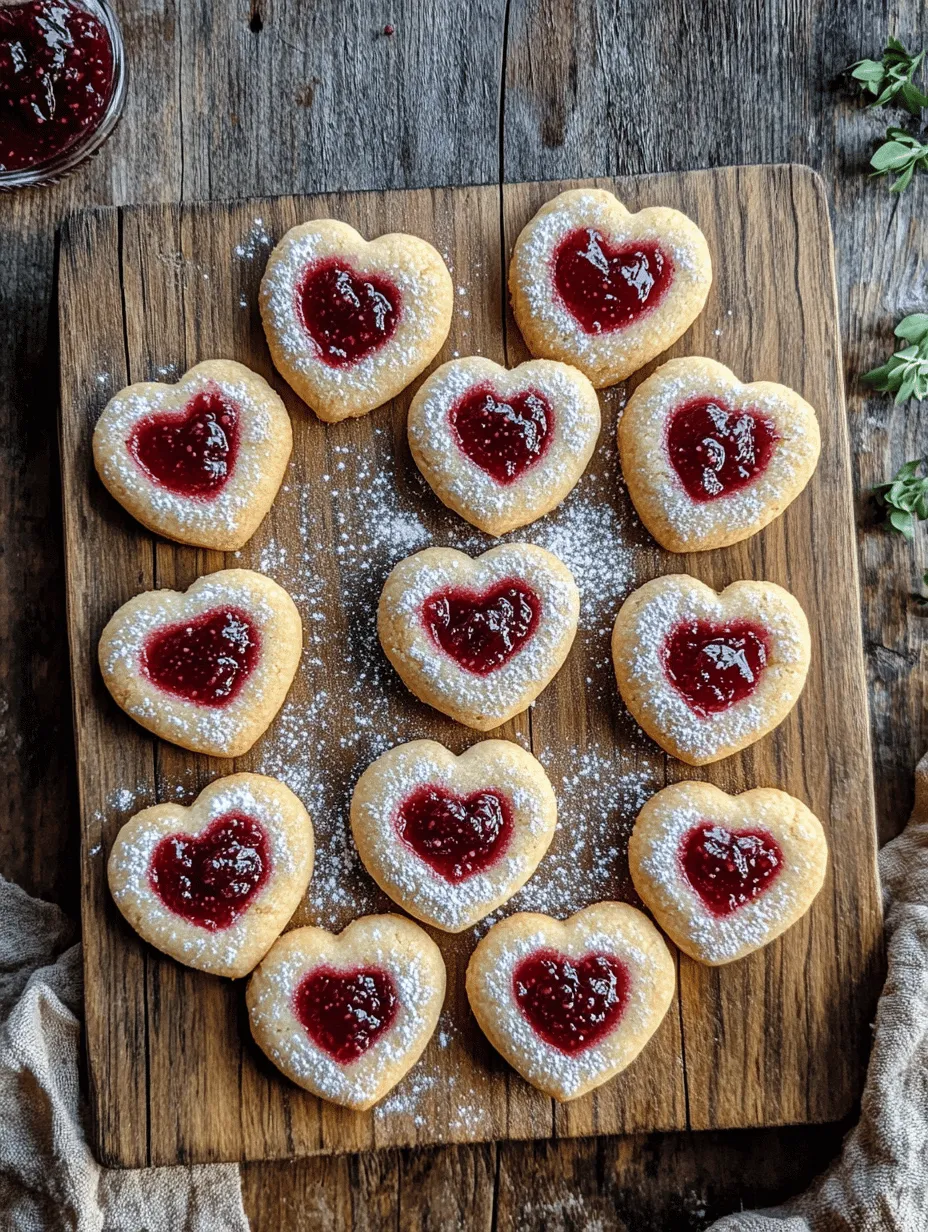
– Optional Powdered Sugar: For a finishing touch, a light dusting of powdered sugar can add a visually appealing element to the cookies. This optional step enhances the presentation, making them even more inviting.
Step-by-Step Instructions for Heart Jam Thumbprint Cookies
Now that we have our ingredients ready, let’s dive into the step-by-step process of creating these delightful Heart Jam Thumbprint Cookies.
Step 1: Preheat the Oven
Begin by preheating your oven to 350°F (175°C). This ensures that your cookies will bake evenly and thoroughly, creating that perfect golden-brown exterior.
Step 2: Prepare Your Baking Sheet
Line a baking sheet with parchment paper. This will prevent the cookies from sticking and make for an easy cleanup.
Step 3: Cream Butter and Sugars
In a mixing bowl, combine the softened unsalted butter, granulated sugar, and brown sugar. Using an electric mixer or a sturdy spatula, cream the mixture until it becomes light and fluffy. This step is crucial as it incorporates air into the dough, resulting in a lighter texture.
Step 4: Add the Egg Yolk and Vanilla
Next, add the egg yolk and vanilla extract to the creamed mixture. Beat until fully combined. The egg yolk will enrich the dough, while the vanilla gives it a fragrant boost.
Step 5: Combine Dry Ingredients
In a separate bowl, whisk together the all-purpose flour, baking powder, and salt. Gradually add this dry mixture to the wet ingredients, mixing until just combined. Be careful not to overmix, as this can lead to tough cookies.
Step 6: Form the Dough
Once the dough is mixed, use your hands to form it into a cohesive ball. If the dough feels too sticky, you can refrigerate it for about 15-30 minutes, which will make it easier to handle.
Step 7: Shape the Cookies
Scoop out tablespoon-sized portions of dough and roll them into balls. Place them on the prepared baking sheet, spacing them about two inches apart. Using your thumb or the back of a teaspoon, gently press into the center of each ball to create an indention for the jam.
Step 8: Fill with Jam
Now comes the fun part: filling the thumbprint with jam. Using a teaspoon, carefully fill each indention with your choice of fruit jam, being careful not to overfill.
Step 9: Bake the Cookies
Place your baking sheet in the preheated oven and bake for 10-12 minutes, or until the edges are lightly golden. Keep an eye on them to prevent overbaking.
Step 10: Cool and Dust (Optional)
Once baked, remove the cookies from the oven and allow them to cool on the baking sheet for a few minutes before transferring them to a wire rack. If desired, dust with powdered sugar for added sweetness and an elegant finish.
With these steps completed, you’ll have a batch of Heart Jam Thumbprint Cookies that are not only delightful to eat but also beautiful to present. These cookies can be enjoyed on their own or shared with friends and family, each bite a reminder of the love and care that went into making them.

Prepping the Kitchen: Setting the Stage for Baking
Before diving into the delightful process of making Heart Jam Thumbprint Cookies, it’s essential to prep your kitchen properly. Start by preheating your oven to 350°F (175°C). This step ensures the cookies bake evenly and achieve that perfect golden-brown finish. While the oven warms up, line your baking sheets with parchment paper or silicone baking mats. This not only prevents the cookies from sticking but also makes cleanup a breeze later on. Having your workspace organized with all ingredients and tools within reach will streamline the process and make your baking experience more enjoyable.
Creaming the Butter and Sugars: Techniques for Achieving the Right Consistency
The next crucial step in creating your Heart Jam Thumbprint Cookies is creaming the butter and sugars together. Begin with room-temperature unsalted butter, about 1 cup (226 grams). Using a stand mixer fitted with a paddle attachment or a hand mixer, beat the butter on medium speed until it becomes light and fluffy, which typically takes about 2 to 3 minutes.
Gradually add 1/2 cup (100 grams) of granulated sugar and 1/2 cup (100 grams) of packed brown sugar to the creamed butter. Continue mixing until the sugars are fully incorporated and the mixture appears pale and fluffy. This process is critical as it incorporates air into the batter, providing the cookies with a light and tender texture.
Incorporating Egg Yolk and Vanilla: Importance of Thorough Mixing
Once your butter and sugars are well-mixed, it’s time to add the egg yolk and vanilla extract. Add 1 large egg yolk and 1 teaspoon of pure vanilla extract to the mixture. The egg yolk adds richness and enhances the flavor of the cookies, while the vanilla extract contributes to their delicious aroma.
Mix the ingredients on low speed until they are just combined. Be careful not to overmix, as this could lead to dense cookies. The goal is to create a homogenous mixture where the egg yolk and vanilla are evenly distributed throughout the batter.
Mixing Dry Ingredients: How to Properly Combine Dry Ingredients for Optimal Texture
In a separate bowl, sift together your dry ingredients. This typically includes 1 3/4 cups (220 grams) of all-purpose flour, 1/2 teaspoon of baking powder, and a pinch of salt. Sifting helps to aerate the flour, ensuring that your cookies will be light and fluffy.
Gradually add the dry ingredients to the wet mixture, mixing on low speed. This method allows for better incorporation without overworking the dough. Stop mixing as soon as you can no longer see any dry flour; the dough should come together but still be a little crumbly. If it seems too dry, you can add a teaspoon of milk to help bind it together.
Forming the Dough: Tips on Rolling and Shaping the Cookies
Once your dough is mixed, it’s time to form it into cookie shapes. Begin by taking small portions of the dough, about 1 tablespoon each, and rolling them into smooth balls between your palms. If you find the dough is slightly sticky, you can lightly dust your hands with flour to prevent sticking.
Place the rolled dough balls on your prepared baking sheets, spacing them about 2 inches apart to allow for spreading during baking. Once all the dough is shaped, you’ll be ready to create the signature thumbprints.
Creating Thumbprints: Techniques for Making Perfect Indentations
To create the iconic thumbprint in each cookie, gently press your thumb into the center of each ball. You want to make a deep enough indentation to hold the jam but not so deep that it goes through the bottom of the cookie. If you prefer, you can also use the back of a teaspoon or the end of a wooden spoon to make the indentations.
Be careful to keep the edges of the cookies intact, as this will help contain the jam filling during baking. After making the indentations, it’s time to fill them with your favorite jam.
Filling with Jam: Best Practices for Filling Without Overflow
For filling your thumbprints, select a high-quality jam or preserves—raspberry, strawberry, or apricot work beautifully. Using a small spoon or a piping bag fitted with a round tip, carefully fill each indentation with jam. Aim to fill each thumbprint just to the top, avoiding any overflowing, as this can cause the jam to spill over during baking.
Baking: Ideal Baking Time and Temperature for the Perfect Cookie
With your cookies filled and ready, place them in the preheated oven. Bake for about 12-15 minutes, or until the edges are lightly golden. Keep a close eye on them in the last few minutes to ensure they don’t overbake. The centers should remain soft, as they will continue to set as they cool.
Cooling Process: Importance of Cooling on a Wire Rack for Texture
Once baked, remove the cookies from the oven and allow them to cool on the baking sheet for about 5 minutes. This resting period allows the cookies to firm up slightly. After this, carefully transfer the cookies to a wire rack to cool completely. Cooling on a wire rack is crucial as it prevents the bottoms from becoming soggy, ensuring a delightful texture.
Serving Suggestions
When it comes to serving your Heart Jam Thumbprint Cookies, presentation is key. Arrange them on a decorative platter or tiered stand for a lovely display. You can dust the cookies with powdered sugar for an elegant touch or drizzle them with melted chocolate for additional flavor and visual appeal.
For beverage pairings, consider serving these cookies with a warm cup of coffee, fragrant herbal tea, or a glass of cold milk. The rich, buttery taste of the cookies complements the creaminess of milk beautifully, while coffee or tea adds a sophisticated contrast.
If you are looking for creative ways to package them for gifting, consider placing them in a clear cellophane bag tied with a pretty ribbon or in a decorative tin. This not only makes for a heartfelt gift but also preserves the freshness of the cookies.
Nutritional Information
Each Heart Jam Thumbprint Cookie contains approximately 100 calories, depending on the specific ingredients and portion size. They provide a delightful treat while still being mindful of balance within your diet. For portion sizes, one or two cookies can satisfy a sweet craving without overindulging, making them a perfect snack or dessert option.
Conclusion
Baking Heart Jam Thumbprint Cookies is not just about creating delicious treats; it’s about the joy and warmth that comes from the process of baking and sharing. The act of mixing ingredients, shaping cookies, and filling them with vibrant jam creates a delightful experience that can be enjoyed alone or with loved ones.
As you embark on this baking adventure, remember that each cookie is a chance to express your creativity. Encourage your readers to try this recipe and to let their imaginations run wild—experimenting with different jams or even adding spices and zest to the dough.
Homemade cookies, like these delightful Heart Jam Thumbprint Cookies, have a timeless appeal that brings people together, fostering connections and creating lasting memories. So gather your ingredients, invite a friend or family member to join, and enjoy the sweet rewards of baking together.