Introduction
No-bake cheesecakes have taken the dessert world by storm, and for good reason. These delightful treats blend the creamy richness of traditional cheesecake with the convenience of not having to turn on an oven. This makes them not only a practical option for home bakers but also a fantastic choice for those who may be intimidated by the thought of baking. One of the most beloved variations of no-bake cheesecake is the banoffee cheesecake, a luscious concoction that combines the sweet, caramelized flavors of bananas and toffee with a creamy cheesecake filling.
This Heavenly No-Bake Banoffee Cheesecake is perfect for various occasions—from casual get-togethers with friends to more formal celebrations like birthdays and anniversaries. Its rich, indulgent flavor profile and stunning presentation make it a showstopper that will impress your guests and satisfy your sweet tooth.
Understanding Banoffee Cheesecake
The origins of banoffee dessert can be traced back to the 1970s in England, where it quickly became a favorite due to its delightful combination of flavors. The name “banoffee” is a portmanteau of “banana” and “toffee,” which perfectly encapsulates its essence. This dessert typically features a rich toffee (often made from condensed milk or caramel) layered with bananas and cream.
What sets no-bake cheesecakes apart is their effortless preparation; without the need for baking, you can create a creamy and decadent dessert that’s sure to please. The appeal lies not just in the ease of preparation but also in the smooth, velvety texture that a no-bake cheesecake provides. The absence of baking results in a lightness that is often absent in traditional baked cheesecakes, making it a refreshing option.
In this particular recipe, the key flavors come from a harmonious blend of ripe bananas, rich caramel sauce, and a luscious cream cheese filling. Each ingredient plays a vital role in creating a dessert that is not only delicious but also visually appealing. The combination of creamy, sweet, and slightly tangy flavors makes this cheesecake a delightful treat for any palate.
Ingredients Breakdown
Before we dive into the preparation, let’s take a closer look at the ingredients that will bring this banoffee cheesecake to life.
Base: Digestive Biscuits or Graham Crackers
The foundation of this cheesecake is the base, typically made from digestive biscuits or graham crackers. These cookies provide a crisp texture that contrasts beautifully with the creamy filling. When crushed, they can be combined with melted butter, creating a sturdy base that holds the cheesecake together. The sweetness of the biscuits also adds to the overall flavor profile, enhancing the caramel and banana notes.
Cheesecake Filling
The filling is the star of our banoffee cheesecake and is made up of several key ingredients:
– Cream Cheese: This is the primary ingredient that lends creaminess to the cheesecake. It provides a rich texture and tangy flavor that balances the sweetness of the other components.
– Double Cream: Also known as heavy cream, this ingredient is whipped to add volume and a light, airy texture to the filling. This helps create that signature creaminess characteristic of cheesecakes.
– Condensed Milk: Sweetened condensed milk adds a rich sweetness and a hint of caramel flavor, enhancing the overall taste of the cheesecake. It also contributes to the smooth texture.
– Vanilla Extract: A splash of vanilla extract elevates the flavor, adding depth and a warm, aromatic note that complements the other ingredients beautifully.
Topping
To finish off the cheesecake, we’ll add a decadent topping that includes:
– Dark Chocolate: Shaved or grated dark chocolate not only adds a touch of elegance but also introduces a slight bitterness that balances the sweetness of the cheesecake and caramel.
– Fresh Bananas: Slices of ripe bananas contribute a fresh, fruity flavor and a soft texture that pairs perfectly with the creamy filling.
– Caramel Sauce: Drizzled on top, caramel sauce adds a delectable sweetness and a glossy finish, making the cheesecake visually irresistible.
Preparing the Base
Now that we have a clear understanding of our ingredients, let’s get started on preparing the base for our banoffee cheesecake. A well-prepared base is crucial for ensuring that the cheesecake holds its shape and has a pleasant texture.
Step-by-Step Guide to Prepare the Biscuit Base
1. Crushing the Biscuits: Begin by placing the digestive biscuits or graham crackers into a large ziplock bag. Seal the bag tightly, ensuring no air escapes, and use a rolling pin to crush the biscuits into fine crumbs. Alternatively, you can use a food processor to achieve a finer consistency. Aim for a texture similar to sand, as this will allow the base to hold together when mixed with butter.
2. Mixing with Butter: Transfer the crushed biscuits to a mixing bowl and pour in melted butter. The butter acts as a binding agent, helping the crumbs stick together. Use a spatula to mix until the crumbs are evenly coated and have a consistency that resembles wet sand.
3. Pressing into the Pan: Next, we’ll need a springform pan (typically 9 inches in diameter) for our cheesecake. Lightly grease the bottom and sides of the pan with a bit of butter or cooking spray to prevent sticking. Pour the biscuit mixture into the pan, using the back of a spoon or your fingers to firmly press the crumbs evenly across the bottom. Ensure the base is compact and level; this will help it hold its shape once set.
4. Chilling the Base: After pressing down the biscuit base, it’s important to chill it in the refrigerator for at least 30 minutes. This step allows the butter to solidify, which helps the base become firm and prevents it from crumbling when slicing the cheesecake later.
Importance of Chilling the Base
Chilling the base is not just a suggestion; it’s a crucial step in the preparation process. A well-chilled base will provide the stability needed for our creamy filling. If you skip this step, you may find that your cheesecake becomes soggy or that the base does not hold together when you attempt to slice it.
Crafting the Cheesecake Filling
Once your biscuit base is firm and ready, we can move on to crafting the cheesecake filling. This is where the magic happens, as we combine our key ingredients to create a luscious, creamy mixture that will sit atop our base.
Detailed Instructions for the Cheesecake Filling
1. Whipping the Cream: Start by pouring the double cream into a large mixing bowl. Using an electric mixer, whip the cream on medium speed until it reaches soft peaks. This process typically takes about 3-5 minutes. Be careful not to overwhip, as this can lead to a grainy texture. Soft peaks should hold their shape but still have a slight jiggle.
2. Combining with Cream Cheese: In another bowl, add the cream cheese and use a hand mixer to beat it until smooth and creamy. It’s important to use room temperature cream cheese to avoid lumps. Once smooth, gradually add in the sweetened condensed milk and vanilla extract, mixing until fully combined.
3. Folding in Whipped Cream: Gently fold the whipped cream into the cream cheese mixture using a spatula. This should be done carefully to retain the lightness of the whipped cream. Use a figure-eight motion, ensuring there are no streaks of cream or cream cheese left.
4. Final Mixing: Once the whipped cream is fully incorporated, you will have a smooth and creamy filling. Taste the mixture and adjust sweetness if necessary, depending on your preference and the ripeness of your bananas.
With the filling prepared, we are just a few steps away from assembling our Heavenly No-Bake Banoffee Cheesecake. The next part of our recipe will focus on layering the cheesecake and adding the irresistible toppings that will take this dessert to the next level. Stay tuned for the continuation of this delicious journey!
Achieving the Perfect Texture for the Cheesecake Filling
To create a Heavenly No-Bake Banoffee Cheesecake, the texture of the filling is paramount. A smooth, creamy filling that melts in your mouth is the ultimate goal. To achieve this, it’s crucial to start with room-temperature cream cheese. Cold cream cheese can result in lumps, so allow it to sit out for at least 30 minutes before mixing.
When combining your cream cheese with the sweetened condensed milk and whipped cream, you’ll want to ensure a well-blended mixture. Begin by beating the cream cheese until it’s completely smooth, then gradually add the sweetened condensed milk, mixing until fully combined.
The technique of folding in whipped cream is essential for maintaining the lightness of the filling. Start by adding a dollop of whipped cream into the cream cheese mixture; this will lighten the cream cheese and make it easier to incorporate the rest. Gently fold in the remaining whipped cream using a spatula, taking care not to deflate the air you’ve just whipped into the cream. This folding motion should be gentle and deliberate—lift the mixture from the bottom and fold over the top until just combined. This step is crucial; over-mixing can lead to a denser filling, which is not what we want.
Another key ingredient is lemon juice. Adding a tablespoon of freshly squeezed lemon juice to the bananas not only enhances the flavor but also helps retain the bananas’ vibrant color, preventing them from browning too quickly. This is especially important in a dessert that is visually appealing, as the bright yellow of the bananas adds a beautiful contrast to the creamy filling.
Assembling the Cheesecake
Once you have perfected the cheesecake filling, it’s time to assemble your masterpiece. Carefully pour the filling over the prepared biscuit crust in your springform pan. Use a spatula to smooth the top, ensuring an even layer. This not only provides a polished look but also helps to create a solid base for your toppings.
To ensure that the cheesecake sets correctly, proper covering and chilling are essential. Cover the cheesecake with plastic wrap or a lid to avoid any absorption of odors from the fridge. Chill the cheesecake in the refrigerator for at least 4 hours, but ideally overnight. This longer chilling time allows the flavors to meld beautifully, resulting in a more delicious dessert.
Suggested Chilling Time
While the minimum chilling time is 4 hours, allowing it to sit overnight will give you the best texture and flavor development. The filling will firm up nicely, making it easier to slice. If you’re short on time, aim for at least 6 hours before serving.
Finishing Touches
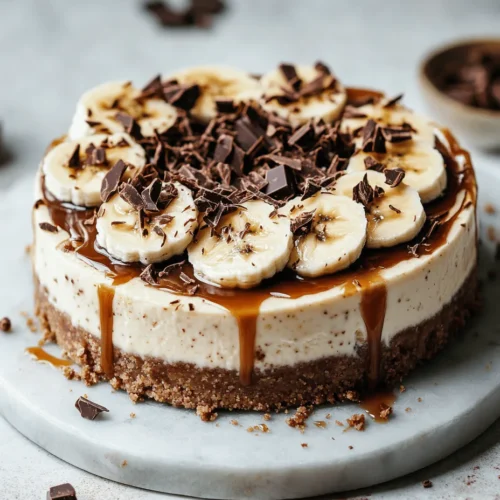
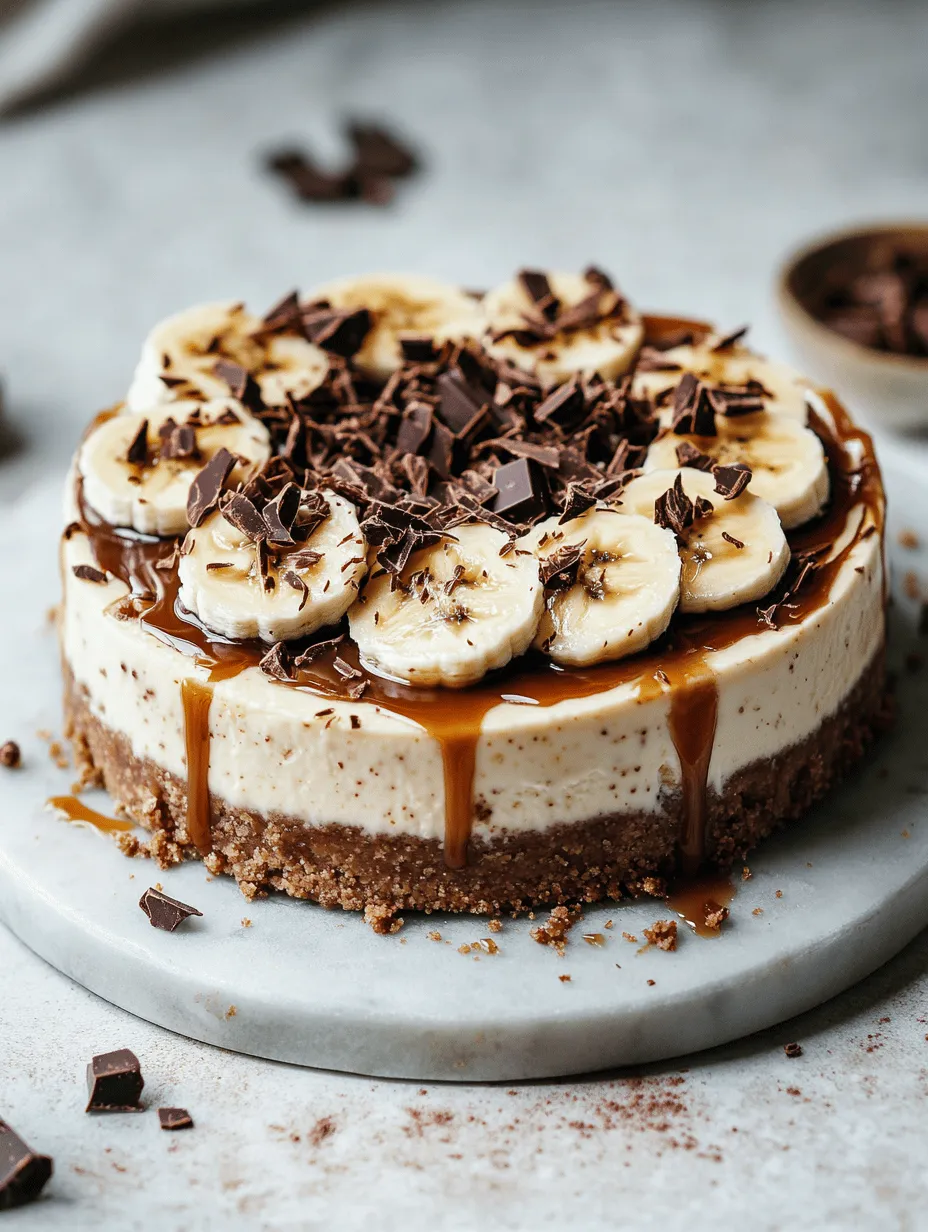
Now comes the fun part—decorating your cheesecake! Before serving, take some time to give it an elegant finish. Start by slicing fresh bananas into thin rounds. You can arrange these banana slices in a circular pattern on top of the cheesecake, creating a beautiful visual that will entice your guests.
Next, drizzle a generous amount of caramel sauce over the top. You can use store-bought caramel sauce or make your own for an extra touch of gourmet. This will not only enhance the flavor but also add a glossy sheen to your cheesecake.
For an extra touch of elegance, consider adding chocolate shavings. A simple way to create chocolate shavings is to use a vegetable peeler on a chocolate bar. Scatter these shavings over the banana slices and caramel for a delightful finish that adds both taste and aesthetic appeal.
Serving Suggestions
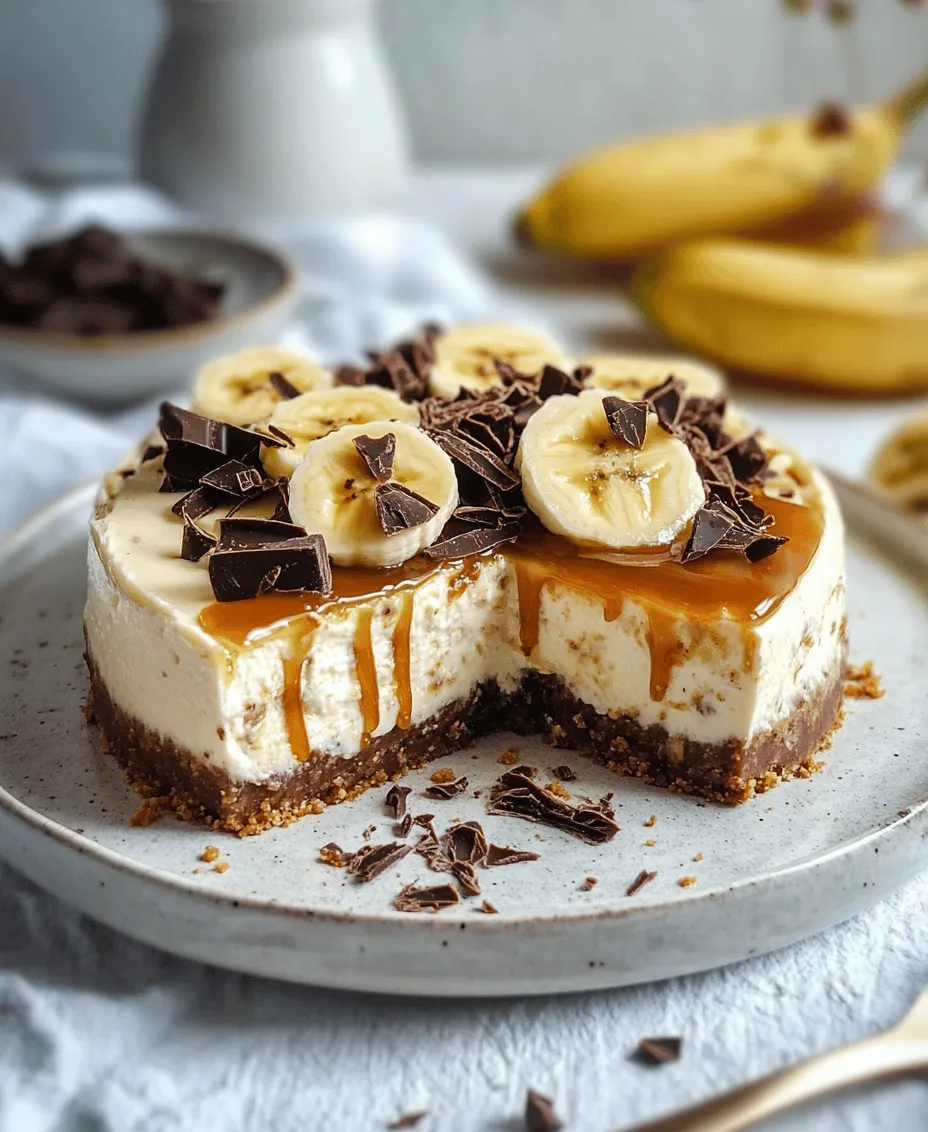
When it comes to serving your Heavenly No-Bake Banoffee Cheesecake, presentation is key. Use a sharp knife to cut clean slices, wiping the knife between cuts for a neat presentation. Aim for slices that are about 1 ½ inches thick, allowing for a satisfying portion without overwhelming your guests.
Pair the cheesecake with a dollop of whipped cream on the side for added richness. A cup of freshly brewed coffee or a nice dessert wine complements the flavors beautifully. The bitterness of coffee balances the sweetness of the cheesecake, while a dessert wine can enhance the caramel notes.
For a more casual serving option, consider presenting it on a rustic wooden board with a selection of fresh fruits like strawberries or raspberries. This adds a vibrant touch and invites guests to indulge in a variety of flavors.
Nutritional Information
Understanding the nutritional aspects of your Heavenly No-Bake Banoffee Cheesecake can help you make informed choices. A typical slice contains approximately 300-350 calories, depending on portion size and specific ingredients.
The primary components include cream cheese, which provides calcium and protein, while the bananas offer potassium and dietary fiber. The biscuit crust contributes carbohydrates, and the sweetened condensed milk adds sweetness along with a bit of fat.
For those looking to modify the recipe for dietary preferences, consider using low-fat cream cheese and a sugar substitute in place of sweetened condensed milk to reduce sugar and calorie content. You could also opt for a gluten-free biscuit crust by using gluten-free cookies or nuts as a base.
Conclusion
Making and enjoying a Heavenly No-Bake Banoffee Cheesecake is not just about satisfying your sweet tooth; it’s about creating a delightful culinary experience that you can share with family and friends. The process of assembling this cheesecake is straightforward, and with the right techniques, you can achieve a professional-looking dessert that will impress anyone who tries it.
We encourage you to share your experiences with this recipe or your own variations. Perhaps you’ll add a layer of chocolate ganache or experiment with different fruits—there’s no limit to the creativity you can bring to this dessert!
Homemade desserts have a unique charm, providing warmth and joy to gatherings. So gather your ingredients, invite your loved ones to join you in the kitchen, and enjoy the process of creating something delicious together. The Heavenly No-Bake Banoffee Cheesecake is sure to become a favorite in your dessert repertoire.