Introduction
There’s something truly special about no-bake desserts. They offer a delightful escape from the heat of the oven and allow us to whip up sweet treats in a fraction of the time. Whether you’re hosting a gathering, looking for a quick snack, or simply craving a sweet indulgence, no-bake desserts are an invaluable ally in the kitchen. Among these, mini banana cream pies stand out as a quintessential favorite, combining the creamy goodness of bananas with a decadent filling—all without the need for baking.
In today’s fast-paced world, the importance of quick and easy recipes cannot be overstated. With busy lifestyles that often leave little room for elaborate cooking sessions, no-bake desserts present an ideal solution. They not only save time but also require minimal effort, making them perfect for both novice and experienced cooks alike. Mini banana cream pies, in particular, are a delightful treat that can elevate any occasion—be it a summer picnic, birthday party, or simply a sweet ending to a weeknight dinner.
The Allure of No-Bake Desserts
No-bake recipes have taken the culinary world by storm, and for good reason. The appeal of these desserts lies in their simplicity and versatility. With just a few ingredients and minimal time commitment, you can create something extraordinarily delicious that impresses both family and guests alike. The convenience of no-bake desserts means you can enjoy homemade treats without the stress of baking, which often requires precise timing and temperature control.
One of the greatest benefits of no-bake desserts is their adaptability. You can experiment with flavors, textures, and presentations to suit your preferences or the season. Whether it’s a classic cheesecake, a chocolate mousse, or the star of our show today—mini banana cream pies—there’s a no-bake recipe for everyone. Personally, I have fond memories of preparing no-bake desserts during the hot summer months, where the last thing I wanted to do was turn on the oven. The joy of creating something delicious without the fuss is an experience I cherish, and I know many others feel the same.
Exploring the Ingredients
Before we dive into the steps of making these mini banana cream pies, let’s take a moment to explore the key ingredients that contribute to their mouthwatering flavor and texture.
1. Graham Cracker Crumbs: The foundation of our mini banana cream pies is a crisp, buttery crust made from graham cracker crumbs. Originating from the 19th century, graham crackers were initially created as a health food by Sylvester Graham. Today, they are a staple in many dessert recipes due to their sweet, slightly nutty flavor. If you’re looking for alternatives, crushed digestive biscuits or even crushed vanilla wafers can also work well, providing a unique twist to the crust.
2. Ripe Bananas: The star ingredient in our mini pies is undoubtedly the bananas. Using ripe bananas is crucial to achieving the perfect balance of sweetness and creaminess. As bananas ripen, their starches convert to sugars, making them sweeter and more flavorful. They also lend a creamy texture to the filling, ensuring that each bite is a delightful experience.
3. Heavy Whipping Cream: This ingredient is essential for creating a luscious filling. Heavy whipping cream not only adds richness but also contributes to the overall texture of the dessert. When whipped, it forms soft peaks that create a light and airy consistency, which beautifully complements the creamy banana filling.
4. Instant Vanilla Pudding Mix: For convenience, we’ll be using instant vanilla pudding mix as the base for our filling. It not only thickens the mixture quickly but also adds a delightful vanilla flavor. If you’re feeling adventurous, you can also make homemade pudding for an extra touch of authenticity.
5. Powdered Sugar and Vanilla Extract: To enhance the flavor profile of our filling, a touch of powdered sugar is added for sweetness, while vanilla extract provides a fragrant note that elevates the overall taste of the pies. These ingredients are simple yet impactful, transforming a basic filling into something truly special.
Step-by-Step Guide to Making No-Bake Mini Banana Cream Pies
Now that we’ve covered the essential ingredients, let’s move on to the exciting part—making our no-bake mini banana cream pies! This recipe is straightforward and easy to follow, even for those who may not consider themselves kitchen whizzes.
1. Preparation of the Crust
To begin, we’ll prepare the crust, which is the foundation of our mini pies. This step is crucial for achieving that perfect balance of texture and flavor.
2. Combining Graham Cracker Crumbs, Granulated Sugar, and Melted Butter
In a mixing bowl, combine 1 cup of graham cracker crumbs, 2 tablespoons of granulated sugar, and 1/4 cup of melted butter. The melted butter acts as a binding agent, ensuring that the crumbs hold together when pressed into the tart pans or muffin tins. The addition of sugar enhances the sweetness of the crust, complementing the filling perfectly.
3. Tips for Achieving the Perfect Texture for the Crust
To achieve the ideal texture, it’s essential to mix the ingredients thoroughly. The mixture should resemble wet sand—moist enough to hold together but not overly soggy. If it feels too dry, add a bit more melted butter, one teaspoon at a time, until the desired consistency is reached. This step is crucial for ensuring that your crust holds its shape once set.
4. Forming the Crust Bases in Tart Pans or Muffin Tins
Once the crust mixture is ready, it’s time to form the bases. Using either mini tart pans or a standard muffin tin, divide the mixture evenly among the compartments, pressing it firmly into the bottom and up the sides. A flat-bottomed measuring cup or a shot glass can be helpful for this task, allowing you to create an even layer.
5. Techniques for Pressing the Mixture Evenly
When pressing the crust mixture, aim for an even thickness throughout, ensuring that every mini pie has a consistent texture. The crust should be firm enough to hold its shape but not so compact that it becomes hard. Once you’ve formed the bases, place them in the refrigerator to chill for about 15-20 minutes. This step is essential for allowing the butter to solidify, which will help the crust maintain its shape when filled.
Now that we’ve laid the groundwork for our mini banana cream pies, we’re well on our way to creating a delicious dessert that is sure to impress. The next steps will involve preparing the creamy filling and assembling your delightful mini pies, so stay tuned as we dive deeper into this delectable recipe!

Importance of Refrigerating to Set the Crust
After preparing your crust, one crucial step that should not be overlooked is refrigerating it to ensure it sets properly. This process allows the butter in the crust to firm up, providing a stable base for your mini pies. When chilled, the crust becomes easier to handle and serves as a sturdy container for your luscious pudding filling. Aim for at least 30 minutes in the refrigerator before adding the filling. This step is essential not just for texture but also for flavor, as it helps meld the ingredients together, creating a more cohesive taste experience.
Making the Pudding Filling
Now that your crust is ready, it’s time to prepare the pudding filling. For this recipe, we will be using instant vanilla pudding mix, which is both convenient and provides a rich flavor. The process begins with whisking the instant pudding mix with cold milk. It’s essential to follow the package instructions, typically using about two cups of milk for one box of pudding mix. This ratio ensures that the pudding thickens properly, resulting in a creamy and delectable filling.
Whisking Instant Pudding Mix with Milk and the Thickening Process
In a mixing bowl, pour the instant pudding mix and gradually add the cold milk while whisking continuously. This step is crucial; whisking not only combines the ingredients but also aids in developing the pudding’s consistency. As you whisk, you’ll notice the mixture beginning to thicken – this usually takes about 2 minutes. The science behind this thickening process lies in the starches in the pudding mix, which absorb the liquid and swell, creating a smooth, creamy texture.
Insight into the Science of Pudding Consistency
Understanding the science behind pudding consistency can enhance your dessert-making skills. Instant pudding relies on modified food starches that expand when mixed with liquid. This process creates a gel-like structure that holds its shape once set. The texture you achieve with instant pudding is smooth and velvety, making it an ideal filling for our mini banana cream pies.
Whipping the Cream
Next, we will prepare the whipped cream, which adds a light and airy component to our filling. You can use either heavy cream or heavy whipping cream for this step. The fat content in heavy cream is crucial for achieving a stable whipped cream that holds its shape.
Step-by-Step on Achieving Soft Peaks
To whip the cream, start with a chilled mixing bowl and beaters, as this helps achieve optimal volume. Pour the heavy cream into the bowl and begin whisking on medium speed. As you whisk, you will notice the cream thickening. Continue whisking until soft peaks form. This stage is reached when the cream holds its shape but still has a slight droop at the tips. It’s important not to over-whip, as this can lead to a grainy texture and ultimately butter.
Importance of Folding the Whipped Cream into the Pudding for Lightness
Once you achieve soft peaks, gently fold the whipped cream into the prepared pudding mixture. Folding is a technique that involves incorporating one mixture into another without deflating the air you’ve just whipped into the cream. This step is crucial for achieving a light and fluffy filling that will make your mini pies irresistible. Use a spatula to scoop from the bottom of the bowl and lift the cream over the pudding, repeating until fully combined.
Layering the Ingredients
Now that your filling is ready, it’s time to layer the ingredients into your prepared crusts. Begin by adding a generous spoonful of pudding into each mini crust, smoothing it out to create an even layer.
Creative Ways to Layer Pudding, Bananas, and Whipped Cream
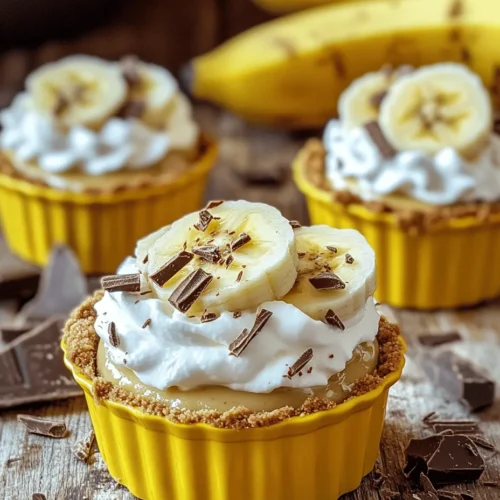
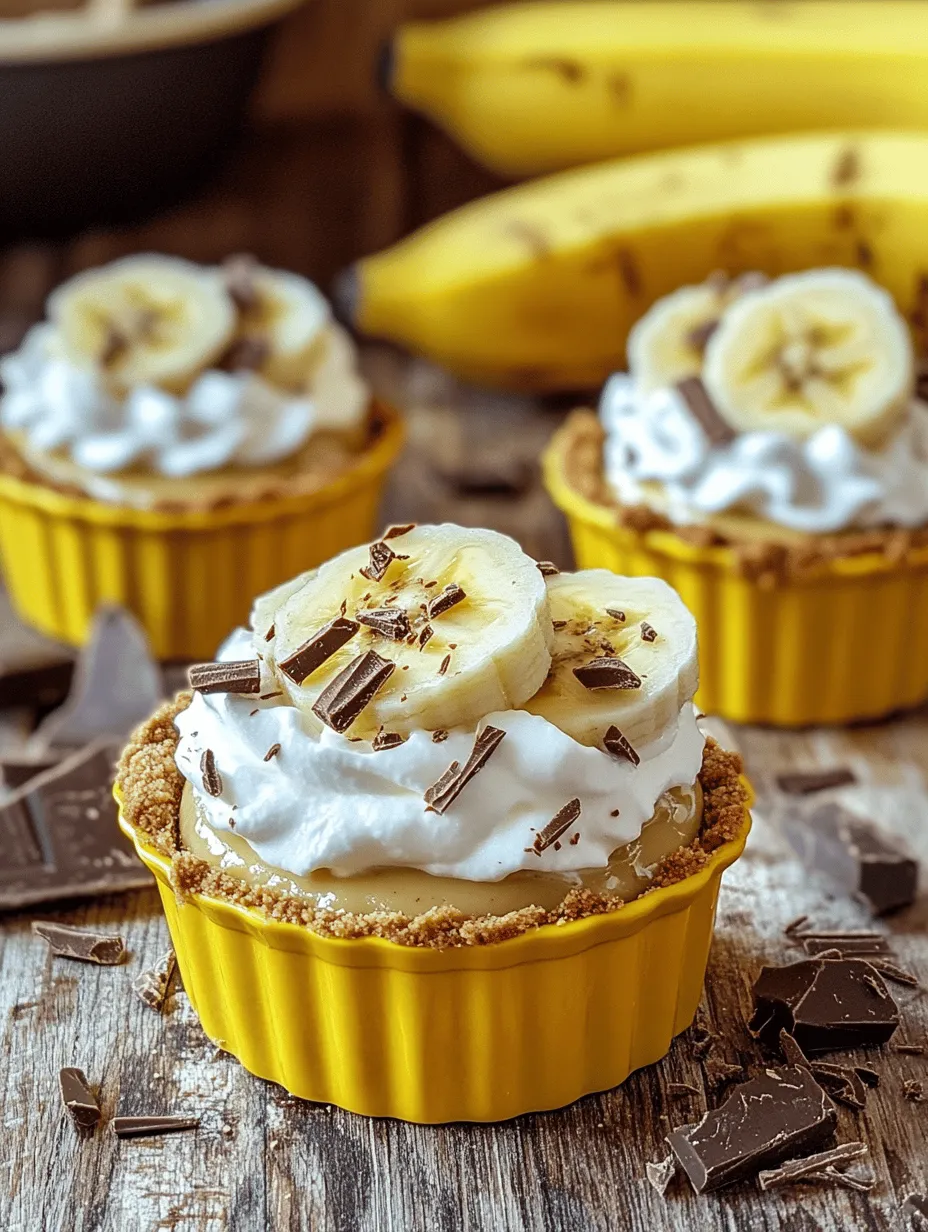
For a delightful presentation and flavor combination, slice fresh bananas and add them on top of the pudding layer. The banana slices not only add natural sweetness but also provide a lovely texture contrast to the creamy pudding. After the bananas, add another layer of pudding, followed by a dollop of whipped cream. You can get creative here – consider using a piping bag to make decorative swirls with the whipped cream for an elegant finish.
Suggestions for Presentation
Presentation plays a significant role in the enjoyment of food, especially desserts. To elevate your mini banana cream pies, consider garnishing them with chocolate shavings, which add a touch of sophistication and a hint of bitterness to balance the sweetness. Additionally, a few banana slices on top can make the pies visually appealing. For extra flair, a sprinkle of crushed graham crackers or a drizzle of caramel sauce can take your presentation to the next level.
Chilling and Serving
After assembling your mini banana cream pies, cover them with plastic wrap and place them in the refrigerator to chill. This chilling process not only allows the flavors to meld but also helps the pudding set properly, ensuring a delightful texture when served.
Explanation of the Chilling Process and Its Importance for Flavor and Texture
Chilling your pies for at least 2 to 3 hours (or overnight, if possible) is crucial for achieving the best flavor and texture. The longer the pies chill, the more the flavors will develop, resulting in a richer and more harmonious dessert. Additionally, chilling firmens the pudding, making it easier to slice and serve.
Ideas for Garnishing the Mini Pies: Chocolate Shavings and Banana Slices
When ready to serve, consider adding additional garnishes to your mini pies. Fresh banana slices can be placed on top just before serving to prevent browning. Chocolate shavings or a light dusting of cocoa powder can enhance the visual appeal and add a delicious chocolatey flavor. You might also sprinkle some crushed nuts for added crunch and texture.
Serving Suggestions for Various Occasions
These no-bake mini banana cream pies are versatile and perfect for various occasions. They make an excellent dessert for summer picnics, birthday parties, and family gatherings. Their individual portions make them easy to serve, and they are sure to impress guests with their delightful flavors and beautiful presentation.
Nutritional Aspects of Mini Banana Cream Pies
When indulging in desserts, it’s beneficial to understand the nutritional aspects. Each mini banana cream pie typically contains around 150-200 calories, depending on the specific ingredients used.
Breakdown of Nutritional Components: Calories, Sugars, Fats, and Carbs per Serving
A standard serving may contain approximately:
– Calories: 180
– Sugars: 12 grams
– Fats: 9 grams
– Carbohydrates: 22 grams
While these pies are certainly a treat, bananas also bring nutritional benefits. They are an excellent source of potassium, vitamin C, and dietary fiber, which can contribute to a balanced diet.
Discussion on the Health Benefits of Bananas
Bananas are not only delicious but also packed with nutrients. They can help regulate blood pressure due to their high potassium levels and provide a quick source of energy. Additionally, the fiber content in bananas aids digestion and promotes gut health, making them a great addition to your diet.
Consideration of Modifications for Dietary Restrictions
For those with dietary restrictions, there are several ways to adapt this recipe. You can use gluten-free graham crackers or alternative crusts such as almond flour or oat-based crusts. Additionally, lactose-free milk and whipped cream alternatives can be used to make this dessert more inclusive for those with dairy sensitivities.
Conclusion
In summary, these no-bake mini banana cream pies are a delightful and simple dessert that anyone can make at home. With layers of creamy pudding, fresh bananas, and light whipped cream, this treat is sure to please both family and friends. The ease of preparation combined with the delightful flavors makes it an ideal choice for any occasion.
We encourage you to try making these mini pies and enjoy the process of creating a sweet treat that brings joy to your loved ones. Sharing homemade desserts is a wonderful way to connect with others and spread happiness. So gather your ingredients, unleash your inner baker, and enjoy the delightful experience of making and sharing these no-bake mini banana cream pies!