

If you’re a fan of rich, indulgent desserts that combine the comforting flavors of chocolate and peanut butter, then Reese’s Butterfinger Cheesecake Bars are sure to become a cherished favorite. These bars take the classic creamy delight of cheesecake and infuse it with the irresistible tastes of Reese’s Peanut Butter Cups and Butterfinger candy bars, creating a perfect harmony of flavors and textures. Whether you’re celebrating a special occasion or simply satisfying a sweet tooth, these cheesecake bars are not only delicious but also visually enticing, making them an excellent choice for any gathering.
Understanding Cheesecake Bars
Before diving into the specifics of our Reese’s Butterfinger Cheesecake Bars, it’s crucial to understand what cheesecake bars are and how they differ from traditional cheesecakes. Cheesecake bars are typically baked in a rectangular or square baking pan, allowing them to be cut into neat squares after cooling. This format makes them easy to serve and share, which is part of their appeal for parties, potlucks, and family gatherings.
Unlike traditional cheesecakes that require a springform pan and often take longer to prepare and chill, cheesecake bars offer a more convenient and straightforward option. They maintain that same creamy texture and rich flavor that cheesecake lovers adore, but with the added benefit of being more portable. Each bite is a luscious experience, combining the dense creaminess of cheesecake with the satisfying crunch of a cookie crust.
The Allure of Reese’s and Butterfinger
What truly sets these cheesecake bars apart is the delightful combination of Reese’s Peanut Butter Cups and Butterfinger candy bars. Each of these beloved treats has a unique flavor profile that enhances the dessert in distinct ways.
Reese’s Peanut Butter Cups are known for their smooth and creamy peanut butter filling encased in rich milk chocolate. This combination creates a balance that is both sweet and salty, making them a perfect addition to our cheesecake bars. The classic pairing of chocolate and peanut butter is a universal favorite, and it adds a nostalgic charm to any dessert.
On the other hand, Butterfinger candy bars bring a crunchy texture and a distinctive butterscotch flavor to the mix. Their crispy, flaky center contrasts beautifully with the creamy cheesecake, providing an exciting textural element that elevates the overall experience. The nostalgia associated with these candy bars evokes memories of childhood treats, making them an ideal choice for a comforting dessert.
Ingredients Breakdown
To create the perfect Reese’s Butterfinger Cheesecake Bars, you’ll need a carefully selected list of ingredients. Understanding the role of each ingredient is essential for achieving that rich, creamy texture and delightful flavor.
Crust Ingredients
1. Chocolate Cookie Crumbs: The base of these cheesecake bars is made from chocolate cookie crumbs, which provide a rich, chocolatey flavor that pairs wonderfully with the cheesecake filling. Using store-bought cookies like Oreos can simplify the process, but you can also make your own by crushing chocolate wafers.
2. Butter: Melted butter is combined with the cookie crumbs to bind them together, ensuring a solid and cohesive crust. The butter adds richness and enhances the overall flavor, ensuring that each bite has a decadent mouthfeel.
Cheesecake Filling Ingredients
1. Cream Cheese: The star of the cheesecake filling is cream cheese, which gives the bars their signature creamy texture. It’s important to use full-fat cream cheese for the best results, as it provides a rich and smooth consistency that is essential for a delectable cheesecake.
2. Sugar: Granulated sugar adds sweetness to the filling. It balances the richness of the cream cheese while contributing to the overall flavor profile.
3. Eggs: Eggs act as a binding agent and help to set the cheesecake as it bakes. They provide structure while ensuring that the filling remains soft and creamy.
4. Whipped Topping: For added fluffiness and lightness, whipped topping is folded into the cheesecake mixture. This ingredient creates an airy texture that contrasts beautifully with the denser crust and adds a delightful creaminess.
5. Reese’s and Butterfinger Pieces: Chopped pieces of both Reese’s Peanut Butter Cups and Butterfinger bars are mixed into the filling, enhancing the flavor and providing bursts of chocolate and peanut butter goodness throughout the cheesecake.
Topping Ingredients
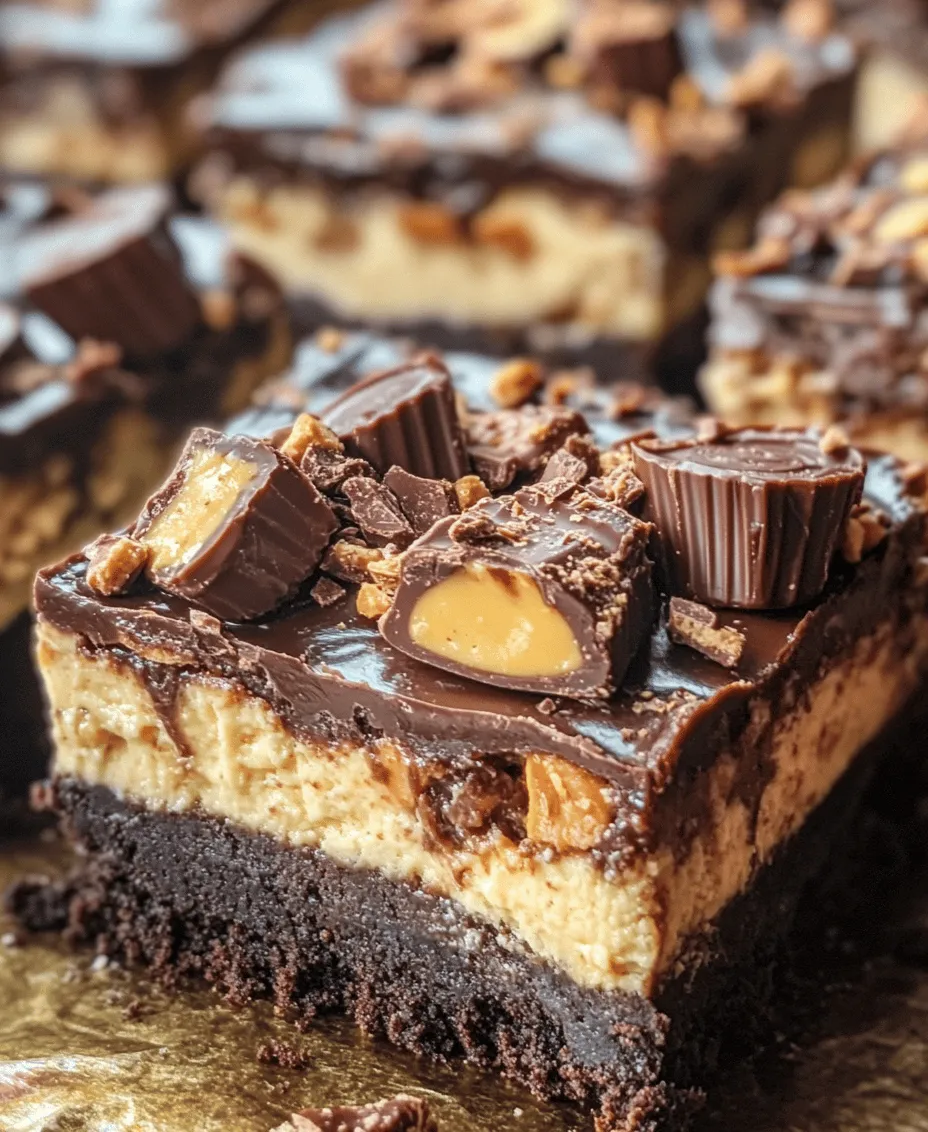
1. Chocolate Ganache: A luscious layer of chocolate ganache crowns the cheesecake bars, adding elegance and a rich chocolate flavor. Made from heavy cream and chocolate, this ganache melts into a smooth, shiny topping that enhances both the appearance and taste of the dessert.
2. Extra Candy Pieces: To finish off these bars, additional chopped Reese’s and Butterfinger pieces are sprinkled on top of the ganache. Not only do they add visual appeal, but they also provide extra crunch and flavor, making each bar a delightful treat for the senses.
Step-by-Step Instructions
Prepping the Baking Pan
When it comes to baking cheesecake bars, proper pan preparation is crucial for achieving perfect results. Start by preheating your oven to 325°F (160°C). While the oven is heating, prepare your baking pan by lining it with parchment paper. This step not only makes it easier to lift the bars out of the pan after baking but also helps prevent sticking.
To line the pan, cut a piece of parchment paper large enough to cover the bottom and sides of the pan, allowing some overhang. This overhang will act as handles, making it simple to lift the cheesecake bars out once they’ve cooled.
After lining the pan, lightly grease the parchment paper with cooking spray or a small amount of butter. This will further ensure that your cheesecake bars release easily once baked.
With the pan prepped and the oven preheated, you’re ready to move on to the next steps of making the crust and filling.
By taking the time to prepare your baking pan correctly and understanding the importance of each ingredient, you’re setting the stage for a successful and delicious baking experience. In the following sections, we’ll delve into the detailed steps for creating the crust and the luscious cheesecake filling that will make your Reese’s Butterfinger Cheesecake Bars a standout dessert.
Creating the Cookie Crust
The foundation of any great cheesecake is its crust, and for the Reese’s Butterfinger Cheesecake Bars, we will create a delectable cookie crust that perfectly complements the rich filling. Start by preheating your oven to 325°F (160°C). In a large mixing bowl, combine 1 ½ cups of crushed chocolate sandwich cookies (like Oreos) with ½ cup of melted unsalted butter. The butter acts as a binding agent, ensuring all the cookie crumbs stick together for a solid base.
To achieve the ideal crust consistency, mix the crushed cookies and melted butter thoroughly until the crumbs are evenly coated. The mixture should resemble wet sand; if it feels too dry, add a touch more melted butter. Once combined, press the mixture firmly into the bottom of a greased 9×13-inch baking pan. Use the back of a measuring cup to compact the crust evenly, ensuring it reaches the edges. This pressing step is crucial, as it creates a sturdy base that will hold the cheesecake filling without crumbling.
Making the Cheesecake Filling
Now that your cookie crust is ready, it’s time to whip up the cheesecake filling. In a mixing bowl, beat 16 ounces of cream cheese at room temperature until smooth. This step is critical; starting with room-temperature cream cheese prevents lumps and helps achieve a creamy texture. Gradually add 1 cup of granulated sugar and continue to beat until the mixture is light and fluffy.
Next, add 2 large eggs, one at a time, mixing on low speed to avoid overmixing. Overmixing can incorporate too much air into the filling, which may lead to cracks during baking. Follow this with 1 teaspoon of vanilla extract and ½ cup of creamy peanut butter. Mix until just combined, ensuring the peanut butter is evenly distributed without overworking the batter.
To elevate the flavor, fold in 1 cup of chopped Butterfinger candies. These will add delightful crunch and chocolatey goodness to your cheesecake bars. Once fully combined, pour the cheesecake filling over the prepared crust and spread it evenly with a spatula.
Baking and Cooling the Cheesecake Bars
Carefully place the baking pan in the preheated oven and bake for approximately 30-35 minutes. Keep an eye on the cheesecake bars; they are ready when the edges are set, and the center has a slight jiggle. A toothpick inserted into the center should come out mostly clean, with a few moist crumbs attached.
Once baked, remove the cheesecake bars from the oven and let them cool in the pan for about 15-20 minutes on a wire rack. This cooling process allows the bars to set further and makes them easier to handle when cutting.
Chilling Process
Chilling is a crucial step in the cheesecake-making process, as it allows the flavors to meld together and the texture to firm up. After the cheesecake bars have cooled to room temperature, cover the pan with plastic wrap or aluminum foil and refrigerate for a minimum of 4 hours, though overnight is ideal. The longer they chill, the better the flavor and texture will be.
Final Assembly
Once the cheesecake bars have chilled and are firm, it’s time for the final assembly. For an extra touch of indulgence, prepare a simple chocolate ganache by heating ½ cup of heavy cream until just simmering and pouring it over 1 cup of semi-sweet chocolate chips in a bowl. Let it sit for a few minutes, then stir until smooth. Drizzle the ganache over the chilled cheesecake bars using a spoon or a piping bag for a more decorative finish.
To top it off, sprinkle additional chopped Butterfinger candies over the ganache for added crunch and visual appeal. This final touch not only enhances the look of your cheesecake bars but also adds bursts of flavor that will delight your guests.
Tips for Success
While making Reese’s Butterfinger Cheesecake Bars is a straightforward process, there are some common pitfalls to avoid:
– Overmixing the Filling: Keep your mixing to a minimum once the eggs are added. Overmixing can lead to cracks in the finished product.
– Crust Too Crumbly: Ensure you press the crust firmly into the pan. If it crumbles when cutting, it might have been too dry. Adding a bit more melted butter can help.
– Not Chilling Long Enough: Patience is key! Chilling overnight will yield the best texture and flavor.
Best Practices for Storage:
Store leftover cheesecake bars in an airtight container in the refrigerator for up to a week. For longer storage, you can freeze the bars. Cut them into squares, wrap them individually in plastic wrap, and then place them in a freezer-safe container. They can be frozen for up to 3 months.
Variations to Consider:
Feel free to experiment with different flavors. Instead of Butterfinger, try Snickers or Reese’s Pieces for a twist. You can also incorporate a layer of caramel sauce for added sweetness.
Serving Suggestions
When it comes to serving your Reese’s Butterfinger Cheesecake Bars, presentation is key. Cut the bars into squares or rectangles and arrange them on a decorative platter. For a party, consider adding a scoop of vanilla ice cream or a dollop of whipped cream on the side for an indulgent treat.
Pair these rich bars with a hot cup of coffee or a sweet dessert wine for a delightful combination. For holidays or special occasions, dress up the serving area with themed decorations that complement the dessert, such as chocolate-themed tableware or colorful napkins.
Nutritional Information
Each serving of Reese’s Butterfinger Cheesecake Bars offers a delicious treat, but it’s important to enjoy them in moderation. On average, each bar contains approximately 250 calories, with about 15 grams of sugar. While these bars are rich and satisfying, it’s advisable to balance them with healthier meal choices throughout the day.
Conclusion
In conclusion, making Reese’s Butterfinger Cheesecake Bars is not only a rewarding baking experience but also a delightful way to indulge in a decadent dessert. From the crunchy cookie crust to the creamy filling bursting with candy pieces, every bite is a celebration of flavors. We encourage you to explore the world of cheesecake variations and make this recipe your own by trying different flavor combinations or toppings.
Baking is all about creativity and sharing joy with loved ones. So gather your ingredients, follow these steps, and enjoy the satisfaction that comes from creating something delicious. Happy baking!
