Indulging in a sweet treat can bring joy to any occasion, and what better way to satisfy your sweet tooth than with a delicious dessert that combines the rich flavors of chocolate and peanut butter? Enter Reese’s Butterfinger Cheesecake Bars—a delectable fusion of creamy cheesecake and layered candy goodness. Perfect for gatherings, celebrations, or simply to enjoy at home, these bars are easy to make and sure to impress. In this article, we will not only provide a step-by-step recipe but also delve into the history of cheesecake, explore the benefits of using certain ingredients, and offer tips for perfecting these dessert bars.
The Allure of Cheesecake: A Brief History
Understanding the origins of cheesecake adds a layer of appreciation to this beloved dessert. Cheesecake has a rich history that dates back to ancient Greece, where it was served to athletes during the first Olympic Games in 776 B.C. Made from a simple mixture of cheese, flour, and honey, this early version of cheesecake laid the groundwork for what would evolve over centuries.
As the Romans conquered Greece, they took the cheesecake recipe with them, making their own adaptations. They introduced the use of eggs, creating a firmer texture. Over time, cheesecake spread across Europe, particularly in Italy, where it became a popular dessert. The Italians added their own spin by using ricotta cheese, which resulted in the famous Italian ricotta cheesecake.
When cheesecake made its way to America, it underwent yet another transformation. The introduction of cream cheese in the early 1900s marked a significant change, resulting in the rich, creamy texture that many people adore today. The New York-style cheesecake, characterized by its dense and creamy consistency, quickly became a favorite.
Now, cheesecake comes in countless variations, from fruity to chocolatey, and with a myriad of toppings. The Reese’s Butterfinger Cheesecake Bars you are about to create are a perfect example of how this classic dessert can be adapted to include popular candy favorites, making it accessible to a wider audience while retaining its delightful essence.
Ingredients Breakdown
Before diving into the preparation, let’s take a closer look at the essential components of the Reese’s Butterfinger Cheesecake Bars. Understanding the role of each ingredient not only helps in the baking process but also enhances the overall flavor and texture of the dessert.
Exploring the Ingredients for the Crust
The crust is the foundation of any cheesecake, and for these bars, we will use crushed graham crackers, unsalted butter, and sugar.
– Crushed Graham Crackers: These provide the classic base for cheesecakes. Their slightly sweet flavor and crumbly texture create a perfect contrast to the creamy filling. When crushed finely, they allow for a smooth, even crust that holds together well.
– Unsalted Butter: This ingredient is crucial as it binds the graham cracker crumbs together and adds richness. Using unsalted butter allows for better control over the overall saltiness of the dessert, ensuring that the sweet flavors shine through.
– Sugar: A small amount of granulated sugar is mixed with the graham cracker crumbs to enhance sweetness and help the crust caramelize slightly during baking. This balance of sweetness is key in complementing the rich cheesecake filling.
Baking the crust is essential for optimal texture and flavor. It not only helps set the crust but also enhances its taste by developing a slightly toasted flavor profile. A properly baked crust will serve as a sturdy base for the creamy filling, ensuring that your cheesecake bars hold their shape when sliced.
Delving into the Cheesecake Filling
The filling is where the magic happens, and in these Reese’s Butterfinger Cheesecake Bars, it is all about the combination of rich and creamy ingredients.
– Cream Cheese: This is the star of the cheesecake filling. The smooth and creamy texture of cream cheese provides the foundation for the cheesecake, giving it that luscious mouthfeel we all crave. It’s important to use full-fat cream cheese for the best results, as low-fat varieties can lead to a less creamy texture.
– Sugar: Just like in the crust, sugar is essential in the filling to balance the tanginess of the cream cheese. It sweetens the filling and helps create that delightful contrast of flavors.
– Eggs: Eggs not only provide structure to the cheesecake but also contribute to its creamy consistency. They help bind the ingredients together, ensuring that the filling sets properly and has a smooth texture.
– Vanilla Extract: A splash of vanilla extract enhances the overall flavor of the cheesecake, adding warmth and depth. It complements the sweetness and balances the richness of the cream cheese.
– Creamy Peanut Butter: This ingredient elevates the filling to new heights. The nutty flavor and smooth texture of peanut butter pair perfectly with the cheesecake, creating a delightful harmony of flavors. It adds a layer of richness and complexity that sets these bars apart from traditional cheesecake recipes.
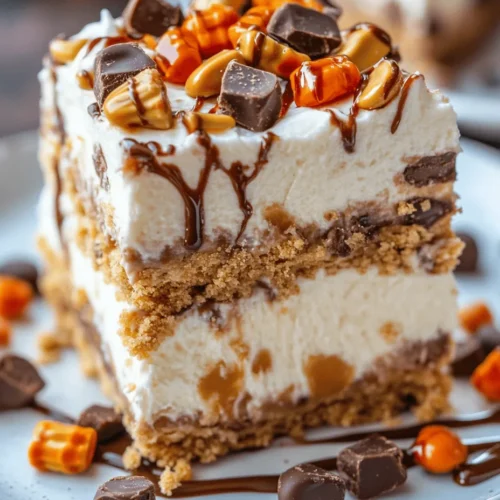
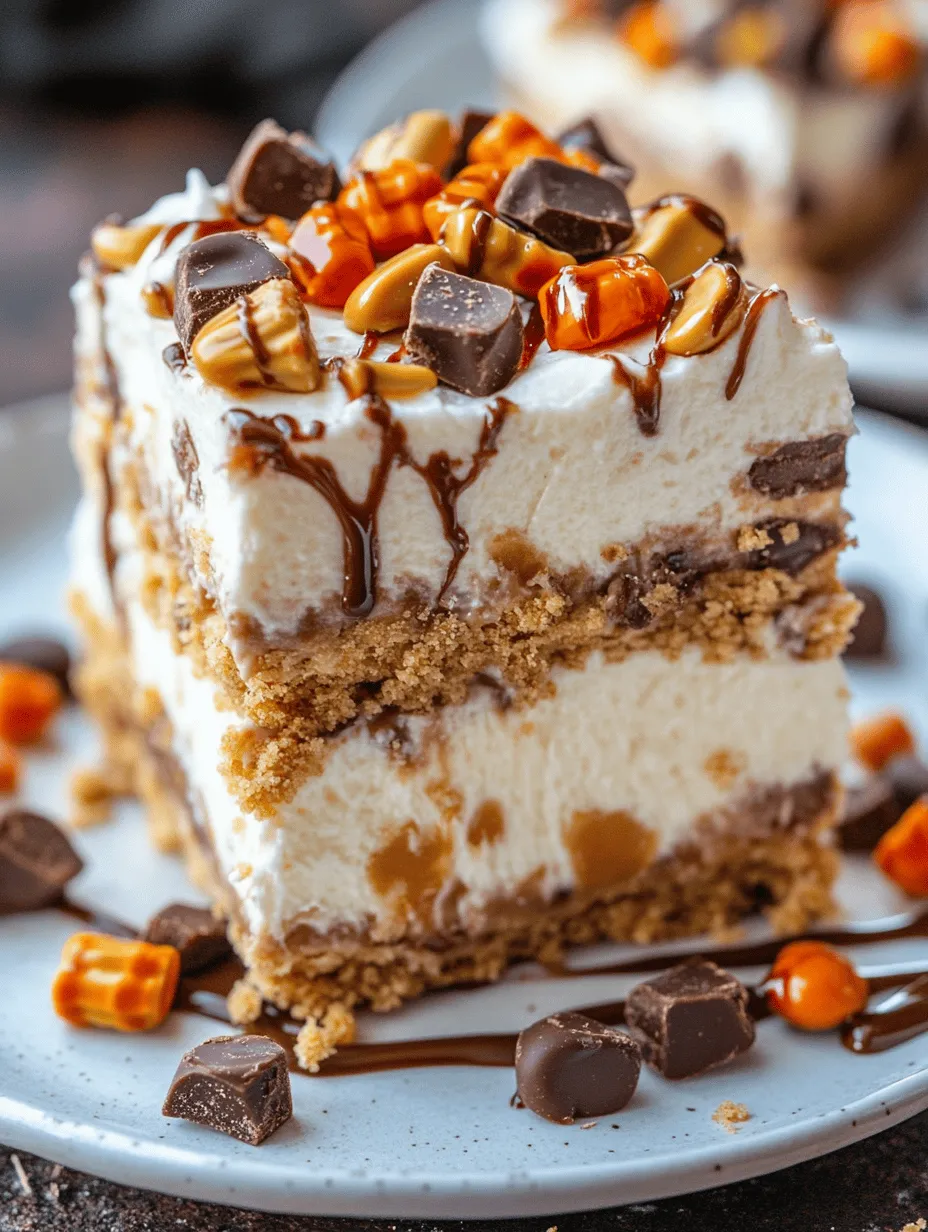
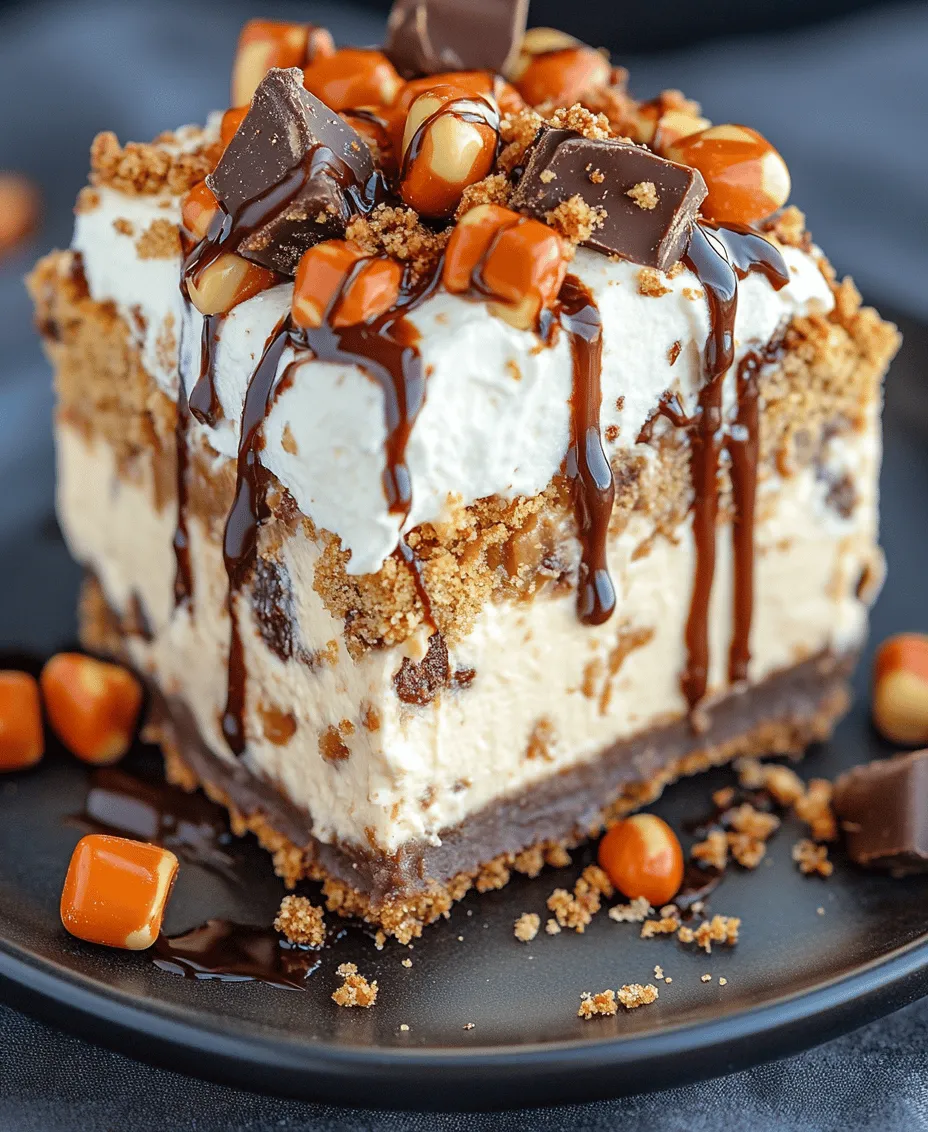
– Butterfinger and Reese’s Peanut Butter Cups: The addition of these iconic candies introduces a delightful crunch and bursts of flavor. Chopped Butterfinger bars add a toffee-like crunch that contrasts beautifully with the creamy filling, while Reese’s Peanut Butter Cups provide pockets of peanut butter goodness that enhance the overall taste experience.
Topping Components and Presentation
To take these cheesecake bars over the top, we’ll finish them with some irresistible toppings.
– Whipped Cream: A dollop of freshly whipped cream adds a light and airy texture that contrasts with the dense cheesecake. It also serves as a canvas for additional toppings, making the dessert visually appealing.
– Chocolate Sauce: Drizzling chocolate sauce over the bars not only adds a rich chocolate flavor but also elevates the dessert’s presentation. The glossy finish creates an enticing appearance that will make your guests eager to dig in.
– Caramel Sauce: Just like chocolate sauce, caramel sauce adds an extra layer of sweetness and complexity. The rich, buttery flavor complements the peanut butter and chocolate elements beautifully.
When it comes to presentation, consider slicing the cheesecake bars into small squares or rectangles and arranging them on a decorative platter. Adding a sprinkle of crushed Butterfinger on top or a few extra chopped Reese’s Peanut Butter Cups can enhance visual appeal and invite indulgence.
Step-by-Step Instructions for Success
Creating Reese’s Butterfinger Cheesecake Bars is a straightforward process that anyone can master with a little patience and attention to detail. Below are the detailed instructions to guide you through each step, ensuring that your cheesecake bars turn out perfectly every time.
Step 1: Preheat the Oven
Begin by preheating your oven to 350°F (175°C). This ensures that your crust will bake evenly and set properly.
Step 2: Prepare the Crust
1. In a mixing bowl, combine 1 ½ cups of crushed graham crackers, ½ cup of melted unsalted butter, and ¼ cup of granulated sugar. Use a fork or a spatula to mix until the crumbs are well coated and the mixture resembles wet sand.
2. Press the mixture firmly into the bottom of a greased 9×13-inch baking pan. Use the back of a measuring cup or your fingers to ensure an even layer.
3. Bake the crust in the preheated oven for 8-10 minutes or until lightly golden. Remove from the oven and let it cool while you prepare the filling.
Step 3: Make the Cheesecake Filling
1. In a large mixing bowl, beat 16 ounces of softened cream cheese with an electric mixer on medium speed until smooth and creamy.
2. Gradually add in ¾ cup of granulated sugar, continuing to beat until completely combined.
3. Add in 3 large eggs, one at a time, mixing well after each addition to ensure a smooth consistency.
4. Stir in 1 teaspoon of vanilla extract and ½ cup of creamy peanut butter until fully incorporated.
5. Gently fold in 1 cup of chopped Butterfinger bars and 1 cup of chopped Reese’s Peanut Butter Cups, making sure they are evenly distributed throughout the filling.
Step 4: Assemble and Bake
1. Pour the cheesecake filling over the cooled crust, spreading it evenly with a spatula.
2. Bake in the oven for 25-30 minutes or until the center is set and only slightly jiggly.
3. Once baked, remove the cheesecake bars from the oven and allow them to cool at room temperature for about 1 hour.
4. Transfer the bars to the refrigerator and chill for at least 4 hours, or overnight if possible, to ensure they set properly.
Step 5: Prepare for Serving
1. Once chilled, remove the cheesecake bars from the refrigerator and slice them into squares or rectangles.
2. Before serving, top each bar with a dollop of whipped cream, a drizzle of chocolate sauce, and a drizzle of caramel sauce.
3. For an extra touch, sprinkle some crushed Butterfinger on top for added texture and flavor.
These Reese’s Butterfinger Cheesecake Bars are the perfect combination of creamy, crunchy, and utterly delicious. The steps outlined above will guide you in creating a dessert that not only tastes incredible but also looks impressive on any dessert table.
In the next part of this article, we will explore additional tips for achieving the best results, answer some common questions about cheesecake bars, and provide variations for those who want to experiment with different flavors. Whether you’re a seasoned baker or a novice in the kitchen, this recipe is sure to become a favorite in your dessert repertoire.
Preparing the Crust
To create a solid foundation for your Reese’s Butterfinger Cheesecake Bars, it’s essential to prepare the crust with care. The crust is typically made from crushed graham crackers, sugar, and melted butter, which together create a rich and flavorful base that complements the creamy cheesecake filling.
1. Mixing the Ingredients: Start by placing your graham cracker crumbs in a large mixing bowl. If you don’t have pre-crushed crumbs, you can easily make your own by placing whole graham crackers in a food processor and pulsing until finely ground. Add granulated sugar to the crumbs to enhance the sweetness. Next, pour in the melted butter, which acts as a binder for the crumbs. Using a fork or a spatula, mix the ingredients until the crumbs are evenly moistened and resemble wet sand.
2. Pressing the Crust: Transfer the crumb mixture to a lined 9×13 inch baking pan. It’s crucial to press the mixture down firmly to create a uniform layer that will hold together once baked. Use the bottom of a measuring cup or a flat spatula to exert even pressure as you press the crumbs into the bottom of the pan. Aim for an even thickness across the entire base, ensuring that it is firmly compacted.
3. Baking the Crust: Preheat your oven to 350°F (175°C). Once the oven is ready, place your crust in the oven and bake it for about 10 to 12 minutes. You want to achieve a light golden color on the surface of the crust, which indicates that it is baked through and ready for the cheesecake filling. Keep a close eye on the crust, as baking times may vary slightly based on your oven’s specifics.
Crafting the Cheesecake Filling
After allowing the crust to cool slightly, it’s time to prepare the cheesecake filling. The filling is the star of the show, and achieving a smooth and creamy texture is essential.
1. Mixing the Cream Cheese: Start by placing softened cream cheese in a large mixing bowl. Using an electric mixer on medium speed, beat the cream cheese until it is completely smooth and free of lumps. This can take about 2 to 3 minutes. For best results, ensure your cream cheese is at room temperature before starting; this helps it blend more easily.
2. Adding the Sugar and Vanilla: Once the cream cheese is smooth, gradually add granulated sugar and vanilla extract. Continue to beat the mixture until everything is well combined. The sugar will not only sweeten the filling but also help in achieving a creamy consistency.
3. Incorporating Eggs: Add the eggs one at a time, mixing on low speed after each addition just until combined. Be careful not to overmix at this stage, as excessive air can lead to cracks during baking.
4. Folding in the Candy Pieces: The pièce de résistance of your cheesecake filling will be the addition of chopped Reese’s and Butterfinger candy. Once your cheesecake batter is smooth, gently fold in the chopped candy pieces using a spatula. This step is crucial; you want to maintain the pieces’ integrity, so be gentle to ensure they don’t break down too much.
Baking and Cooling Process
After preparing your crust and filling, it’s time to bring everything together.
1. Assembling the Bars: Pour the cheesecake filling over the pre-baked crust, using a spatula to spread it into an even layer.
2. Baking the Cheesecake Bars: Place the pan back into the preheated oven and bake for approximately 30 to 35 minutes. The bars are done when the edges are set, but the center should still have a slight jiggle. This slight movement indicates a creamy texture, which will firm up as the bars cool.
3. Cooling and Chilling: Allow the bars to cool at room temperature for about 1 hour before transferring them to the refrigerator. Chilling the cheesecake bars for at least 4 hours, or preferably overnight, allows the flavors to meld and the texture to become perfectly creamy.
Serving and Enjoying Your Cheesecake Bars
Now that your Reese’s Butterfinger Cheesecake Bars are ready, it’s time to cut and serve them in style.
Perfectly Cutting the Cheesecake Bars
To achieve neat and professional-looking slices, follow these simple steps:
1. Use a Sharp Knife: Before cutting, ensure your knife is sharp. A dull knife can crush the bars instead of cutting them cleanly. For best results, dip the knife in hot water and wipe it dry before each cut; this will help produce clean slices.
2. Cutting Technique: Start by cutting the bars into squares or rectangles, depending on your preference. Make long, even cuts, and avoid dragging the knife back and forth, as this can crumble the edges.
3. Chilling Again (Optional): If your bars have softened slightly during cutting, you can chill them again for a few minutes to firm them up before serving.
Creating the Ideal Serving Experience
To enhance your dessert experience, consider the following pairing options:
– Beverages: These cheesecake bars pair beautifully with a rich cup of coffee or a soothing cup of tea. The coffee’s bitterness complements the sweetness of the cheesecake, while tea provides a lighter contrast.
– Occasions for Serving: Whether you are hosting a casual family gathering, celebrating a birthday, or enjoying a festive holiday, these cheesecake bars are versatile. They can be served as a delightful ending to a meal or as a sweet treat during a coffee break.
Conclusion
Reese’s Butterfinger Cheesecake Bars are more than just a dessert; they embody a delightful combination of flavors that can bring joy to any gathering. By following this comprehensive guide, you can create a treat that not only satisfies your sweet cravings but also impresses your friends and family. The blend of creamy cheesecake with crunchy candy pieces offers a unique culinary experience that celebrates the beloved flavors of chocolate and peanut butter.
Whether you enjoy them fresh out of the oven or chilled from the fridge, these bars are sure to become a favorite in your dessert repertoire. Enjoy the process of making and sharing these delectable treats, knowing you have created something truly special. The next time you are in need of a show-stopping dessert, don’t hesitate to whip up these irresistible Reese’s Butterfinger Cheesecake Bars!