
Introduction
As the sun shines brighter and the days grow longer, summer beckons us to embrace the joys of cooking with fresh, seasonal ingredients. The warmth of the season transforms not only our outdoor activities but also our culinary desires, urging us to create light, vibrant meals that nourish both the body and spirit. During these sun-soaked months, the thrill of experimenting with bold flavors and fresh produce is unmatched, making it the perfect time to indulge in a variety of delightful dishes.
In this article, we will explore an array of enticing summer recipes, starting with a standout star: the Refreshing Watermelon & Feta Salad. This salad embodies the essence of summer with its combination of juicy watermelon, creamy feta cheese, and aromatic mint, creating a refreshing dish that is perfect for picnics, barbecues, or simply enjoying at home. We’ll also delve into other summer favorites like Grilled Lemon Herb Chicken Skewers, Veggie-Packed Quinoa Summer Bowl, BBQ Shrimp Tacos with Avocado Cream, and Zucchini Noodles with Pesto & Cherry Tomatoes. Each recipe showcases the beauty of seasonal ingredients while offering an explosion of flavors that will tantalize your taste buds.
The Essence of Summer in Your Kitchen
As the temperatures rise, our cooking habits shift towards lighter, more refreshing meals that reflect the season’s bounty. Summer is the time to embrace an array of fruits and vegetables, each bursting with flavor and nutrients. The use of seasonal ingredients not only enhances the taste of our dishes but also provides numerous health benefits. For instance, fruits like watermelon and vegetables like zucchini are hydrating and packed with vitamins, making them ideal choices for summertime cooking.
Moreover, summer cooking methods align perfectly with our desire for lighter fare. Grilling, chilling, and assembling fresh salads are just a few of the techniques that allow us to prepare meals that are not only delicious but also quick and easy. The focus shifts toward simplicity, where the natural flavors of ingredients take center stage, allowing for effortless yet satisfying meals.
Refreshing Watermelon & Feta Salad
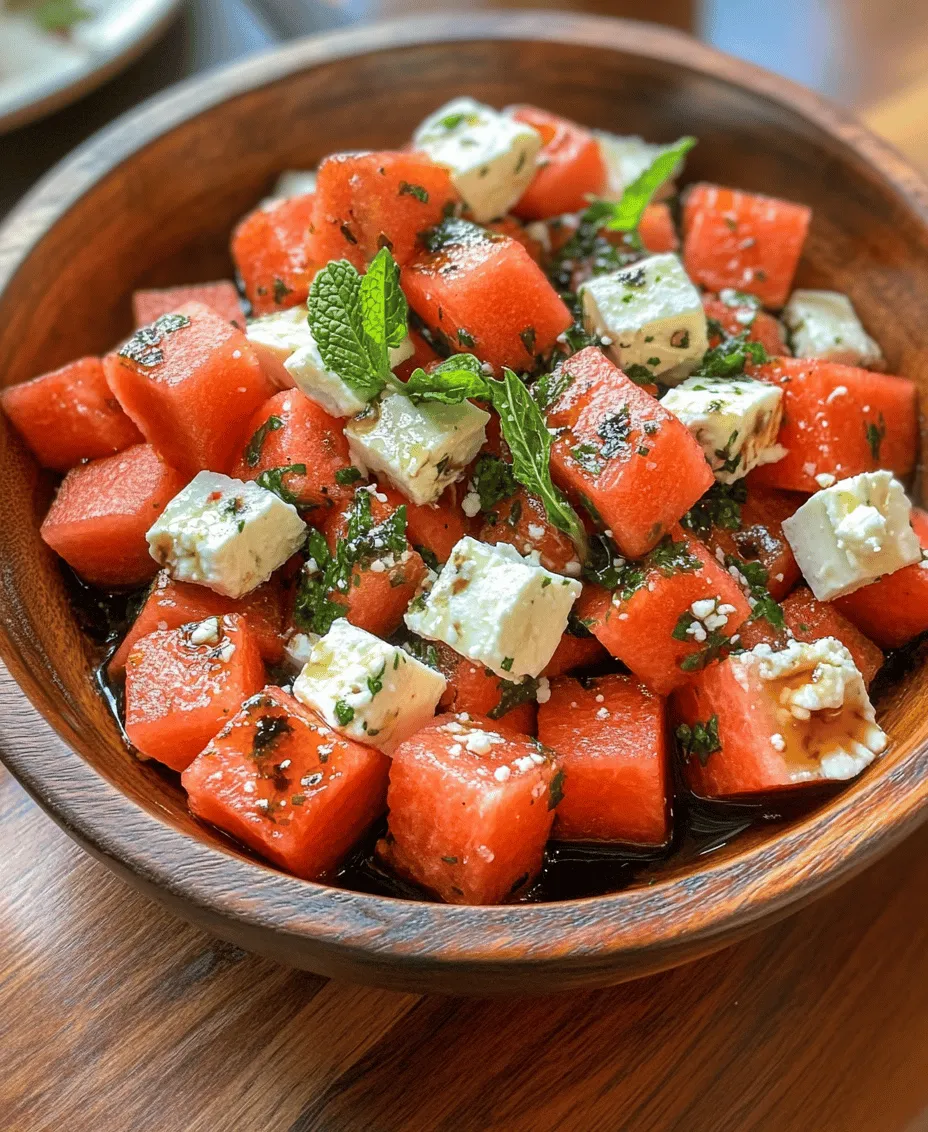
This Refreshing Watermelon & Feta Salad is a quintessential summer dish that balances sweetness and saltiness, making it a crowd-pleaser at any gathering. The vibrant colors and textures invite you to dig in, while the combination of fresh ingredients offers a delightful experience for the palate. This salad is not only visually appealing but also quick to assemble, making it an ideal choice for busy summer days when you want to enjoy a healthy meal without extensive preparation.
Ingredient Breakdown
To create this mouthwatering salad, you’ll need the following key ingredients:
1. Seedless Watermelon: The star of the dish, watermelon adds a refreshing sweetness and juiciness that is perfect for hot summer days. Seedless varieties are preferred for their convenience, allowing you to enjoy the fruit without interruption. Rich in vitamins A and C, watermelon is also hydrating and low in calories, making it an excellent choice for a light salad.
2. Feta Cheese: This tangy, creamy cheese provides a wonderful contrast to the sweetness of the watermelon. Originating from Greece, feta is made from sheep’s milk or a combination of sheep and goat’s milk. Its crumbly texture and salty flavor enhance the overall taste of the salad, making each bite an explosion of flavor.
3. Fresh Mint: Adding a touch of aromatic freshness, mint takes this salad to the next level. The bright green leaves bring a cooling effect that complements the watermelon perfectly, enhancing the overall flavor profile of the dish.
4. Olive Oil: A drizzle of high-quality extra virgin olive oil ties the salad together, adding richness and depth to the flavors without overpowering the freshness of the ingredients.
5. Balsamic Glaze (optional): For those who enjoy a touch of sweetness and acidity, a balsamic glaze can be drizzled on top just before serving. It adds a beautiful finish and enhances the overall presentation of the salad.
Step-by-Step Preparation
Preparing the Refreshing Watermelon & Feta Salad is a breeze, allowing you to enjoy this delightful dish with minimal effort. Follow these simple steps to create a salad that will impress your family and friends:
1. Select Your Watermelon: Choose a ripe, seedless watermelon with a uniform shape and a shiny skin. Look for a yellow spot on the rind, which indicates ripeness. Once selected, cut the watermelon in half and scoop out the flesh using a melon baller or knife. Cut the watermelon into bite-sized cubes and place them in a large mixing bowl.
2. Prepare the Feta Cheese: Crumble the feta cheese into small pieces. You can use store-bought feta or make your own by pressing the cheese to achieve the desired texture. Add the crumbled feta to the bowl with the watermelon.
3. Chop the Mint: Rinse fresh mint leaves under cold water to remove any dirt. Pat them dry with a paper towel and chop them coarsely. Add the chopped mint to the mixing bowl, ensuring you distribute the mint evenly throughout the salad.
4. Drizzle with Olive Oil: Pour a generous drizzle of extra virgin olive oil over the salad. This adds flavor and helps to meld the ingredients together.
5. Toss Gently: Using a large spoon or spatula, gently toss the ingredients to combine. Be careful not to mash the watermelon or feta; you want to maintain the integrity of the ingredients for a beautiful presentation.
6. Add Balsamic Glaze (Optional): If you choose to use balsamic glaze, drizzle it over the salad just before serving for an added layer of flavor and a touch of elegance.
7. Serve Immediately: This salad is best enjoyed fresh, so serve it immediately to ensure the flavors are at their peak. However, you can also refrigerate it for up to an hour before serving if you prefer it chilled.
Presentation Tips
To elevate the presentation of your Refreshing Watermelon & Feta Salad, consider the following tips:
– Use a Large Serving Bowl: A beautiful serving bowl can enhance the visual appeal of the salad, allowing the vibrant colors of the watermelon, feta, and mint to shine.
– Garnish with Whole Mint Leaves: For an added touch of elegance, garnish the salad with a few whole mint leaves on top. This not only enhances the presentation but also invites guests to enjoy the aromatic freshness of the mint.
– Serve with a Side of Lime Wedges: Accompany the salad with lime wedges for an extra citrusy kick. Guests can squeeze fresh lime juice over their portions to enhance the flavors even further.
Suggested Pairings and Serving Suggestions
The Refreshing Watermelon & Feta Salad pairs beautifully with a variety of summer dishes. Here are some suggested pairings:
– Grilled Meats: This salad complements grilled chicken, lamb, or seafood perfectly. The creamy feta and sweet watermelon balance the smoky flavors of grilled meats, making for a satisfying meal.
– Pasta Dishes: Serve the salad alongside light pasta dishes tossed in olive oil, garlic, and seasonal vegetables for a complete summer feast.
– Cold Beverages: Pair the salad with refreshing drinks like iced tea, lemonade, or a light white wine to enhance the overall dining experience.
By incorporating the Refreshing Watermelon & Feta Salad into your summer menu, you create a delightful dish that embodies the spirit of the season. Its combination of flavors and textures makes it a standout addition to any gathering, ensuring that everyone leaves satisfied and refreshed. Whether enjoyed as a light lunch or as a side dish at a barbecue, this salad is sure to become a favorite in your summer repertoire.
Stay tuned for the next section, where we’ll explore the savory and aromatic Grilled Lemon Herb Chicken Skewers, another fantastic recipe that captures the essence of summer cooking.
Pasta Choice and Cooking Tips for Al Dente Texture
When it comes to creating a refreshing watermelon and feta salad, the right pasta can elevate the dish to a new level. Opting for pasta like farfalle or penne not only adds a delightful texture but also complements the salad’s fresh flavors. To achieve that perfect al dente texture, follow these simple cooking tips:
1. Salt Your Water: Always start with a pot of well-salted boiling water. This not only flavors the pasta but also helps it cook evenly.
2. Timing is Key: Check the package instructions for cooking times, but start testing the pasta a minute or two before the recommended time. Al dente pasta should be firm to the bite but not hard.
3. Reserve Some Pasta Water: Before draining the pasta, reserve about a cup of the cooking water. This starchy water can be used later to adjust the consistency of your dressing or sauce if needed.
4. Shock in Cold Water: If you’re preparing your pasta ahead of time, immediately drain it and toss it in cold water to stop the cooking process. This prevents the pasta from becoming mushy when combined with the salad.
By mastering these techniques, your pasta will add a satisfying chewiness to the watermelon and feta salad, making every bite enjoyable.
Fresh Ingredients: The Role of Olives, Tomatoes, and Feta in Mediterranean Cuisine
The Mediterranean diet is celebrated for its vibrant flavors and fresh ingredients, and our watermelon and feta salad embraces this philosophy beautifully.
– Olives: Adding olives to the salad brings a briny flavor that contrasts perfectly with the sweetness of the watermelon. Varieties like Kalamata or Castelvetrano can enhance the dish with their rich, complex notes, providing a delightful balance.
– Tomatoes: Ripe, juicy tomatoes are another staple in Mediterranean cuisine that can elevate your salad. Their acidity and sweetness complement the watermelon, while their vibrant color adds visual appeal. Choose heirloom or cherry tomatoes for an extra burst of flavor and color.
– Feta Cheese: Feta is quintessential in Mediterranean salads, offering a creamy texture and a tangy flavor that pairs seamlessly with both watermelon and olives. For the best results, opt for high-quality feta, preferably from sheep’s milk, as it provides a richer taste.
Incorporating these ingredients not only enhances the flavor profile of your salad but also aligns with the health benefits of the Mediterranean diet, which emphasizes fresh, nutrient-dense foods.
Dressing Preparation and Its Impact on Flavor
The dressing is the heart of any salad, and for the watermelon and feta salad, a light vinaigrette is ideal to enhance the freshness without overwhelming the dish. Here’s a simple yet flavorful dressing recipe:
Ingredients for the Dressing:
– 3 tablespoons extra virgin olive oil
– 1 tablespoon white balsamic vinegar (or red wine vinegar)
– 1 teaspoon honey or agave syrup (optional for sweetness)
– Salt and freshly cracked black pepper to taste
Instructions:
1. Whisk Together: In a small bowl, combine the olive oil, vinegar, and honey. Whisk until the mixture is emulsified.
2. Seasoning: Add salt and pepper to taste, adjusting based on your preference. The goal is to create a dressing that balances the sweetness of the watermelon and the saltiness of the feta.
3. Taste Test: Always taste your dressing before adding it to the salad. This ensures that the flavor is just right.
Drizzling this dressing over your salad just before serving will enhance every bite, bringing harmony to the contrasting flavors of sweet watermelon and savory feta.
Serving Suggestions for Gatherings
This refreshing watermelon and feta salad is perfect for summer gatherings, barbecues, or picnics. Here are some tips to make it even more appealing for your guests:
– Layering: For an impressive presentation, consider layering the salad ingredients in a large glass bowl or individual serving glasses. This creates a stunning visual effect and encourages guests to dig in.
– Garnish: Fresh herbs like mint or basil can be sprinkled on top just before serving for added color and aroma. Edible flowers can also be a delightful touch, enhancing the garden-fresh feel of the salad.
– Pairing: This salad pairs beautifully with grilled meats, such as lemon dill roasted salmon or chicken skewers. Offering complementary dishes will create a cohesive and satisfying meal.
– Portioning: For casual gatherings, consider serving the salad in individual portions. This makes it easy for guests to help themselves without needing serving utensils.
Citrus Grilled Salmon with Asparagus
Salmon is a fantastic protein option for a summer meal, especially when it’s grilled. Here’s how you can incorporate it into your gathering.
The Health Benefits of Salmon and Grilling Methods
Salmon is not only delicious but also packed with health benefits. Rich in omega-3 fatty acids, it supports heart health, brain function, and has anti-inflammatory properties. Grilling is an excellent cooking method as it enhances the natural flavors while keeping the fish moist.
Ingredient Breakdown:
– Fresh salmon fillets (6 ounces each)
– Olive oil (for brushing)
– Fresh lemon juice (2 tablespoons)
– Zest of 1 lemon
– Fresh herbs (dill, parsley, or thyme)
– Salt and pepper to taste
– Asparagus spears (trimmed)
Citrus Marinade: The Importance of Acidity and Flavor Balance
To prepare the salmon, create a citrus marinade that will infuse the fish with flavor.
1. Combine Ingredients: In a bowl, mix olive oil, lemon juice, lemon zest, and chopped fresh herbs. Season with salt and pepper.
2. Marinate: Place the salmon fillets in a dish and pour the marinade over them. Let them sit for at least 30 minutes (or up to 2 hours) in the refrigerator. This allows the citrus to penetrate the fish, enhancing its flavor.
Asparagus: Seasonal Vegetable Benefits and Cooking Tips
Asparagus is a wonderful seasonal vegetable that complements the grilled salmon beautifully. It’s rich in vitamins A, C, E, and K, and full of fiber.
Cooking Tips:
– Preparation: Trim the ends of the asparagus and rinse them under cold water. Pat dry before grilling.
– Seasoning: Toss the asparagus with olive oil, salt, and pepper before grilling to enhance its natural flavors.
Grilling Techniques for Perfect Salmon and Asparagus
1. Preheat the Grill: Ensure your grill is preheated to medium-high heat to achieve those beautiful grill marks.
2. Grill the Salmon: Place the salmon skin-side down on the grill. Cook for about 6-8 minutes on one side, then carefully flip and grill for an additional 3-4 minutes until cooked through.
3. Grill the Asparagus: Add the asparagus to the grill during the last 5-6 minutes of the salmon’s cooking time, turning occasionally until tender and slightly charred.
Ideas for Complementing Sides or Salads
To create a well-rounded meal, consider serving the citrus grilled salmon and asparagus alongside the watermelon and feta salad. Other side options include:
– Quinoa salad with vegetables and herbs
– Roasted baby potatoes with garlic and rosemary
– Couscous with roasted peppers and olives
Caprese Stuffed Avocados
Avocados are in vogue for summer recipes, and the Caprese stuffed avocado is a perfect dish to highlight their creamy texture.
Ingredient Breakdown:
– Ripe avocados (halved and pitted)
– Cherry tomatoes (halved)
– Fresh mozzarella balls (bocconcini)
– Fresh basil leaves
– Balsamic glaze (for drizzling)
– Olive oil, salt, and pepper
Fresh Mozzarella and Basil: Essential Components of a Classic Caprese
The fresh mozzarella and basil are what make this dish a true Caprese. Mozzarella adds creaminess while basil contributes a fragrant aroma that complements the dish perfectly.
Preparation Tips and Presentation Ideas
1. Scoop and Stuff: Gently scoop out a bit of the avocado flesh to create more space for the filling. Then, mix the tomatoes, mozzarella, and basil in a bowl. Drizzle with olive oil and season with salt and pepper before stuffing the mixture back into the avocado halves.
2. Drizzle with Balsamic Glaze: Finish with a light drizzle of balsamic glaze for sweetness and acidity, enhancing the overall flavor.
3. Serve Beautifully: Arrange the stuffed avocados on a platter, garnishing with additional basil leaves for a stunning presentation.
Pairing Suggestions for a Complete Meal
To round out your meal, consider adding a crusty bread or a light pasta dish. The stuffed avocados can serve as a starter or a side, ensuring your guests enjoy a balanced and colorful plate.
Spicy Shrimp and Vegetable Stir-Fry
For a quick and flavorful weeknight meal, look no further than a spicy shrimp and vegetable stir-fry.
Quick Cooking Methods for Weeknight Meals
Stir-frying is a fast cooking method that locks in flavor and nutrients, making it ideal for busy weeknights.
Ingredient Breakdown:
– Fresh shrimp (peeled and deveined)
– Bell peppers (sliced)
– Broccoli florets
– Snap peas
– Garlic (minced)
– Sriracha (for spice)
– Soy sauce and sesame oil
The Importance of Fresh Vegetables in Stir-Fries
Utilizing fresh vegetables not only adds color and texture but also enhances the nutritional value of your dish. The crunch of bell peppers and the tender broccoli create a satisfying contrast with the shrimp.
Spice Level Management with Sriracha and Alternatives
When it comes to spice, sriracha is a fantastic option, though you can adjust the heat level based on your preference. For a milder flavor, consider using less sriracha or substituting it with a sweet chili sauce.
Stir-Frying Techniques for Optimal Texture
1. High Heat: Use a wok or large skillet preheated over high heat. This ensures a quick cook time and prevents the vegetables from becoming soggy.
2. Cook in Batches: Avoid overcrowding the pan, as this will lower the temperature and result in steaming rather than stir-frying. Cook the shrimp first, set them aside, then add vegetables to the pan.
Serving Suggestions with Rice or Noodles
Serve your spicy shrimp and vegetable stir-fry over steamed rice or noodles for a complete meal. Garnish with sesame seeds and chopped green onions for an added touch.
Grilled Vegetable Flatbreads with Hummus
Embrace summer cooking with grilled vegetables, which shine in this grilled vegetable flatbread dish.
Ingredient Breakdown:
– Assorted vegetables (zucchini, bell peppers, eggplant)
– Olive oil, salt, and pepper
– Flatbreads (store-bought or homemade)
– Hummus (store-bought or homemade)
The Appeal of Grilled Vegetables in Summer Cooking
Grilled vegetables are not only flavorful but also bring a smoky depth to dishes that highlight their natural sweetness.
Hummus: The Nutritional Benefits and Making It From Scratch
Hummus is a nutritious option that provides fiber and protein. Making it from scratch is simple; blend chickpeas, tahini, lemon juice, garlic, and olive oil until smooth. Adjust with water for desired consistency.
Grilling Techniques for Vegetables and Bread
1. Preheat the Grill: Ensure your grill is hot before adding vegetables to get those attractive char marks.
2. Grill the Vegetables: Toss your vegetables in olive oil, salt, and pepper, then grill them until tender and slightly charred, about 5-10 minutes.
3. Grill the Flatbreads: After the vegetables, quickly grill the flatbreads just until warm and slightly crispy, about 1-2 minutes on each side.
Ideas for Customization and Garnishing
Feel free to customize your flatbreads with different toppings, such as feta cheese, olives, or a drizzle of balsamic reduction for added flavor. Fresh herbs like parsley or cilantro can also enhance the dish.
Chilled Gazpacho Soup
As temperatures rise, chilled soups like gazpacho become a refreshing choice.
The Refreshing Nature of Cold Soups in Summer
Cold soups are perfect for hot summer days, providing hydration while being light and refreshing.
Ingredient Breakdown:
– Ripe tomatoes
– Cucumber
– Bell pepper
– Red onion
– Garlic
– Olive oil, vinegar, and seasoning
The Role of Fresh Tomatoes and Seasonal Vegetables
Using fresh, seasonal tomatoes is crucial to achieving a rich and flavorful gazpacho. The combination of vegetables creates a vibrant and nutrient-rich dish.
Blending Techniques for a Smooth Texture
1. Blend in Batches: If you have a large quantity, blend in smaller batches to ensure everything is evenly pureed.
2. Adjust Consistency: If your gazpacho is too thick, add a bit of chilled water or vegetable broth until you reach the desired consistency.
Garnishing Ideas and Serving Suggestions
Serve your gazpacho chilled, garnished with diced vegetables or croutons for texture. A drizzle of olive oil on top adds a touch of richness.
Lemon Dill Roasted Potatoes
Roasted vegetables bring charm to summer meals, and lemon dill roasted potatoes are a delightful option.
Ingredient Breakdown:
– Baby potatoes (halved)
– Olive oil, lemon juice, and zest
– Fresh dill
– Salt and pepper
Baby Potatoes: Their Flavor and Preparation Tips
Baby potatoes are tender and flavorful. Parboil them briefly before roasting to ensure they are cooked through and crispy.
Dill: Enhancing the Dish With Fresh Herb Flavors
Dill adds a bright, herby flavor that complements the roasted potatoes beautifully. Use fresh dill for the best flavor.
Roasting Techniques for Achieving the Perfect Texture
1. High Heat: Roast at a high temperature (around 425°F or 220°C) to achieve a crispy exterior.
2. Tossing: Toss the potatoes in olive oil, lemon juice, and seasoning, then spread them in a single layer on a baking sheet for even roasting.
Ideas for Pairing with Grilled Meats or Fish
These roasted potatoes pair well with grilled meats,