

Indulge in a Crunchy, Cheesy Delight That You Can Make at Home!
—
Introduction
Picture this: the golden sun dipping below the horizon, casting a warm glow over your backyard barbecue. The air is filled with the intoxicating scent of sizzling burgers and fresh-cut grass, but there’s one sound that pulls you away from the main event—the unmistakable crunch of crispy onion rings being pulled from the fryer. I can still hear the laughter of my friends as they gathered around the table, eagerly reaching for those perfectly battered rings, the Parmesan cheese glistening under the lights, a promise of flavor in every bite.
It was one of those carefree summer evenings where food became the centerpiece of joy—a moment where onion rings transformed from mere appetizers into cherished memories. As I watched everyone savoring the rings, I realized that this crunchy bite of heaven was not just a side dish but the ultimate companion to any gathering. Fast forward to today, and I’m here to share a twist on that classic: Crispy Onion Rings Parmesan made effortlessly in an air fryer. With a mere 40 minutes from prep to plate, you’ll find that these onion rings don’t just satisfy cravings; they spark nostalgia wrapped in a delicious crunch.
Let’s dive into the details, and you’ll see how simple it is to recreate that memorable dish while keeping your kitchen cool and your taste buds dancing!
—
Why This Recipe Works
The beauty of these Crispy Onion Rings Parmesan lies not just in their delightful crunch but also in the careful balance of flavors and textures that make each bite a celebration. The smoked paprika and garlic powder work harmoniously, infusing the rings with a depth of flavor that complements the natural sweetness of the red onions. By soaking the onion rings in buttermilk, you’re not only tenderizing the onions but also adding a tangy richness that elevates the overall taste profile.
The air fryer is a game changer here. Unlike traditional frying, which can leave you with greasy fingers and an oily kitchen, the air fryer uses hot air circulation to achieve that coveted crispiness with far less oil—just a drizzle of olive oil before cooking does the trick! The Panko breadcrumbs add an extra crunch factor that ordinary breadcrumbs simply can’t match. When combined with the Parmesan cheese, they create a crunchy exterior that contrasts beautifully with the tender onion interior.
Each ingredient plays a critical role in the final result. The onions bring sweetness and moisture, the flour acts as a glue for the coatings, and the cheese adds umami and depth. What sets these onion rings apart from your typical diner fare is the air frying method, which offers a lighter, healthier take without sacrificing the satisfaction of biting into a crispy, cheesy snack. The result? An appetizer that delights your taste buds while keeping your waistline in check, making it perfect for any occasion.
—
What Makes It Special
– Healthier Option: Unlike the deep-fried versions you’d find at restaurants, these onion rings are air-fried, significantly reducing the fat content while still delivering that satisfying crunch. You can enjoy them guilt-free!
– Customization Potential: One of my favorite aspects of making these at home is the freedom to customize. Feel like kicking it up a notch? Add cayenne for a spicy kick or switch up the cheese to cheddar for a different flavor profile. You’re in control!
– Freshness Factor: There’s something undeniably satisfying about biting into a freshly made onion ring. You can taste the vibrant flavors of the red onion, which might get lost in store-bought versions. Plus, you can whip these up whenever the craving strikes!
– Invite Others to Join: Making these onion rings can be a fun cooking experience with family and friends. Set up a dredging station and let everyone join in on the fun, creating a lovely shared experience that’s just as delicious as the result.
—
Ingredient Breakdown
– Red Onions: These are the stars of the dish. Their natural sweetness contrasts beautifully with the salty Parmesan and the crunchy coating. The quantity matters here—two large onions yield enough rings to serve as a satisfying appetizer for four people.
– All-Purpose Flour: This forms the first layer of coating, providing a base that helps the buttermilk and the final breadcrumb mixture adhere to the onions. It also contributes to the overall crunchiness when cooked.
– Buttermilk: Soaking the onion rings in buttermilk not only adds moisture but also tenderizes them. This step is crucial for maximizing flavor; if you don’t have buttermilk, you can easily make a substitute by mixing milk with a tablespoon of vinegar or lemon juice.
– Panko Breadcrumbs: These Japanese-style breadcrumbs are the secret to that extra crunch. They are lighter and flakier than regular breadcrumbs, creating a perfect crispy exterior. If you can’t find Panko, regular breadcrumbs can work, but the texture won’t be quite the same.
– Parmesan Cheese: The star of the flavor game! The grated Parmesan adds saltiness and a nutty flavor that enhances the overall dish. Using freshly grated cheese is a game changer in terms of flavor, so consider investing in a good quality block of cheese.
– Smoked Paprika, Garlic Powder, Dried Oregano: These spices bring warmth and depth to the dish. Smoked paprika adds a hint of smokiness that pairs well with the sweetness of the onions, while garlic powder and oregano add a herby note that ties everything together.
– Olive Oil: A light drizzle of olive oil before air frying ensures a crispy exterior without the need for deep frying. You can use other oils like avocado oil if preferred.
– Salt and Pepper: These are essential for enhancing all the flavors. Always taste and adjust as needed to ensure the perfect balance.
Substitutions: If you’re looking for dairy-free options, you might replace the buttermilk with a plant-based milk mixed with vinegar. For gluten-free versions, you can substitute the all-purpose flour with almond flour or a gluten-free flour blend.
For those on a vegan diet, consider using a vegan cheese alternative and omitting the egg in the dredging step.
—
Equipment Needed
– Air Fryer: This is the star of the show, allowing you to achieve that deep-fried crispiness without the excess oil. If you don’t have an air fryer, you can use a conventional oven, but the texture will vary.
– Shallow Bowls: You’ll need these for breading the onion rings. Make sure they are wide enough to accommodate the rings comfortably for even coating.
– Tongs: Essential for flipping the onion rings halfway through cooking and for handling them without crushing their delicate coating.
– Baking Sheet (optional): If you prefer, you can place the cooked onion rings on a baking sheet to keep them warm while you finish cooking the rest.
– Cutting Board and Knife: For slicing your onions into perfect rings. A sharp knife will make this task much easier!
– Whisk: This is helpful for mixing the flour and spices evenly, ensuring every onion ring gets a taste of all those wonderful flavors.
– Measuring Cups and Spoons: Precision is key in cooking, so have these handy to measure out your ingredients accurately.
Feel free to get creative with your cooking setup, but having the right tools will streamline the process and help you achieve the best results!
Step-by-Step Instructions
1. Soak the Onion Rings
Start by slicing your two large red onions into thick rings, about half an inch wide. Then, place these rings into a bowl and pour in the buttermilk until they are fully submerged. Let them soak for at least 10 minutes. This step is crucial as the buttermilk helps to tenderize the onions while adding a subtle tangy flavor. You’ll know they’re ready when they look plump and slightly softened.
2. Prepare the Seasoned Flour
In a shallow bowl, combine 1 cup of all-purpose flour, 1 teaspoon of smoked paprika, 1 teaspoon of garlic powder, 1 teaspoon of dried oregano, and a pinch of salt and pepper. Use a whisk or fork to blend these ingredients until they are evenly mixed. The key here is to ensure that each onion ring will be well-coated with this flavorful mixture, enhancing the overall taste. Take a moment to inhale the aromatic blend – you should smell the warmth of the spices!
3. Dredge the Onion Rings
Once your onion rings have soaked, remove them from the buttermilk, allowing any excess to drip off. Now, take each ring and dredge it in the seasoned flour mixture, ensuring that it’s evenly coated. Shake off any excess flour before moving to the next step. This process will create a base that clings well to the onion rings, providing a crispy texture once fried. You want them to be coated but not caked in flour.
4. Double-Dip for Extra Crunch
After dredging in flour, dip the coated onion rings back into the buttermilk. This step may seem repetitive, but it’s essential for achieving that extra crunch that Panko breadcrumbs provide. After dipping, transfer the rings to a plate with a mixture of 1 cup of Panko breadcrumbs and 1/2 cup of grated Parmesan cheese. Press firmly to ensure the breadcrumb mixture adheres well to each ring. The combination of textures here will yield a delightful crunch.
5. Preheat the Air Fryer
While you’re preparing the onion rings, preheat your air fryer to 400°F (200°C). This temperature will ensure that your onion rings cook evenly and become crispy without absorbing too much oil. You should hear a slight sizzle when you place the rings inside – that’s a good sign that they’re cooking perfectly!
6. Arrange and Drizzle
Once preheated, carefully arrange the onion rings in a single layer in the air fryer basket, making sure they’re not overcrowded to allow for proper air circulation. Lightly drizzle them with 2 tablespoons of olive oil — this helps achieve that golden color and crispy texture. Keep an eye on the time, as you’ll cook them for 15 minutes, flipping them halfway through. You’ll want to check for a golden-brown hue, which indicates they’re nearing perfection.
7. Cool and Serve
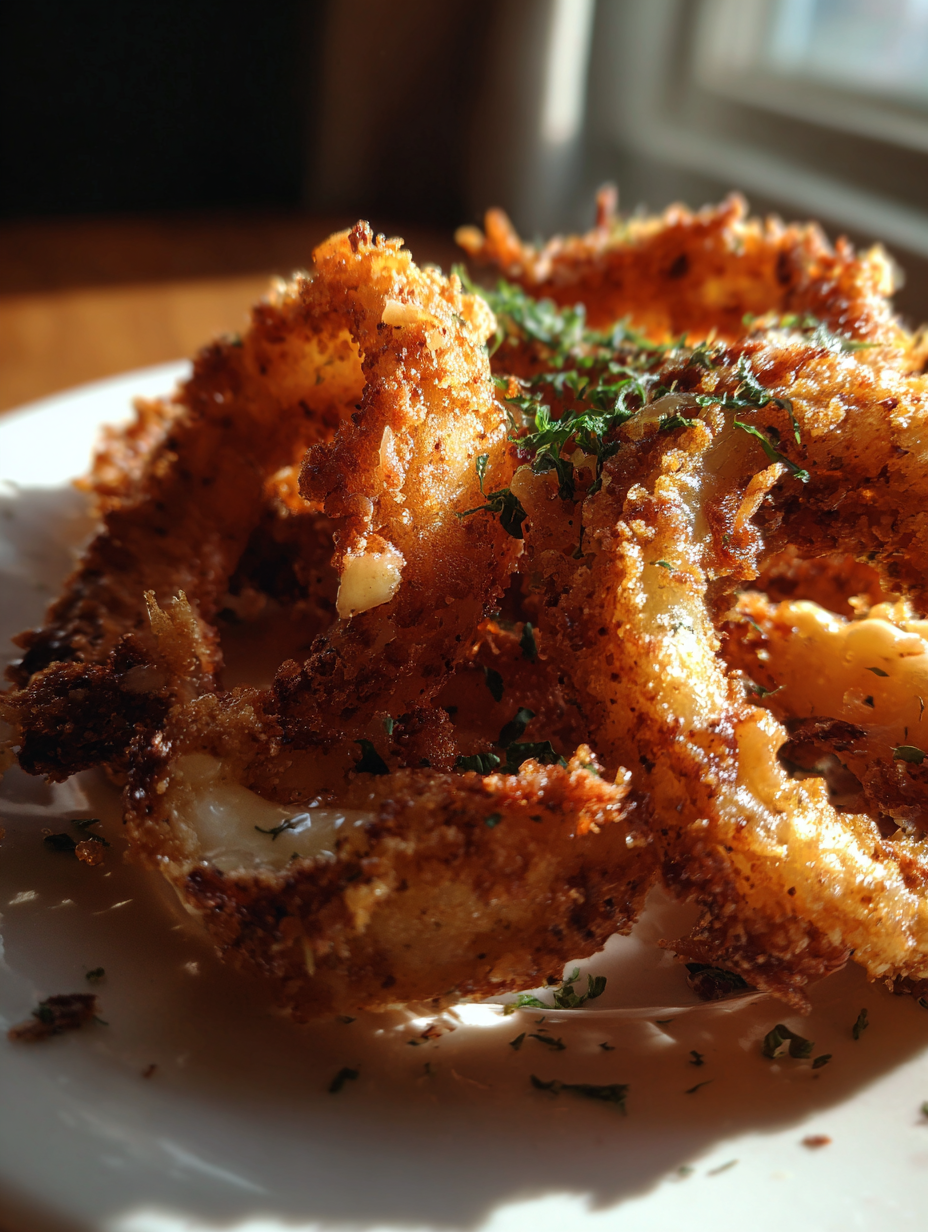
After 15 minutes, carefully remove the crispy onion rings from the air fryer. They should be beautifully golden and have a satisfying crunch when you tap them. Let them cool slightly on a wire rack for a few minutes; this ensures they don’t steam and lose their crispiness. Serve warm, paired with your favorite dipping sauce, like marinara or ranch. The aroma will be irresistible, and the flavors will delight your palate!
Chef’s Note: If you’re making a larger batch, keep the first batch warm in a low oven while you finish cooking the rest to ensure they all stay crispy until serving.
Pro Tips for the Best Results
1. Use Fresh Ingredients
Always opt for fresh red onions rather than older ones. Fresh onions have a sweeter, milder flavor, which translates to a better-tasting ring. Additionally, fresh Panko breadcrumbs will provide a superior crunch compared to stale ones.
2. Don’t Skip the Soaking
The buttermilk soak isn’t just for flavor; it also helps the flour and breadcrumbs stick better. If you’re in a hurry, let them soak for at least 5 minutes, but 10 is ideal for the best texture.
3. Keep Your Air Fryer Clean
To get the best results, ensure your air fryer basket is clean before cooking. Any leftover residue from previous meals can affect the taste and texture of your onion rings.
4. Adjust Cooking Times for Thickness
Depending on how thick you cut your onion rings, cooking times may vary slightly. Thicker rings may need an additional 2-5 minutes. Keep an eye on them, and look for that golden color as an indicator of doneness.
5. Experiment with Seasonings
Don’t hesitate to play around with the seasonings in the flour mixture. Adding a pinch of cayenne pepper or Italian herbs can elevate the flavor profile and give your onion rings a unique twist.
6. Use a Wire Rack
If you’re making multiple batches, consider placing the cooked onion rings on a wire rack instead of stacking them on a plate. This prevents them from steaming and losing their crispy texture.
7. Store Properly
If you have leftovers, store them in an airtight container in the fridge. For reheating, use the air fryer for a few minutes to restore their crispy goodness instead of microwaving them, which can make them soggy.
Common Mistakes to Avoid
1. Skipping the Soak
Many home cooks skip soaking onion rings in buttermilk, thinking it’s unnecessary. This can lead to a dry texture and less flavor. Always allow them to soak; it’s worth the wait for a juicier bite!
2. Overcrowding the Air Fryer
Placing too many rings in the air fryer at once can result in uneven cooking. The hot air needs to circulate freely around each ring to achieve that perfect crunch. Always work in batches if necessary.
3. Not Preheating the Air Fryer
Forgetting to preheat your air fryer can lead to soggy onion rings. Preheating ensures they start cooking immediately and evenly, yielding a crispier result.
4. Using Regular Breadcrumbs
Using regular breadcrumbs instead of Panko will result in a less crunchy texture. Panko is lighter and crispier, providing that delightful crunch that is essential for great onion rings.
5. Not Drizzling with Oil
Skipping the drizzle of olive oil can lead to dry onion rings. The oil helps the crumbs adhere and creates a crispy outer layer, so don’t skip this step!
6. Ignoring the Cooking Time
Overcooking can lead to burnt onion rings, while undercooking leaves them soggy and raw inside. Always keep an eye on the time and check for that golden color as your cue.
Creative Variations
1. Seasonal Variation
Pumpkin Spice Onion Rings: In the fall, mix 1 teaspoon of pumpkin spice into your seasoned flour. This gives a delightful twist, combining the savory onion flavor with a hint of sweetness that’s perfect for the season.
2. Dietary-Friendly Version
Vegan Onion Rings: Substitute buttermilk with plant-based milk (like almond milk) mixed with a tablespoon of lemon juice for acidity. Use a vegan Parmesan alternative to keep these rings dairy-free while still satisfying.
3. Gourmet Elevated Version
Truffle Parmesan Onion Rings: Drizzle your coated onion rings with a little truffle oil before cooking, and top with fresh chopped parsley after they come out of the air fryer. This adds an elegant touch that elevates your appetizer to gourmet status.
4. Quick 15-Minute Version
Speedy Onion Rings: If you’re short on time, use store-bought frozen onion rings. Simply toss them in a mixture of grated Parmesan and spices before air frying according to package instructions. This cuts down on prep time significantly!
5. Kid-Friendly Version
Cheesy Ranch Onion Rings: Mix ranch seasoning into the Panko and Parmesan mixture and serve with a side of ranch dressing for dipping. Kids love the familiar flavor, and it makes for a fun, interactive snack.
6. International Twist
Indian-Spiced Onion Rings: Add 1 tablespoon of garam masala and 1 teaspoon of cumin to the flour mixture. Serve with a tangy yogurt dip or mint chutney for a flavorful, Indian-inspired appetizer that packs a punch.
Serving Ideas
When it comes to plating your Crispy Onion Rings Parmesan, let your creativity shine! Here are a few inspiring serving ideas that will elevate your dish:
1. Garnish with Fresh Herbs: Sprinkle finely chopped parsley or chives over the onion rings just before serving. The vibrant greens will add a pop of color and a fresh flavor that complements the savory crunch of the rings.
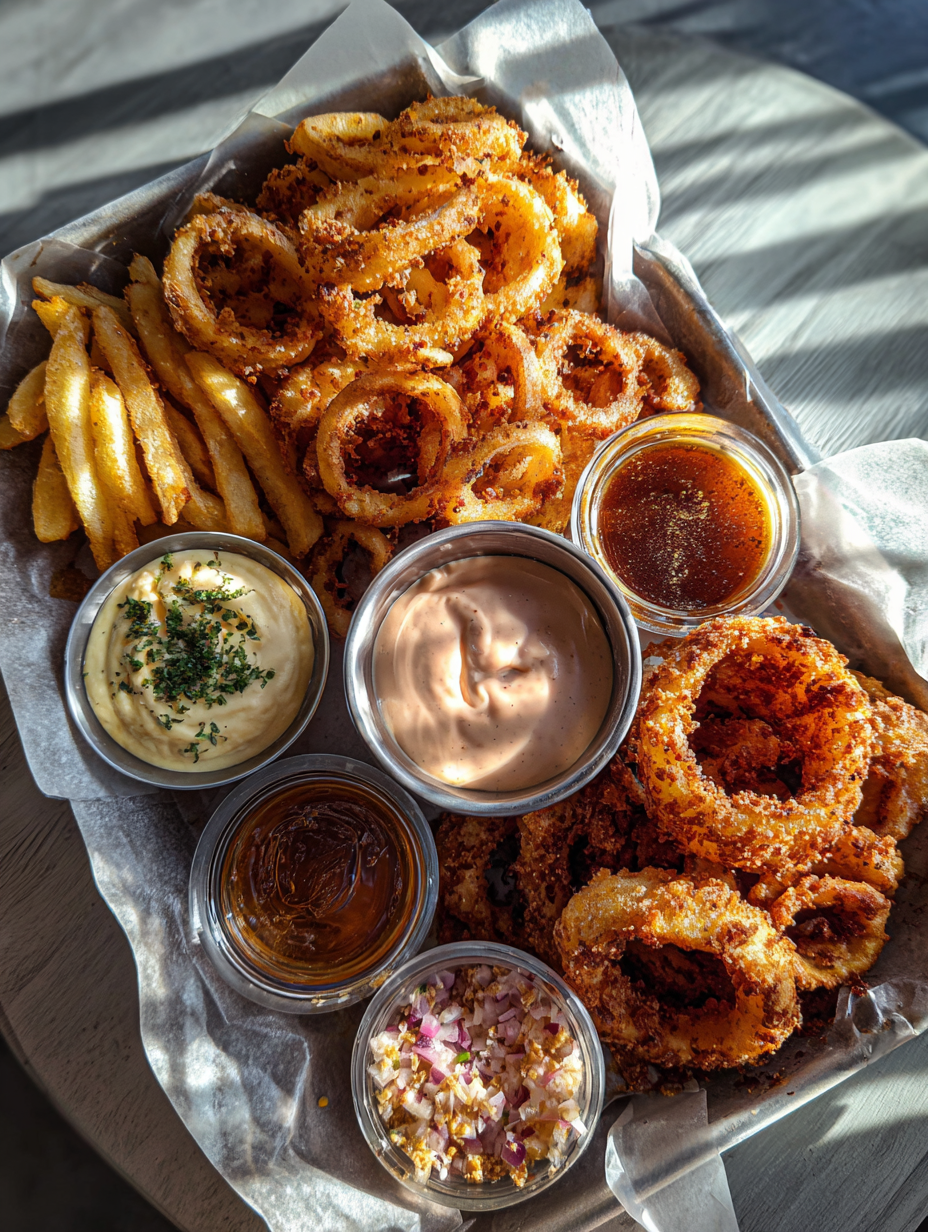
2. Present on a Rustic Wooden Board: Arrange the onion rings on a large wooden board, interspersed with small bowls of dipping sauces like marinara and ranch. This creates a communal feel, perfect for sharing, and showcases the rings beautifully.
3. Use a Tiered Serving Stand: For a more elegant touch, stack your onion rings on a tiered serving stand. This not only maximizes presentation space but also draws the eye upward, making your appetizer the star of the table.
4. Serve in Cones: Place individual onion rings in paper cones or small cups, garnished with a sprinkle of extra Parmesan. This playful presentation is perfect for parties, allowing guests to grab and go.
5. Plate with Colorful Vegetables: Surround your onion rings with slices of fresh bell peppers and carrot sticks for a visually appealing contrast. The bright colors will make the dish pop, and the crunchy veggies will enhance the overall texture experience.
Aim for about 5-6 onion rings per serving as a perfect portion for an appetizer. With these presentation tips, your Crispy Onion Rings Parmesan will be as delightful to the eye as they are to the palate!
What to Serve With
Pairing your Crispy Onion Rings Parmesan with complementary dishes can make the meal feel more complete and satisfying. Here are some excellent options:
1. Classic Burger: A juicy beef burger topped with fresh lettuce, ripe tomatoes, and your favorite cheese creates a hearty contrast to the crispy texture of the onion rings. The richness of the burger complements the savory flavor of the rings beautifully.
2. Caesar Salad: The creamy dressing and crisp romaine lettuce in a Caesar salad provide a refreshing contrast to the crunchy onion rings. Plus, the garlic notes in the dressing harmonize well with the seasonings on the rings.
3. Spicy Buffalo Wings: The heat from spicy buffalo wings pairs perfectly with the cool, creamy ranch you might serve with your onion rings. This combination balances the flavors and textures for an indulgent snack spread.
4. Craft Beer or Sparkling Water: A cold, crisp lager or a refreshing sparkling water will cleanse your palate between bites. The carbonation contrasts nicely with the crunchy rings, enhancing your tasting experience.
5. Lemon Garlic Pasta: A light lemon garlic pasta adds a zesty flair to your meal. The citrus notes refresh the palate after each bite of the rich, cheesy onion rings.
6. Chocolate Mousse: For dessert, a rich chocolate mousse provides a delightful contrast to the savory appetizer. The silky texture and deep chocolate flavor will satisfy your sweet tooth after indulging in crispy goodness.
These pairings will not only enhance your culinary experience but also create a delightful balance of flavors, textures, and colors.
Storage Guide
To properly store any leftover Crispy Onion Rings Parmesan, follow these guidelines:
– Container: Use an airtight container made of glass or BPA-free plastic to keep your onion rings fresh. This helps prevent moisture from making the rings soggy.
– Temperature: Store them in your refrigerator, ideally at a temperature of 40°F (4°C).
– Shelf Life: Properly stored, your onion rings will keep for about 3-4 days. After this point, they may lose their texture and flavor.
– Signs of Spoilage: If you notice any unusual odors, discoloration, or a slimy texture, it’s best to discard the rings to ensure your safety.
– Refreshing Before Serving: To restore their original crispness, reheat the onion rings in your air fryer at 350°F (175°C) for about 5-7 minutes. This will help revive their crunch without compromising flavor.
By following these storage tips, you can enjoy your delicious onion rings even days after they’ve been made!
Freezing Tips
Crispy Onion Rings Parmesan can freeze well if you plan to save some for later. Here’s how to do it right:
– Portioning: Before freezing, ensure the onion rings are completely cooled. Arrange them in a single layer on a baking sheet and freeze until firm, about 1-2 hours.
– Wrapping Method: Once frozen, transfer the onion rings to a freezer-safe zip-top bag or an airtight container, ensuring to remove as much air as possible to prevent freezer burn.
– Labeling: Don’t forget to label your container with the date so you can track how long they’ve been stored.
– Freezer Life: They will keep well for about 2-3 months.
– Quality Changes: After thawing, the texture may be slightly less crispy, but reheating them in the air fryer can help restore some of that crunch.
– Thawing Method: For best results, thaw your onion rings overnight in the refrigerator before reheating. This will help maintain their structure and flavor.
With these freezing tips, you can enjoy your crispy delights whenever the craving strikes!
Reheating Guide
Reheating your Crispy Onion Rings Parmesan requires a bit of care to ensure they maintain their original deliciousness. Here’s how to do it using different methods:
– Microwave: Place the onion rings on a microwave-safe plate. Heat on medium power (50%) for about 1-2 minutes, checking halfway through. To prevent drying out, place a damp paper towel over the rings while microwaving.
– Oven: Preheat your oven to 375°F (190°C). Place the onion rings on a baking sheet in a single layer. Bake for about 8-10 minutes, flipping them halfway through. You can cover them loosely with foil to prevent excessive browning.
– Stovetop: Heat a non-stick skillet over medium-low heat. Add a tiny splash of water to create steam, then cover the skillet and heat for about 3-5 minutes. This method helps to restore some moisture while heating.
To refresh the original texture and flavor, the air fryer method is the most effective. Simply reheat them at 350°F (175°C) for about 5-7 minutes until they’re crispy again!
Nutrition Overview
Your Crispy Onion Rings Parmesan aren’t just a tasty treat — they also offer some nutritional benefits. Here’s a quick overview:
– Calories: Approximately 240 calories per serving.
– Protein: About 6 grams, thanks to the Parmesan and the all-purpose flour.
– Carbohydrates: Around 30 grams, mainly from the flour and onions.
– Fat: Roughly 10 grams, primarily from the olive oil and cheese.
– Fiber: About 2 grams, contributing to your daily fiber intake.
– Sugar: Minimal, around 2 grams, which is naturally occurring in the onions.
Key ingredients like onions provide antioxidants and have anti-inflammatory properties, while Parmesan cheese adds calcium and protein. Enjoying these onion rings can be a delightful way to indulge without compromising on nutrition. They make for a fun party snack or a homey appetizer that doesn’t skimp on flavor!
Frequently Asked Questions
Q: Can I use yellow or white onions instead of red onions?
A: Absolutely! While red onions offer a milder, sweeter flavor, yellow or white onions can be used for a sharper taste. Both will still provide delicious crunch and flavor in your onion rings.
Q: How can I make this recipe gluten-free?
A: To make gluten-free onion rings, substitute the all-purpose flour with a gluten-free flour blend and use gluten-free Panko breadcrumbs. The texture and flavor will remain delightful!
Q: What can I use instead of buttermilk?
A: If you don’t have buttermilk on hand, you can easily make a substitute by mixing 1/2 cup of milk with 1/2 tablespoon of vinegar or lemon juice. Let it sit for about 5-10 minutes until it thickens slightly.
Q: Can I make these onion rings in an oven instead of an air fryer?
A: Yes! To bake them, preheat your oven to 425°F (220°C) and arrange the coated onion rings on a baking sheet lined with parchment paper. Bake for about 20-25 minutes, flipping halfway through for even browning.
Q: How do I know when my onion rings are done cooking?
A: Your onion rings are done when they are golden brown and crispy. Keep an eye on them during the last few minutes of cooking to avoid over-browning.
Q: Can I prepare the onion rings ahead of time?
A: Yes! You can coat the onion rings and store them in the refrigerator for a few hours before cooking. Just be sure to cover them to prevent drying out.
Q: What dipping sauces pair best with onion rings?
A: Popular dipping sauces include Ranch, Marinara, and Chipotle Aioli. Each offers a different flavor profile that pairs wonderfully with the crunchy rings.
Q: Can I add spices to the coating for extra flavor?
A: Absolutely! Feel free to experiment with spices like cayenne pepper for heat, or Italian seasoning for a more herbaceous flavor. Tailor the recipe to suit your taste preferences!
Final Thoughts
Whipping up a batch of Crispy Onion Rings Parmesan is not just about creating a savory snack; it’s about the joy of sharing a delightful experience with family and friends. Remember to soak the onion rings in buttermilk for that perfect tenderness and flavor absorption. Don’t hesitate to play around with spices and dipping sauces to personalize the dish to your liking.
I can’t wait for you to try this recipe and see how much you enjoy the crispy, cheesy goodness! If you do make them, please share your results — I’d love to hear how they turned out. Now, gather your ingredients and let’s get cooking!
Crispy Onion Rings Parmesan Recipe (Air Fryer Appetizer) 🧅🧀
Ingredients
- 2 large red onions sliced into rings
- 1 cup all-purpose flour for coating
- 1/2 cup buttermilk for soaking
- 1 cup Panko breadcrumbs for extra crunch
- 1/2 cup Parmesan cheese grated
- 1 teaspoon smoked paprika for flavor
- 1 teaspoon garlic powder
- 1 teaspoon dried oregano
- 2 tablespoons olive oil for drizzling
- salt and pepper to taste
Instructions
- Begin by soaking the sliced red onion rings in buttermilk for at least 10 minutes to tenderize and enhance flavor.
- In a shallow bowl, combine the flour, smoked paprika, garlic powder, oregano, salt, and pepper. Mix well.
- Remove the onion rings from the buttermilk and dredge them in the seasoned flour, shaking off any excess.
- Next, dip the floured onion rings back into the buttermilk before coating them in a mixture of Panko breadcrumbs and grated Parmesan cheese.
- Preheat the air fryer to 400°F (200°C). Arrange the coated onion rings in a single layer in the air fryer basket, lightly drizzle with olive oil.
- Cook for 15 minutes, flipping halfway through, until golden and crispy. Keep an eye on them to avoid overcooking.
- Once cooked, remove the onion rings from the air fryer and let them cool slightly before serving.
- Serve warm with your favorite dipping sauce, such as marinara or ranch, for an added flavor boost.
Notes
Tip 2: Store leftovers in an airtight container in the refrigerator and reheat in the air fryer for best results.
Variation: Try using different types of cheese like cheddar or adding spices like cayenne for heat.