

About This Recipe
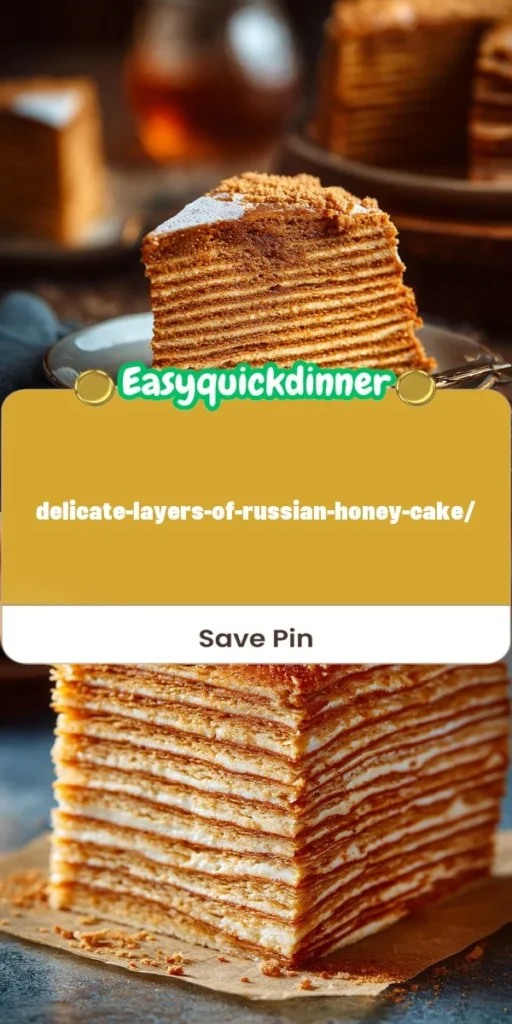
Delve into the world of Russian desserts with this exquisite Delicate Layers of Russian Honey Cake. Known as “Medovik,” this cake is a beloved classic in Russia, celebrated for its rich flavors and soft, tender layers. The cake achieves a perfect balance of sweetness and texture, making it an ideal dessert for any occasion, from birthdays to casual family gatherings. This recipe not only showcases the traditional elements of Russian baking but also highlights the use of simple, wholesome ingredients that are easily accessible, allowing home bakers of all skill levels to engage with this delightful treat. With a little patience and love, you can create a stunning cake that will not only impress your family and friends but also become a cherished part of your own baking repertoire.
Why You’ll Love This
Discover the reasons why this Russian Honey Cake will become a favorite in your home:
- Irresistible Flavor: The combination of honey, sour cream, and a hint of vanilla creates a luscious flavor profile that is both unique and comforting. The honey provides a warm, floral sweetness, while the sour cream adds a delightful tang, balancing the overall taste beautifully.
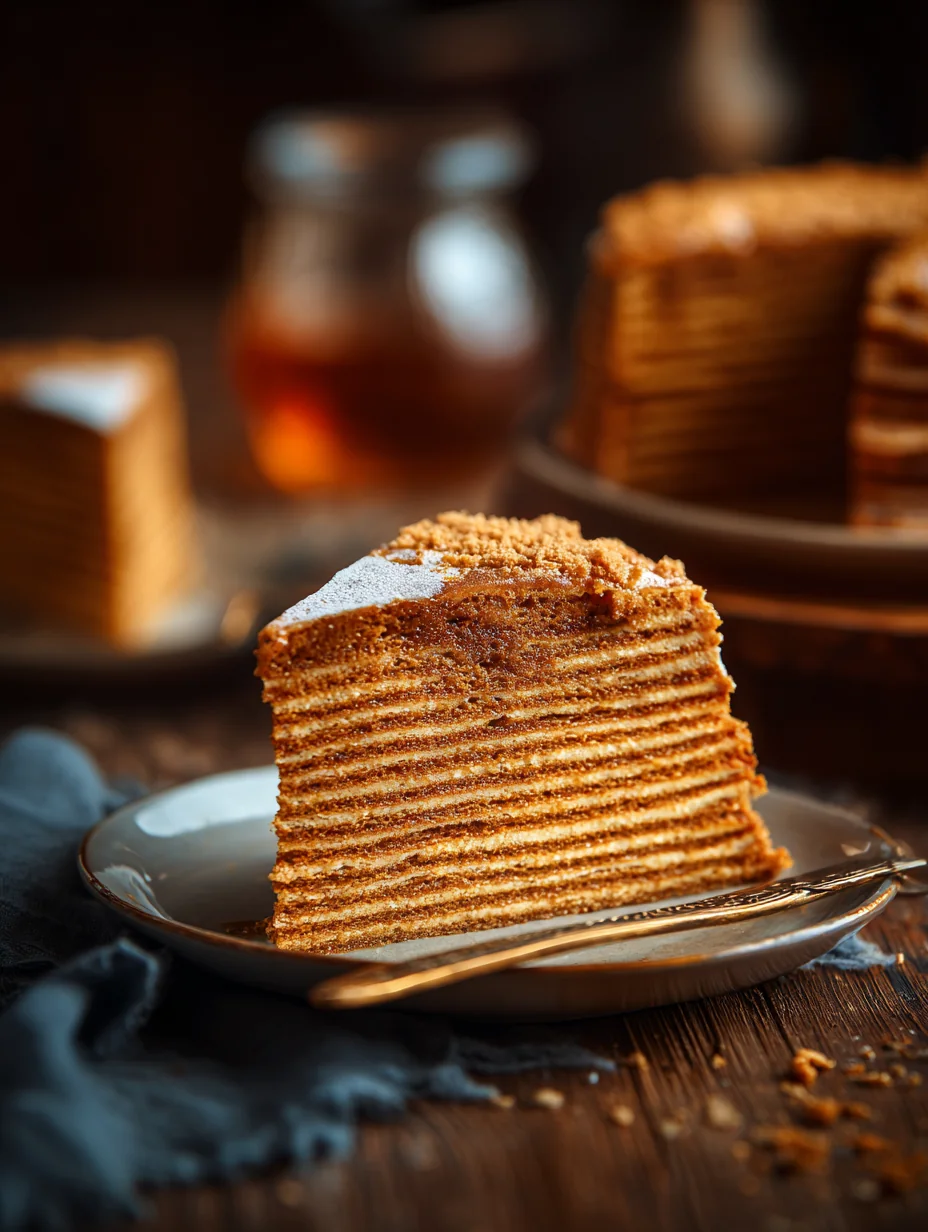
- Textural Delight: The delicate layers provide a satisfying contrast between the soft cake and the creamy filling. Each bite offers a tender crumb paired with a rich, velvety cream, making it a treat for the senses.
- Versatile Presentation: This cake is not only delicious but also visually stunning, making it perfect for celebrations or as a delightful everyday treat. You can decorate it with chopped nuts or a dusting of confectioners’ sugar for an elegant touch.
- Beginner-Friendly: With clear instructions and a straightforward process, even novice bakers can successfully make this cake. The step-by-step guidance included ensures that you can tackle this recipe with confidence.
🥗 Ingredient Breakdown
Explore the key ingredients that contribute to the delightful taste and texture of this honey cake. Each component plays a crucial role in creating the final masterpiece.
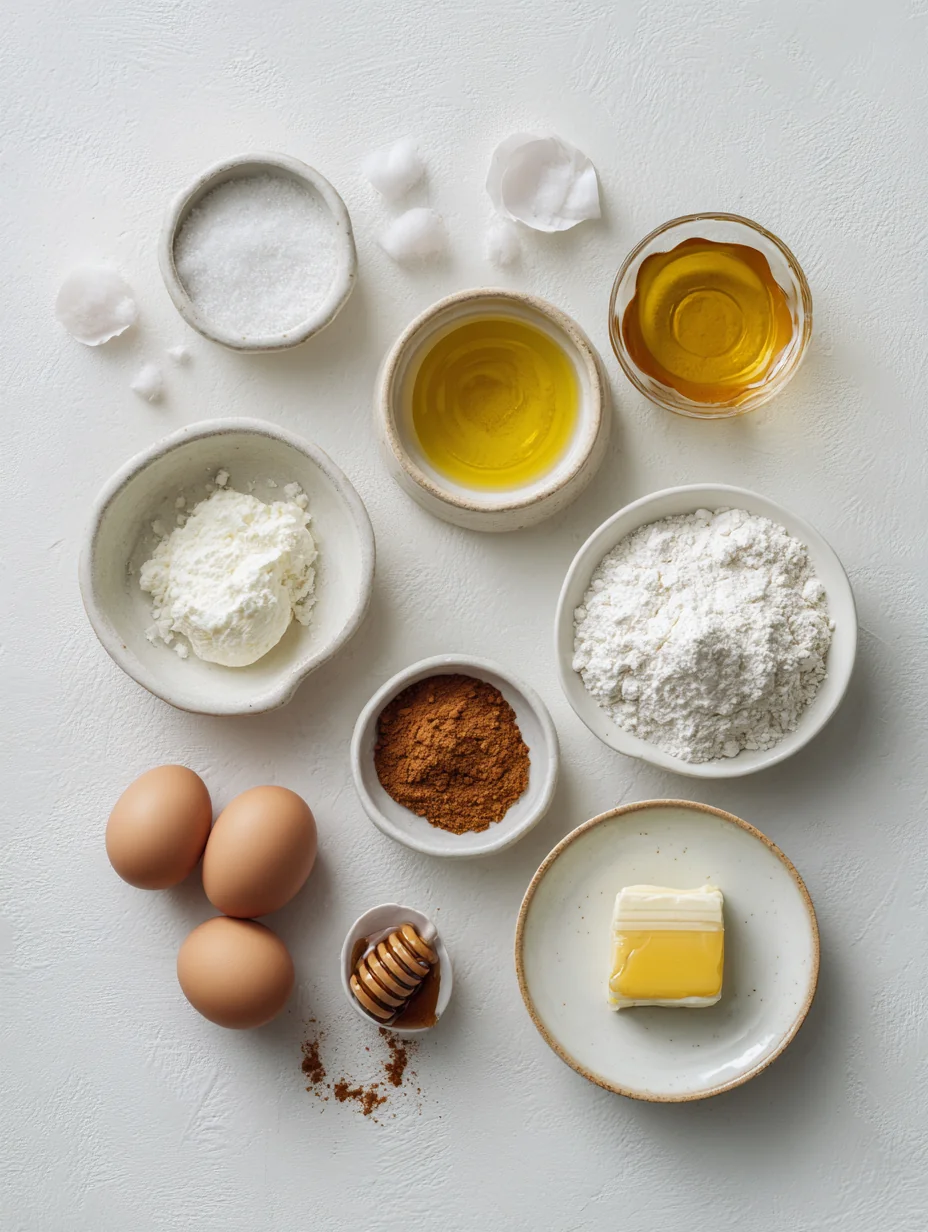
- All-Purpose Flour: This versatile flour forms the base of the cake, providing structure and stability. It’s essential for creating a tender crumb, allowing the cake to hold its shape while still being soft.
- Granulated Sugar: Adds sweetness and helps with the cake’s moisture. The sugar not only sweetens the cake but also caramelizes slightly during baking, enhancing its flavor.
- Honey: The star ingredient that imparts a unique flavor and moisture to the cake layers. Honey adds depth and richness, making each bite memorable.
- Unsalted Butter: Contributes richness and enhances the cake’s tenderness. Using unsalted butter allows you to control the saltiness of the cake, ensuring a balanced flavor profile.
- Eggs: Bind the ingredients together and add a light, airy texture. Eggs are crucial for the leavening process, helping the cake rise and giving it a soft, fluffy consistency.
- Baking Soda: Helps the cake rise, creating that delicate layer effect. As it reacts with the acidic components (like honey and sour cream), it produces carbon dioxide, which lifts the cake.
- Salt: Balances sweetness and enhances overall flavor. A small amount of salt can elevate the taste, making the sweetness more pronounced and well-rounded.
- Sour Cream: Provides creaminess and tang, essential for the filling. It adds moisture and a slight acidity, which complements the sweetness of the honey beautifully.
- Vanilla Extract: Adds warmth and depth to the flavor. Vanilla is a classic flavor enhancer that rounds out the taste of the cake, making it more aromatic and inviting.
- Confectioners’ Sugar: Used for a finishing touch, adding sweetness and visual appeal. This sugar will help with the texture of the cream filling and can also be dusted on top for decoration.
- Chopped Walnuts or Almonds: Optional garnishes that add crunch and flavor contrast. These nuts provide a lovely texture and nutty flavor, enhancing the overall experience of the cake.
Step-by-step Preparation
Follow these detailed steps to create your Delicate Layers of Russian Honey Cake.
1. Prepare the Cake Layers
Start by melting 1 cup of honey, 1 cup of granulated sugar, and 1/2 cup (1 stick) of unsalted butter together in a saucepan over low heat. Stir gently until the mixture is smooth and fully combined. This mixture will be the foundation of your cake layers, so ensure that it is well blended.
Once the mixture is smooth, remove it from heat and let it cool slightly. In a separate bowl, whisk together 3 large eggs, 1 teaspoon of baking soda, and 1/2 teaspoon of salt until combined. Gradually add the warm honey mixture to the egg mixture, stirring continuously to avoid cooking the eggs.
Next, sift in 4 cups of all-purpose flour, mixing gently until a soft dough forms. The dough should be slightly sticky but manageable. If it seems too wet, add a little more flour, a tablespoon at a time.
Now, divide the dough into 6 equal portions and shape each portion into a disc. Wrap each disc in plastic wrap and refrigerate for at least 1 hour. Chilling the dough makes it easier to roll out and will help achieve the delicate layers characteristic of this cake.
2. Bake the Cake Layers
Preheat your oven to 350 degreesF (175 degreesC). While the oven is heating, take one of the chilled dough discs out of the refrigerator. On a lightly floured surface, roll out the dough into a thin layer, about 1/8 inch thick. Use a sharp knife or a round cutter to cut the dough into circles, approximately 8 inches in diameter. If you don’t have a round cutter, you can use the bottom of a cake pan as a guide.
Transfer the cut dough to a lined baking sheet. Repeat this process with the remaining discs, making sure to keep the rolled dough covered with a clean kitchen towel to prevent it from drying out.
Bake the layers in the preheated oven for about 5-7 minutes, or until they are golden brown. Keep a close eye on them, as they can go from perfectly baked to overdone quickly. Once baked, remove them from the oven and let them cool completely on a wire rack.
3. Make the Cream Filling
While the cake layers are cooling, it’s time to prepare the cream filling. In a large mixing bowl, combine 2 cups of sour cream, 1/2 cup of honey, and 1 teaspoon of vanilla extract. Using an electric mixer, beat the mixture on medium speed until it is creamy and well combined. The sour cream will provide a tangy base that perfectly balances the sweetness of the honey, creating a luscious filling.
Once your cream filling is ready and the cake layers have cooled, you are well on your way to assembling your beautiful Russian Honey Cake.
Component Preparation
Dough Preparation
To create the delicate layers of Russian Honey Cake, the dough preparation is crucial. Start by combining the honey, sugar, and butter in a saucepan over low heat. Stir until the mixture is smooth and fully combined. Allow it to cool slightly before adding eggs, whisking until the mixture is homogenous.
For the dry ingredients, sift together the flour, baking soda, and salt in a separate bowl. Gradually incorporate the dry ingredients into the wet mixture, mixing until a soft dough forms.
Kneading is an essential step. Transfer the dough onto a floured surface and knead gently for about 5 minutes, just until it becomes smooth. Be careful not to over-knead, as this can make the dough tough. Once kneaded, wrap the dough in plastic wrap and refrigerate for at least 2 hours, or overnight if possible. This chilling period allows the dough to relax, making it easier to roll out thin layers.
Baking Tips
When it’s time to bake the layers, preheat your oven to 350 degreesF (175 degreesC). Divide the chilled dough into equal portions; typically, you will want around 8 equal pieces for classic Russian Honey Cake. Roll each portion out on a floured surface to about 1/8 inch thick. Use a round cake pan or a template to cut out circles from each rolled layer.
To ensure even baking, space the layers appropriately on a lined baking sheet. Avoid overcrowding; if necessary, bake in batches. Bake each layer for approximately 5-7 minutes, or until they are golden brown. Keep an eye on them, as they can burn quickly. Once baked, allow the layers to cool completely on a wire rack.
Cream Filling
The cream filling is what brings the cake together. A traditional filling consists of a mix of sour cream and condensed milk, providing the perfect balance of tanginess and sweetness. Start by whisking together 2 cups of sour cream and 1 cup of condensed milk in a mixing bowl until smooth. Taste the mixture and adjust the sweetness to your preference by adding powdered sugar if desired. For an extra depth of flavor, consider adding a splash of vanilla extract or a hint of lemon juice.
Assembly & Serving Tips
Layering Technique
As you assemble the cake, a careful approach is necessary to achieve a stunning finish. Place the first layer of cake on your serving platter. Generously spread a layer of cream filling on top, ensuring it reaches the edges. Repeat this process with each subsequent layer, taking care to keep the layers aligned. The cream should be evenly distributed to prevent any sliding, which is crucial for maintaining the cake’s structure.
Final Touches
Once all layers are stacked, apply a thin layer of cream over the top and sides of the cake to create a smooth, polished finish. This crumb coat helps to seal in any loose crumbs and sets the stage for the final decoration. Chill the cake for about 30 minutes to firm everything up, making it easier to apply a final, thicker layer of cream.
Serving Suggestions
When it comes time to serve your Russian Honey Cake, use a sharp knife dipped in hot water for clean slices. Consider plating each piece with a dollop of extra cream or a drizzle of honey for added sweetness. This cake pairs beautifully with a cup of tea or coffee, making it an ideal dessert for gatherings or afternoon tea.
Presentation
Dusting with Confectioners’ Sugar
A simple yet effective way to elevate your cake’s presentation is by dusting it with confectioners’ sugar. Use a fine-mesh sieve to evenly sprinkle sugar over the top of the cake. For a more artistic touch, you can create a stencil to form patterns with the sugar.
Garnishing Ideas
To add an elegant flair, consider garnishing your cake with nuts, fresh fruits, or edible flowers. Chopped walnuts or hazelnuts can be sprinkled over the top or along the sides for a rustic look. Fresh berries or slices of fruit can provide a refreshing contrast, while edible flowers will add a vibrant pop of color, making your cake a centerpiece at any gathering.
Variations
Flavor Twists
While the classic Russian Honey Cake is delightful on its own, you can easily incorporate flavor twists to suit your taste. Add spices like cinnamon or ground ginger to the dough for a warm, aromatic touch that complements the honey.
Nutty Additions
For those who love nuts, consider incorporating different varieties. Almonds, pecans, or pistachios can be chopped and mixed into the cream filling or sprinkled on top of the cake. Nut pastes can also add a rich flavor profile to the layers.
Fruit Layers
Introduce layers of fruit preserves or fresh fruits between the cake layers for a refreshing twist. Raspberry or apricot preserves work particularly well, adding sweetness and a beautiful color contrast to the cake.
Storage Guidelines
Short-term Storage
To keep your Russian Honey Cake fresh for a few days, store it in the refrigerator. Cover the cake with plastic wrap or place it in an airtight container. The flavors often improve after a day, allowing the cream to soak into the layers, enhancing the overall taste.
Long-term Storage
If you need to store the cake for an extended period, freezing is an excellent option. Wrap individual layers tightly in plastic wrap and then in aluminum foil to prevent freezer burn. The cake can be frozen for up to three months. To defrost, transfer the layers to the refrigerator for several hours or overnight before reassembling with the cream.
FAQ
What if I don’t have sour cream?
If sour cream is not available, you can substitute it with plain Greek yogurt or a mixture of cream cheese and buttermilk. Both alternatives will provide a similar tangy flavor and creamy texture.
Can I make this cake ahead of time?
Absolutely! Russian Honey Cake is perfect for making ahead. In fact, the flavors meld beautifully after sitting for a day or two, making it an ideal dessert for special occasions.
How do I prevent the layers from cracking during baking?
To prevent cracks, ensure that your dough is rolled out evenly and not too thick. Additionally, keeping an eye on the baking time and temperature will help achieve a perfectly baked layer. If cracks do occur, don’t worry; they can be hidden under the cream filling.
By following these detailed instructions and tips, you can create a stunning Russian Honey Cake that will impress your family and friends, making any occasion truly special. Enjoy the process of baking and savoring each delicate layer of this traditional dessert!