


Creamy Dreamy Baked Mac & Cheese
About This Recipe
This Creamy Dreamy Baked Mac & Cheese recipe is the ultimate comfort food that combines rich, gooey cheeses with perfectly cooked elbow macaroni. Ideal for family gatherings, potlucks, or a cozy night in, this dish will quickly become a staple in your home. With its creamy cheese sauce and crispy breadcrumb topping, it’s a dish that delights both kids and adults alike. The combination of textures and flavors makes it a standout dish that warms the heart and satisfies the palate.
Why You’ll Love This
- Ultimate Comfort Food: Warm, cheesy, and filling, this mac & cheese is the epitome of comfort food. There’s something inherently satisfying about a bowl of creamy pasta that hugs you from the inside out.
- Cheese Lovers Delight: With a blend of sharp cheddar, Gruyère, and mozzarella, every bite is packed with cheesy goodness. The rich flavors meld together to create a heavenly experience for your taste buds.
- Beginner-Friendly: The recipe is straightforward and perfect for beginners. With easy-to-follow steps, you’ll impress everyone with your cooking skills, even if you’re just starting out in the kitchen.
- Customizable: You can easily adapt it to suit your taste preferences or dietary needs. Want to add some veggies? Go for it! Prefer a different cheese? The options are endless.
🥗 Ingredient Breakdown
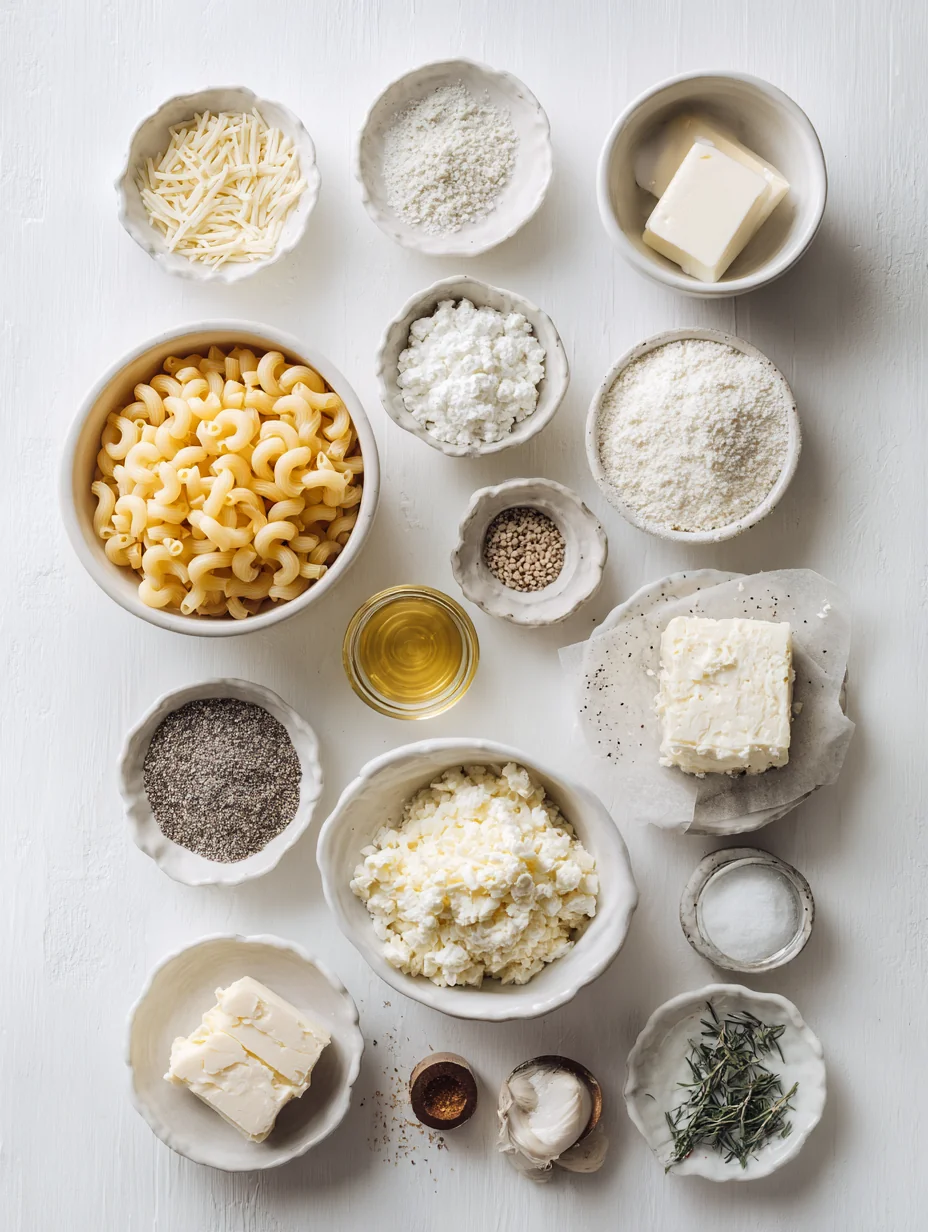
Understanding each ingredient in this recipe can help you appreciate the role it plays in creating that creamy, dreamy dish. Here’s what you’ll need:
- Elbow Macaroni: This is the classic pasta choice for mac & cheese. Its small, curved shape is perfect for holding onto the creamy sauce, making each bite a delightful mix of pasta and cheese.
- Sharp Cheddar Cheese: This cheese adds a tangy flavor that is essential for authentic mac & cheese. The sharpness cuts through the richness of the other cheeses, providing a balanced flavor profile.
- Gruyère Cheese: Known for its nutty flavor, Gruyère contributes to the creaminess and depth of the dish. It melts beautifully and adds a sophisticated element to the classic recipe.
- Mozzarella Cheese: This cheese ensures a gooey texture that stretches beautifully, giving you that classic mac & cheese pull. It’s mild in flavor, allowing the other cheeses to shine.
- Parmesan Cheese: A dash of Parmesan adds a salty, umami flavor and helps create a golden crust when baked. Its sharpness complements the other cheeses nicely.
- Whole Milk: This ingredient creates a rich and creamy cheese sauce. The fat content in whole milk contributes to the overall creaminess of the dish.
- Unsalted Butter & All-Purpose Flour: These two ingredients are used to create a roux, which serves as the base for the cheese sauce. The butter adds richness, while the flour thickens the sauce.
- Spices: Garlic powder, onion powder, and smoked paprika enhance the flavor profile of the dish. They add depth and a hint of smokiness that elevates the overall taste.
- Breadcrumbs: These provide a crunchy topping that contrasts beautifully with the creamy pasta. Toasted to a golden brown, they add texture and visual appeal.
- Fresh Parsley: A bright garnish that adds a pop of color and freshness. It’s not just for decoration; it also offers a slight herbal note that brightens the dish.
Step-by-step Preparation
Now that you have a good understanding of the ingredients, let’s get started with the preparation. Follow these steps for a perfect creamy baked mac & cheese:
1. Preheat the Oven: Start by preheating your oven to 350 degreesF (175 degreesC). This ensures that your mac & cheese will bake evenly and develop a delightful crust on top.
2. Cook the Pasta: In a large pot, bring salted water to a rolling boil. Add the elbow macaroni and cook according to the package instructions until al dente, typically about 7-8 minutes. Al dente means the pasta should still have a slight bite to it, as it will continue to cook in the oven. Once cooked, drain the pasta and set it aside.
3. Make the Cheese Sauce: In a large saucepan, melt 4 tablespoons of unsalted butter over medium heat. Once the butter has melted, whisk in 4 tablespoons of all-purpose flour. This mixture is known as a roux and will help thicken your cheese sauce. Continue to whisk for about 1-2 minutes until the mixture is bubbly and golden.
4. Add Milk: Gradually pour in 4 cups of whole milk while whisking continuously. This will help prevent lumps from forming. Keep whisking until the mixture thickens and bubbles gently, which should take about 5-7 minutes. You’re looking for a consistency that coats the back of a spoon.
5. Incorporate Spices and Cheese: Once the sauce has thickened, add 1 teaspoon each of garlic powder, onion powder, and smoked paprika, stirring to combine. Then, gradually mix in 2 cups of sharp cheddar cheese, 1 cup of Gruyère cheese, and 1 cup of mozzarella cheese. Stir until all the cheese is melted and the sauce is smooth and creamy.
Now that you have your delicious cheese sauce ready, you’re well on your way to creating a mouthwatering Creamy Dreamy Baked Mac & Cheese. In the next steps, you will combine the pasta with the sauce and prepare it for baking. Stay tuned!
Combine Pasta and Sauce
Once your macaroni is perfectly al dente and your cheese sauce is bubbling with flavor, it’s time to bring the two components together. Carefully drain the cooked pasta and transfer it to a large mixing bowl. Pour the creamy cheese sauce over the macaroni and gently fold the pasta into the sauce. Use a spatula or wooden spoon to ensure that each piece of macaroni is thoroughly coated with the luscious cheese mixture. This step is essential; you want every bite to be rich and cheesy, not just the top layer.
Prepare for Baking
Preheat your oven to 350 degreesF (175 degreesC) while you prepare your baking dish. Generously grease a 3-quart baking dish with butter or cooking spray to prevent sticking. Once your macaroni and cheese mixture is well combined, pour it into the greased dish, spreading it evenly. For an added layer of flavor and texture, sprinkle a layer of grated Parmesan cheese over the top, followed by a generous coating of breadcrumbs. This combination will create a delightful golden crust as it bakes.
Bake
Now it’s time to let the oven work its magic. Place your prepared mac and cheese in the preheated oven and bake for about 25-30 minutes. You’ll know it’s ready when the top is beautifully golden brown and the edges are bubbling with cheesy goodness. If you like your mac and cheese with an extra crispy topping, you can broil it for an additional 2-3 minutes at the end, but keep a close eye to avoid burning.
Garnish and Serve
Once baked, remove the dish from the oven and let it cool for about 5-10 minutes. This resting period allows the cheese to set a bit, making it easier to serve. Just before serving, garnish with freshly chopped parsley to add a pop of color and a hint of freshness. Serve your creamy dreamy baked mac and cheese warm, and watch as everyone digs in for seconds!
Component Preparation
Cooking the Pasta
When cooking the macaroni, it’s crucial to follow the package instructions but stop cooking a minute or two short of al dente. This ensures the pasta retains some firmness, as it will continue to cook while baking in the cheese sauce. After draining, rinse the pasta briefly under cold water to halt the cooking process, then set it aside.
Making the Roux
Creating a roux is an essential step in developing the base of your cheese sauce. In a medium saucepan, melt butter over medium heat, then add an equal amount of flour. Stir continuously for about 2-3 minutes, or until the mixture turns a light golden color. This cooking time allows the raw flour taste to dissipate, resulting in a smoother sauce.
Mixing in Cheese
When it comes to adding the cheese, patience is key. Start with a handful of shredded cheese and stir it into the roux until completely melted and smooth before adding more. This gradual incorporation helps maintain a creamy texture without any clumps. Repeat until all your cheese is fully melted and blended into the sauce.
Assembly & Serving Tips
Layering
For those who want an extra cheesy experience, consider layering some shredded cheese between the macaroni and cheese sauce. This technique not only adds flavor but also creates a delightful surprise as you dig into your dish.
Serving Size
This recipe is designed to serve 6-8 people, making it perfect for family gatherings or meal prep for the week ahead. If you’re serving a larger crowd, consider doubling the recipe or providing additional sides to complement the dish.
Serving Temperature
For the best experience, serve the mac and cheese warm. The gooey cheese and crispy breadcrumbs create a wonderful contrast that is most enjoyable fresh out of the oven.
Presentation
Garnishing
To elevate the visual appeal of your dish, garnish with freshly chopped parsley or even a sprinkle of paprika for a hint of color. This simple touch can make your mac and cheese look as good as it tastes.
Plating
Consider serving your baked mac and cheese in individual bowls for a more personal touch or on a large platter for a family-style feast. Pair with a crisp side salad to balance out the richness of the dish, making for a well-rounded meal.
Variations
Cheese Swaps
Feel free to get creative with the types of cheese you use. Gouda, Fontina, or even a spicy Pepper Jack can add unique flavors to your mac and cheese. Mixing different cheeses not only enhances the flavor but also contributes to a complex texture.
Add-Ins
For those looking to boost the nutritional value or flavor profile, consider adding cooked bacon, sautéed mushrooms, steamed broccoli, or sun-dried tomatoes. These ingredients can complement the creamy cheese sauce beautifully.
Gluten-Free Option
If you or your guests are gluten-sensitive, you can easily modify this recipe by using gluten-free pasta and substituting regular flour with a gluten-free blend. This ensures everyone can enjoy a comforting bowl of mac and cheese.
Storage Guidelines
Refrigeration
Leftover baked mac and cheese can be stored in an airtight container in the refrigerator for up to 3-4 days. When ready to enjoy, simply reheat in the oven or microwave until warmed through.
Freezing
For longer storage, you can freeze the baked mac and cheese for up to 2 months. Be sure to use a freezer-safe dish, and cover it tightly with plastic wrap and aluminum foil. Thaw overnight in the refrigerator before reheating for a quick and easy meal.
FAQ
Can I make baked mac and cheese ahead of time?
Yes! You can prepare the macaroni and cheese mixture, transfer it to the baking dish, cover it, and refrigerate it for up to 24 hours. When ready to bake, simply add a few extra minutes to the baking time.
What type of pasta is best for mac and cheese?
While elbow macaroni is the classic choice, you can also use shells, cavatappi, or even penne for a different texture and appearance.
How do I prevent my mac and cheese from becoming dry?
To prevent dryness, ensure that you use enough cheese sauce and cover the dish with foil during the first half of baking to retain moisture. If you prefer a creamier texture, you can also add a splash of milk or cream before serving.
With these detailed instructions and tips, you’re well on your way to mastering the art of creamy dreamy baked mac and cheese. Enjoy the process and the delicious results!