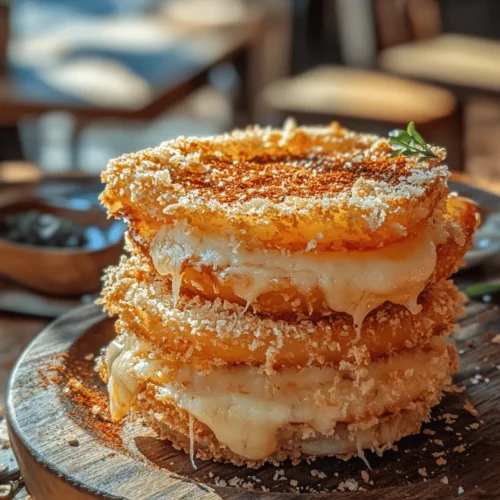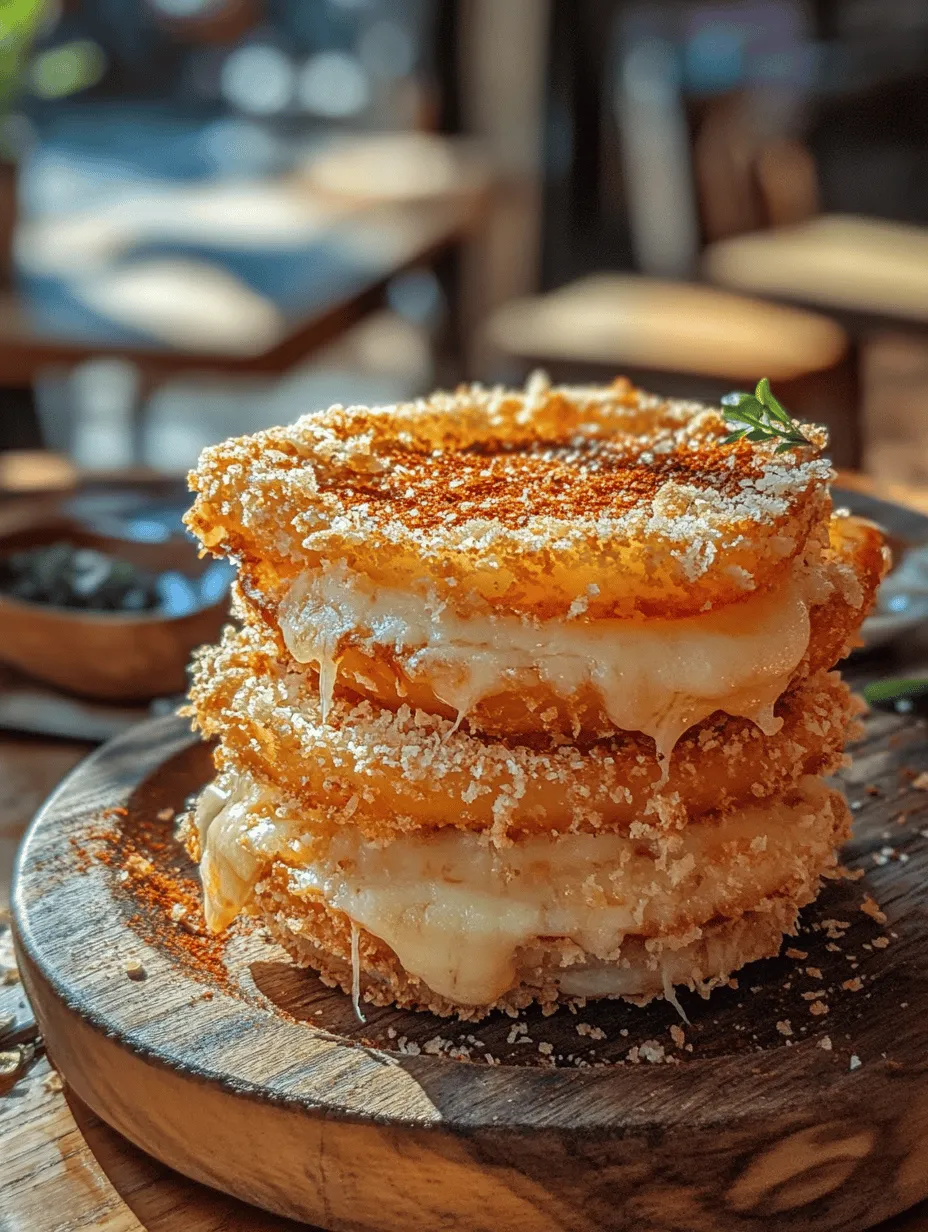
When it comes to comfort food, few dishes can rival the satisfaction of crispy, cheesy onion rings. These Baked Cheesy Onion Rings marry the delightful crunch of golden-brown breading with the savory goodness of melted mozzarella cheese, creating a burst of flavor and texture that is simply irresistible. Whether you’re hosting a game night, preparing a family dinner, or simply craving a tasty snack, these onion rings are the perfect choice. They not only serve as a crowd-pleasing appetizer but also shine as a delectable side dish. Best of all, this baked version takes a healthier approach to the classic fried onion rings, allowing you to indulge without the guilt.
One of the standout features of this recipe is the harmonious blend of flavors and textures. The crispy exterior gives way to a soft, cheesy interior that tantalizes the taste buds with every bite. The subtle sweetness of the onions complements the savory notes of the seasonings, making these rings an explosion of flavor. Additionally, the versatility of onion rings means that you can enjoy them in various ways—serve them alongside burgers, pile them high on a platter for a party, or enjoy them as a standalone snack with your favorite dipping sauce.
The health-conscious among us will appreciate that baking rather than frying significantly reduces the overall fat content, making these onion rings a lighter alternative. By using wholesome ingredients and a straightforward baking technique, you can create a delightful treat that satisfies your cravings without compromising your dietary goals.
Understanding the Ingredients
To create the perfect Baked Cheesy Onion Rings, understanding each ingredient’s role is essential. Here’s a detailed breakdown of what you’ll need and how these components contribute to the overall dish.
Onions
The star of our recipe is undoubtedly the onions. While you can use various types, yellow onions are commonly favored for their balanced sweetness and robust flavor. They are versatile and work well in many dishes, including these onion rings. However, if you prefer a milder taste, sweet onions like Vidalia or Walla Walla can also be used, providing a sweeter bite that contrasts beautifully with the savory breading. For those who enjoy a touch of sharpness, red onions can offer a more pronounced flavor, although they may require a longer cooking time to mellow out.
All-Purpose Flour
All-purpose flour plays a crucial role in the breading process. It provides a base that helps the egg adhere to the onion rings, ensuring that the subsequent layers of seasoning and breadcrumbs stick effectively. The flour also contributes to the overall texture, helping to create a crispy coating once baked.
Seasonings
Seasonings are the heart of flavor in any recipe, and our Baked Cheesy Onion Rings are no exception. The following spices are essential to enhance the taste:
– Garlic Powder: This adds depth and aromatic flavor to the breading, making every bite more appealing.
– Onion Powder: It complements the natural onion flavor while intensifying the overall savory notes of the dish.
– Smoked Paprika: This ingredient introduces a subtle smokiness that elevates the flavor profile, giving the rings a gourmet touch.
– Cayenne Pepper: For those who enjoy a little heat, cayenne pepper can be adjusted to taste, providing a delightful kick that balances the richness of the cheese.
Eggs
Eggs serve as a binding agent in this recipe, helping to create a cohesive coating on the onion rings. They provide moisture and act as a glue that holds the flour and breadcrumbs together, ensuring that the crispy coating adheres properly throughout the baking process.
Breadcrumbs
For the perfect crunchy texture, we recommend using panko breadcrumbs. These Japanese-style breadcrumbs are coarser and lighter than traditional breadcrumbs, resulting in a crispier finish when baked. They create an airy, crunchy crust that enhances the overall texture of the onion rings.
Mozzarella Cheese
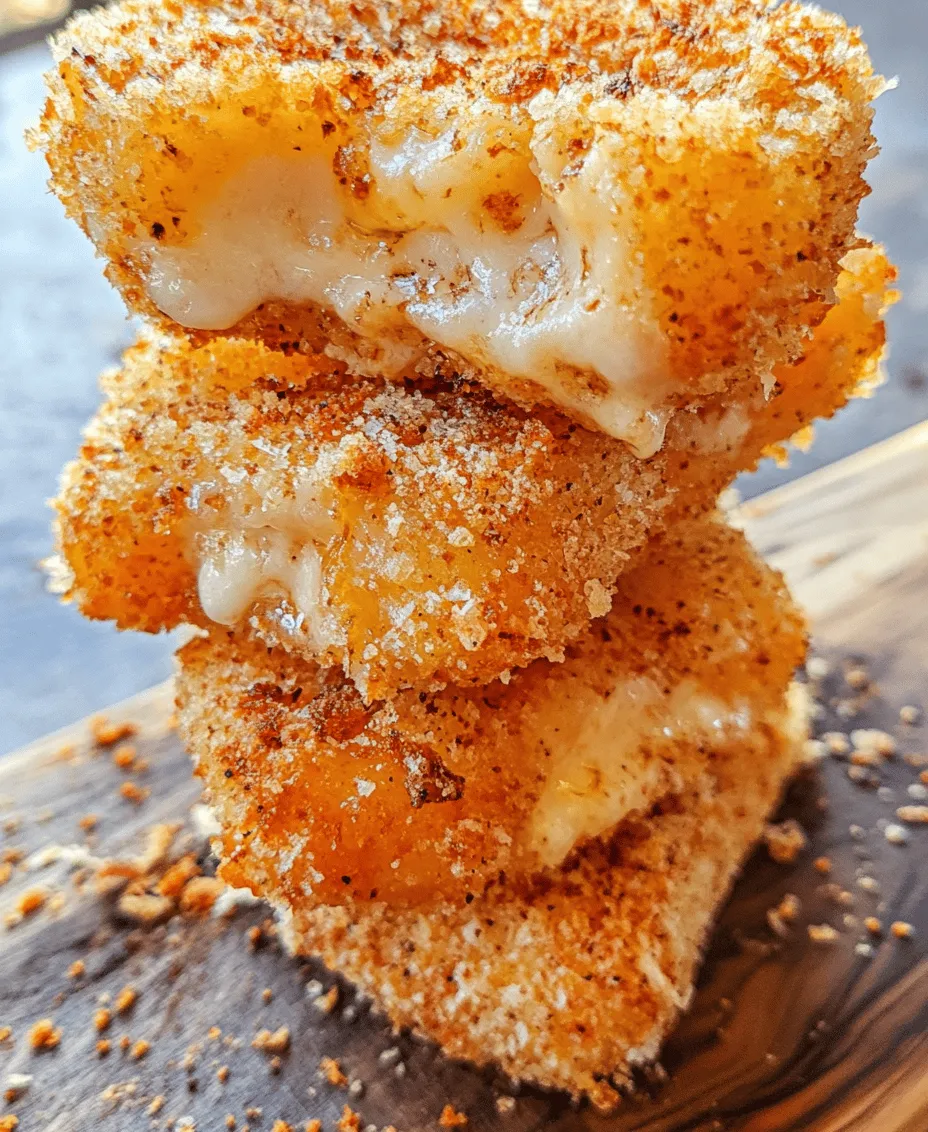
Mozzarella cheese is the star ingredient that brings the cheesy aspect of the onion rings to life. It melts beautifully, creating a gooey interior that complements the crispy exterior. The mild flavor of mozzarella allows the other seasonings to shine while providing that comforting, cheesy goodness that everyone loves.
Olive Oil vs. Cooking Spray
When it comes to cooking fat, you have options. Olive oil is a healthier choice, providing monounsaturated fats and a rich flavor that can enhance the overall taste of the onion rings. Drizzling a small amount over the breaded rings before baking can help achieve that golden-brown color. Alternatively, cooking spray can be used for a lighter option, ensuring the rings crisp up without adding too many extra calories.
Step-by-Step Preparation Guide
Now that we understand the key ingredients, let’s dive into the preparation process for these Baked Cheesy Onion Rings. Follow these steps closely to achieve perfectly crispy and cheesy results.
Preheating the Oven
Before you start preparing your onion rings, it’s vital to preheat your oven. Aim for a temperature of 425°F (220°C). Preheating the oven ensures that the onion rings cook evenly and develop a crispy exterior. A hot oven is crucial for achieving that golden-brown color we all associate with the perfect onion ring.
Importance of Temperature in Achieving Perfect Crispiness
The right baking temperature helps to evaporate moisture from the onion rings quickly and allows the exterior to crisp up while the cheese melts inside. This balance is key to creating the ideal texture—crispy on the outside and gooey on the inside.
Tips for Lining a Baking Sheet for Easy Cleanup
To make cleanup a breeze, line your baking sheet with parchment paper or a silicone baking mat. This not only prevents the onion rings from sticking but also allows for easy removal once they’re baked. Additionally, lining the pan ensures that any excess oil or melted cheese can be quickly wiped away, keeping your kitchen tidy.
Preparing the Onions
The first step in preparing your onion rings is to slice the onions into rings. Here’s how to do it effectively:
Techniques for Slicing Onions into Rings
1. Peel the Onion: Start by removing the outer skin of the onion. Use a sharp knife to cut off the root and stem ends.
2. Cut into Rings: Place the onion flat on your cutting board and slice it into rings that are about 1/4 to 1/2 inch thick. The thickness will affect the cooking time, so be consistent with your cuts.
3. Separate the Rings: Carefully separate the rings from each other. Take your time to avoid breaking them, as this can affect the presentation and texture of your finished product.
Setting Up the Breading Station
Now that your onions are ready, it’s time to set up your breading station. This organized approach will help streamline the process and ensure that the onion rings come out perfectly coated.
Explanation of the Three-Bowl Method
1. Bowl One (Flour): Place the all-purpose flour in the first bowl. Season it lightly with salt, garlic powder, onion powder, smoked paprika, and cayenne pepper. Mix well to ensure an even distribution of seasonings.
2. Bowl Two (Eggs): In the second bowl, crack two large eggs and whisk them until well beaten. This will be your binding agent for the flour and breadcrumbs.
3. Bowl Three (Breadcrumbs): Fill the third bowl with panko breadcrumbs. You can add more seasonings here if desired for an extra flavor punch.
Tips on Maintaining a Tidy Workspace While Breading
To keep your workspace organized while breading the onion rings, consider the following tips:
– Use One Hand for Wet and One for Dry: Designate one hand for handling the flour and breadcrumbs and the other for the egg to avoid clumping and excessive mess.
– Clean as You Go: Keep a damp cloth nearby to wipe up any spills or drips as you work, making the cleanup process much more manageable.
– Work in Batches: Breading a few onion rings at a time can make the process less overwhelming and allow for more thorough coating.
By following these steps, you’ll have a great foundation for making delicious Baked Cheesy Onion Rings that are sure to impress your family and friends. Stay tuned for the next section, where we’ll delve into the baking process and tips for achieving the perfect finish!
Breading the Onion Rings
Once your onion rings are sliced and ready, it’s time to start the breading process, which is crucial for that delightful crunch and flavor. This step involves a simple three-step dipping process: flour, egg, and breadcrumb.
Dipping Process
1. Prepare the Stations: Set up three shallow bowls – one with all-purpose flour, another with beaten eggs, and the last with the seasoned breadcrumbs mixed with cheese. Make sure to season your flour with salt and pepper for a well-rounded flavor.
2. Coat the Rings: Begin by taking an onion ring and dredging it in the flour, ensuring it’s fully coated. Shake off any excess flour before dipping it into the egg mixture. The egg will help the breadcrumbs adhere to the onion, creating that delicious crust.
3. Breadcrumb Coating: Finally, transfer the ring into the breadcrumb mixture. Press down gently to ensure an even coating. The importance of an even coat cannot be overstated; it ensures that every bite is packed with flavor and that the texture is consistently crunchy.
4. Repeat: Continue this process until all the onion rings are breaded. Place them on a plate or a baking tray lined with parchment paper to make the transfer to the baking sheet easier.
Importance of Even Coating for Texture and Flavor
An even coating is essential for achieving the perfect texture and flavor balance. Unevenly coated rings can lead to some parts being overly crunchy while others are soft, which detracts from the overall experience. Moreover, even coating ensures that every bite is flavorful, so take your time with this step!
Arranging for Baking
After breading all the onion rings, the next step is arranging them on a baking sheet. This is a vital part of the process, as proper spacing will ensure that they bake evenly and achieve that desirable crispiness.
Spacing and Placement on the Baking Sheet
1. Use a Large Baking Sheet: If possible, use a large baking sheet or two smaller ones to avoid overcrowding. Overcrowding can lead to steaming instead of baking, resulting in soggy onion rings.
2. Leave Space: Arrange the breaded onion rings in a single layer, leaving enough space between each ring. This spacing allows hot air to circulate around each ring, promoting even cooking.
3. Line with Parchment Paper: For an easier cleanup and to help the rings crisp up, line the baking sheet with parchment paper. This also prevents sticking and adds to the crunch factor.
The Role of Oil in Achieving a Crunchy Finish
Before placing the baking sheet in the oven, lightly spray or drizzle the onion rings with oil. This step is crucial for achieving that golden-brown color and crunchy texture. The oil helps to crisp the breadcrumbs while baking, so don’t skip this part!
Baking Process
Now that your onion rings are arranged and ready for the oven, it’s time to bake them to perfection.
Detailed Baking Instructions
1. Preheat the Oven: Preheat your oven to 425°F (220°C). A hot oven is essential for creating that crispy exterior while keeping the inside tender.
2. Bake: Place the baking sheet in the preheated oven and bake for about 20-25 minutes. It’s important to flip the onion rings halfway through the cooking time to ensure even browning on both sides.
3. Monitor for Doneness: Keep an eye on the onion rings towards the end of the baking time. They should be golden brown and crispy. If you find they need a little longer, don’t hesitate to add an extra few minutes, but be careful not to overcook them.
Serving Suggestions
Baked cheesy onion rings are best served hot and fresh from the oven. Here are some ideal serving tips and ideas to elevate your dining experience.
Ideal Serving Temperatures and Presentation Tips
Serve the onion rings immediately while they’re still warm to enjoy their maximum crunch factor. For presentation, arrange them on a large platter or individual serving dishes. You can garnish with fresh herbs like parsley or chives for a pop of color.
Recommended Dipping Sauces
To complement the savory flavor of the onion rings, consider serving them with a selection of dipping sauces:
– Marinara Sauce: The acidity and sweetness of marinara pair beautifully with the cheesy, crispy rings.
– Ranch Dressing: A classic choice that adds creaminess and herby flavors.
– Spicy Aioli: For those who enjoy a kick, a spicy aioli can enhance the flavor profile of the onion rings.
Pairing Ideas
These baked cheesy onion rings can be enjoyed in various ways. They make an excellent side dish alongside burgers or sandwiches, adding a delicious crunch. Alternatively, serve them as a stand-alone snack at parties or gatherings, where they are sure to be a hit.
Nutritional Information
When it comes to enjoying snacks, understanding their nutritional content is essential, especially if you’re looking for healthier options.
Breakdown of Nutritional Content per Serving
A serving of baked cheesy onion rings (about 4-5 rings) typically contains:
– Calories: Approximately 200 calories
– Fats: 10 grams of fat
– Carbohydrates: 25 grams of carbs
– Proteins: 5 grams of protein
Discussion on the Health Benefits of Baked Over Fried Snacks
Baking instead of frying significantly reduces the amount of oil absorbed by the onion rings, resulting in fewer calories and less fat. This makes baked cheesy onion rings a healthier alternative to traditional fried onion rings, allowing you to indulge without the guilt. The use of whole ingredients also means you’re getting more nutrients, especially if you opt for whole-grain breadcrumbs.
Tips for Customization
One of the best parts about making baked cheesy onion rings at home is the ability to customize them to your taste. Here are some ideas to get you started:
Exploring Variations
– Herbs and Spices: Add dried herbs like oregano, basil, or thyme to your breadcrumb mixture for an extra layer of flavor. You can also experiment with different spices such as paprika or garlic powder for a flavor kick.
– Alternative Cheeses: While cheddar is a fantastic choice for cheesiness, consider using different cheeses like parmesan for a sharper flavor or mozzarella for a gooey texture.
Ideas for Adding a Twist
For those looking to make their onion rings heartier, consider adding vegetables or proteins to the breading process. Grated zucchini or shredded carrots can be mixed in with the breadcrumbs, or you can incorporate cooked, crumbled bacon or finely diced chicken for a protein-packed snack.
Conclusion
Making baked cheesy onion rings at home is not just about satisfying your snack cravings; it’s about enjoying the process of creating something delicious and healthier. These rings are perfect for any occasion, whether as a side dish, a snack for movie night, or an appetizer for gatherings.
Their versatility allows you to experiment with flavors and ingredients, making them a truly personalized culinary creation. So go ahead, gather your ingredients, and enjoy the joy of baking your own cheesy onion rings. You’ll find that once you make them at home, you’ll never want to go back to store-bought versions again!