Introduction
There’s something undeniably charming about homemade pretzel bites. Whether you’re cozying up for a movie night, hosting a party, or simply indulging in a late-night snack, these soft, buttery bites of heaven are bound to elevate your experience. Buttery Garlic Herb Pretzel Bites offer a delightful twist on the classic pretzel, infusing each bite with the irresistible flavors of garlic and fresh herbs. They are perfect for dipping into your favorite sauces, making them a versatile choice for any occasion.
What sets these pretzel bites apart is not just their flavor but also their texture. The combination of a chewy exterior and a soft, pillowy interior creates a mouthwatering contrast that will have your tastebuds singing. And the best part? They’re surprisingly easy to make at home! With a few simple ingredients and a little bit of time, you’ll be able to whip up a batch that will impress your family and friends.
These pretzel bites are not just a snack; they’re a fun appetizer for gatherings, a unique twist on traditional party foods, and a delicious treat to satisfy your cravings. So, roll up your sleeves, and let’s dive into the delightful world of Buttery Garlic Herb Pretzel Bites!
Understanding the Ingredients
To create the perfect Buttery Garlic Herb Pretzel Bites, it’s essential to understand the role of each ingredient in the recipe. Each component contributes to the flavor, texture, and overall success of your pretzel bites.
– Warm Water: The foundation of any great dough starts with warm water. Its primary role is to activate the yeast, which is crucial for the dough’s rise. The ideal temperature for warm water is between 100°F and 110°F (38°C to 43°C); this warmth helps to create a thriving environment for the yeast to multiply.
– Active Dry Yeast: This ingredient is the star of the show when it comes to dough leavening. Active dry yeast works by consuming the sugars in the dough and producing carbon dioxide gas, which causes the dough to rise. For this recipe, ensuring that the yeast is fresh and properly activated is key to achieving that fluffy texture.
– Granulated Sugar: While sugar might seem like just a sweetener, it plays a vital role in enhancing the activation of the yeast. The sugar provides food for the yeast, promoting fermentation and helping the dough to rise beautifully.
– All-Purpose Flour: The backbone of your pretzel dough, all-purpose flour provides structure and stability. It also contains gluten, which is essential for creating the chewy texture that pretzels are known for. Using the right amount of flour is crucial; too much can lead to a dense bite, while too little will result in a sticky mess.
– Baking Soda: This ingredient is unique to pretzel-making. After the dough is shaped into bites, it’s traditionally boiled in a baking soda solution before baking. This process gives pretzels their distinctive chewy crust and rich, brown color. Baking soda also helps to enhance the flavor of the pretzels.
– Kosher Salt: Salt is an essential ingredient that enhances the overall flavor profile of your pretzel bites. It also contributes to the texture by affecting the dough’s gluten structure. Using kosher salt provides a nice crunch and a burst of flavor with each bite.
– Unsalted Butter: Adding richness and flavor, unsalted butter is brushed onto the pretzel bites after baking. It provides that buttery sheen and enhances the overall taste. Using unsalted butter allows you to control the saltiness of the final product.
– Garlic and Herbs: Fresh garlic and herbs, such as rosemary or thyme, lend an aromatic quality and elevate the flavor of the pretzel bites. The combination of garlic and herbs creates a savory profile that perfectly complements the buttery goodness.
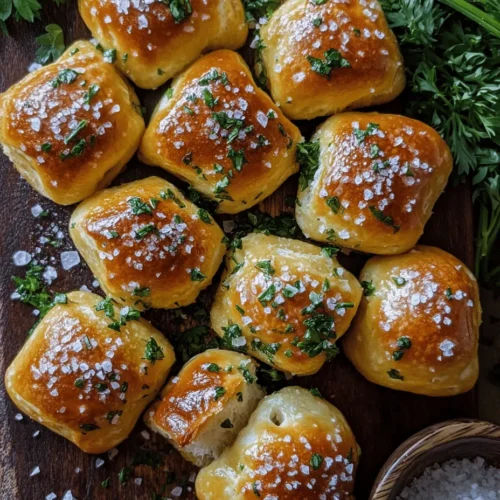
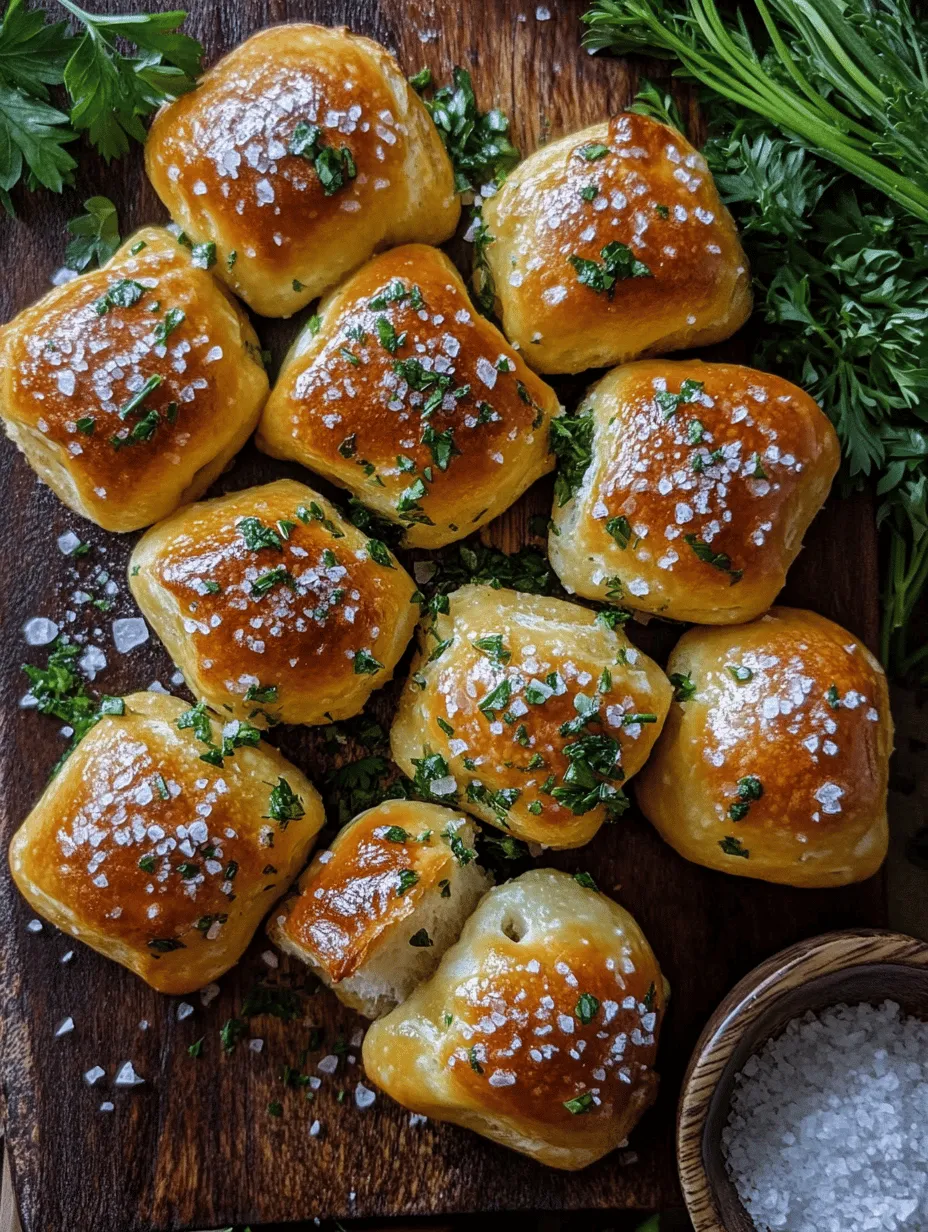
– Flaky Sea Salt: The finishing touch, flaky sea salt, is sprinkled on top of the pretzel bites after baking. It not only enhances the flavor but also adds a beautiful presentation, making each bite visually appealing.
With a solid understanding of the ingredients, you’re ready to embark on the exciting journey of making your own Buttery Garlic Herb Pretzel Bites!
Step-by-Step Process
Activating the Yeast
The first step in making your pretzel bites is activating the yeast. To do this, you’ll need to combine the warm water, active dry yeast, and granulated sugar in a mixing bowl. Gently stir the mixture and let it sit for about 5 to 10 minutes. This process is crucial because it allows the yeast to wake up and start bubbling, indicating that it’s alive and ready to work its magic.
Important Tips for Activating Yeast:
– Water Temperature: Ensure your water is warm but not hot, as excessive heat can kill the yeast. Aim for a temperature range of 100°F to 110°F (38°C to 43°C).
– Proofing: Keep an eye on the mixture. You’ll know the yeast is activated when it’s foamy and has expanded in size. If you don’t see any bubbles after 10 minutes, it’s best to start over with fresh yeast.
Making the Dough
Once the yeast is activated, it’s time to make the dough. In a large mixing bowl or a stand mixer fitted with a dough hook, combine the activated yeast mixture with all-purpose flour and kosher salt. Mix until the ingredients are combined, then knead the dough until it becomes smooth and elastic.
Tips for Mixing and Achieving the Right Dough Consistency:
– Gradually Add Flour: Start by adding 3 cups of flour to the yeast mixture, and gradually incorporate more until the dough pulls away from the sides of the bowl.
– Kneading: Knead the dough for about 5 to 7 minutes. If you’re using a stand mixer, knead on medium speed. The dough should be slightly tacky but not sticky. If it’s too sticky, add a little more flour, a tablespoon at a time.
First Rise: Creating the Perfect Environment
After kneading, it’s time for the dough to rise. Transfer the dough to a lightly greased bowl, cover it with a kitchen towel or plastic wrap, and place it in a warm, draft-free area. This first rise is essential for developing the flavors and texture of the pretzel bites.
Finding the Best Spot for Dough Rising:
– Temperature: Look for a spot that’s around 75°F to 80°F (24°C to 27°C). An oven with the light on or a warm kitchen counter works well.
– Signs of Readiness: The dough is ready when it has doubled in size, which usually takes about 1 to 1.5 hours. To check, gently press a finger into the dough; if the indentation remains, it’s ready for the next step.
Preheating the Oven: Setting the Stage for Baking
While the dough is rising, you can take this time to preheat your oven. Set it to 425°F (220°C), ensuring it reaches temperature before you bake the pretzel bites. This step is crucial for achieving that perfect golden-brown crust.
With the dough rising beautifully and the oven preheating, you’re well on your way to creating a delicious batch of Buttery Garlic Herb Pretzel Bites. In the next section, you’ll learn how to shape the dough and prepare it for boiling and baking. Stay tuned for the next steps, where the magic truly happens!

Importance of a Hot Oven in Achieving the Desired Texture
When crafting the perfect buttery garlic herb pretzel bites, one of the most crucial elements is ensuring your oven is adequately preheated. A hot oven is essential for achieving that delightful golden brown crust while keeping the inside fluffy and tender. Preheating your oven to 450°F (232°C) allows the dough to rise quickly as it bakes, creating that signature chewy texture synonymous with pretzels. If the oven isn’t hot enough, the pretzels may end up being dense instead of light and airy, so be patient and make sure your oven is at the right temperature before sliding the pretzel bites in.
Preparing the Water Bath: The Science Behind Boiling
Before we dive into the baking process, it’s essential to prepare the water bath, which plays a monumental role in the final outcome of your pretzel bites. This step involves boiling water with baking soda added, creating an alkaline solution. The science behind this is simple yet effective: the baking soda bath enhances the pretzel’s color, flavor, and texture.
When the pretzel bites are boiled for about 30 seconds, they undergo a process called gelatinization. This means the outside of the dough begins to form a protective layer that helps lock in moisture while baking. This contributes to that delightful chewy exterior while the inside remains soft. The alkaline nature of the baking soda helps achieve that classic pretzel flavor, giving it a distinctive taste that regular bread simply cannot replicate.
Explanation of the Baking Soda Bath and Its Effects on Flavor and Texture
The baking soda bath is not just a step; it’s the key to transforming dough into pretzel bites. The alkaline solution created by dissolving baking soda in boiling water changes the proteins in the dough, leading to a Maillard reaction during baking. This reaction not only deepens the color of the pretzel bites, giving them that appetizing golden-brown finish, but also enhances their flavor profile, making them taste distinctly like pretzels.
Shaping the Pretzel Bites: Techniques for Uniformity
Once your dough has risen, it’s time to shape the pretzel bites. This step is crucial for uniformity and cooking consistency. Start by dividing the dough into smaller portions—typically, you can cut it into four equal pieces. Roll each piece into a long rope, approximately half an inch thick. Use a bench scraper or a sharp knife to cut the rope into bite-sized pieces, about 1 to 2 inches long.
For the best results, try to keep all pieces uniform in size to ensure even cooking. If you prefer a more traditional pretzel shape, you can twist the ropes into classic pretzel knots before cutting them into bites. Regardless of the shape, aim for consistency to help achieve an evenly baked result.
Tips on Rolling and Cutting Dough for Consistent Sizes
To ensure your pretzel bites are uniform, here are a few tips:
– Use a ruler or measuring tape for precision when cutting the dough.
– Roll the dough on a lightly floured surface to prevent sticking.
– Keep your hands and tools lightly floured to maintain smooth rolling.
– If you find the dough is too sticky, allow it to rest for a few minutes before rolling, which will help it firm up.
Boiling the Bites: A Crucial Step
Boiling the pretzel bites is a crucial step that cannot be skipped. Once your water bath is ready, gently add the pretzel bites into the boiling water. Depending on the size of your pot, you may need to do this in batches to avoid overcrowding.
Details on Timing and Technique for Boiling Pretzel Bites
Boil each batch for approximately 30 seconds, allowing them to puff up slightly. Use a slotted spoon to remove the bites from the boiling water and place them on a baking sheet lined with parchment paper. This step not only enhances the flavor but also contributes to the chewy texture that will develop during baking.
Safety Tips for Handling Boiling Water
When boiling the pretzel bites, safety is paramount. Here are a few tips:
– Always use a slotted spoon or spider to lower and remove the pretzel bites from boiling water.
– Keep a close eye on the water to prevent it from boiling over.
– Use oven mitts to protect your hands when handling hot pots and pans.
Crafting the Garlic Herb Butter: Essential Flavor Boost
While your pretzel bites are boiling, it’s time to prepare the garlic herb butter that will elevate them to the next level. Melt unsalted butter in a small saucepan over medium heat. Once melted, add minced garlic and let it sauté until fragrant, which usually takes about 1 minute. This is where the timing and heat come into play; too much heat can burn the garlic, leading to bitterness instead of the rich flavor you want.
Importance of Timing and Heat in Releasing Flavors
The key to perfect garlic herb butter is to ensure the garlic is just golden and fragrant. If you let it cook for too long, it can quickly turn from delicious to burnt. After removing from heat, add your choice of fresh herbs—such as parsley, thyme, or rosemary—for an additional flavor boost. This herb-infused butter will coat the pretzel bites beautifully, giving them that irresistible flavor.
Suggestions for Variations in Herbs Used
Feel free to experiment with different herbs based on your preferences or what you have on hand. You could use dried herbs if fresh ones aren’t available; however, fresh herbs provide a more vibrant flavor. Some great options include:
– Oregano
– Basil
– Chives
– Dill
Coating the Pretzel Bites: Ensuring Even Distribution
Once your pretzel bites are boiled and have cooled slightly, it’s time to coat them in the garlic herb butter. Using a pastry brush or a spoon, carefully brush the melted butter mixture onto each pretzel bite, ensuring a generous coating for maximum flavor.
Techniques for Brushing Butter Evenly on Each Bite
To ensure even distribution:
– Brush the butter on both sides of each pretzel bite for ultimate flavor.
– Work in batches to avoid letting the butter sit too long and solidify.
– If desired, sprinkle a pinch of coarse sea salt on top after buttering for added texture and taste.
Baking: Achieving the Perfect Golden Brown
Now that your pretzel bites are coated, it’s time to bake them in the preheated oven. Place the baking sheet in the center of the oven and bake for 12-15 minutes, or until they are golden brown.
Visual Cues for Doneness
Keep an eye on your pretzel bites as they bake. They should puff up slightly and take on a rich golden color. A good indicator of doneness is a fragrant aroma filling your kitchen, signaling that they are close to being ready.
Importance of Oven Positioning for Even Baking
Make sure to position your baking sheet in the center of the oven for even cooking. If your oven has hot spots, consider rotating the baking sheet halfway through the baking time to ensure all bites are evenly baked.
Serving Suggestions
These buttery garlic herb pretzel bites are perfect for any occasion. Here are some serving suggestions to enhance your experience:
– Pairing with Dipping Sauces: Serve the pretzel bites with a variety of dipping sauces, such as spicy mustard, creamy cheese sauce, or a tangy ranch dressing.
– Presentation Ideas: For gatherings or parties, consider arranging the pretzel bites on a large platter with small bowls of different dips. Garnish with fresh herbs for a pop of color and freshness.
– Storing and Reheating Leftovers: If you have leftovers (which is rare!), store them in an airtight container in the refrigerator for up to three days. To reheat, place them in a preheated oven at 350°F (175°C) for about 5-7 minutes until they are warm and the butter is re-melted.
Nutritional Information
Understanding the nutritional profile of your homemade pretzel bites can help you enjoy them guilt-free. Here’s a rough breakdown per serving (approximately 4 pretzel bites):
– Calories: 220
– Fats: 10g (Saturated Fat: 6g)
– Proteins: 4g
– Carbohydrates: 29g (Fiber: 1g, Sugars: 1g)
These pretzel bites combine a balance of carbohydrates from the dough and healthy fats from the butter, making them a satisfying indulgence. However, as with any treat, moderation is key, especially for those watching their calorie intake or following specific dietary restrictions.
Conclusion
Homemade buttery garlic herb pretzel bites are not just a snack; they are an experience filled with warm, soft textures and rich flavors that evoke memories of family gatherings and celebrations. The joy of creating these delightful bites in your kitchen is priceless, and experimenting with different herbs and dips can lead to endless variations to suit your taste.
Take the time to savor the process of baking and share these delicious pretzel bites with friends and family, creating moments of joy and satisfaction. Whether you serve them at a party or enjoy them as a cozy evening snack, these pretzel bites are sure to become a favorite in your home. So roll up your sleeves, gather your ingredients, and get ready to indulge in a truly delectable treat!