Introduction
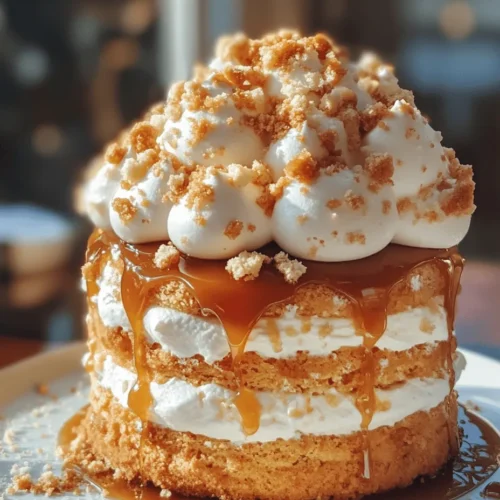
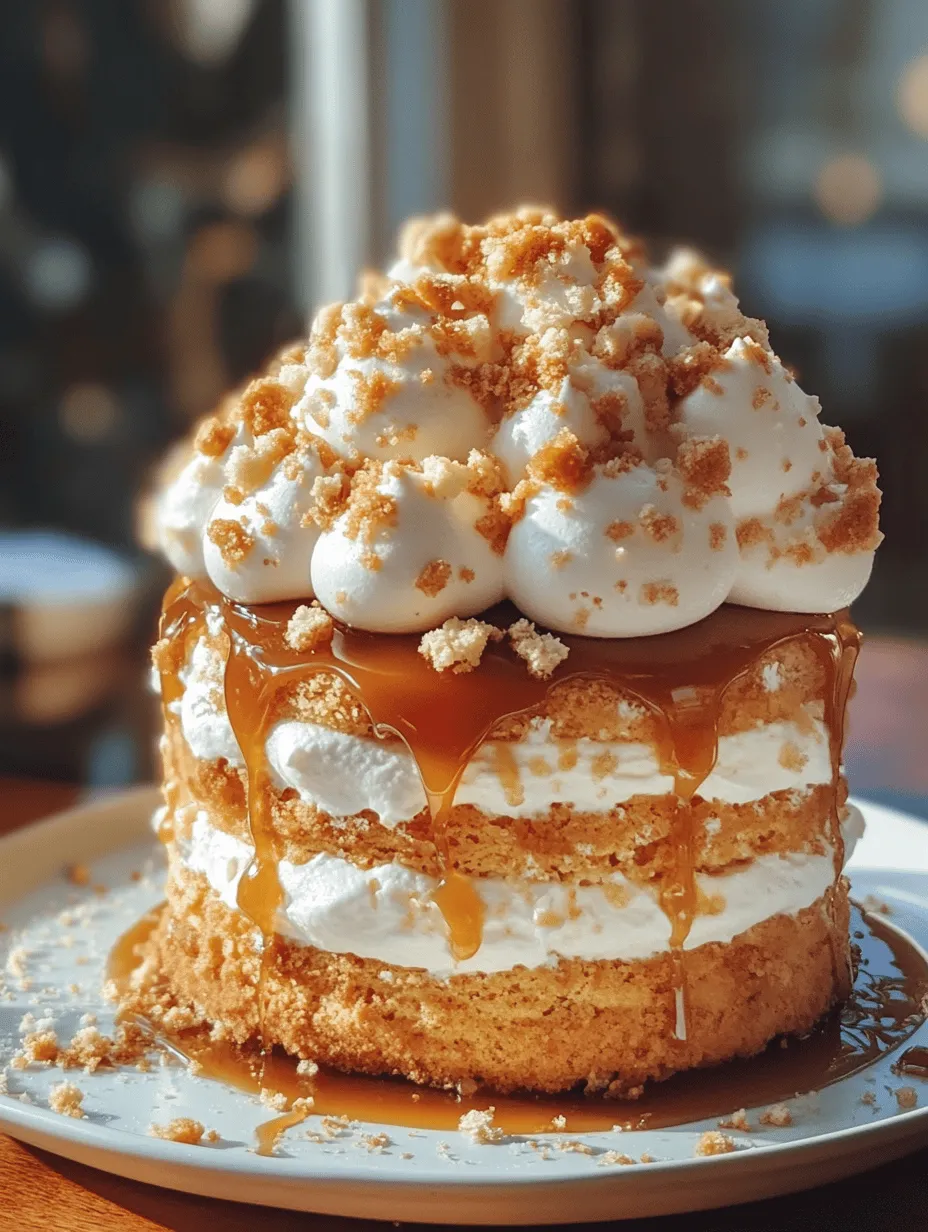
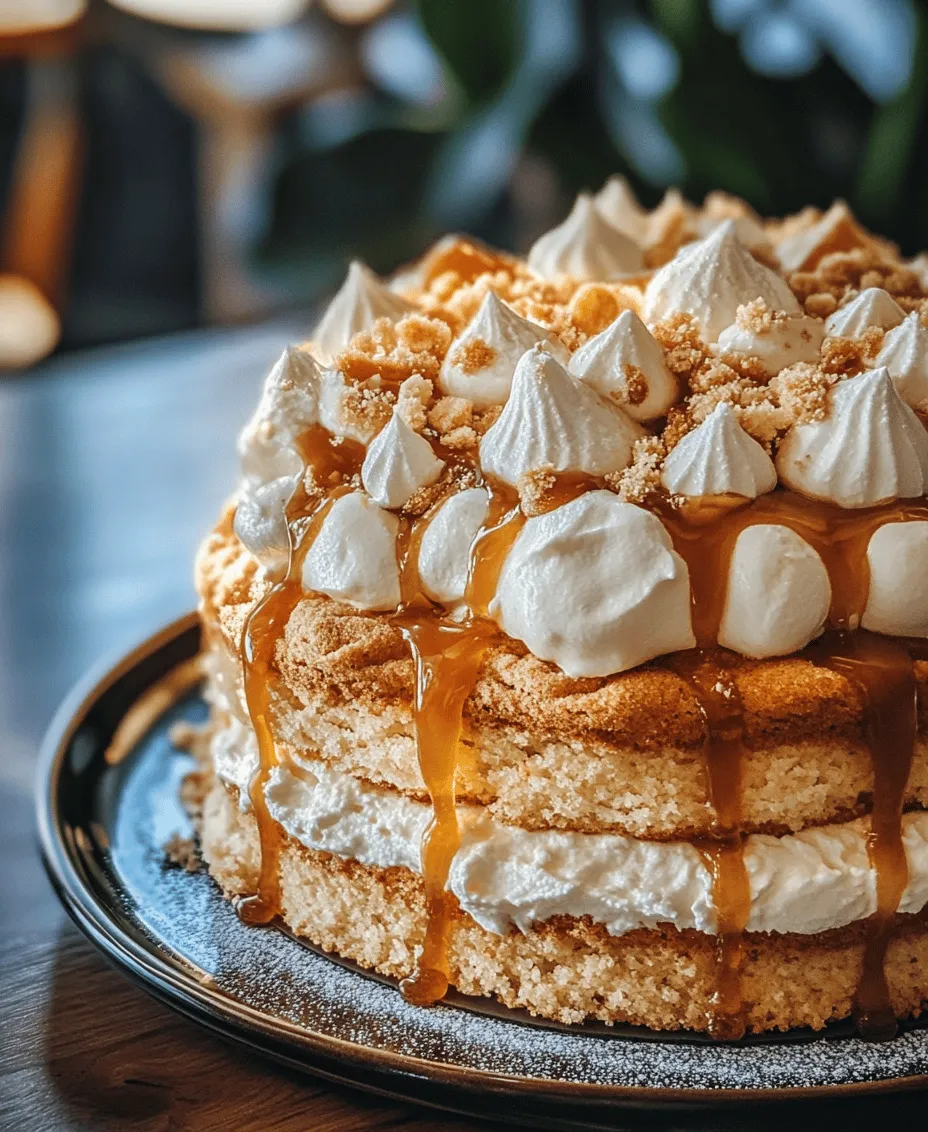
Caramel Cloud Cake is a delightful dessert that captures the hearts of cake lovers with its unique blend of textures and flavors. Imagine a cake that boasts a soft, airy structure reminiscent of a fluffy cloud, enveloped in a rich, luscious caramel sauce that adds a decadent touch to every bite. This cake is not just a treat for the taste buds; it’s also a feast for the eyes, making it an elegant centerpiece for any gathering.
What sets Caramel Cloud Cake apart is its perfect balance of sweetness and creaminess. The cake’s light, sponge-like texture contrasts beautifully with the smooth, buttery caramel, making each slice a heavenly experience. Ideal for special occasions like birthdays, festive celebrations, or family gatherings, this cake will undoubtedly impress your guests and become a cherished favorite.
Whether you are a seasoned baker or a novice looking to try something new, Caramel Cloud Cake provides a rewarding baking experience that culminates in a dessert that is both impressive and delicious. Let’s dive into the components that make this cake truly unique and understand how to create this delightful masterpiece.
Understanding the Components of Caramel Cloud Cake
To fully appreciate the Caramel Cloud Cake, it’s essential to understand its components and the role each ingredient plays in achieving its signature texture and flavor. At its core, this cake is beautifully simple, relying on a handful of fresh ingredients that work in harmony to create an unforgettable dessert.
The foundation of the cake is a soft, fluffy sponge made from all-purpose flour, butter, sugar, eggs, and buttermilk. These ingredients provide the necessary structure while ensuring the cake remains light and airy. All-purpose flour is key, as it has the right balance of protein to create a tender crumb without making the cake too dense. Butter contributes richness and flavor, while buttermilk not only adds moisture but also a slight tang that enhances the overall taste.
The caramel sauce, on the other hand, is a rich, sweet topping that elevates the cake to new heights. Made from granulated sugar, butter, cream, and a touch of sea salt, the caramel sauce adds a complex flavor profile that beautifully complements the cake’s sweetness. The use of sea salt is crucial, as it balances the richness of the caramel, making each bite more flavorful and enjoyable.
Using fresh, high-quality ingredients is vital for optimal flavor and texture. The freshness of the eggs, the quality of the butter, and the purity of the sugar all contribute to the success of your Caramel Cloud Cake. When you source the best ingredients, you ensure that the final product is not just good but truly exceptional.
The Cake Base: A Soft and Fluffy Foundation
To create a successful Caramel Cloud Cake, the first step is preparing the cake base, which provides the soft and fluffy foundation for this indulgent dessert. Let’s explore the key ingredients needed for the cake and how they contribute to achieving the desired texture.
Ingredients for the Cake Base
1. All-Purpose Flour: The backbone of the cake, providing structure while keeping it light.
2. Butter: Adds flavor and richness to the cake, while also aiding in achieving a tender crumb.
3. Sugar: Sweetens the cake and also helps with the creaming process, which contributes to the cake’s fluffiness.
4. Eggs: Provide moisture and stability to the cake, helping it rise during baking.
5. Buttermilk: Adds moisture, tenderness, and a slight tanginess to the cake, balancing out the sweetness.
The Importance of Proper Mixing Techniques
Achieving the perfect texture for your Caramel Cloud Cake hinges on proper mixing techniques, especially when creaming the butter and sugar. Here’s a detailed breakdown of the process:
1. Creaming Butter and Sugar: Start by ensuring that your butter is at room temperature. This allows for easy creaming and helps incorporate air into the mixture. In a mixing bowl, combine the softened butter and granulated sugar. Use an electric mixer on medium speed to beat them together until the mixture becomes light and fluffy. This process typically takes about 3-5 minutes. The goal is to incorporate as much air as possible, which will help the cake rise and create a light texture.
2. Incorporating Eggs: Once the butter and sugar are well creamed, it’s time to add the eggs. Beat them in one at a time, ensuring each egg is fully incorporated before adding the next. This will help maintain the emulsion and ensure a uniform batter.
3. Mixing in Dry Ingredients: In a separate bowl, sift together the all-purpose flour and any leavening agents (like baking powder). This step helps prevent lumps and ensures even distribution of the dry ingredients. Gradually add the dry ingredients to the wet mixture, alternating with the buttermilk. Start and end with the dry ingredients to maintain the structure of the batter. Mix until just combined, as overmixing can lead to a dense cake.
Step-by-Step Breakdown of Cake Preparation
1. Preheat the Oven: Start by preheating your oven to 350°F (175°C). This ensures that your cake bakes evenly.
2. Prepare the Baking Pan: Grease and flour your cake pans or line them with parchment paper to prevent sticking. This step is essential for a clean release once the cake is baked.
3. Cream the Butter and Sugar: In a mixing bowl, combine 1 cup of softened butter with 2 cups of granulated sugar. Beat until light and fluffy.
4. Add Eggs: Add 4 large eggs to the mixture, one at a time, beating well after each addition.
5. Combine Dry Ingredients: In another bowl, whisk together 2 ½ cups of all-purpose flour, 1 teaspoon of baking powder, and a pinch of salt.
6. Mix Dry Ingredients with Wet Ingredients: Gradually add the dry mixture to the creamed butter and sugar, alternating with 1 cup of buttermilk. Start and end with the flour mixture, mixing until just combined.
7. Pour into Pans: Divide the batter evenly between the prepared cake pans. Smooth the tops with a spatula for an even bake.
8. Bake: Place the pans in the preheated oven and bake for about 25-30 minutes or until a toothpick inserted into the center comes out clean.
9. Cool: Once baked, allow the cakes to cool in the pans for about 10 minutes before transferring them to a wire rack to cool completely.
By carefully following these steps and using the right techniques, you can create a light, airy cake base that serves as the perfect canvas for your rich caramel sauce.
Creating the Perfect Caramel Sauce
No Caramel Cloud Cake would be complete without its signature caramel sauce. This sauce not only enhances the flavor profile of the cake but also adds a luxurious touch that takes the dessert to another level. Understanding the caramelization process is key to mastering this delicious topping.
The Caramelization Process
Caramelization is the process where sugar is heated until it melts and transforms into a golden-brown syrup. This transformation brings out the natural flavors of the sugar, creating a deep, rich taste that is both sweet and slightly nutty. Temperature control is crucial during this process; too high of a heat can cause the sugar to burn, while too low can make it take too long to caramelize.
Step-by-Step Guide to Making Caramel Sauce
1. Gather Ingredients: You will need 1 cup of granulated sugar, 6 tablespoons of unsalted butter, and ½ cup of heavy cream. A pinch of sea salt is optional but highly recommended for flavor enhancement.
2. Heat the Sugar: In a medium saucepan over medium heat, pour in the granulated sugar. Stir continuously with a wooden spoon or silicone spatula. As the sugar heats, it will begin to clump together before melting into a smooth, amber-colored liquid.
3. Watch for Color Changes: Monitor the sugar closely as it melts. It will change from white to clear, then to a light golden color, and finally to a deep amber. This process should take about 5-7 minutes. Remove the pan from heat once it reaches the desired amber shade, being careful not to let it burn.
4. Add Butter: Quickly add the butter to the melted sugar. The mixture will bubble up vigorously. Stir until the butter is fully melted and incorporated.
5. Incorporate Cream: Slowly pour in the heavy cream while stirring continuously. Be cautious, as the mixture may bubble up again. Continue stirring until the sauce is smooth and well combined.
6. Season with Sea Salt: If desired, add a pinch of sea salt to enhance the caramel’s flavor and balance the sweetness.
7. Cool the Caramel Sauce: Allow the caramel sauce to cool slightly before drizzling it over your cooled cake. It will thicken as it cools, making it easier to pour and spread.
Troubleshooting Common Issues
– Burned Sugar: If the sugar burns, it will taste bitter. If you notice any dark brown specks, it’s best to start over, as there’s no saving burnt caramel.
– Grainy Texture: If your caramel sauce turns grainy, it may be due to sugar crystallization. To prevent this, avoid stirring the sugar too much as it melts and ensure that the sides of the pan are clean during the cooking process.
– Too Thick or Thin: If your sauce is too thick, you can thin it out by adding a little more cream and gently reheating it. If it’s too thin, allow it to simmer on low heat for a few more minutes until it thickens to your desired consistency.
With these steps and tips, you’ll be well on your way to creating a stunning Caramel Cloud Cake that will leave your guests in awe. The combination of the soft cake base and the rich caramel sauce creates a dessert experience that is truly unforgettable. Stay tuned for the next part, where we will explore the assembly of the cake and additional serving suggestions.
Whipping Up the Cloud Topping
The cloud topping is what truly elevates the Caramel Cloud Cake, adding a delicate lightness that contrasts beautifully with the rich caramel layers. This airy topping transforms the cake into a decadent dessert that feels almost ethereal. When whipping the cream, it’s essential to use heavy cream, as it contains a higher fat content that allows for the formation of stable, stiff peaks. This stability is crucial for ensuring that the cloud topping holds its shape when layered onto the cake.
To achieve the perfect whipped cream, start with chilled heavy cream—this helps it whip faster and to a greater volume. Using an electric mixer, beat the cream on medium speed until it thickens, then increase the speed to high. It’s important to stop whipping as soon as the peaks form, as over-whipping can turn the cream into butter. For those looking to add an extra layer of texture and flavor, consider folding in crumbled meringue cookies into the whipped cream. This not only adds a delightful crunch but also enhances the overall flavor profile of the cake.
Assembling the Caramel Cloud Cake
Once your cake layers have cooled and your cloud topping is ready, it’s time to assemble the Caramel Cloud Cake. Follow these step-by-step instructions to create a stunning presentation that will impress your family and friends:
1. Prepare the Cake Layers: Ensure that your cake layers are completely cool. This prevents the cloud topping from melting and sliding off the cake. If you haven’t already, level the tops of each layer with a serrated knife to create a flat surface.
2. Layering the Caramel: Place one of the cake layers on a serving platter. Generously drizzle a layer of your homemade caramel sauce over the top, allowing it to soak into the cake slightly. Be sure to reserve some caramel for drizzling on top later.
3. Adding the Cloud Topping: With a spatula, spread a layer of whipped cream over the caramel on the first cake layer, making sure to cover it completely.
4. Repeat the Process: Place the second cake layer on top of the first and repeat the process: drizzle with caramel, then spread with whipped cream.
5. Final Layer: Add the third cake layer on top. For the final touch, spread a generous amount of whipped cream on the top of the cake and around the sides, smoothing it out for an elegant look.
6. Garnishing: To achieve a visually appealing presentation, drizzle the reserved caramel sauce over the top of the cake. For added flair, consider garnishing with chocolate shavings, crushed nuts, or even fresh berries. This not only enhances the cake’s appearance but also adds delightful texture and flavor.
Serving Suggestions and Pairings
When it comes to serving the Caramel Cloud Cake, the presentation should be just as delightful as the taste. Here are some recommendations to ensure a perfect serving experience:
– Beverage Pairings: The rich flavors of the Caramel Cloud Cake pair beautifully with several beverages. A cup of freshly brewed coffee complements the sweetness of the cake, while a nice cup of tea, such as Earl Grey or chamomile, provides a soothing contrast. For a refreshing option, consider serving it with iced tea or sparkling water.
– Serving Temperature: The cake can be served chilled or at room temperature, depending on your preference. If you choose to serve it chilled, the flavors will be more pronounced, and the cloud topping will be firmer. Serving it at room temperature allows the caramel to become more pronounced and gooey, creating a different but equally enjoyable experience.
– Customization Options: One of the joys of baking is the ability to customize your creations. For those who enjoy fruity flavors, consider adding layers of fresh fruit such as sliced strawberries, bananas, or peaches between the cake layers. Nuts such as pecans or walnuts can also be added for an additional crunch. These variations can cater to different tastes and make the dessert feel unique each time you bake it.
Storage and Shelf Life
To ensure that your Caramel Cloud Cake remains fresh and delicious, proper storage is key. Here are some best practices for storing your cake:
– Refrigeration: Store any leftover cake in an airtight container in the refrigerator. This will help maintain the moisture of the cake and the integrity of the cloud topping. If you have added fruit or nuts, it’s best to consume the cake within 3 to 4 days.
– Longevity of Caramel Sauce: If you have extra caramel sauce, it can be stored in an airtight container in the fridge for up to two weeks. Simply reheat it slightly before using to achieve a pourable consistency.
– Cloud Topping Shelf Life: The whipped cream topping is best enjoyed fresh and typically lasts for about 2-3 days in the refrigerator. If you anticipate having leftover cake, consider adding the whipped cream topping right before serving to maintain its airy texture.
Conclusion
The Caramel Cloud Cake is a delightful dessert that encapsulates the joy of baking and the pleasure of sharing delicious food with loved ones. With its rich layers of caramel and light, fluffy cloud topping, this cake offers a balanced combination of flavors and textures that is hard to resist.
Encouraging your friends and family to try making this cake at home can lead to wonderful baking memories and delightful gatherings. Whether you serve it at a special occasion or simply enjoy it as a treat after dinner, this cake will surely become a favorite in your dessert repertoire. So gather your ingredients, whip up this heavenly cake, and indulge in the joy of baking and sharing delightful desserts.