Cheeseburger pockets have emerged as a beloved comfort food, marrying the classic flavors of a cheeseburger with the convenience of a handheld pastry. Imagine biting into a flaky, golden crust that gives way to a savory filling of juicy ground beef, melty cheddar cheese, and aromatic onions. This dish is not just a meal; it’s an experience that evokes warmth, satisfaction, and nostalgia. Whether you’re hosting a family dinner, preparing for a game day gathering, or simply seeking a satisfying snack, cheeseburger pockets are sure to please a crowd.
Their versatility allows them to shine in various settings—serve them as appetizers at parties, pack them for lunch, or enjoy them as a cozy dinner option. With their appealing combination of textures and flavors, cheeseburger pockets are a delightful twist on traditional burgers, making them an exciting addition to your culinary repertoire.
In this article, we’ll dive into the creation of cheeseburger pockets, exploring their origins, the essential ingredients that contribute to their deliciousness, and a step-by-step preparation guide that will empower you to make this delectable dish at home.
Understanding the Cheeseburger Pocket
The cheeseburger pocket is believed to have roots in American cuisine, where the concept of stuffing flavorful fillings into dough has long been a culinary tradition. Variations of stuffed pastries can be found in many cultures—think of empanadas in Latin America, pasties in the UK, or calzones in Italy. The cheeseburger pocket takes inspiration from these global influences, combining the familiar taste of a cheeseburger with the convenience of pastry.
One of the key appeals of cheeseburger pockets is their versatility. They can be adapted to suit different tastes and dietary preferences. For instance, you can easily swap out ground beef for ground turkey, chicken, or even plant-based meat alternatives to cater to various dietary needs. Additionally, the filling can be customized with different cheeses, spices, or vegetables, allowing for endless variations. This adaptability makes cheeseburger pockets a favorite in many households, as they can be tailored to fit any occasion or palate.
Ingredients Breakdown
To create the perfect cheeseburger pocket, it’s essential to understand the role of each ingredient. Let’s take a closer look at the key components:
Ground Beef
Ground beef serves as the heart of the cheeseburger pocket, providing a rich, savory flavor that forms the foundation of the filling. When selecting ground beef, it’s best to choose a blend with a higher fat content, such as 80/20 (80% lean meat to 20% fat). This ratio ensures that the beef remains juicy and flavorful after cooking. Additionally, browning the beef properly enhances its taste, developing a rich, caramelized exterior that adds depth to the filling.
Cheddar Cheese
Cheddar cheese is the go-to choice for cheeseburger pockets due to its sharp flavor and excellent melting qualities. When melted, cheddar becomes gooey and stretchy, creating that satisfying cheeseburger experience. While sharp cheddar offers a more intense flavor, mild or medium cheddar can also work well, depending on your preference. For an extra twist, consider blending cheddar with other cheeses like mozzarella or pepper jack for added creaminess and heat.
Onions and Garlic
Onions and garlic are essential aromatics that elevate the flavor of the filling. Sautéing diced onions until they are translucent brings out their natural sweetness, while garlic adds a robust, savory note. Together, they create a harmonious base that enhances the overall taste of the cheeseburger pocket.
Worcestershire Sauce and Mustard
These two condiments play a significant role in adding depth and complexity to the filling. Worcestershire sauce contributes a savory umami flavor that complements the beef, while mustard adds a tangy kick that balances the richness of the cheese. Together, they help to create a well-rounded and flavorful filling.
Biscuit Dough vs. Puff Pastry
When it comes to the outer layer of the cheeseburger pocket, you have two popular options: biscuit dough or puff pastry. Biscuit dough is thicker and tends to have a more substantial texture, giving the pockets a hearty bite. On the other hand, puff pastry is lighter and flakier, creating a delicate shell that crisps beautifully in the oven. Both options have their merits, so choose based on your texture preference and the desired end result.
Egg Wash
An egg wash, typically made from beaten egg mixed with a splash of water or milk, is brushed over the pastry before baking. This simple step is crucial for achieving a golden-brown color and an appealing shine on the exterior of your cheeseburger pockets. It enhances the presentation and adds a touch of professionalism to your homemade creation.
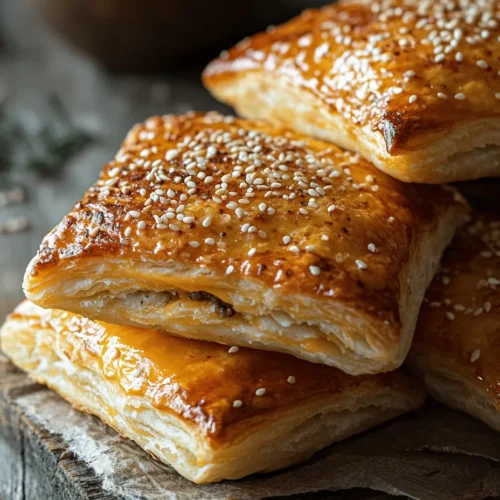
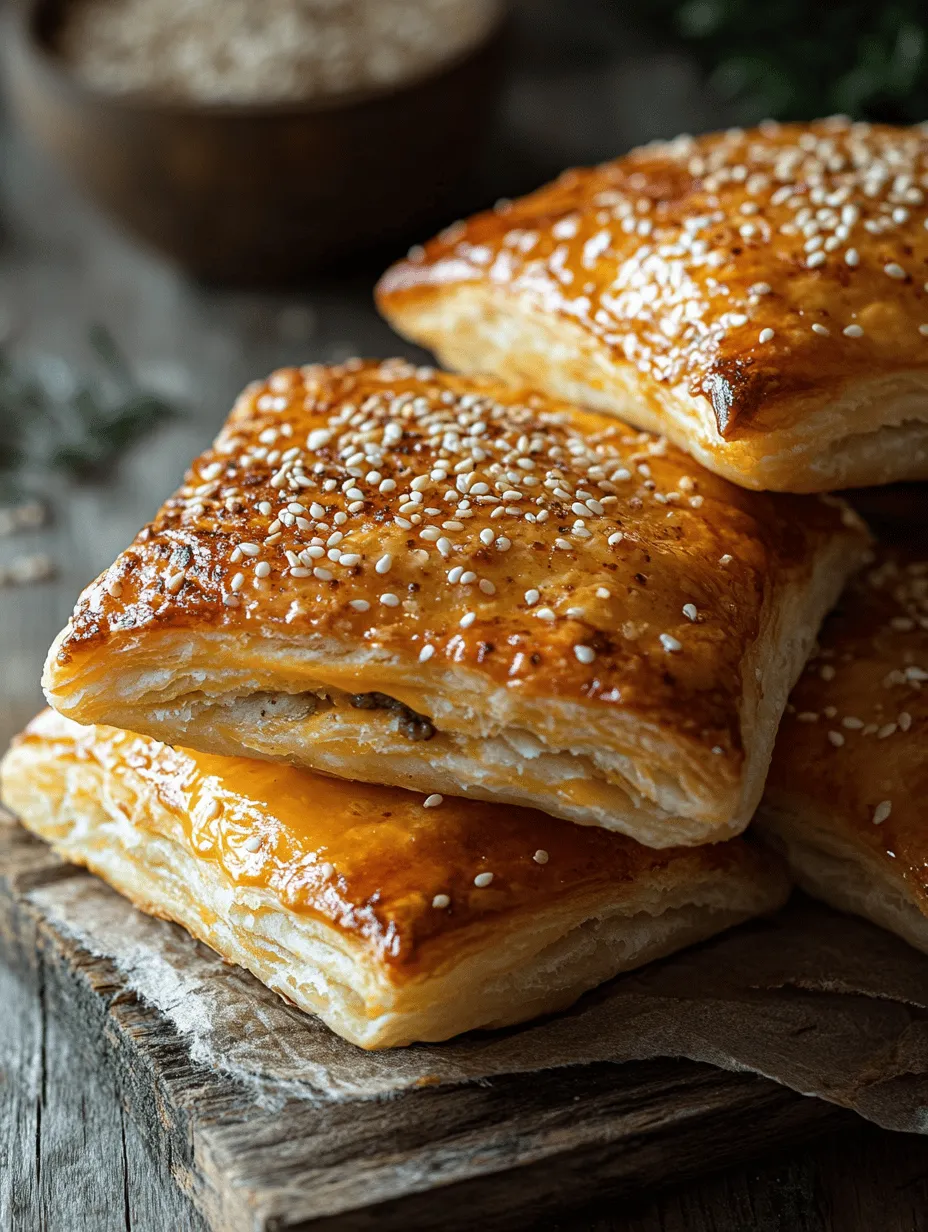
Optional Sesame Seeds
For those looking to add an extra layer of texture and aesthetics, sprinkling sesame seeds on top of the egg wash before baking is a great option. These small seeds not only look appealing but also provide a subtle crunch that complements the soft pastry.
Step-by-Step Preparation Guide
Now that we’ve explored the ingredients, let’s dive into the preparation process. This step-by-step guide will ensure that you create perfect cheeseburger pockets every time.
Preparing the Filling
1. Brown the Ground Beef: Begin by heating a large skillet over medium heat. Add the ground beef and cook, breaking it apart with a spatula, until it’s browned and fully cooked. This should take about 5-7 minutes. As it cooks, make sure to drain any excess fat to keep the filling from becoming greasy.
2. Add Aromatics: Once the beef is browned, add diced onions and minced garlic to the skillet. Continue cooking for an additional 3-4 minutes, or until the onions are soft and translucent. This step is crucial as it allows the flavors to meld together beautifully.
3. Season the Mixture: Stir in Worcestershire sauce and mustard to the beef mixture, ensuring that all ingredients are well combined. This is where the flavor really comes to life, so take a moment to taste the mixture and adjust the seasoning if necessary. A pinch of salt and pepper can make a significant difference.
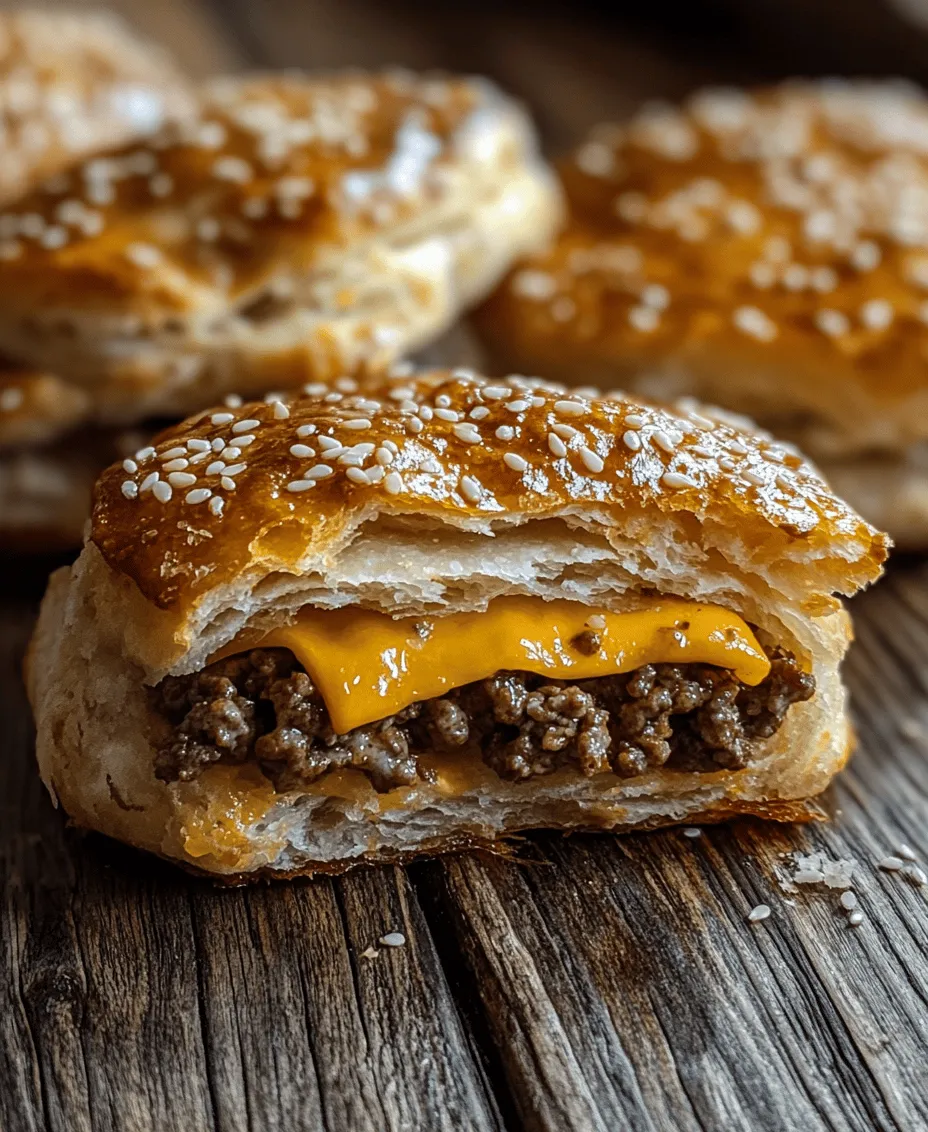
4. Incorporate the Cheese: Remove the skillet from heat and stir in shredded cheddar cheese while the mixture is still warm. The heat from the filling will melt the cheese slightly, creating a creamy and cohesive texture that binds the filling together.
Combining Ingredients
With the filling prepared, it’s time to assemble the cheeseburger pockets. If you’ve chosen biscuit dough, roll it out to about a ¼ inch thickness on a lightly floured surface. For puff pastry, ensure that it’s thawed and rolled out according to the package instructions.
1. Cut the Dough: Use a round cutter or a glass to cut out circles of dough, aiming for about 4-5 inches in diameter. This will be the base for each pocket.
2. Fill the Dough: Place a generous spoonful of the cheeseburger filling in the center of each dough circle. Be careful not to overfill, as this can make sealing the pockets difficult.
3. Seal the Edges: Fold the dough over the filling to create a half-moon shape. Press the edges together firmly, and use a fork to crimp the edges for a decorative finish. This step is vital to prevent any filling from leaking during baking.
4. Prepare for Baking: Place the filled pockets on a baking sheet lined with parchment paper. Brush each pocket with the egg wash to achieve that golden-brown finish. If desired, sprinkle sesame seeds on top for added texture and flair.
By following these steps, you’re well on your way to creating delicious cheeseburger pockets that are sure to impress. Stay tuned for the next part of this article, where we will explore baking techniques and serving suggestions to elevate your cheeseburger pocket experience to the next level.
Dough Preparation
To create the perfect cheeseburger pockets, the dough is a crucial element that should not be overlooked. Whether you choose to use biscuit dough or puff pastry, achieving a uniform thickness throughout the dough is essential for ensuring even cooking and a delightful texture. Here are some tips to help you roll out the dough effectively:
1. Chill the Dough: If you’re using store-bought puff pastry, make sure it is chilled but not frozen when you begin to work with it. Cold dough is easier to roll out and helps maintain its structure during baking. If you’re making your own dough, refrigerate it for at least 30 minutes before rolling.
2. Flour the Surface: Lightly flour your work surface and rolling pin to prevent sticking. This ensures that the dough rolls out smoothly without tearing. Be careful not to use too much flour, as this can alter the texture of the dough.
3. Roll Evenly: Start from the center and roll outward, applying even pressure. Rotate the dough occasionally to maintain a circular shape and ensure uniform thickness. Aim for a thickness of about 1/8 inch for puff pastry and slightly thicker for biscuit dough.
4. Cutting the Dough: Use a sharp knife or a pizza cutter to cut the dough into even squares or circles. The size will depend on how large you want your pockets to be. Typically, 4 to 6 inches in diameter works well for a balanced filling-to-dough ratio.
Filling and Sealing Pockets
Now that your dough is prepped, it’s time to fill and seal your cheeseburger pockets. Proper sealing is vital to avoid any leaks during the baking process, which can lead to a messy outcome.
1. Add the Filling: Place a generous scoop of your cheeseburger filling in the center of each dough piece. Avoid overfilling, as this can make it difficult to seal properly. A tablespoon or two should do the trick, depending on the size of your dough.
2. Moisten the Edges: To create a secure seal, moisten the edges of the dough with a little water or egg wash. This helps the two sides adhere better.
3. Fold and Seal: Carefully fold the dough over the filling to create a pocket. Press the edges together firmly, then use a fork to crimp the edges. This not only enhances the seal but adds a decorative touch.
4. Check the Seals: Make sure there are no gaps where the filling can escape. If you notice any tears or holes, use extra dough to patch them up.
Egg Wash Application
Applying an egg wash is a crucial step that gives your cheeseburger pockets a beautiful golden-brown finish. Here’s how to do it effectively:
1. Prepare the Egg Wash: In a small bowl, beat one egg with a tablespoon of water or milk. The liquid will help achieve a shiny, golden crust.
2. Application Technique: Using a pastry brush, gently apply the egg wash over the top of each pocket. Be careful not to let it drip down the sides, as this can cause the pockets to become soggy.
3. Even Coating: Ensure that the egg wash covers the entire surface without pooling in one spot. This will help your pockets brown evenly in the oven.
Baking and Serving Suggestions
Once your cheeseburger pockets are filled, sealed, and brushed with egg wash, it’s time to bake them to perfection.
Baking Temperature and Time
1. Preheat the Oven: Preheat your oven to 400°F (200°C). This temperature is ideal for achieving a crispy exterior while ensuring the filling is cooked through.
2. Baking Process: Place the pockets on a baking sheet lined with parchment paper, making sure they are spaced apart to allow for even heat circulation. Bake for about 15-20 minutes or until they are golden brown and puffed up.
3. Significance of Temperature: Baking at the right temperature is crucial; too low and the pockets will become soggy, too high and they may burn before the insides are cooked.
Cooling Period
After baking, it’s important to let your cheeseburger pockets cool for a few minutes on a wire rack. This cooling period helps set the filling and makes them easier to handle. Cutting into them immediately can lead to a messy filling explosion.
Serving Ideas
Cheeseburger pockets make a fantastic meal or snack and can be served in various ways:
– Condiments: Classic condiments like ketchup, mustard, and mayonnaise are always a hit. For a twist, try some spicy sriracha or tangy barbecue sauce.
– Dipping Sauces: Pair your pockets with ranch dressing, aioli, or a zesty salsa for an added flavor dimension.
– Side Dishes: Consider serving with a side of crispy fries or a fresh salad to complete the meal.
Nutritional Information
When enjoying cheeseburger pockets, it’s beneficial to be aware of their nutritional profile. A typical cheeseburger pocket contains:
– Calories: Approximately 300-400 calories per pocket, depending on the ingredients used.
– Fat Content: Around 20 grams of fat, primarily from the dough and filling.
– Protein: About 15-20 grams of protein, making it a filling option.
For those conscious of dietary choices, there are easy modifications to enhance the healthiness of your cheeseburger pockets:
– Lean Meats: Use ground turkey or lean ground beef to lower fat content.
– Whole Wheat Dough: Opt for whole wheat biscuit or puff pastry for added fiber.
– Vegetable Additions: Incorporate finely chopped vegetables such as spinach or zucchini into the filling for added nutrients.
Variations and Customizations
The versatility of cheeseburger pockets means you can tailor them to suit various dietary preferences and flavor profiles. Here are some exciting variations to try:
Vegetarian Option
For a meatless version, swap out the beef for black beans, lentils, or a mixture of sautéed vegetables. Season with taco or burger spices to maintain that beloved flavor profile.
Cheese Variations
Experiment with different cheeses for unique flavor combinations. Try using:
– Mozzarella: For a milder, stretchy cheese experience.
– Pepper Jack: For a spicy kick.
– Cheddar: Classic choice that pairs perfectly with ground beef.
Add-ins
Enhance your filling with additional ingredients for more texture and flavor. Consider adding:
– Diced Bell Peppers: Adds sweetness and crunch.
– Jalapeños: For those who enjoy a spicy bite.
– Mushrooms: Introduce earthiness and umami depth to the filling.
Conclusion
Cheeseburger pockets are a delightful fusion of flavors and textures, making them a versatile dish for any occasion. Whether you are preparing them for a family dinner, game day, or a casual get-together with friends, these pockets are sure to please.
The ease of preparation, combined with the opportunity for customization, allows you to make this recipe your own. Get creative with fillings and ingredients, and don’t hesitate to experiment with different flavor combinations. Enjoy the comfort and satisfaction of sharing these delicious cheeseburger pockets with those you love, and watch them become a staple in your culinary repertoire.