


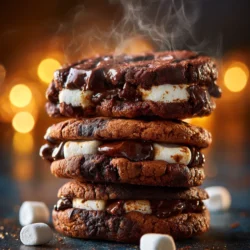
Chocolate Marshmallow Cookie Extravaganza is not just a recipe; it’s an experience that brings together the rich, decadent flavors of chocolate cookies and the fluffy, sweet delight of marshmallows. This cookie is the perfect embodiment of comfort food, making it an ideal choice for family gatherings, celebrations, or simply to satisfy a sweet craving. With each bite, you’ll find a delightful contrast between the chewy chocolate cookie base and the pillowy softness of marshmallows, creating a symphony of textures and flavors that is truly unforgettable.
In this article, we will guide you through the process of creating these scrumptious cookies, detailing each step and providing insights into the ingredients and techniques that will ensure your baking endeavors are a resounding success.
Understanding the Ingredients
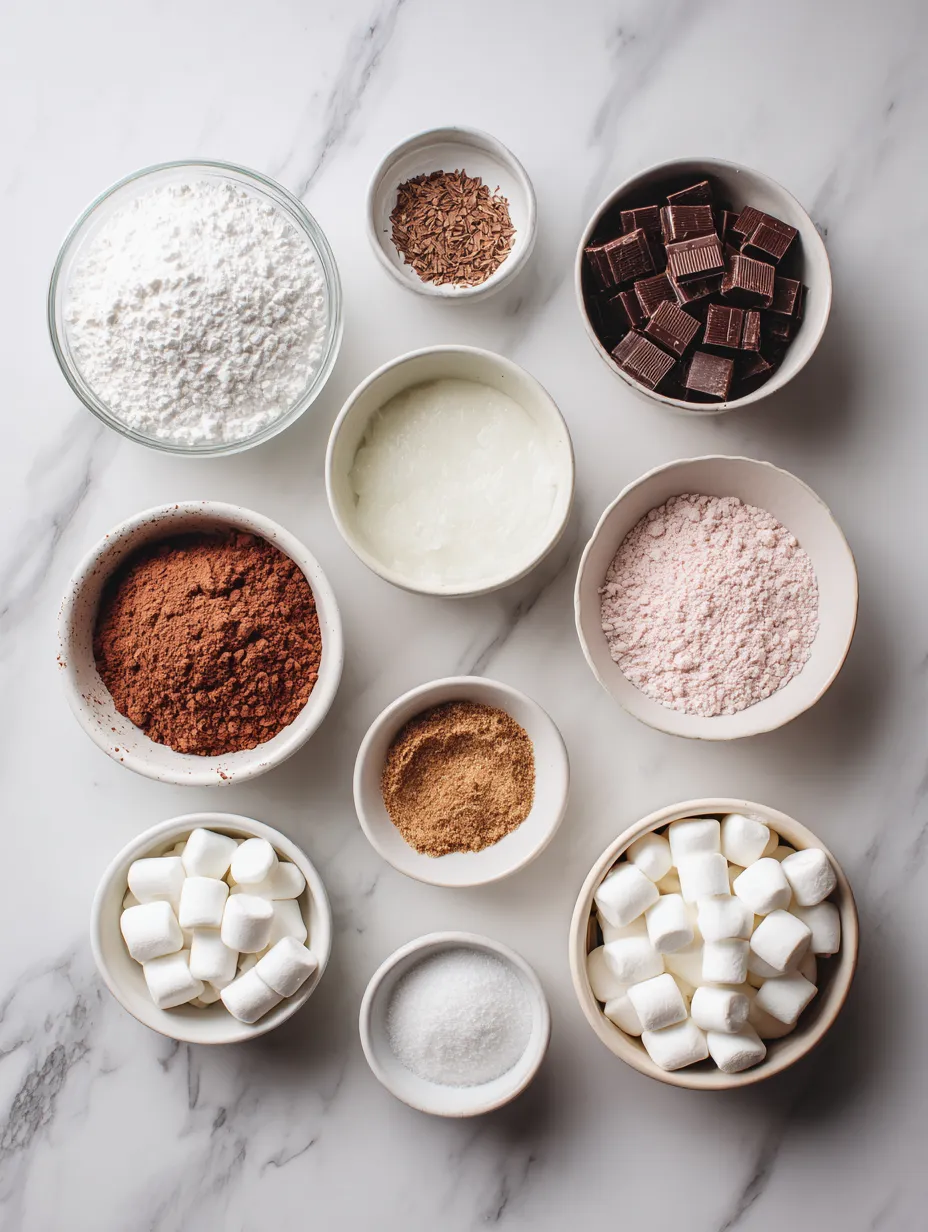
Before diving into the preparation steps, it’s essential to understand the core ingredients that come together to make the Chocolate Marshmallow Cookie Extravaganza so special. Each component plays a crucial role in flavor, texture, and overall success of the cookie.
Overview of Core Ingredients
– Unsalted Butter: This is the foundation of your cookie dough. Unsalted butter provides the necessary fat to create a rich flavor and tender texture, allowing the cookies to spread perfectly during baking.
– Sugars: The combination of brown sugar and granulated sugar is pivotal for achieving the right cookie structure and taste. Brown sugar adds moisture and a hint of caramel flavor, while granulated sugar contributes to the crispiness of the edges.
– Eggs: Eggs serve multiple purposes in baking. They act as a binding agent, provide moisture, and help the cookies rise. The proteins in eggs coagulate during baking, giving the cookies their structure.
– Vanilla Extract: A key flavor enhancer, vanilla extract elevates the overall taste profile of the cookies. It adds a warm, sweet aroma that complements the chocolate and marshmallow beautifully.
– All-Purpose Flour and Cocoa Powder: These two dry ingredients create the base of the cookie. All-purpose flour provides the necessary structure, while cocoa powder contributes the rich chocolate flavor that makes these cookies irresistible.
– Baking Soda and Salt: Baking soda acts as a leavening agent, helping the cookies rise and develop a soft, chewy texture. Salt is crucial for balancing flavors, enhancing the sweetness of the cookies.
– Chocolate Chips and Marshmallows: The stars of the show! Chocolate chips add bursts of rich chocolate flavor, while marshmallows bring a delightful softness and sweetness that pairs perfectly with the chocolate cookie base.
– Optional Nuts: For those who enjoy a bit of crunch, adding chopped nuts such as walnuts or pecans can enhance the texture and introduce a new layer of flavor.
Preparation Steps
Now that we’ve covered the essentials of the ingredients, let’s move on to the preparation steps. Following these steps carefully will help you achieve the best possible results for your Chocolate Marshmallow Cookie Extravaganza.
Preheating and Preparing the Oven
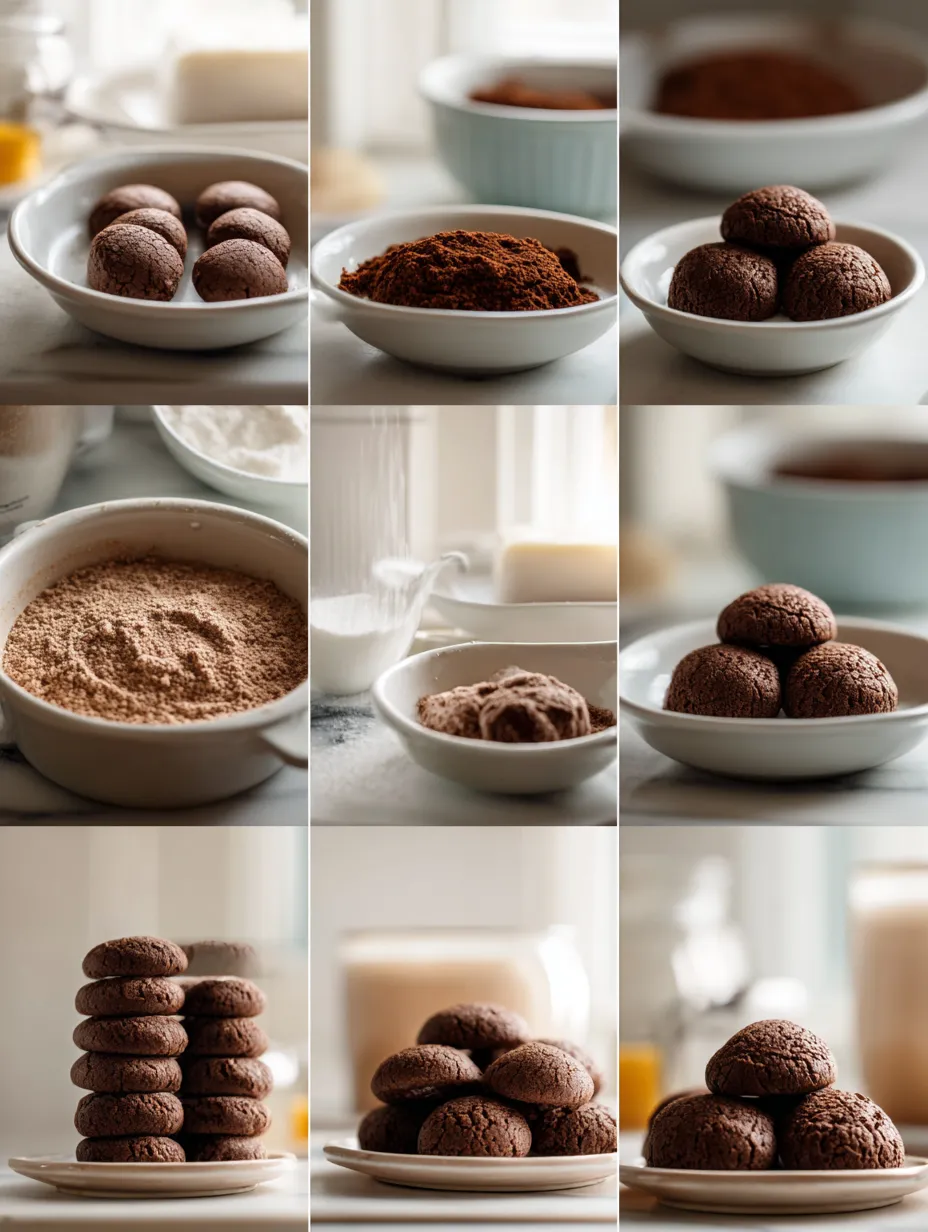
1. Preheat Your Oven: Begin by preheating your oven to 350°F (175°C). Preheating is crucial for even baking, as it ensures that your cookies start cooking at the right temperature, resulting in perfectly baked treats.
2. Line Baking Sheets: While the oven is preheating, prepare your baking sheets. Line them with parchment paper or silicone baking mats. This will not only make cleanup easier but also help prevent the cookies from sticking to the sheets, allowing for easy removal once baked.
Creaming Butter and Sugars
1. Soften the Butter: Ensure your unsalted butter is at room temperature. This makes it easier to cream with the sugars, creating a light and fluffy mixture.
2. Combine Butter and Sugars: In a large mixing bowl, add your softened butter along with both granulated and brown sugars. Using an electric mixer, beat on medium speed until the mixture is light and fluffy, which usually takes about 2-3 minutes.
– Tip: Start on a lower speed to prevent sugar from flying everywhere. Once the butter and sugars are combined, increase the speed.
Incorporating Eggs and Vanilla
1. Add Eggs One at a Time: Crack the eggs into a small bowl to avoid shell fragments, then add them one at a time to the butter-sugar mixture. Beat well after each addition to ensure they are fully incorporated. This step helps maintain the emulsification and ensures a uniform texture.
2. Mix in Vanilla Extract: Pour in the vanilla extract and mix until combined. Vanilla not only enhances the flavor but also adds a pleasant aroma to your cookie dough.
Mixing Dry Ingredients
1. Whisk Together Dry Ingredients: In a separate bowl, whisk together the all-purpose flour, cocoa powder, baking soda, and salt. This step is important for ensuring that the leavening agent is evenly distributed throughout the flour before it’s combined with the wet ingredients.
– Impact of Measurement: Accurate measurement of your dry ingredients is key. Too much flour can lead to dry cookies, while too little could result in cookies that spread too much.
Combining Wet and Dry Ingredients
1. Incorporate Dry Ingredients: Gradually add the dry mixture to the wet ingredients, stirring gently with a spatula or wooden spoon.
– Avoid Over-mixing: Mix just until the flour is incorporated. Over-mixing can lead to tough cookies, so stop as soon as you see no more dry flour.
Folding in Chocolate Chips and Marshmallows
1. Add Chocolate Chips and Marshmallows: Once the dough is fully combined, fold in the chocolate chips and mini marshmallows. Use a gentle hand to avoid breaking up the marshmallows, which will retain their shape better during baking.
2. Chill the Dough (Optional): For even better results, consider chilling the dough for about 30 minutes. This helps solidify the fat in the cookies, reducing spread and enhancing their texture.
Now that you have a thorough understanding of the ingredients and initial preparation steps, you are well on your way to creating these delightful Chocolate Marshmallow Cookies. This recipe promises not just to satisfy your sweet tooth but to become a beloved staple in your baking repertoire. Stay tuned for the next steps, where we will cover baking techniques, tips for perfect cookies, and variations to make this recipe your own.
Creating the perfect Chocolate Marshmallow Cookie is an art that combines rich flavors and delightful textures. In this guide, we’ll delve into best practices for mixing, shaping, baking, and serving your cookies, ensuring that each bite is as delightful as the last. We will also cover how to store them properly and explore exciting variations to suit any palate.
Best Practices for Incorporating Mix-Ins Evenly Throughout the Dough
To achieve a well-balanced distribution of chocolate chips and marshmallows in your cookie dough, follow these practices:
– Use Room Temperature Ingredients: Ensure that your butter and eggs are at room temperature. This helps emulsify the ingredients, leading to a smoother dough that allows mix-ins to incorporate evenly.
– Mix Gradually: After combining your wet ingredients with the dry, add the chocolate chips and marshmallows gradually. Stir gently until just combined. Overmixing can lead to a tough cookie, so be gentle.
– Fold, Don’t Stir: Use a spatula to fold in the mix-ins. This technique helps distribute them evenly without breaking them apart or incorporating too much air.
Scooping and Shaping the Dough
To create uniformly shaped cookies that bake evenly, follow these guidelines:
Recommended Tools for Portioning Out Cookie Dough
– Cookie Scoop: A medium cookie scoop (about 1.5 tablespoons) is perfect for portioning out dough. This ensures uniform size, which leads to even baking.
– Parchment Paper: Line your baking sheets with parchment paper. This prevents sticking and allows for easy cleanup.
Ensuring Proper Spacing on the Baking Sheet for Optimal Baking
– Spacing: Place cookie dough balls at least 2 inches apart on the baking sheet. This allows for proper spreading and prevents cookies from merging during baking.
– Batch Size: Depending on your baking sheet size, aim for 8-12 cookies per batch, allowing ample space for each to spread.
Baking the Cookies
Setting the Right Temperature and Time
Baking cookies at the right temperature is crucial for achieving that perfect chewy texture.
– Ideal Temperature: Preheat your oven to 350°F (175°C). This temperature allows the cookies to bake evenly and helps achieve a nice golden color.
– Baking Time: Bake for 10-12 minutes, but start checking at the 9-minute mark. Oven temperatures can vary, and you want to avoid overbaking.
Recognizing When Cookies Are Done Based on Visual Cues
– Visual Cues: Look for a slightly puffed appearance and edges that are set but the center should still look soft. They will continue to cook on the baking sheet after removal.
– Golden Brown Color: The edges should be a golden brown while the center may appear lighter. This is a sign that your cookies are perfectly baked.
Cooling Process
Once your cookies are out of the oven, the cooling process is essential for optimal flavor and texture development.
Why Cooling Cookies on the Baking Sheet is Crucial
– Initial Cooling: Allow cookies to cool on the baking sheet for 5-10 minutes. This helps them set and makes transferring to a wire rack easier without breaking.
The Science Behind Cookie Texture Development as They Cool
– Texture Changes: As cookies cool, the residual heat continues to bake the center, resulting in a chewy texture. This is particularly important for cookies with marshmallows, as they will retain a gooeyness that contrasts beautifully with the cookie itself.
Serving Suggestions
Best Ways to Enjoy Your Chocolate Marshmallow Cookies
– Serving Warm vs. Cooled: Serve cookies warm for a gooey texture and melty chocolate. If you prefer a firmer cookie, let them cool completely.
– Pairing Ideas: These cookies pair wonderfully with a glass of cold milk, a hot cup of coffee, or even a scoop of vanilla ice cream for an indulgent dessert.
Storing Your Cookies
Optimal Storage Conditions
– Airtight Container: Store your cookies in an airtight container at room temperature. This helps maintain their freshness and prevents them from drying out.
– Layering with Parchment Paper: If stacking your cookies, place parchment paper between layers to minimize sticking.
Discussing the Shelf Life of These Cookies
– Shelf Life: Chocolate Marshmallow Cookies can last up to a week at room temperature. For longer storage, consider freezing them for up to 3 months. Just ensure they are completely cooled before wrapping in plastic wrap and placing in a freezer-safe container.
Variations and Customizations
Exploring Flavor Enhancements
– Substituting Different Types of Chocolate Chips: Experiment with different chocolate types such as dark chocolate, white chocolate, or even peanut butter chips to give your cookies a unique twist.
– Adjusting Marshmallow Amounts: Increase or decrease the amount of marshmallows depending on your desired gooeyness. More marshmallows create a softer, chewier cookie.
Incorporating Additional Mix-Ins
– Suggestions for Nuts: Add chopped pecans, walnuts, or almonds for added crunch and flavor.
– Dried Fruits: Incorporate dried cherries, cranberries, or even coconut flakes for a different flavor profile.
– Spices: A hint of cinnamon or nutmeg can elevate the flavor and add warmth to your cookies.
Making It Gluten-Free or Dairy-Free
– Alternative Ingredient Options: Substitute all-purpose flour with a gluten-free blend or almond flour. For a dairy-free version, use coconut oil or dairy-free butter and ensure your chocolate chips are dairy-free.
Conclusion
The Chocolate Marshmallow Cookie Extravaganza is not just a recipe; it’s a celebration of flavors and textures that brings joy to every bite. Whether enjoyed fresh from the oven or shared with loved ones, these cookies are a testament to the simplicity and pleasure of homemade treats. With this comprehensive guide, you have all the tools you need to create these delightful cookies with confidence and creativity. Embrace the joy of baking and the satisfaction that comes from sharing your delicious creations.
Chocolate Marshmallow Cookie
Ingredients
- 1 cup (2 sticks) unsalted butter, softened
- 1 cup granulated sugar
- 1 cup packed brown sugar
- 2 large eggs
- 2 teaspoons vanilla extract
- 2 1/4 cups all-purpose flour
- 3/4 cup unsweetened cocoa powder
- 1 teaspoon baking soda
- 1/2 teaspoon salt
- 1 cup semi-sweet chocolate chips
- 1 cup mini marshmallows
- 1/2 cup chopped nuts (optional)
Instructions
1. Preheat your oven to 350°F (175°C). Line two baking sheets with parchment paper and set aside.
2. In a large mixing bowl, creamy together the softened butter, granulated sugar, and brown sugar until it’s light and fluffy. This should take about 2-3 minutes.
3. Beat in the eggs one at a time, mixing thoroughly after each addition, then stir in the vanilla extract.
4. In a separate bowl, sift together the flour, cocoa powder, baking soda, and salt. Gradually add the dry ingredients to the butter mixture, mixing until just combined. Be careful not to overmix!
5. Fold in the chocolate chips, mini marshmallows, and nuts (if using). The dough will be thick and slightly sticky.
6. Scoop out tablespoons of dough and roll them into balls. Place them about 2 inches apart on the prepared baking sheets.
7. Bake in the preheated oven for 10-12 minutes, until the edges are firm but the centers still look slightly soft. The cookies will continue to cook on the baking sheet after being removed from the oven.
8. Allow the cookies to cool on the baking sheet for about 5 minutes before transferring them to a wire cooling rack.
Notes
- To keep cookies softer, store them in an airtight container with a slice of bread. The moisture from the bread will help maintain the cookie's texture!
- For more intense chocolate flavor, increase cocoa powder to 1 cup and decrease flour to 2 cups.