Introduction
Easter is a time for celebration, family gatherings, and of course, delightful treats. This Colorful No Bake Jello Pie is a fun and visually stunning dessert that perfectly captures the spirit of the holiday. With its vibrant layers of flavored Jello and a creamy filling, this delightful pie is not only easy to make but also a showstopper at any Easter gathering. The combination of colors, textures, and flavors makes it an appealing choice for both children and adults alike. In this article, we will explore the recipe in detail, break down the preparation steps, and offer insights into the ingredients that make this pie a must-try for your holiday festivities.
The Magic of No Bake Desserts
Understanding No Bake Desserts
Defining No Bake Desserts
No bake desserts have been a beloved category in the culinary world for many years. As the name suggests, these treats do not require baking, making them a convenient option for busy home cooks. Instead of relying on an oven, no bake recipes typically utilize refrigeration or freezing to set and firm up the dessert. This method allows for quick preparation and eliminates the worry of overbaking, ensuring that your sweet creations turn out perfectly every time.
Benefits of Choosing No Bake Recipes
The allure of no bake desserts lies in their simplicity and versatility. They are often quicker to prepare than traditional baked goods and can be made ahead of time, making them ideal for gatherings. Additionally, no bake recipes typically require fewer ingredients and equipment, which means less cleanup afterward. This allows you to enjoy more quality time with your loved ones during the holiday season without the stress of extensive baking.
Why This Jello Pie Stands Out
Appealing Visuals
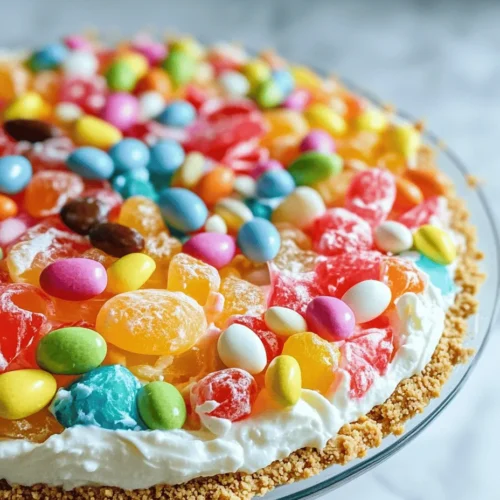
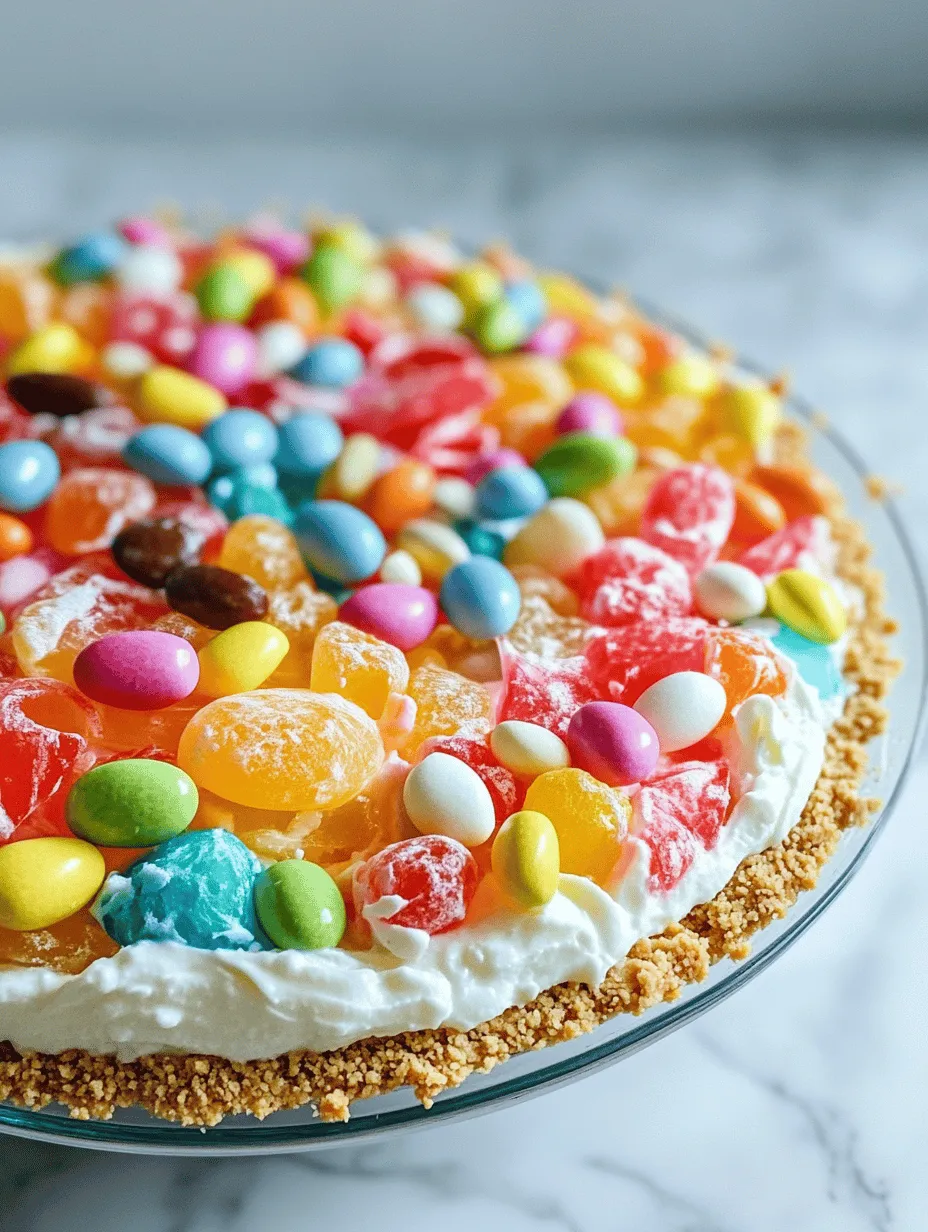
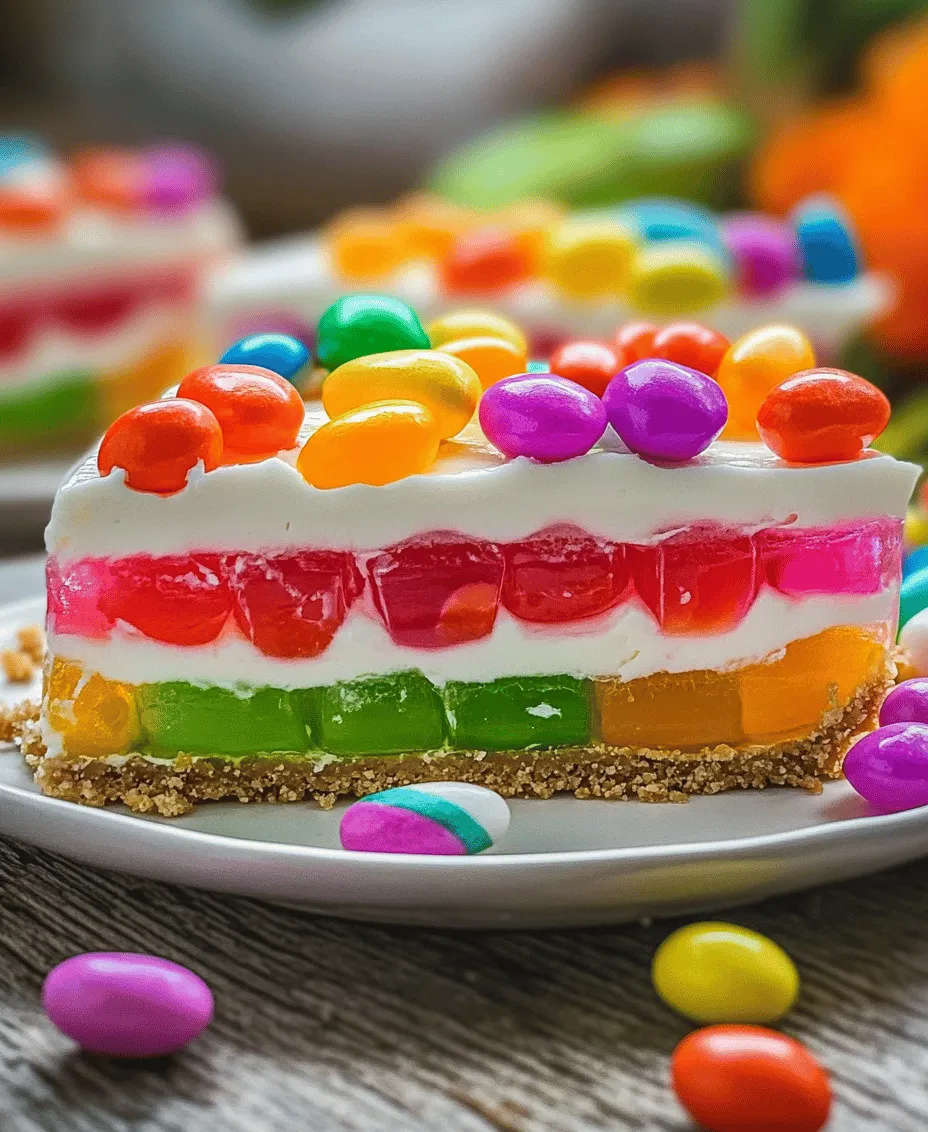
What sets the Colorful No Bake Jello Pie apart from other desserts is its eye-catching appearance. The vibrant layers of Jello create a stunning rainbow effect that is sure to impress your guests. Each layer can be made in a different flavor, not only enhancing the visual appeal but also providing a delightful variety of tastes. The combination of colors adds a festive touch to any Easter celebration, making it a perfect centerpiece for your dessert table.
Layered Flavors and Textures
This pie is not just about looks; it also delivers on flavor. The layered Jello offers a refreshing and fruity taste that contrasts beautifully with the creamy filling. The smooth texture of the cream cheese mixture complements the slightly firm Jello layers, creating a satisfying bite that keeps everyone coming back for more. Whether you prefer classic flavors like strawberry and lime or want to experiment with more exotic options, this pie allows for creativity in both flavor and presentation.
Perfect for All Ages
Another reason this Jello pie is a hit during Easter is its universal appeal. Children are naturally drawn to the bright colors and fun shapes, while adults appreciate the nostalgic flavors of their childhood. This dessert encourages family interaction, from selecting favorite Jello flavors to decorating the pie together. It’s a delightful activity that fosters bonding and creates lasting memories.
Ingredients Breakdown
Creating the Colorful No Bake Jello Pie requires a few essential components, each contributing to its unique flavor and texture.
Essential Components of the Crust
Graham Cracker Crumbs: The Base Flavor
The foundation of this pie begins with a graham cracker crust. The sweet, crumbly texture of crushed graham crackers provides a perfect contrast to the creamy filling and fruity layers above. To make the crust, you will need approximately two cups of graham cracker crumbs, which can be easily prepared by crushing whole graham crackers in a food processor or placing them in a zip-top bag and rolling a rolling pin over them.
Unsalted Butter and Granulated Sugar: Binding and Sweetening
To bring the crust together, you will need unsalted butter and granulated sugar. The butter adds richness and helps bind the crumbs, while the sugar enhances the overall sweetness of the crust. Melt about half a cup of unsalted butter and mix it with the graham cracker crumbs and sugar until the mixture resembles wet sand. This combination will create a deliciously sweet and buttery base for your pie.
Creating the Jello Layers
Choosing Your Flavors: Popular Options
One of the most enjoyable aspects of making this pie is selecting the Jello flavors that will make up the colorful layers. Popular choices include strawberry, raspberry, lime, lemon, orange, and blue raspberry. You can choose just a few flavors or go all out with a rainbow effect. Each flavor will contribute its unique color and taste, creating a vibrant display that’s sure to excite your guests.
The Role of Boiling and Cold Water
To prepare the Jello, you will need to dissolve the gelatin powder in boiling water before adding cold water. This step is crucial, as it activates the gelatin and allows it to set properly. Each layer should be prepared separately, so be prepared to dedicate time to let each layer cool and set in the refrigerator before adding the next. The layering process is what results in the beautiful, stratified effect that makes this pie so visually appealing.
Crafting the Cream Cheese Filling
The Importance of Cream Cheese in Desserts
The creamy filling in this pie is made primarily of cream cheese, which adds a smooth and rich texture that balances the fruity layers. Cream cheese is a popular ingredient in many no bake desserts because it holds its shape well when chilled and contributes a slight tanginess that enhances the overall flavor profile of the pie.
Whipped Topping: Adding Lightness and Volume
In addition to cream cheese, whipped topping is used to lighten the filling and add volume. This combination creates the perfect creamy layer that contrasts beautifully with the firmer Jello layers. You can use store-bought whipped topping or make your own by whipping heavy cream until soft peaks form. Either way, this light and fluffy layer is essential for achieving the desired texture in your pie.
Decorative Touches with Easter Candies
The Fun Factor of Colorful Candies
To add an extra festive touch, consider decorating the top of your Jello pie with colorful Easter candies. This could include mini chocolate eggs, pastel M&M’s, or even gummy bunnies. Not only do these candies enhance the visual appeal of the pie, but they also provide an additional layer of sweetness and a fun surprise for guests.
Suggestions for Candy Varieties
When choosing candies for decoration, think about both color and flavor. Look for candies that complement the Jello flavors and that will catch the eye of your guests. You can scatter them on top of the pie or arrange them in a decorative pattern. Regardless of your choices, this final touch will ensure your Colorful No Bake Jello Pie is a true Easter delight.
Step-by-Step Instructions
Now that we’ve broken down the ingredients, it’s time to dive into the preparation process. Following these step-by-step instructions will help you create a stunning Colorful No Bake Jello Pie that will be the highlight of your Easter celebration.
Preparing the Crust
1. Gather Your Ingredients: Start by gathering your graham cracker crumbs, unsalted butter, and granulated sugar. You’ll need two cups of graham cracker crumbs, half a cup of unsalted butter (melted), and a quarter cup of granulated sugar.
2. Mix the Crust Ingredients: In a mixing bowl, combine the graham cracker crumbs and granulated sugar. Pour the melted butter over the crumb mixture and stir until everything is evenly combined. The mixture should resemble wet sand and hold together when pressed.
3. Form the Crust: Press the crumb mixture firmly into the bottom and up the sides of a 9-inch pie pan. Use the back of a measuring cup or your fingers to create an even layer. Make sure to press down firmly to ensure the crust holds its shape once set.
4. Chill the Crust: Place the crust in the refrigerator while you prepare the Jello layers. This will help it firm up and make it easier to work with when you add the fillings.
Mixing Ingredients for Ideal Consistency
As you prepare the Jello layers, be sure to follow the instructions carefully to achieve the perfect consistency for your pie.
1. Prepare the Jello: For each layer, follow the package instructions. Typically, this involves dissolving the Jello powder in boiling water, stirring until fully dissolved, and then adding cold water.
2. Layering the Jello: Pour the first layer of prepared Jello into the chilled crust. Return it to the refrigerator to set, usually for about 30 minutes or until firm.
3. Repeat the Process: Once the first layer has set, repeat the process for each subsequent layer, allowing each layer to set before adding the next. This will create the beautiful, colorful effect that makes this pie so special.
With these steps, you are well on your way to creating a delightful Colorful No Bake Jello Pie that will bring joy and sweetness to your Easter gathering. Stay tuned for the next section where we will continue with more detailed instructions and tips to ensure your pie is a success!
Proper Pressing Techniques for a Firm Base
Creating a firm base for your Colorful No Bake Jello Pie is crucial for a well-structured dessert that holds its shape when sliced. Start with your graham cracker crumbs, which you can either crush manually or use a food processor for a finer texture. Combine the crumbs with melted butter and sugar, mixing until the texture resembles wet sand.
To press the mixture into your pie plate, use the bottom of a measuring cup or a flat object. Begin at the center of the plate, pressing down evenly and working your way to the edges. Make sure to create a compact layer that covers the bottom and slightly up the sides of the pie plate. This technique prevents the crust from crumbling when it’s time to serve. Once pressed evenly, place the crust in the refrigerator for about 15 to 30 minutes to firm up before adding the jello layers.
Making the Jello Layers
The vibrant layers of the Jello pie are what make this dessert truly special. For this recipe, you’ll be using multiple flavors of Jello to create a colorful effect. Start by selecting your favorite Jello flavors—typically, red, green, blue, and yellow work beautifully for an Easter theme.
Prepare each flavor of Jello according to the package instructions, usually involving boiling water and then mixing in cold water. Allow the colored mixtures to cool slightly before pouring them into the pie crust. Pour the first layer, filling it just enough to cover the crust without overflowing.
Dissolving Jello: Key Tips for Success
When dissolving your Jello, it’s essential to ensure it is fully dissolved to achieve a smooth texture. Start by boiling the specified amount of water, then gradually add the Jello powder while stirring continuously. This helps prevent clumps from forming. After the powder has completely dissolved, add the cold water as directed, and mix thoroughly. For best results, let the mixture cool for a few minutes before pouring it over the crust.
Cooling Time: Why It Matters
Cooling time is key in the preparation of a layered Jello pie. After pouring the first layer, allow it to set in the refrigerator until it is firm, typically about 30 minutes. This step is crucial as it ensures that each layer adheres properly to the one below it, preventing them from mixing and maintaining distinct layers. Repeat the process for each Jello layer, allowing appropriate cooling time before adding the next.
Crafting the Cream Cheese Layer
The cream cheese layer adds a deliciously rich contrast to the sweet and fruity Jello layers. Begin by softening your cream cheese at room temperature for about 30 minutes, which makes it easier to blend. In a mixing bowl, beat the cream cheese until it’s smooth and creamy. Gradually add in powdered sugar and vanilla extract, mixing until fully incorporated and fluffy.
Mixing Techniques for Smoothness
To achieve a velvety cream cheese layer, mixing technique matters. Use an electric mixer on medium speed to ensure that the ingredients are well combined. Scrape down the sides of the bowl as needed to incorporate all the cream cheese. Avoid overmixing, which can introduce too much air and lead to a grainy texture.
Incorporating Whipped Topping: Folding vs. Mixing
Once your cream cheese mixture is smooth, it’s time to fold in the whipped topping. This step adds lightness to the cream cheese layer. Use a spatula to gently fold the whipped topping into the cream cheese mixture. The key here is to mix gently to avoid deflating the whipped topping, ensuring the layer remains airy and light.
Assembling the Pie
Now that you have your layers prepared, it’s time to assemble your pie. Start by pouring a layer of the cream cheese mixture over the first set jello layer. Use a spatula to spread it evenly but carefully, not disturbing the jello layer underneath. Allow the pie to chill for about 30 minutes to an hour before adding the next layer of Jello.
Layering Techniques for Visual Appeal
To ensure your pie has an appealing look, consider using a piping bag to layer your cream cheese mixture. This technique allows for cleaner lines and a more definitive separation between layers. Alternate between Jello and cream cheese layers to create a visually striking dessert.
Refrigeration Timing for Setting Layers
Each layer of Jello and cream cheese should be refrigerated until set before adding the next. A good rule of thumb is to allow at least 30 minutes of chill time for each Jello layer and 1 hour for the cream cheese layer. This helps maintain the structure and ensures that each layer holds up when sliced.
Finishing Touches and Decoration
Once your pie is fully assembled and set, it’s time for the finishing touches. Consider using colorful sprinkles, fresh fruit, or edible Easter-themed decorations to enhance the visual appeal of your pie. Whipped cream rosettes on top can also add a delightful touch.
Creative Ideas for Candy Placement
Incorporating candy into your pie not only enhances its flavor but also adds a festive touch. Consider using pastel-colored M&Ms, jelly beans, or chocolate eggs. You can place them strategically on top of the pie before serving, or tuck them into the layers for a surprise element.
Chilling the Pie: Importance of Patience
After assembling and decorating your pie, it’s essential to let it chill for several hours—ideally overnight. This not only enhances the flavors but also ensures the structure is firm when it’s time to serve. Patience is key, as this final chilling step will result in a pie that slices beautifully and holds its layers intact.
Serving Suggestions
Ideal Occasions for Serving
The Colorful No Bake Jello Pie is perfect for various occasions, particularly Easter celebrations. Its vibrant colors and fun presentation make it a delightful centerpiece for your holiday table. Additionally, it can brighten up summer barbecues, birthday parties, or any gathering where you want to impress guests with a beautiful dessert.
Easter Celebrations and Beyond
This pie embodies the spirit of Easter, making it an ideal choice for family gatherings, potlucks, or brunches. Beyond Easter, it suits any festive occasion thanks to its lively colors and flavors.
Pairing with Other Easter Dishes
The light and refreshing nature of the Jello pie pairs well with traditional Easter dishes, such as glazed ham, spring salads, or creamy potato dishes. Its sweetness complements savory flavors, creating a well-rounded meal.
Presentation Tips
When presenting the pie, consider using a glass pie dish to showcase the colorful layers. Serve it on a decorative platter to enhance its visual appeal.
Serving Style: Individual Slices vs. Whole Pie
You can serve the pie as whole slices or as individual mini pies in small dessert cups. Individual servings are perfect for parties, allowing guests to enjoy their portion easily without needing to slice the pie.
Garnishing Ideas for an Elegant Touch
For an elegant finish, consider garnishing each slice with a sprig of mint, a dusting of powdered sugar, or a drizzle of chocolate syrup. These small touches elevate the presentation and enhance the overall eating experience.
Nutritional Information
Caloric Breakdown
While the Colorful No Bake Jello Pie is a delightful treat, it’s important to be aware of its nutritional content. Each slice typically contains approximately 200-250 calories, depending on the specific ingredients used and portion size.
Understanding Serving Sizes
Portion control can help you enjoy this dessert without overindulging. A standard serving size is typically one slice or about 1/8 of the pie.
Balancing Treats with Healthier Options
If you’re looking to balance out your dessert choices, consider serving the pie alongside fresh fruit or a light yogurt parfait. This way, you can enjoy a fun treat while still maintaining a healthy diet.
Conclusion
The Colorful No Bake Jello Pie is more than just a dessert; it is an expression of creativity and joy that embodies the essence of Easter celebrations. With its delightful layers and simple preparation, this pie is sure to become a beloved tradition in your household. Whether you’re hosting a gathering or bringing a dish to share, this vibrant pie will bring smiles and satisfaction to everyone at the table. Embrace the spirit of the season and treat yourself and your loved ones to this stunning and delicious festive delight!