Introduction
There’s something undeniably delightful about homemade ice cream. The process of crafting your own frozen treat brings a sense of nostalgia and joy that store-bought varieties simply can’t replicate. As the summer sun shines brightly, the allure of creamy, refreshing ice cream becomes even more compelling. Among the myriad of flavors available, peach ice cream stands out, thanks to its vibrant sweetness and luscious texture.
Using ripe, juicy peaches as the star ingredient elevates this dessert to a whole new level, offering a burst of freshness that can only come from fruit harvested at its peak. The sweet aroma of sun-ripened peaches wafting through your kitchen is a sure way to get everyone excited about what’s to come. This recipe for Creamy Dreamy Homemade Peach Ice Cream not only captures the essence of summer but also proves to be incredibly easy to make, allowing you to indulge in a delightful treat without the hassle.
In this article, we will explore the essentials of making this peach ice cream, highlight the key ingredients that contribute to its irresistible flavor, and guide you through the preparation steps needed to achieve the perfect creamy consistency. Whether you’re hosting a summer barbecue or just looking for a way to cool down on a hot day, this homemade peach ice cream is sure to impress.
Understanding the Ingredients
Ripe Peaches: The Star of the Show
The foundation of any great peach ice cream lies in the quality of the peaches used. Ripe peaches are crucial for achieving the intense flavor and natural sweetness that this dessert demands. When selecting peaches, look for fruit that is firm yet slightly yielding to pressure, with a fragrant aroma and a warm, golden hue. This indicates that the peaches have ripened properly on the tree, allowing their sugars to develop fully.
Incorporating ripe peaches into your ice cream provides not only flavor but also a beautiful, vibrant color that makes the final product visually appealing. The juiciness of the peaches adds moisture to the ice cream base, enhancing its overall texture and mouthfeel.
The Role of Sugar
Sugar is an essential ingredient in our peach ice cream recipe, serving multiple purposes. Firstly, it balances the sweetness of the peaches, ensuring that the ice cream is not overly tangy or bland. The right amount of sugar enhances the natural flavors of the fruit while also contributing to the creamy texture of the final product.
When making ice cream, it’s important to remember that sugar lowers the freezing point of the mixture, which helps create a smoother texture. This is particularly important when making homemade ice cream, as it can often turn out icy if not enough sugar is added.
Heavy Cream and Whole Milk: The Creamy Base
To achieve that signature creamy texture in homemade ice cream, heavy cream and whole milk are indispensable. Heavy cream contains a higher fat content, which adds richness and enhances the mouthfeel of the ice cream. This fat also helps to prevent ice crystals from forming, resulting in a smoother, creamier product.
Whole milk, on the other hand, contributes to the overall volume and lightness of the ice cream. The combination of heavy cream and whole milk creates a harmonious balance, ensuring that the ice cream is not only rich but also easy to scoop and serve.
Flavor Enhancers: Vanilla Extract and Lemon Juice
Vanilla extract is a classic flavor enhancer in ice cream recipes, providing a warm, aromatic undertone that complements the sweetness of the peaches. Just a splash of high-quality vanilla extract can elevate the overall flavor profile, creating a more complex and enjoyable taste experience.
Lemon juice serves a different purpose in our peach ice cream. A small amount of fresh lemon juice brightens the flavor of the peaches and adds a touch of acidity that balances the sweetness. This acidity helps to enhance the natural flavors of the fruit, making each bite more refreshing and invigorating.
Optional Twist: Almond Extract
For those looking to add a unique twist to their peach ice cream, consider including a hint of almond extract. This optional ingredient brings a nutty depth that pairs beautifully with the fruity notes of the peaches. A little goes a long way, so start with a small amount and adjust according to your taste preferences.
Preparation Steps Detailed
Preparing the Peaches
The first step in making your homemade peach ice cream is preparing the peaches. Begin by washing the fruit thoroughly and then peeling the skin off. While some may choose to leave the skin on for added texture, removing it allows for a smoother ice cream base. Once peeled, slice the peaches into small chunks.
Macerating the peaches with sugar is a critical step that should not be overlooked. In a mixing bowl, combine the sliced peaches with sugar and let them sit for at least 30 minutes. This process allows the sugar to draw out the natural juices from the peaches, creating a syrup that enhances the flavor and ensures that the ice cream is sweet enough. The maceration process also softens the peaches, making them easier to blend later on.
Blending the Peach Mixture
After macerating, it’s time to blend the peach mixture. Transfer the softened peaches and their syrup into a blender or food processor. Blend until smooth, but take care not to over-blend. You want to maintain some texture in the ice cream, so aim for a consistency that is creamy with small bits of peach throughout. This will give your ice cream a delightful, fruity bite in every scoop.
Mixing the Base
Next, it’s time to create the ice cream base. In a separate mixing bowl, combine the heavy cream, whole milk, sugar, vanilla extract, and lemon juice. Whisk the mixture until the sugar is completely dissolved. This step is crucial, as it ensures that the ice cream base is uniform and free of any gritty texture.
The science behind combining fats (from the cream) and sugars is essential in ice cream making. The sugar helps to stabilize the mixture while the fat contributes to the creaminess. Whisking thoroughly is key to achieving a homogenous mixture, which is vital for a smooth final product.
Incorporating the Peaches
Once your ice cream base is well mixed, it’s time to incorporate the peach puree. Gently fold the blended peach mixture into the ice cream base using a spatula. Folding is a technique that minimizes air loss, allowing your ice cream to remain light and airy. Be careful not to overmix, as you want to preserve some of the peach texture for added interest.
As you fold in the peaches, take a moment to appreciate the vibrant color and aroma that fills the bowl. This is a crucial step, as it brings together all the flavors you’ve created, setting the stage for an incredibly delicious homemade peach ice cream.
Chilling and Churning: The Key to Creamy Ice Cream
Once the peach mixture is combined with the ice cream base, it’s crucial to chill the mixture before churning. Pour the combined mixture into a container and cover it with a lid or plastic wrap. Allow it to chill in the refrigerator for at least 2 hours, or preferably overnight. This chilling process not only allows the flavors to meld but also ensures that the mixture is adequately cold before it hits the ice cream maker.
After chilling, it’s time to churn the ice cream. Follow the manufacturer’s instructions for your ice cream maker, as churning times may vary. Generally, you will churn the mixture until it thickens and reaches a soft-serve consistency. During this process, air is incorporated, helping to create a light and creamy texture.
As you embark on this delightful journey of making Creamy Dreamy Homemade Peach Ice Cream, remember to embrace the process. Each step brings you closer to a refreshing summer treat that celebrates the deliciousness of ripe peaches and the joy of homemade desserts. Stay tuned for the next part, where we’ll explore the final touches and tips for serving your peach ice cream!
Why Chilling is Essential for Flavor Development
Chilling your peach mixture before churning is a crucial step that significantly enhances the flavor profile of your homemade ice cream. Allowing the mixture to sit in the refrigerator for several hours or overnight enables the flavors to meld together, creating a richer and more complex taste. Additionally, chilling the mixture ensures that it is cold enough to churn effectively in your ice cream maker, which helps to achieve that creamy texture we all love.
Recommended Chilling Times and Methods
For optimal results, it is recommended to chill your peach mixture for at least 4 to 6 hours, or even overnight. This extended time allows the sugar to fully dissolve and the flavors to deepen. To chill your mixture, simply pour it into a covered container and place it in the refrigerator. If you’re short on time, a quick method involves placing the mixture in a shallow dish, which will cool it faster due to increased surface area.
Churning the Ice Cream
Now that your mixture is well-chilled, it’s time to churn it to create that fluffy, light texture that is characteristic of great ice cream.
Overview of How Ice Cream Makers Work
Ice cream makers work by freezing the mixture while simultaneously incorporating air into it. The process is crucial for achieving that smooth consistency. When you pour the chilled mixture into the ice cream maker, the paddles stir and mix the ingredients while the machine freezes them. This combination of cold and movement prevents large ice crystals from forming, resulting in a creamy finish.
Signs to Look for to Determine the Right Consistency During Churning
As your ice cream churns, keep an eye on the texture. You’ll know it’s ready when it thickens and resembles soft-serve ice cream, typically taking around 20 to 30 minutes in most machines. The mixture should be thick enough to hold its shape when you lift the paddle from the machine. If it appears too runny or soupy, it may need additional churning time.
Freezing and Serving the Ice Cream
Once the churning process is complete, you’ll need to transfer your ice cream into a storage container for freezing.
Transferring Churned Ice Cream to Storage
When transferring your churned ice cream, use a spatula to scrape the mixture into an airtight container. This process helps minimize air exposure, which is essential for maintaining the quality of your ice cream.
Best Practices to Avoid Ice Crystals
To prevent ice crystals from forming in your ice cream, it’s important to minimize air exposure as much as possible. Press a piece of plastic wrap directly onto the surface of the ice cream before sealing the container. This creates a barrier that reduces the chances of ice crystals developing during the freezing process.
Discussing the Importance of Airtight Containers
Using airtight containers is key to preserving the flavor and texture of your ice cream. Containers that are not airtight will allow moisture and odors from the freezer to penetrate, which can lead to freezer burn and off-flavors. Look for containers specifically designed for freezing, made from materials that withstand low temperatures.
Recommended Freezing Times for Optimal Texture
For the best texture, freeze your peach ice cream for at least 4 to 6 hours after churning. If you allow it to freeze overnight, it will develop a firmer consistency, perfect for scooping. If you prefer a softer texture, you can let it sit at room temperature for about 10 minutes before serving.
Serving Suggestions
Now that your peach ice cream is ready, let’s explore some creative serving ideas.
Creative Ways to Serve the Ice Cream
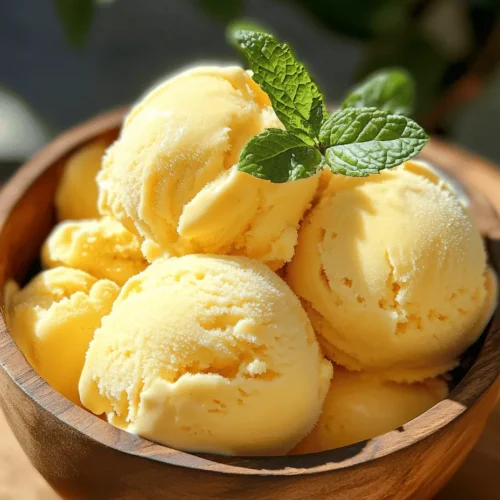
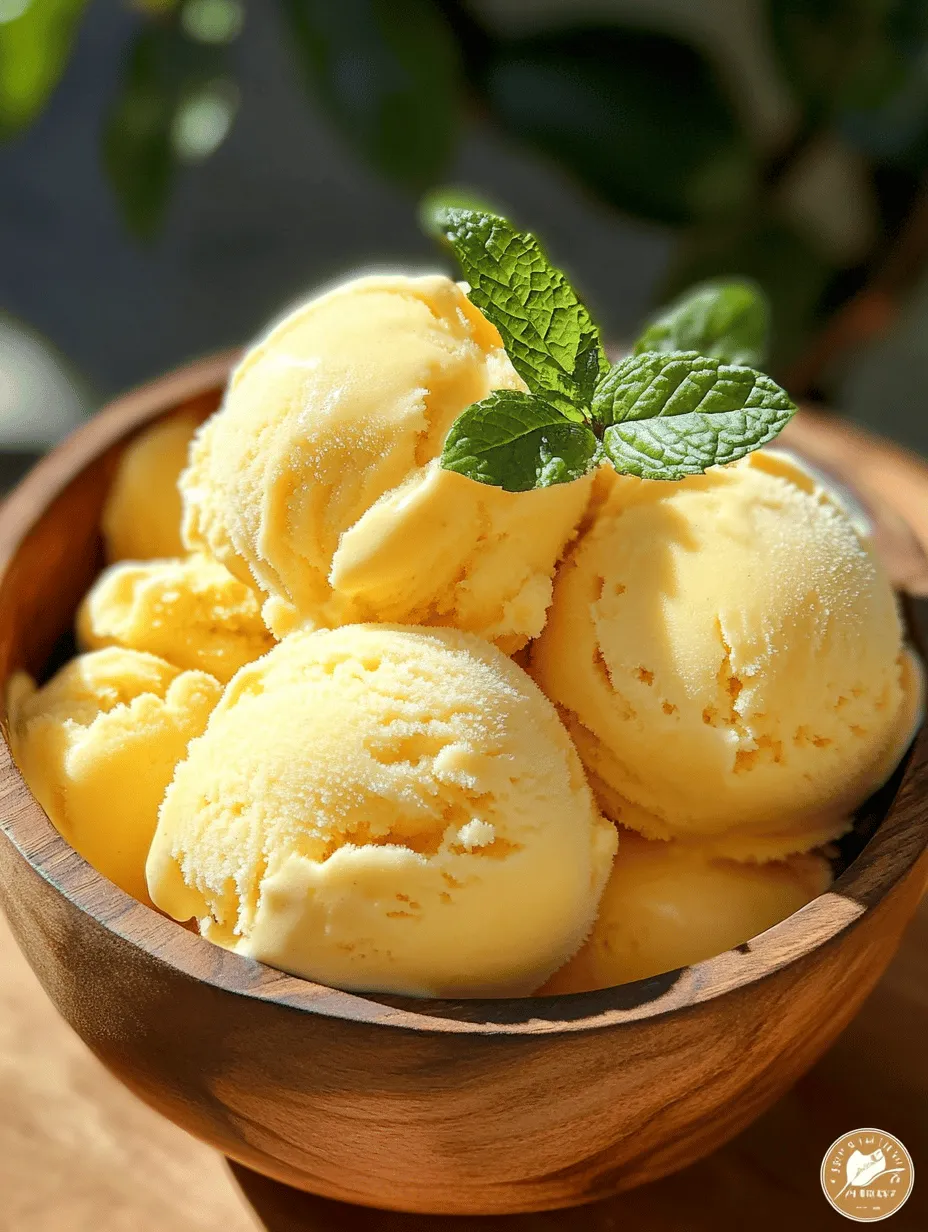
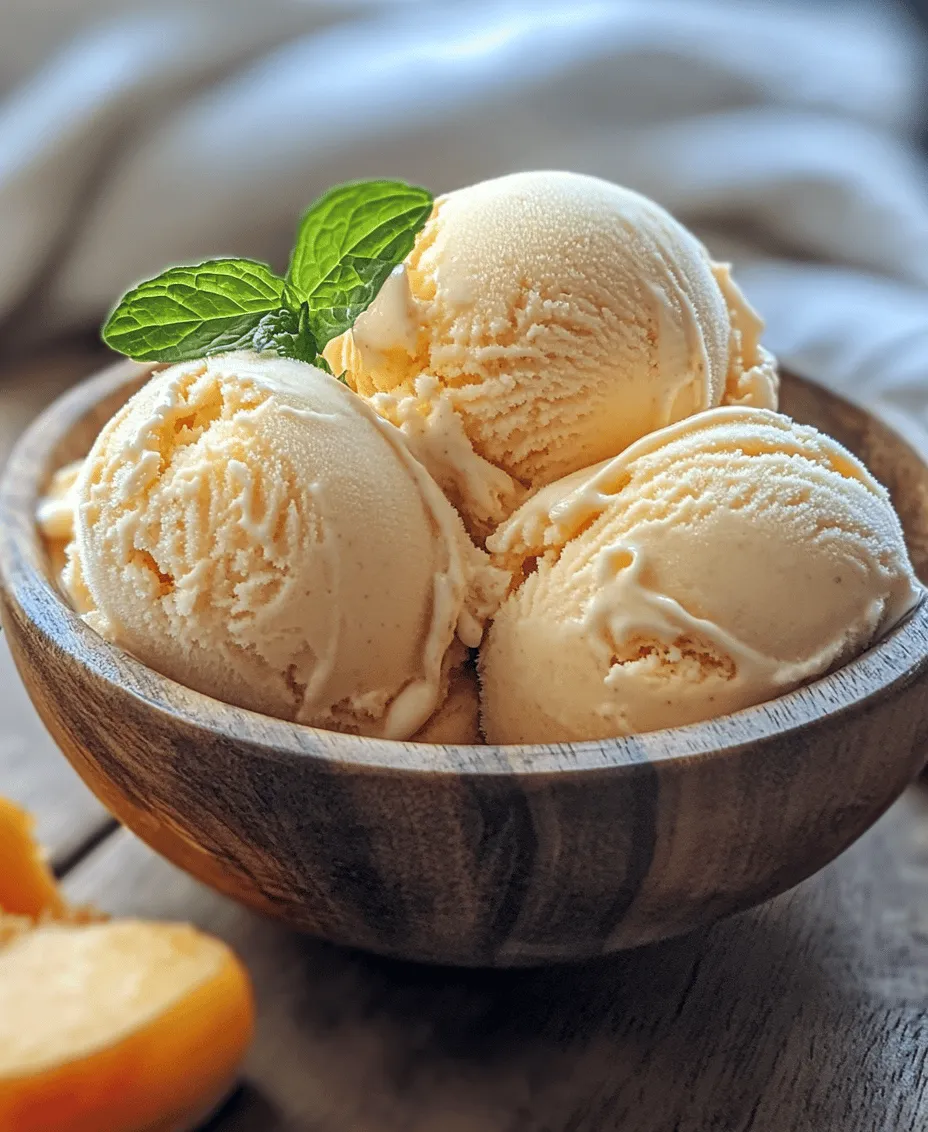
– Bowls and Cones: Serve your peach ice cream in a classic waffle cone or a simple bowl. For an elegant touch, consider using a sundae glass topped with a sprig of mint.
– Garnishes: Enhance your presentation with garnishes such as fresh peach slices, chopped nuts, or a drizzle of honey. A sprinkle of cinnamon or nutmeg can also add a delightful aroma and flavor contrast.
– Serving Sizes: Consider using a small ice cream scoop for portion control, especially if you’re serving guests. This not only looks appealing but helps prevent overindulgence.
Pairing Recommendations with Other Desserts or Fruits
Peach ice cream pairs beautifully with a variety of desserts. Consider serving it alongside a slice of warm peach cobbler, or use it as a topping for brownies or a rich chocolate cake. For a refreshing twist, combine it with fresh berries or serve it over a fruit salad.
Health Benefits of Homemade Ice Cream
Making your own peach ice cream comes with several health advantages compared to store-bought options.
Nutritional Advantages of Using Fresh Fruit
Using fresh peaches in your ice cream not only enhances the flavor but also adds nutritional benefits. Peaches are a good source of vitamins A and C, fiber, and antioxidants. By making your ice cream at home, you can control the amount of sugar and cream, resulting in a healthier treat.
Comparison of Homemade Ice Cream vs. Store-Bought Options
Store-bought ice creams often contain preservatives, artificial flavors, and stabilizers. By making your own, you can ensure that you’re using wholesome, natural ingredients without any hidden additives. This level of transparency is a significant advantage when it comes to making healthier choices for your family.
Discussing Portion Control and the Ability to Customize Ingredients
Another benefit of homemade ice cream is the ability to control portion sizes and customize ingredients. You can adjust the sweetness to your liking, substitute dairy for non-dairy alternatives, or incorporate your favorite mix-ins. This flexibility allows you to enjoy a treat that aligns with your dietary preferences and goals.
Exploring Variations and Customizations
One of the joys of making peach ice cream is the opportunity to experiment with different flavors and ingredients.
Suggestions for Alternative Fruits and Flavor Combinations
While peach ice cream is delicious on its own, consider trying other fruits such as strawberries, blueberries, or mangoes. You can also create a mixed fruit ice cream by combining your favorite flavors. For a unique twist, experiment with adding spices like cardamom or ginger to enhance the flavor profile.
Dairy-Free Options for Those with Allergies or Dietary Restrictions
If you or your guests have dietary restrictions, you can easily make a dairy-free version of peach ice cream. Substitute heavy cream with coconut cream or almond milk, and use a plant-based sweetener if desired. This allows everyone to enjoy the delightful taste of homemade ice cream without compromising their dietary needs.
Incorporating Mix-Ins Like Nuts or Chocolate for Added Texture
To add texture and flavor, consider incorporating mix-ins such as chopped nuts, chocolate chips, or cookie crumbles. These additions can provide a delightful crunch and elevate the overall experience. Just be sure to add them during the last few minutes of churning to ensure they are evenly distributed throughout the ice cream.
Conclusion
Making homemade peach ice cream is not just a culinary endeavor; it is a joyful experience that allows you to create a delightful treat using fresh ingredients. The satisfaction of crafting your own ice cream from scratch, combined with the vibrant flavors of ripe peaches, brings a sense of accomplishment and indulgence.
As you experiment with this recipe, don’t hesitate to make it your own by incorporating different fruits, flavors, and mix-ins. Homemade peach ice cream is a versatile treat perfect for any occasion, whether it’s a hot summer day or a special gathering with loved ones. Embrace the process, enjoy the delicious results, and share the joy of homemade ice cream with family and friends.