Introduction
The Black Forest Cake, or Schwarzwälder Kirschtorte as it is known in Germany, is a dessert that perfectly embodies indulgence. This iconic cake has captured the hearts of dessert lovers around the globe with its rich chocolate layers, tart cherry filling, and luscious whipped cream frosting. Rooted deeply in German tradition, its origins date back to the early 20th century, where it was created in the Black Forest region of Germany. The cake not only stands as a symbol of celebration but also reflects the rich culinary heritage of the area, where cherries and chocolate are abundant.
Homemade desserts carry a special charm, evoking nostalgia and a sense of accomplishment that store-bought options simply cannot replicate. Creating a Black Forest Cake from scratch allows you to experience the joy of baking while impressing friends and family with a stunning centerpiece that tastes just as divine as it looks. Whether it’s for a birthday celebration, a festive gathering, or a well-deserved treat for yourself, making a Black Forest Cake in your own kitchen is a rewarding experience that promises to satisfy both your sweet tooth and your creative urges.
Understanding Black Forest Cake
To truly appreciate the Black Forest Cake, one must delve into its historical roots. The cake’s name stems from the Black Forest region in southwestern Germany, known for its dense forests and sour cherries. The traditional recipe features layers of rich chocolate sponge cake, whipped cream, and cherries, all of which are generously soaked in Kirschwasser, a clear cherry brandy that adds an authentic depth of flavor. This combination creates a delightful contrast between the sweet and the tart, a hallmark of this beloved dessert.
The essential components of a classic Black Forest Cake include the chocolate cake layers, the cherry filling, and the whipped cream frosting. Each element plays a crucial role in the overall taste and texture of the cake. The chocolate cake provides a moist, rich foundation, while the cherries offer a burst of tartness that cuts through the sweetness of the whipped cream. Over the years, variations of the Black Forest Cake have emerged, incorporating different ingredients or techniques. Some bakers opt for a layer of chocolate ganache, while others may choose to add additional flavors, such as almond or vanilla, to enhance the cake’s complexity.
Ingredients Breakdown
Creating a delicious Black Forest Cake requires a careful selection of high-quality ingredients. Here’s a detailed breakdown of the components that will come together to form this decadent dessert:
Chocolate Cake
1. All-Purpose Flour: The backbone of your cake, flour provides structure. For the best results, use a high-quality brand and ensure it is measured accurately to avoid a dense cake.
2. Granulated Sugar: This ingredient sweetens the cake and contributes to its moisture. The sugar also helps in creating a tender crumb by interacting with the flour during mixing.
3. Cocoa Powder: Unsweetened cocoa powder is essential for that rich chocolate flavor. Opt for a Dutch-processed cocoa for a smoother taste and darker color, if available.
4. Baking Powder and Baking Soda: These leavening agents are crucial for achieving the cake’s rise. They create air pockets in the batter, resulting in a fluffy texture.
5. Salt: A pinch of salt enhances the overall flavor of the cake, balancing the sweetness and emphasizing the chocolate.
6. Eggs: Eggs add moisture and richness while also acting as a binding agent. They help create a fluffy texture when whipped with sugar.
7. Buttermilk: This ingredient provides acidity, which helps to tenderize the cake and adds a slight tanginess that complements the chocolate.
8. Vegetable Oil: Using oil instead of butter results in a moister cake. It helps retain moisture and gives the cake a soft texture.
9. Boiling Water: Surprisingly, adding boiling water to the batter brings out the cocoa’s flavor and ensures a moist cake. This step also helps to dissolve the cocoa powder, resulting in a smoother batter.
Cherry Filling
The cherry filling is a defining feature of the Black Forest Cake. You can choose between fresh or frozen cherries, but each option has its pros and cons.
– Fresh Cherries: When in season, fresh cherries provide a vibrant taste and texture. They can be pitted and used whole or chopped, depending on your preference. However, fresh cherries may require additional sweetening, particularly if they are tart.
– Frozen Cherries: These cherries are often picked at peak ripeness and can be more convenient, as they are available year-round. They may release more juice when thawed, so it’s essential to drain them before using to avoid a soggy cake.
Whichever option you choose, the cherries should be cooked down with a bit of sugar to create a thick, flavorful filling that contrasts beautifully with the rich chocolate layers.
Whipped Cream Frosting
The final touch to your Black Forest Cake is the whipped cream frosting. Choosing the right cream is crucial for achieving a stable and fluffy frosting.
– Heavy Whipping Cream: Look for cream with at least 36% fat content for the best results. This higher fat content allows for better whipping and stability, ensuring your frosting holds its shape.
– Powdered Sugar: This type of sugar dissolves easily into the cream, creating a smooth texture. It also provides sweetness without the graininess that granulated sugar can impart.
– Vanilla Extract: A splash of pure vanilla extract enhances the flavor of the whipped cream, adding a subtle warmth that complements the chocolate and cherries perfectly.
To achieve the perfect consistency, whip the cream until soft peaks form. Be cautious not to over-whip, as this can lead to a grainy texture or even butter. If you plan to pipe decorations or layers, consider stabilizing the whipped cream with a bit of gelatin or cornstarch, which will help maintain its shape.
Preparation and Baking Process
Before diving into making the Black Forest Cake, it’s important to prepare your kitchen and gather all necessary tools and ingredients. Preheat your oven to 350°F (175°C) and grease two round 9-inch cake pans, lining the bottoms with parchment paper for easy removal. This preparation ensures a smooth baking process and helps prevent sticking.
Step-by-Step Instructions for Making the Chocolate Cake
1. Mixing the Dry Ingredients: In a large mixing bowl, whisk together the all-purpose flour, cocoa powder, baking powder, baking soda, and salt. This step ensures that the leavening agents are evenly distributed throughout the flour.
2. Combining Wet Ingredients: In a separate bowl, combine the granulated sugar, eggs, buttermilk, and vegetable oil. Use a hand mixer or stand mixer to beat these ingredients together until smooth and well combined.
3. Incorporating the Dry Ingredients: Gradually add the dry mixture to the wet mixture, alternating with the boiling water. Start by adding half of the dry ingredients, then half the boiling water, mixing until just combined. Repeat this process, being careful not to overmix the batter, as this can lead to a dense cake.
4. Baking the Cakes: Divide the batter evenly between the prepared pans. Bake in the preheated oven for 30-35 minutes or until a toothpick inserted into the center comes out clean. The cakes should spring back when lightly pressed.
5. Cooling the Cakes: Once baked, remove the cakes from the oven and allow them to cool in the pans for about 10 minutes. Then, carefully transfer them to a wire rack to cool completely. Proper cooling is essential to avoid a soggy bottom when layering the cake.
Crafting the Cherry Filling
While the cakes cool, it’s time to prepare the cherry filling. If using fresh cherries, wash, pit, and chop them into bite-sized pieces. For frozen cherries, allow them to thaw and drain any excess liquid.
1. Cooking the Cherries: In a saucepan over medium heat, combine the cherries with sugar and a splash of water. Cook until the cherries begin to break down and release their juices, stirring occasionally. Allow the mixture to simmer for 10-15 minutes until it thickens slightly. If desired, you can use cornstarch to thicken the filling further.
2. Cooling the Filling: Once thickened, remove the cherry mixture from the heat and let it cool completely. This cooling step is crucial to prevent the whipped cream from melting when you assemble the cake.
As you embark on this delightful journey of creating a Decadent Homemade Black Forest Cake, remember that the process is just as enjoyable as the final product. The satisfaction of crafting a beloved classic from scratch, with its rich flavors and stunning presentation, is a rewarding experience that will surely impress all who partake in your creation. Stay tuned for the next steps in assembling and decorating your Black Forest Cake!
Tips for Achieving the Right Consistency for the Filling
When it comes to creating the perfect filling for your Black Forest Cake, consistency is key. The filling typically consists of cherries, sugar, and a thickening agent such as cornstarch or gelatin. To ensure a luscious cherry filling that adheres well to the cake layers, follow these tips:
1. Choose the Right Cherries: Opt for ripe, sweet cherries if you’re using fresh ones, or high-quality canned or jarred cherries for convenience. If using canned cherries, drain them well to avoid excess moisture.
2. Cook the Filling Gently: If you’re making a cooked cherry filling, simmer the cherries with sugar over low heat. This allows the flavors to meld without breaking down the cherries too much. Stir constantly to prevent sticking and burning.
3. Use a Thickening Agent: A slurry made from cornstarch and water can help achieve the right thickness. Combine 1 tablespoon of cornstarch with 2 tablespoons of cold water, then stir it into the cherry mixture as it cooks. Allow it to bubble for a minute or two until thickened.
4. Cool Before Assembling: Always let your filling cool completely before spreading it on the cake. A warm filling can cause the whipped cream frosting to melt and compromise the structure of your cake.
Creating the Whipped Cream Frosting
The whipped cream frosting is a signature element of the Black Forest Cake, providing a light and fluffy contrast to the rich chocolate layers. Here’s how to achieve the perfect whipped cream frosting:
Importance of Using Chilled Equipment for Whipping Cream
To achieve the best results when whipping cream, it’s crucial to start with chilled equipment. Here’s why:
– Temperature Matters: Cold cream whips better and holds its shape longer. Chill your mixing bowl and beaters in the fridge for at least 15 minutes before you start whipping.
– Heavy Cream is Key: Use heavy whipping cream with at least 36% fat content. This ensures that you get the volume and stability needed for frosting.
How to Achieve Stiff Peaks and Best Practices for Flavoring
1. Start Slow: Begin whipping the cream on a low speed to avoid splattering. Gradually increase the speed to medium-high once the cream starts to thicken.
2. Watch for Stiff Peaks: Stop whipping when you see stiff peaks form. This means that the cream should hold its shape and not fall when you lift the beater. Be careful not to over-whip, as this can turn your cream into butter.
3. Flavoring Your Frosting: For added flavor, consider incorporating vanilla extract or a splash of almond extract into the cream as it begins to thicken. Start with about 1 teaspoon of vanilla for a subtle flavor, adjusting to taste.
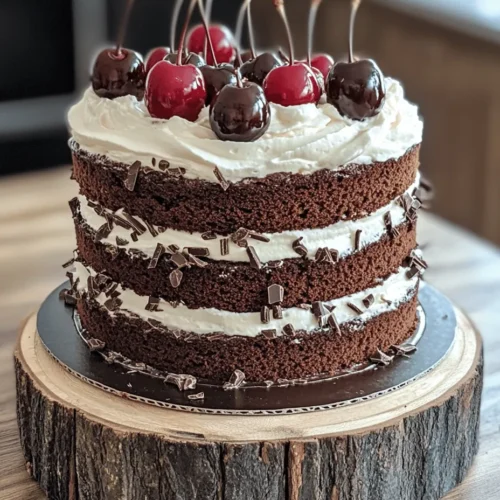
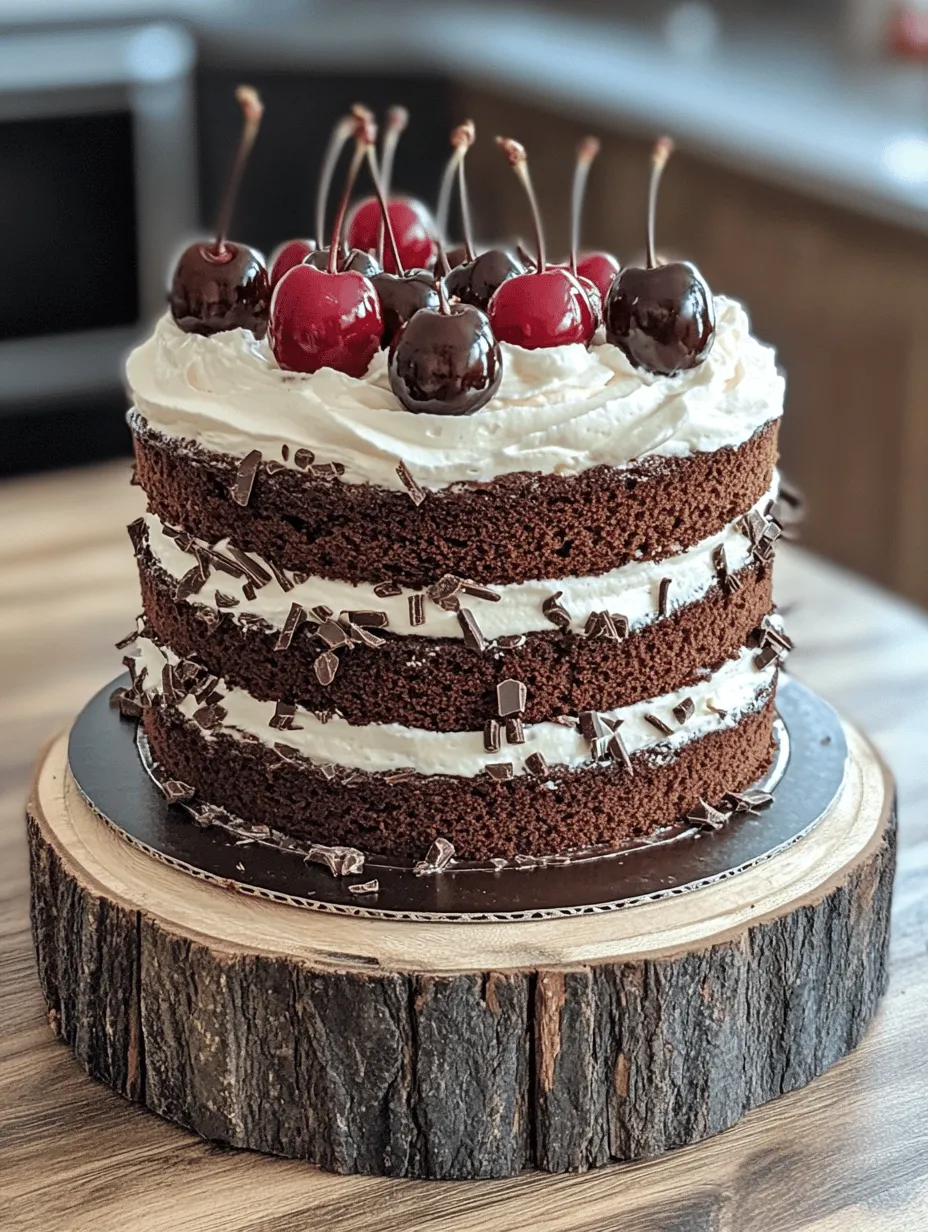
Assembling the Black Forest Cake
Now that your layers are baked, your filling is prepared, and your frosting is whipped, it’s time to bring it all together into a stunning Black Forest Cake.
Techniques for Slicing Cake Layers Evenly
1. Use a Serrated Knife: A serrated knife is ideal for slicing through cake layers. It allows for a clean cut without crushing the cake.
2. Level the Cake: Before slicing, ensure that your cake layers are completely cooled. If the tops are domed, use a straight edge to gently shave off the top until it’s flat.
3. Measure for Uniform Layers: If you want perfectly even layers, consider using a cake leveler or a ruler to measure and mark where you want to cut before slicing.
Layering the Cake with Frosting and Cherry Filling
1. Start with a Base Layer: Place one layer of chocolate cake on a cake stand or plate.
2. Spread the Filling: Use an offset spatula to evenly spread a layer of cherry filling on top of the cake layer, leaving a small border around the edge to prevent overflow.
3. Add a Layer of Frosting: Next, spread a layer of whipped cream frosting on top of the cherry filling.
4. Repeat: Place the second layer of cake on top and repeat the process until all layers are stacked. Finish with the last layer of cake, then cover the entire cake with the remaining whipped cream frosting, smoothing it out with your spatula.
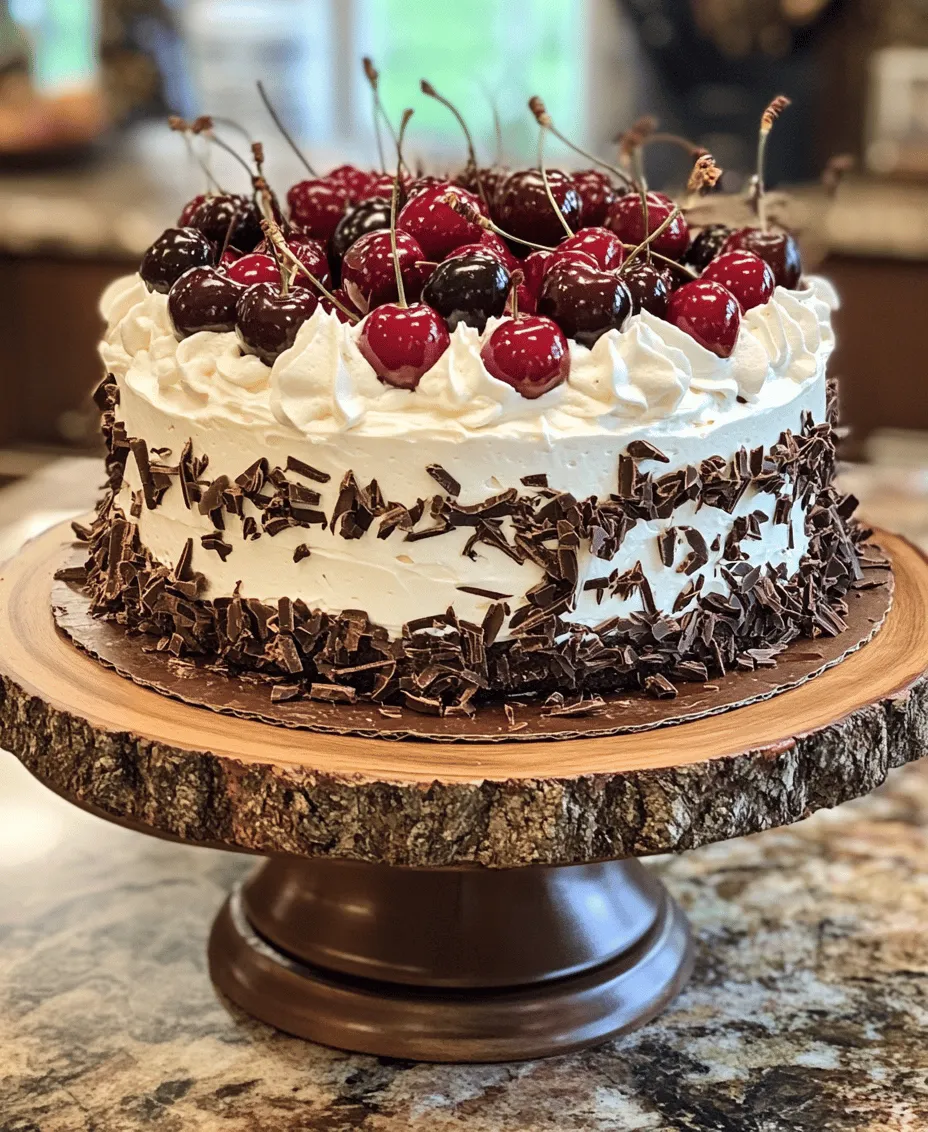
Final Touches for Presentation
1. Chill Before Serving: After assembling the cake, refrigerate it for at least 30 minutes. This allows the layers to set and makes it easier to slice.
2. Garnish: For a stunning finish, garnish the top with chocolate shavings and a few whole cherries. You can create chocolate shavings by using a vegetable peeler on a chocolate bar.
3. Dust with Cocoa Powder: A light dusting of cocoa powder can add an elegant touch to your cake’s presentation.
Serving Suggestions
The Black Forest Cake is a showstopper at any gathering, and knowing how to serve it can enhance the experience.
1. Accompaniments: This cake pairs wonderfully with a cup of freshly brewed coffee or a glass of dessert wine. The rich chocolate and cherry flavors complement the bitterness of coffee or the sweetness of dessert wines beautifully.
2. Presentation Ideas: For special occasions, consider presenting your cake on a decorative cake stand. Add some fresh cherries or mint leaves around the base for an appealing look.
3. Slice Size: Serve generous slices, as the rich flavors will leave your guests satisfied. A typical serving size is about 1-2 inches thick.
Storage and Shelf Life
To maintain the freshness and quality of your Black Forest Cake, proper storage is essential.
1. Storing Leftover Cake: If you have leftover cake, store it in an airtight container in the refrigerator. It’s best consumed within 3-4 days, as the whipped cream may begin to lose its texture over time.
2. Keeping the Cake Fresh: To keep the cake moist, ensure it is covered properly. If you notice the whipped cream starting to weep, you can lightly re-whip it before serving again.
3. Freezing Components: If you want to make your cake ahead of time, consider freezing the individual components. The chocolate cake layers can be wrapped tightly in plastic wrap and stored in the freezer for up to 2 months. The cherry filling can also be frozen, while the whipped cream frosting is best made fresh.
Conclusion
Making a homemade Black Forest Cake is not only a culinary adventure but also a rewarding experience that brings joy to both the baker and those who get to enjoy it. The layers of rich chocolate cake, luscious cherry filling, and fluffy whipped cream frosting come together to create a dessert that is both indulgent and delightful.
Baking is a wonderful way to express creativity, and this classic dessert is a perfect way to hone your skills. As you explore the art of baking, you’ll discover the satisfaction that comes from creating something special from scratch. The timeless appeal of Black Forest Cake makes it a cherished treat that brings people together, perfect for celebrations or simply enjoying a slice with loved ones.
So gather your ingredients, unleash your inner baker, and enjoy the delicious journey of creating this delectable dessert that stands the test of time.