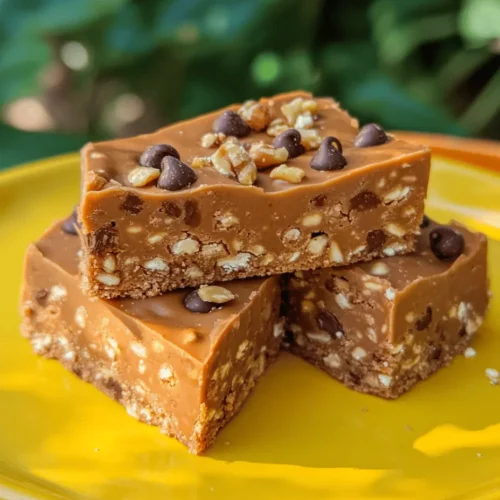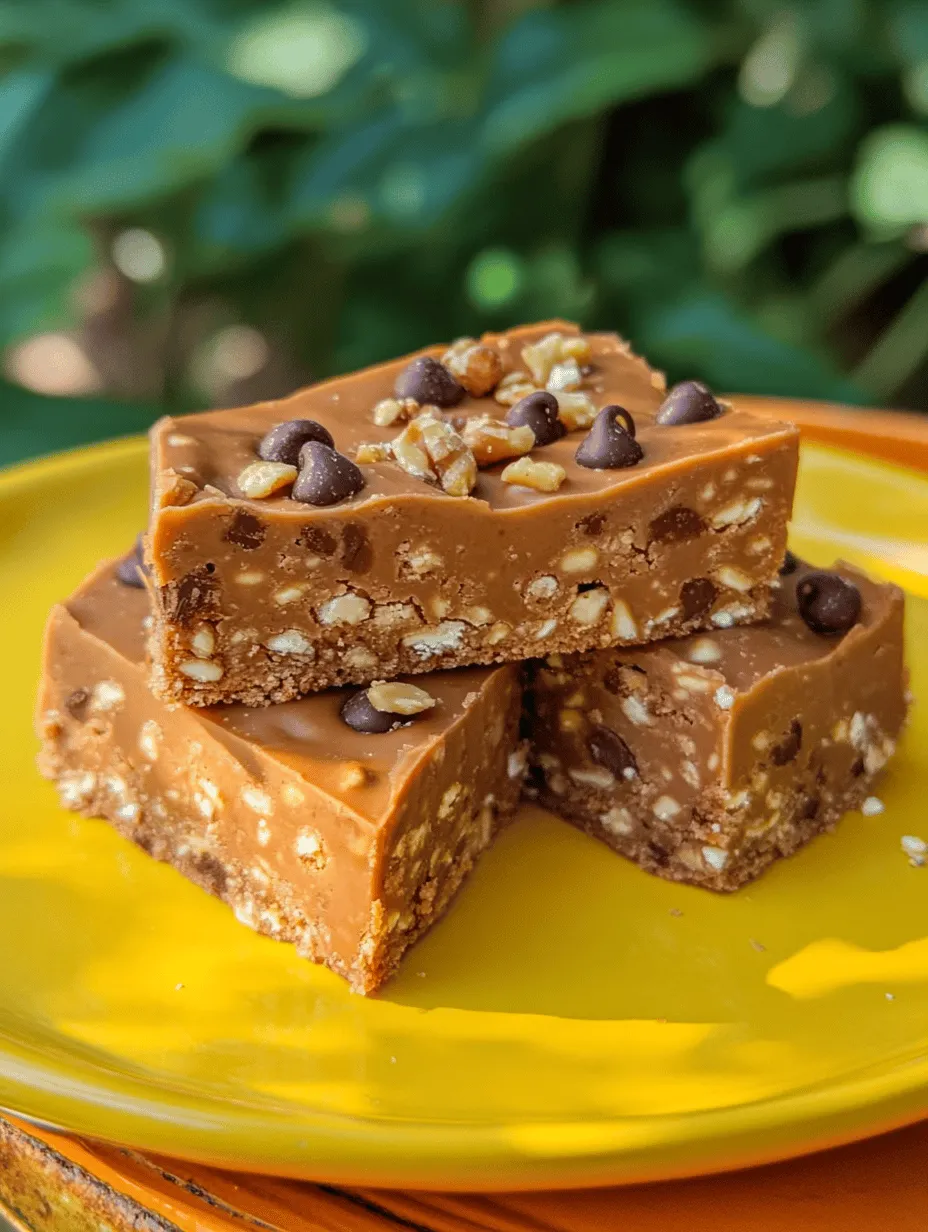
Introduction to Dreamy No-Bake Peanut Butter Bars
In the world of snacks and desserts, few things can rival the creamy, rich flavor of peanut butter, especially when paired with the sweetness of honey or maple syrup. Dreamy No-Bake Peanut Butter Bars are the perfect solution for those who crave a delicious treat without the hassle of baking. These bars combine the wholesome goodness of oats, the lusciousness of peanut butter, and a hint of sweetness, making them not only delectable but also a nutritious snack option.
Whether you’re looking for a quick pick-me-up during a busy day, a post-workout treat, or a delightful dessert to share with friends and family, these no-bake bars deliver on all fronts. The beauty of this recipe lies in its simplicity and the fact that it requires no oven, making it an ideal choice for those hot summer days or for anyone who prefers not to heat up their kitchen. In this article, we will explore the delightful simplicity of this recipe, the nutritional benefits of its ingredients, and how to enjoy these bars as a quick snack or dessert.
Understanding the Ingredients
Exploring the Role of Peanut Butter
At the heart of these Dreamy No-Bake Peanut Butter Bars is the star ingredient: peanut butter. This creamy delight is not just a flavor enhancer; it also packs a powerful nutritional punch. Peanut butter is rich in protein, providing a satiety factor that helps keep hunger at bay. A typical serving of peanut butter contains about 8 grams of protein, which makes it an excellent choice for those looking to boost their protein intake without resorting to meat or dairy.
In addition to protein, peanut butter contains healthy fats, particularly monounsaturated fats, which are beneficial for heart health. It also provides essential vitamins and minerals, including vitamin E, magnesium, and potassium. The type of peanut butter you choose can also make a difference in your bars.
– Creamy Peanut Butter: This version is smooth and easy to mix into your ingredients, providing a velvety texture to the bars. It’s ideal for those who prefer a smooth finish without any crunchy bits.
– Crunchy Peanut Butter: For those who enjoy a bit of texture in their treats, crunchy peanut butter adds delightful little bits of peanuts throughout the bars, enhancing the overall texture and experience.
The Sweetness Factor: Honey vs. Maple Syrup
Sweetness plays an essential role in balancing the flavors of the peanut butter. When it comes to sweetening your Dreamy No-Bake Peanut Butter Bars, you have two excellent options: honey or maple syrup. Both ingredients not only add sweetness but also contribute unique flavors and health benefits.
– Honey: Known for its natural sweetness, honey is a great source of antioxidants and has anti-inflammatory properties. It can also help soothe sore throats and boost your immune system. When choosing honey for your recipe, opt for raw or local varieties when possible, as these often retain more of their natural nutrients.
– Maple Syrup: As a natural sweetener, maple syrup comes with its own set of benefits. It’s lower on the glycemic index compared to refined sugars, making it a better choice for maintaining stable blood sugar levels. Additionally, maple syrup is rich in vitamins and minerals, including manganese and zinc. When selecting maple syrup, look for pure, grade A maple syrup for the best flavor and quality.
Choosing between honey and maple syrup often comes down to personal preference and dietary needs. Some people may prefer the floral notes of honey, while others may favor the earthy sweetness of maple syrup. Both options will create delicious bars, so feel free to experiment and find your favorite.
The Importance of Vanilla Extract
To elevate the flavor profile of your no-bake bars, vanilla extract is a crucial ingredient. It adds depth and warmth to the overall taste, making the bars even more irresistible. Vanilla extract comes in two main forms: pure and imitation.
– Pure Vanilla Extract: Made from real vanilla beans, pure vanilla extract has a complex flavor and is generally regarded as the superior choice. It’s worth the investment for the enhanced taste and the aromatic qualities it brings to your baking.
– Imitation Vanilla Extract: This version is made from synthetic vanillin and often lacks the full flavor profile of pure vanilla. While it can be a budget-friendly option, it may not provide the same depth of flavor that pure vanilla does.
When making your Dreamy No-Bake Peanut Butter Bars, using pure vanilla extract can significantly enhance the overall flavor, making each bite feel more luxurious and satisfying.
The Oats: A Filling Base
Another key component of these bars is rolled oats. They serve as the filling base that provides structure and texture to the bars. Oats are not only nutritious, but they also contribute a delightful chewiness that pairs perfectly with the creaminess of peanut butter.
Rolled oats are an excellent source of dietary fiber, particularly beta-glucans, which help lower cholesterol levels and promote heart health. They also provide a steady source of energy, making them a great addition to any snack. Oats are rich in vitamins and minerals, including iron, magnesium, and B vitamins, which support overall health.
In addition to their health benefits, oats are incredibly versatile. They can be easily incorporated into various recipes, from cookies to smoothies to energy bars. When making your Dreamy No-Bake Peanut Butter Bars, opt for rolled oats rather than quick oats, as they provide a better texture and chew.
Chocolate Chips and Nuts: The Perfect Finishing Touches
To take your Dreamy No-Bake Peanut Butter Bars to the next level, consider adding chocolate chips and chopped nuts. These ingredients not only enhance the flavor but also add nutritional value and texture.
– Dark Chocolate Chips: Dark chocolate is a rich source of antioxidants and has been linked to various health benefits, including improved heart health and cognitive function. The bittersweet flavor of dark chocolate complements the sweetness of the bars beautifully, creating a harmonious balance. When choosing chocolate chips, look for those with at least 70% cocoa content for maximum health benefits.
– Chopped Nuts: Nuts add a satisfying crunch and additional nutrition to your bars. They are a great source of healthy fats, protein, and fiber. Almonds, walnuts, and pecans are all excellent choices that can enhance the flavor and texture of your no-bake bars. When adding nuts, feel free to experiment with different varieties or even use a combination to find your favorite mix.
By incorporating these finishing touches, you can customize your Dreamy No-Bake Peanut Butter Bars to suit your taste preferences while also boosting their nutritional profile.
Step-by-Step Guide to Making Dreamy No-Bake Peanut Butter Bars
Preparation and Mixing
Now that you have a solid understanding of the ingredients, it’s time to dive into the preparation process. Making Dreamy No-Bake Peanut Butter Bars is straightforward and can be completed in just a few simple steps.
1. Gather Your Ingredients: Start by assembling all the necessary ingredients, which include peanut butter, honey or maple syrup, vanilla extract, rolled oats, chocolate chips, and chopped nuts. Having everything within reach will make the mixing process smoother.
2. Mix the Peanut Butter Mixture: In a large mixing bowl, combine the peanut butter, honey or maple syrup, and vanilla extract. Use a spatula or spoon to mix thoroughly until the ingredients are well incorporated. The mixture should be creamy and smooth. If you find the peanut butter too thick, consider warming it slightly in the microwave for about 15-20 seconds to make it easier to mix.
3. Achieving the Perfect Consistency: The key to achieving the right consistency for your bars is to ensure that the peanut butter mixture is not too runny or too thick. You want it to be smooth enough to blend with the oats but thick enough to hold its shape once set. If the mixture feels too dry, you can add a touch more honey or maple syrup to help bind the ingredients together.
Incorporating Oats and Additional Ingredients
Once your peanut butter mixture is ready, it’s time to fold in the oats and any additional ingredients, such as chocolate chips and chopped nuts.
1. Mixing in the Oats: Gradually add the rolled oats to the peanut butter mixture, stirring gently until the oats are evenly coated. It’s essential to mix thoroughly to ensure that every oat has some of that delicious peanut butter goodness.
2. Even Distribution of Chocolate Chips and Nuts: After incorporating the oats, add your chosen chocolate chips and chopped nuts. Gently fold them into the mixture, ensuring even distribution throughout the bars. This step is crucial, as you want every bite to have a balanced combination of flavors and textures.
3. Preparing Your Pan: Line an 8×8-inch or 9×9-inch baking dish with parchment paper, leaving some overhang on the sides for easy removal later. You can also lightly grease the pan with cooking spray to prevent sticking.
4. Pressing the Mixture into the Pan: Transfer the peanut butter mixture into the prepared baking dish and press it down firmly using the back of a spatula or your hands. Make sure to spread it evenly so that it sets uniformly. The firmer you press the mixture, the better the bars will hold together once chilled.
5. Chilling the Bars: Place the baking dish in the refrigerator for at least 1-2 hours or until the bars are firm. This chilling period allows the mixture to set properly, making it easier to cut into bars later on.
Once the bars have chilled and set, you can slice them into squares or rectangles, depending on your preference. These Dreamy No-Bake Peanut Butter Bars are now ready to be enjoyed, offering a delightful combination of flavors and textures that will satisfy your sweet tooth without any guilt. Whether you’re grabbing one for an afternoon snack or serving them at a gathering, these bars are sure to become a favorite in your household.

Preparing the Baking Dish
Before diving into making your Dreamy No-Bake Peanut Butter Bars, it’s essential to prepare your baking dish properly. This step is crucial for ensuring that your bars come out easily and maintain their shape.
Importance of Using Parchment Paper for Easy Removal
Using parchment paper is a game changer when it comes to no-bake desserts. By lining your baking dish with parchment paper, you create a non-stick surface that allows for easy removal of the bars once they are set. This prevents the mixture from sticking to the sides and bottom of the dish, which can lead to crumbling and mess. Additionally, you can use the edges of the parchment paper to lift the entire batch out of the dish with ease.
Tips for Pressing the Mixture Evenly
Once your baking dish is lined with parchment paper, it’s time to press down the peanut butter mixture. Here are some tips to ensure you achieve an even layer:
– Use a flat spatula or the back of a measuring cup to press the mixture firmly into the corners of the dish. This helps create a solid base for the bars.
– Wet your hands slightly or use a piece of wax paper to prevent sticking while smoothing the top layer.
– Ensure the mixture is level by checking the sides of the dish. An even layer helps the bars set uniformly, which is crucial for the perfect texture.
Chilling and Setting
Now that your mixture is pressed into the prepared baking dish, the next step is chilling. Chilling is not just about making the bars cold; it plays a vital role in achieving the right consistency.
The Science Behind Chilling for Structure
Chilling allows the peanut butter bars to set properly. The fats in the peanut butter and any chocolate used will solidify when chilled, creating a firmer texture that makes cutting the bars easier. This process helps bind the ingredients together, ensuring they hold their shape when you slice them.
How Long to Chill and How to Know When They Are Ready
For best results, chill your bars in the refrigerator for at least 2 to 3 hours. If you are in a hurry, you can place them in the freezer for about 30 to 45 minutes, but make sure to keep an eye on them to avoid freezing solid. You’ll know they are ready when they feel firm to the touch and hold their shape when pressed lightly. A firm texture indicates that they are set properly and will slice cleanly.
Storage and Serving Suggestions
Now that your Dreamy No-Bake Peanut Butter Bars are ready, let’s discuss how to store them and some creative serving suggestions.
Storing Your Peanut Butter Bars
To keep your peanut butter bars fresh and delicious, follow these best practices:
– Refrigerate: Store the bars in an airtight container in the refrigerator. This will help preserve their texture and flavor. If stacked, place a layer of parchment paper between them to prevent sticking.
– Freezing: For longer storage, you can freeze the bars. Wrap each bar individually in plastic wrap and place them in a freezer-safe container. They can last up to 2 months in the freezer. Thaw them in the fridge before serving for the best texture.
Shelf Life Considerations
When stored properly in the refrigerator, your Dreamy No-Bake Peanut Butter Bars can last for about one week. If frozen, they can last up to two months, making them a great option for meal prep or healthy snacking.
Creative Ways to Serve
These peanut butter bars are versatile and can be enjoyed in various ways. Here are some creative serving suggestions:
– Pairing with Fruits or Yogurt: Serve your bars alongside fresh fruit like bananas, apples, or strawberries for a refreshing contrast. You can also crumble a bar over Greek yogurt for an extra protein boost and a satisfying crunch.
– Incorporate into Meal Prep for Healthy Snacking: Cut the bars into smaller squares and pack them in snack-sized containers for quick grab-and-go options. They make an excellent addition to lunch boxes or as a mid-afternoon snack to keep your energy levels up.
Nutritional Benefits of Dreamy No-Bake Peanut Butter Bars
Understanding the nutritional profile of your Dreamy No-Bake Peanut Butter Bars can help you appreciate their health benefits.
Analyzing the Nutritional Profile
Here’s a breakdown of the main ingredients in your peanut butter bars:
– Peanut Butter: Provides healthy fats, protein, and essential nutrients such as magnesium and vitamin E.
– Oats: A great source of fiber, which aids in digestion and helps keep you full longer.
– Maple Syrup or Honey: Offers natural sweetness while providing antioxidants and nutrients.
On average, each serving of your bars contains approximately 150-200 calories, 6-8g of protein, 8-10g of fat, and 15-20g of carbohydrates, depending on the specific ingredients used.
Benefits of Each Ingredient for a Balanced Diet
– Peanut Butter: Rich in protein and healthy fats, it supports muscle repair and provides sustained energy.
– Oats: Help lower cholesterol levels and are an excellent source of slow-releasing carbohydrates, making them ideal for sustained energy.
– Maple Syrup: A natural sweetener that contains minerals like zinc and manganese, it can be a healthier alternative to processed sugars.
Perfect for Various Diets
These bars are incredibly adaptable, making them suitable for a range of dietary preferences.
Gluten-Free Options with Oats
Ensure you use certified gluten-free oats if you are catering to gluten-sensitive individuals. This way, everyone can enjoy the delightful taste without worry.
Vegan-Friendly Adaptations Using Maple Syrup and Dark Chocolate
For a fully vegan option, substitute honey with maple syrup and opt for dark chocolate that is dairy-free. This adaptation keeps the bars delicious without any animal products, making them suitable for vegans.
Common Questions and Troubleshooting
As with any recipe, you may have some questions or face challenges during preparation. Here are some common concerns and solutions:
What to Do If the Mixture Is Too Dry or Too Wet
– Too Dry: If your mixture feels too crumbly and dry, add a bit more peanut butter or a splash of non-dairy milk to bring it together. Mix thoroughly until you reach a cohesive texture.
– Too Wet: If the mixture is too wet and sticky, you can incorporate more oats or protein powder to absorb the excess moisture. Gradually add until the desired consistency is achieved.
Suggestions for Ingredient Substitutions
If you don’t have a specific ingredient on hand, here are a few substitutions:
– Nut Butters: Almond butter or cashew butter can easily replace peanut butter for a different flavor.
– Sweeteners: Agave syrup or brown rice syrup can substitute for maple syrup or honey.
– Add-Ins: Feel free to add mix-ins like chia seeds, flaxseeds, or even dried fruits for added flavor and nutrition.
Conclusion: Enjoying Your Dreamy Peanut Butter Bars
Dreamy No-Bake Peanut Butter Bars are not only a simple and delicious recipe but also a nutritious choice for snacking. With their rich flavor and satisfying texture, they are perfect for anyone looking to indulge without the guilt of traditional desserts. Whether enjoyed as an afternoon snack or a post-dinner treat, these bars are sure to become a favorite in your household. By understanding the ingredients and following the easy preparation steps, you can create a delightful and healthy snack that everyone will love.
So, gather your ingredients, prepare your baking dish, and get ready to enjoy these scrumptious peanut butter bars that are as good for your taste buds as they are for your health. You’ll find that they are perfect for any occasion, satisfying sweet cravings while keeping your dietary needs in check. Make these bars today and discover a new favorite in your snacking repertoire!