Introduction
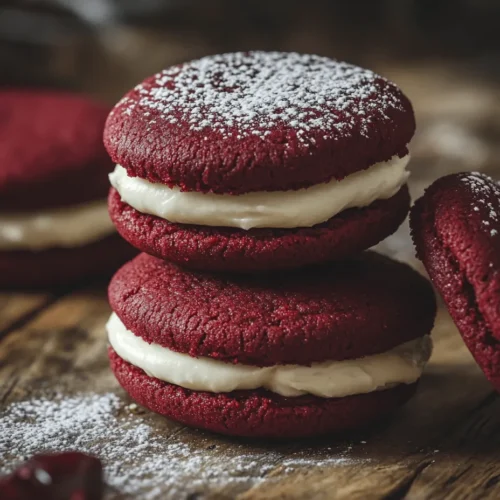
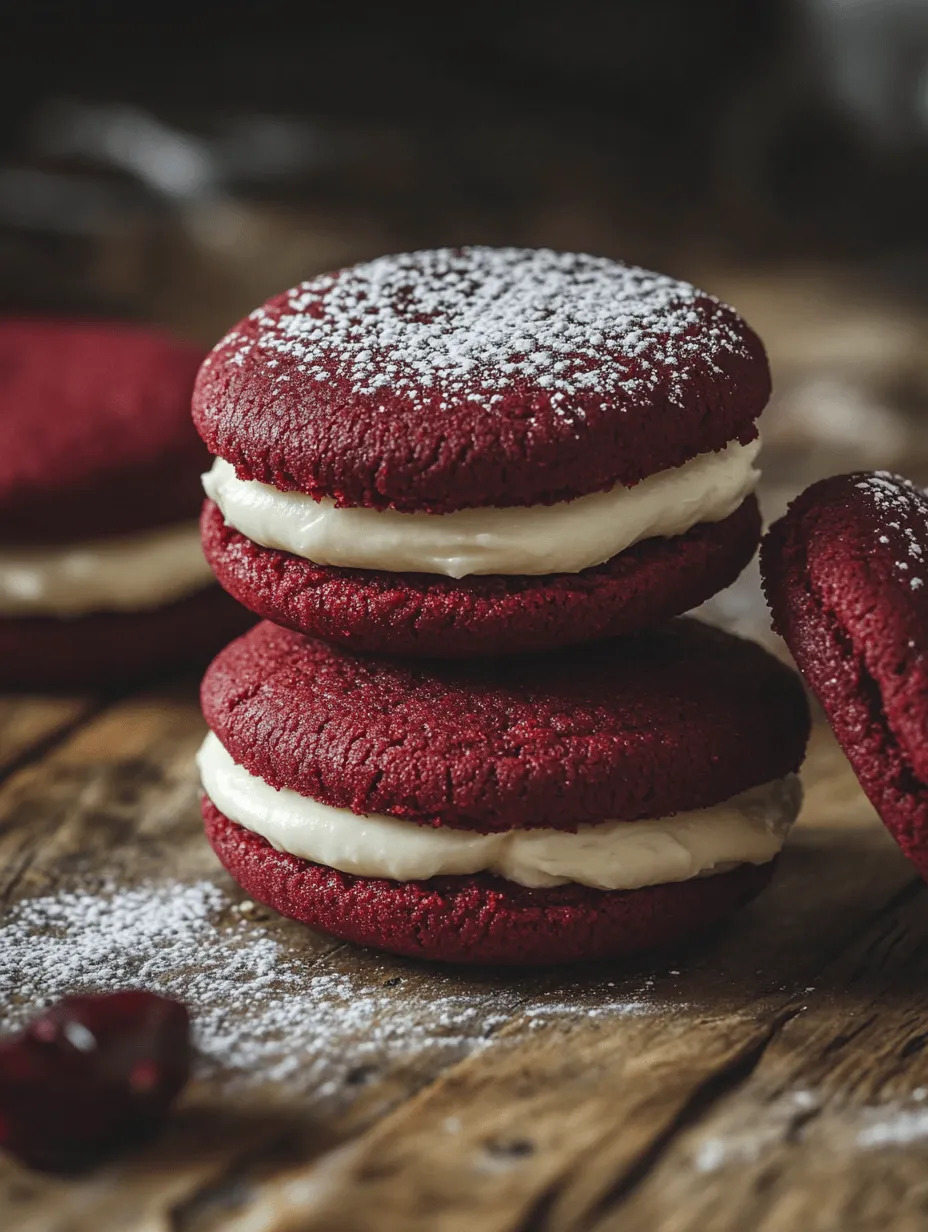
Red Velvet Oreos are an enticing twist on the classic cookie that combines the rich, velvety flavor of red velvet cake with the beloved Oreo cookie format. This creative concoction brings together the best of both worlds, appealing to cookie lovers and red velvet enthusiasts alike. With their striking red color and creamy filling, Easy Red Velvet Oreos are not only delicious but also visually appealing, making them the perfect treat for any occasion, from holiday gatherings to birthday parties.
The popularity of red velvet desserts has surged in recent years, thanks in part to their unique flavor profile and festive aesthetics. The combination of cocoa powder and buttermilk creates a subtly chocolatey taste that is both rich and refreshing. This dessert’s signature hue, a vibrant red, has become synonymous with celebrations, making it a favorite among those looking to add a pop of color to their dessert tables.
In this article, we will provide a detailed recipe and guide for making Easy Red Velvet Oreos at home. Whether you’re planning a special event or simply want to treat yourself to a delightful dessert, this recipe will walk you through the process, ensuring delicious results every time.
Understanding Red Velvet Flavor and Aesthetic
To appreciate the allure of Red Velvet Oreos, it’s essential to delve into the origins and characteristics of red velvet cake itself. This iconic dessert dates back to the early 20th century and is believed to have originated in Canada or the United States. Traditionally, red velvet cake is known for its soft, dense texture and a unique flavor that is a subtle blend of cocoa and vanilla. It is often paired with a cream cheese frosting, which perfectly complements its rich taste.
The vibrant red color of red velvet cake is not just visually stunning; it also carries a fascinating history. The reddish tint is typically achieved through the use of cocoa powder, which reacts with acidic ingredients like buttermilk and vinegar. However, the addition of red food coloring has become a standard practice in modern recipes, enhancing the cake’s striking appearance. This eye-catching color makes red velvet desserts an attractive choice for celebrations, capturing attention and enticing appetites.
When it comes to creating Easy Red Velvet Oreos, the iconic Oreo cookie serves as an ideal base for this variation. The classic chocolate wafer of the Oreo complements the red velvet flavor beautifully, providing a contrast that enhances the overall taste experience. The sweet, creamy filling adds a delightful richness, making these cookies a decadent treat that is sure to impress.
Ingredients Breakdown
To create the perfect Easy Red Velvet Oreos, you’ll need a selection of key ingredients that contribute to the cookie’s flavor, texture, and overall appeal. Here’s a breakdown of the essential components:
– All-Purpose Flour: This ingredient forms the foundation of the cookies, providing structure and texture. The right amount of flour is crucial for achieving the ideal balance between chewy and crispy.
– Unsweetened Cocoa Powder: Cocoa powder is essential for introducing depth of flavor. While red velvet cake is not overly chocolatey, the cocoa adds a subtle richness that enhances the overall taste profile.
– Baking Soda and Salt: These two ingredients serve vital roles in the baking process. Baking soda acts as a leavening agent, helping the cookies rise and develop a light texture, while salt enhances the flavors and balances the sweetness.
– Butter: Butter is a key ingredient that creates a rich and creamy texture in the cookies. Using unsalted butter allows you to control the salt content and ensures a perfectly balanced flavor.
– Sugars: A combination of granulated sugar and brown sugar is used to balance sweetness and moisture. Brown sugar adds a hint of caramel flavor, contributing to the cookies’ overall taste.
– Egg and Vanilla Extract: The egg acts as a binding agent, helping to hold the ingredients together while adding moisture. Vanilla extract enhances the flavor, providing a warm, aromatic undertone.
– Red Food Coloring: This ingredient is crucial for achieving the signature red hue of the cookies. The amount of food coloring can be adjusted based on personal preference and desired intensity.
– Cream Cheese Frosting: The perfect filling for these cookies, cream cheese frosting adds a rich and tangy flavor that complements the sweetness of the red velvet cookies.
– Optional Powdered Sugar: For presentation, a light dusting of powdered sugar can elevate the visual appeal of the finished product, making them look even more enticing.
Step-by-Step Instructions for Easy Red Velvet Oreos
Now that you are familiar with the ingredients, it’s time to dive into the step-by-step instructions for creating Easy Red Velvet Oreos. Following these guidelines will ensure that you achieve the best results:
Step 1: Preheat the Oven
Begin by preheating your oven to 350°F (175°C). This step is crucial as it ensures that the cookies bake evenly and achieve the desired texture. While the oven is heating, you can prepare the cookie dough, maximizing your efficiency in the kitchen.
Step 2: Prepare the Baking Sheet
Line a baking sheet with parchment paper or a silicone baking mat. This will prevent the cookies from sticking and make cleanup a breeze. Having your baking sheet ready will save you time when you are ready to bake the cookies.
Step 3: Mix Dry Ingredients
In a mixing bowl, whisk together the all-purpose flour, unsweetened cocoa powder, baking soda, and salt. This step ensures that the dry ingredients are evenly distributed and helps to prevent clumping when combined with the wet ingredients.
Step 4: Cream Butter and Sugars
In a separate large mixing bowl, cream together the softened butter, granulated sugar, and brown sugar using an electric mixer. Beat the mixture on medium speed until it becomes light and fluffy, which typically takes about 3-5 minutes. This process incorporates air into the butter, resulting in a lighter cookie texture.
Step 5: Add Egg, Vanilla, and Food Coloring
Next, add the egg, vanilla extract, and red food coloring to the butter and sugar mixture. Mix until well combined, ensuring that the food coloring is evenly dispersed throughout the batter. The mixture should take on a vibrant red hue, signaling that you are on the right track.
Step 6: Combine Wet and Dry Ingredients
Gradually add the dry ingredients to the wet mixture, mixing on low speed until just combined. Be careful not to overmix, as this can lead to tough cookies. The dough should be soft and slightly sticky, which is perfect for shaping into cookie rounds.
These initial steps set the foundation for your Easy Red Velvet Oreos. Stay tuned for the continuation of this delicious recipe, where we will guide you through the remaining steps to create these delectable cookies, including how to make the cream cheese filling and assemble your very own Red Velvet Oreos.

Combining Dry Ingredients
To achieve the perfect texture for your Easy Red Velvet Oreos, it’s essential to combine the dry ingredients effectively. Begin by sifting together the all-purpose flour, cocoa powder, baking soda, and salt in a large mixing bowl. Sifting not only helps break up any clumps but also aerates the flour, ensuring a lighter cookie. When combining these dry ingredients, use a whisk to mix thoroughly, allowing for even distribution of the cocoa powder throughout the flour. This technique prevents any clumps from forming and ensures that every bite of your cookies has a consistent flavor.
Creaming Butter and Sugars
Next, we move on to one of the most critical steps in cookie baking: creaming the butter and sugars. In a separate bowl, combine the softened unsalted butter, granulated sugar, and brown sugar. Using an electric mixer, beat the mixture on medium speed until it becomes light and fluffy, which typically takes about 3 to 5 minutes. The creaming method is vital as it incorporates air into the butter, leading to a lighter and fluffier cookie. The sugars should dissolve into the butter, creating a smooth mixture that provides the foundation for your cookie dough.
Adding Egg and Color
Once your butter and sugars are creamed to perfection, it’s time to add the egg and food coloring. Crack in one large egg and mix until just combined. For the characteristic red velvet effect, add red gel food coloring. Start with a few drops and mix thoroughly, assessing the color until you reach your desired shade. This step is crucial, as the right amount of food coloring will give your cookies that iconic red hue without compromising the dough’s consistency. Make sure to scrape down the sides of the bowl to ensure all ingredients are well incorporated.
Blending in Dry Ingredients
Now it’s time to blend the dry ingredients into the wet mixture. Gently fold the dry ingredients into the creamed butter mixture using a spatula or wooden spoon. Be cautious during this step: overmixing can lead to tough cookies. The goal is to combine the ingredients until just incorporated, leaving behind a few floury streaks. This will ensure that your cookies maintain a tender texture. A little patience here will pay off with cookies that are soft and delightful.
Shaping Cookies
With your dough ready, it’s time to shape the cookies. Use a cookie scoop or tablespoon to portion out the dough, rolling it into balls about one inch in diameter. Space the cookie dough balls at least two inches apart on your prepared baking sheet, as they will spread while baking. This spacing is crucial for even baking and to prevent the cookies from merging into one another. If you prefer larger cookies, simply increase the size of the dough balls, but adjust the baking time accordingly.
Baking the Cookies
Preheat your oven to 350°F (175°C) and bake the cookies for 10-12 minutes. You’ll know they are done when the edges appear set, and the centers are slightly soft. Keep a close eye on them, as they can go from perfectly baked to overdone quickly. Once out of the oven, allow the cookies to cool on the baking sheet for about 5 minutes before transferring them to a wire rack. This cooling step allows the cookies to firm up slightly, making them easier to handle.
Filling with Frosting
While your cookies are cooling, prepare the cream cheese frosting. Once the cookies are completely cool, turn half of them over to make the filling process easier. Using a piping bag or a knife, spread a generous amount of frosting on the flat side of one cookie and top with another, creating a sandwich. Aim for a balanced filling that doesn’t overflow but is still generous enough to provide a delightful creaminess with each bite. For a more polished look, you can pipe the frosting into decorative swirls.
Optional Dusting
To enhance the visual appeal of your Red Velvet Oreos, consider a light dusting of powdered sugar or cocoa powder on top of the filled cookies. This step is optional but can add an elegant touch that makes your cookies look even more appealing. Use a fine-mesh sieve to evenly distribute the powdered sugar, giving your cookies a professional finish that is sure to impress.
Variations and Customizations
One of the joys of baking is the ability to customize recipes to suit your tastes. For different types of fillings, consider using chocolate ganache or vanilla frosting instead of the traditional cream cheese. These variations can add a delightful twist, catering to different flavor preferences.
If you’re looking to add texture, consider mixing in crushed nuts or sprinkles into the dough before baking. Not only do they add crunch, but they also provide a visual pop to your cookies. For those who are gluten-sensitive, you can easily substitute all-purpose flour with a gluten-free flour blend, ensuring everyone can enjoy these delicious treats.
Serving Suggestions and Pairings
Easy Red Velvet Oreos are versatile and can be enjoyed in various settings. Pair them with a glass of cold milk for a classic treat or enjoy them alongside a warm cup of coffee or hot cocoa for a cozy experience. They are perfect for special occasions like birthdays, holidays, or casual get-togethers.
For gifting, consider packaging these cookies in decorative boxes or jars, tied with ribbons for an added touch. They make delightful homemade gifts that are sure to be appreciated by friends and family.
Nutritional Information
Each serving of Easy Red Velvet Oreos typically contains approximately 150 calories, with a balance of carbohydrates, fats, and proteins. While these cookies are indulgent, moderation is key. Enjoying a homemade treat is a wonderful experience, but it’s essential to be mindful of portion sizes to maintain a healthy diet.
Conclusion
Making Easy Red Velvet Oreos at home brings joy and satisfaction that store-bought cookies simply can’t match. From the rich flavor of the red velvet to the smooth cream cheese filling, every bite is a celebration of baking. Don’t be afraid to experiment with this recipe, whether it’s trying different fillings or adding your favorite textures.
Baking is not just about the end product; it’s also about the process. Enjoy the time spent in the kitchen, and share your delicious creations with loved ones. The smiles and laughter that come from sharing homemade treats are what baking is all about. So roll up your sleeves, gather your ingredients, and get ready to make these scrumptious Easy Red Velvet Oreos!