Introduction
As the holiday season approaches, the delightful aroma of freshly baked goods fills our homes, and one treat that consistently brings joy and nostalgia is the classic sugar cookie. These sweet, buttery bites have been a staple for generations, often adorning festive tables, gift exchanges, and family gatherings. Whether it’s the simple pleasure of decorating them with loved ones or the excitement of sharing them with neighbors, sugar cookies embody the spirit of the holidays.
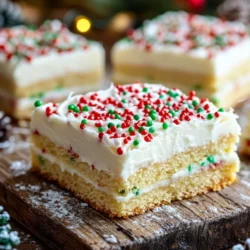
This year, we invite you to try a delightful twist on this beloved classic: Festive Frosted Christmas Sugar Cookie Bars. These bars capture all the charm of traditional sugar cookies but with the added convenience of a single, easy-to-bake pan. No need to roll, cut, or frost dozens of individual cookies—just bake, frost, and slice! Their vibrant colors and festive toppings make them the perfect centerpiece for holiday gatherings, ensuring everyone at your celebration will be drawn to this festive treat.
In this article, we’ll explore the allure of sugar cookie bars, share a detailed ingredient list, and guide you through the initial steps of preparing these delightful bars. Whether you’re an experienced baker or a novice looking to create memorable holiday moments, this recipe is designed for ease and enjoyment, allowing you to spend more time with family and friends as you create delicious memories.
The Allure of Sugar Cookie Bars
Sugar cookie bars have surged in popularity in recent years, and it’s easy to see why. Unlike traditional cookies, which require time-consuming rolling and cutting, sugar cookie bars streamline the baking process by transforming the classic cookie dough into a single sheet. This means less mess and minimal cleanup, making them an excellent choice for busy holiday schedules.
Another compelling reason for their popularity is their shareability. Just imagine presenting a vibrant tray of sugar cookie bars at your next holiday party. Guests can easily grab a piece, indulge in the soft, chewy texture, and enjoy the festive flavors without the need for plates or utensils. Their square shape also allows for perfect portion control, ensuring that everyone can enjoy a taste without feeling overwhelmed.
Moreover, sugar cookie bars offer incredible versatility. You can customize them in countless ways—add different flavor extracts, incorporate festive mix-ins like chocolate chips or nuts, and experiment with various frostings and decorations. This adaptability allows you to cater to a wide range of tastes, ensuring that your festive frosted Christmas sugar cookie bars will be loved by all.
Ingredients for Festive Frosted Christmas Sugar Cookie Bars
Creating the perfect festive frosted Christmas sugar cookie bars begins with a few essential ingredients. Here’s a detailed breakdown of what you’ll need:
All-Purpose Flour
The foundation of any great cookie bar is all-purpose flour. It provides the necessary structure and texture, ensuring your bars have that delightful chewy consistency. When measuring flour, be sure to spoon it into your measuring cup and level it off with a knife to avoid packing, which can lead to dense bars.
Baking Soda and Baking Powder
These two leavening agents are crucial for creating the perfect rise in your cookie bars. Baking soda, a base, reacts with acids in the dough to produce carbon dioxide, helping the bars expand and become tender. Baking powder, on the other hand, contains both an acid and a base and contributes to the leavening process. Using both ensures a well-balanced texture that is soft yet sturdy.
Unsalted Butter
Butter is the key to flavor and moisture in your sugar cookie bars. Unsalted butter is preferred because it allows you to control the salt content of your recipe. When creamed with sugar, butter helps create a light and fluffy base, which contributes to the airy texture of your bars. Make sure your butter is at room temperature for the best results.
Granulated Sugar
Sugar isn’t just for sweetness; it plays a significant role in the texture of your cookie bars. Granulated sugar helps to create a chewy texture, while the creaming process with butter incorporates air, resulting in a light bar. For those who enjoy a sweeter treat, feel free to adjust the sugar quantity slightly based on your taste preferences.
Egg
Eggs act as a binding agent, holding all the ingredients together while contributing moisture. They also help in achieving a tender crumb. Make sure to use large eggs, as the size can impact the overall moisture content of your cookie bars.
Flavor Extracts: Vanilla and Optional Almond Extract
Flavor extracts are where the magic happens. Pure vanilla extract is a classic choice, infusing the bars with a warm, aromatic flavor that complements the sweetness. For a unique twist, consider adding a splash of almond extract. This nutty flavor pairs beautifully with vanilla and adds depth to your cookie bars.
Icing Sugar and Milk
To achieve the perfectly sweet and creamy frosting for your sugar cookie bars, you’ll need icing sugar (also known as powdered sugar) and milk. The combination of these two ingredients creates a smooth, spreadable frosting that can be easily adjusted for consistency by adding more milk or icing sugar as needed.
Christmas-Themed Sprinkles
No festive treat is complete without some sparkle! Christmas-themed sprinkles add a visual appeal to your sugar cookie bars, making them irresistible. From colorful nonpareils to holiday-themed shapes, sprinkles contribute to the festive spirit and delight both kids and adults alike.
Step-by-Step Instructions for Making Sugar Cookie Bars
Now that you have all your ingredients ready, it’s time to dive into the baking process! The first step is crucial to ensure even baking and the best texture for your sugar cookie bars.
Preheat the Oven
Before you even start mixing your ingredients, preheat your oven to 350°F (175°C). Preheating is essential because it ensures that your cookie bars bake evenly from the moment they enter the oven. An adequately heated oven helps achieve that perfect balance between a chewy center and slightly crisp edges, resulting in a delicious bar that everyone will love.
Stay tuned as we continue with the detailed instructions on mixing, baking, and frosting your festive frosted Christmas sugar cookie bars, ensuring that you create a holiday treat that will become a family favorite for years to come.

Prepare Dry Ingredients
The foundation of any great baked good starts with the proper preparation of dry ingredients. For your Festive Frosted Christmas Sugar Cookie Bars, sifting together the flour, baking powder, and salt is essential. This process not only breaks up any clumps but also ensures that the leavening agent is evenly distributed throughout the flour. An even mix of dry ingredients contributes to a consistent texture within the cookie bars, allowing them to rise properly and bake evenly. Remember, these cookie bars are meant to be soft and chewy, not dense or dry, so take the time to mix these ingredients thoroughly.
Creaming Butter and Sugar
Next, the creaming of butter and sugar is a crucial step that directly impacts the texture of your cookie bars. Start with room temperature butter, as it will blend more easily and incorporate air, leading to a fluffier batter. Using a hand mixer or stand mixer, beat the butter and sugar together until the mixture is light and creamy, about 3 to 5 minutes. This process not only increases the volume of the batter but also helps create a tender crumb in the final product. The sugar granules cut into the butter, creating tiny air pockets that will expand during baking, resulting in a delightful texture.
Adding Egg and Extracts
Once your butter and sugar are perfectly creamed, it’s time to add the egg and extracts. The egg acts as a binding agent, helping the ingredients come together while adding moisture. For this recipe, one large egg is sufficient. Beat it lightly before adding to the mixture, along with the vanilla extract. Vanilla is a classic choice, but feel free to experiment with other extracts like almond or lemon for a unique twist. Incorporating these flavors at this stage enriches the overall taste of your cookie bars, making them more appealing.
Combining Ingredients
Combining the wet and dry ingredients is where the magic happens. Pour the dry ingredient mixture into the creamed butter, sugar, and egg mixture. Mix gently until just combined, being careful not to overmix. Overmixing can lead to tough cookie bars due to the development of gluten. You want your batter to be well-blended but still slightly lumpy. A few flour streaks are perfectly normal and will disappear during baking. This step is essential for achieving that soft, tender texture that everyone loves in sugar cookie bars.
Spreading the Batter
With your batter ready, it’s time to spread it into your prepared baking pan. Use a spatula to gently spread the batter evenly across the bottom of the pan. Aim for an even layer to ensure uniform baking. If you find it challenging to spread the thick batter, lightly dampen your hands or spatula to prevent sticking. A well-spread batter will bake more evenly, resulting in cookie bars that are perfectly cooked throughout.
Baking
Now, it’s time to bake your cookie bars. Preheat your oven to 350°F (175°C) and bake the bars for about 20 to 25 minutes. Keep an eye on them towards the end of the baking time. The edges should be lightly golden, and the center should appear set but slightly soft; this is where the magic happens. Remember that cookie bars will continue to cook slightly as they cool, so don’t be tempted to leave them in the oven too long. Overbaked bars will lose their moisture and turn dry, which we want to avoid at all costs.
Cooling
Once baked, remove the cookie bars from the oven and let them cool in the pan for about 10 minutes. Then, transfer them to a wire rack to cool completely. Cooling is crucial because it allows the bars to firm up, making them easier to frost and cut into squares. Patience is key here; rushing the cooling process can result in a messy frosting job and unevenly cut bars.
Creating the Perfect Frosting
Now that your cookie bars are cool, let’s move on to the frosting. For a classic buttercream frosting, start by beating together softened butter and powdered sugar until well combined. Add a splash of milk or cream to achieve a smooth, spreadable consistency. The goal is to create a frosting that is thick enough to hold its shape but still pourable enough to spread easily over the bars.
For added flavor, consider incorporating other extracts such as peppermint for a holiday twist or even a hint of cocoa for a chocolate variation. If your frosting is too thick, add more milk a tablespoon at a time until you reach your desired consistency. Conversely, if it’s too thin, add more powdered sugar until it thickens up.
Decorating the Cookie Bars
When it comes to decorating your cookie bars, the festive season offers endless possibilities. While sprinkles are a classic choice, you can elevate the presentation with edible glitter, holiday-themed candies, or even a drizzle of melted chocolate. Consider using seasonal sprinkles that reflect the colors of Christmas, such as red, green, and white.
The visual appeal of your cookie bars is important, especially if you plan to serve them at holiday gatherings or give them as gifts. A beautifully decorated tray of sugar cookie bars can be a delightful centerpiece and will surely impress your guests.
Serving Suggestions and Pairings
These Festive Frosted Christmas Sugar Cookie Bars are perfect for various occasions. Serve them at holiday parties, family gatherings, or even as gifts for neighbors and friends. To enhance the experience, pair them with classic holiday beverages. Hot cocoa topped with marshmallows or spiced apple cider complements the sweet flavors of the cookie bars beautifully.
If you have leftovers, store them in an airtight container at room temperature for up to a week. For longer storage, consider freezing individual bars wrapped in plastic wrap and placed in a freezer-safe container. This way, you can enjoy a sweet treat even after the holiday season has ended.
Conclusion
Making festive frosted Christmas sugar cookie bars is not only a delightful baking experience but also a wonderful way to embrace the spirit of the holiday season. The joy of creating something sweet and sharing it with loved ones is truly special. These cookie bars are simple to make and adaptable, allowing you to add your personal touches.
As you gather in the kitchen, remember that baking is more than just creating delicious treats; it’s about making memories and bringing people together. So, don your apron, gather your ingredients, and immerse yourself in the joyful tradition of holiday baking. Share these cookie bars with friends and family, and watch as they create smiles and lasting memories for years to come.