Introduction
Chocolate desserts have a magical ability to captivate the hearts and palates of many. From the rich, smooth texture to the decadent flavors, they are universally adored. Among the myriad of chocolate-based treats, the chocolate lava cake stands out as a showstopper. This dessert, with its warm, oozing chocolate center, has become a favorite across the globe, offering both an exquisite taste and a delightful presentation that leaves a lasting impression.
The concept of a chocolate lava cake is both simple and indulgent. Originating from French cuisine, this dessert was first popularized in the 1980s by renowned chef Jean-Georges Vongerichten. Its combination of a firm outer cake layer and a molten chocolate center creates a sensational contrast that excites the taste buds. This unique texture, coupled with its rich chocolate flavor, makes it a beloved choice for dessert lovers everywhere.
In this post, we will guide you through the steps to create your own heavenly chocolate lava cake. You’ll discover the essential ingredients, learn the step-by-step instructions for crafting this dessert, and explore tips for achieving the perfect lava effect. Whether you’re preparing for a dinner party, a romantic evening, or a family gathering, this recipe will ensure your dessert is the highlight of the meal.
The Magic of Chocolate Lava Cake
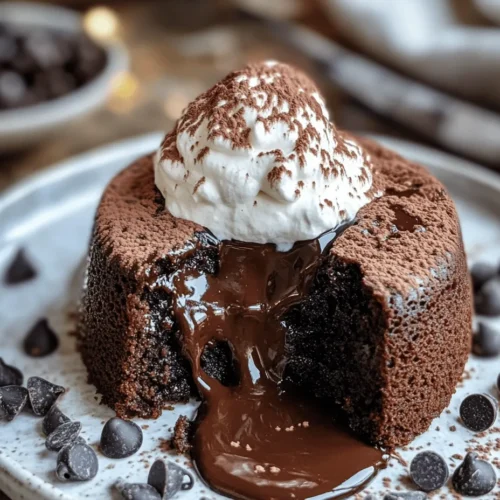
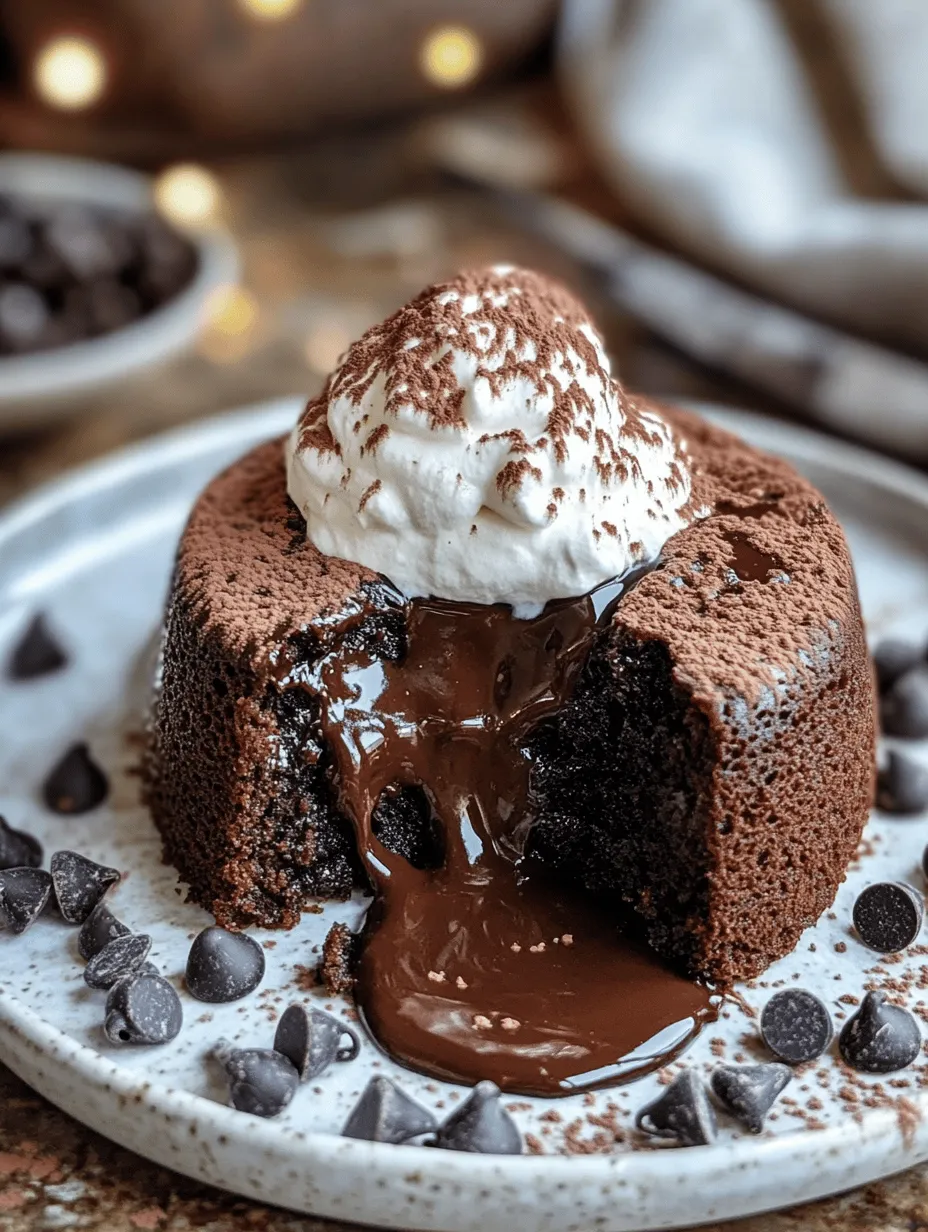
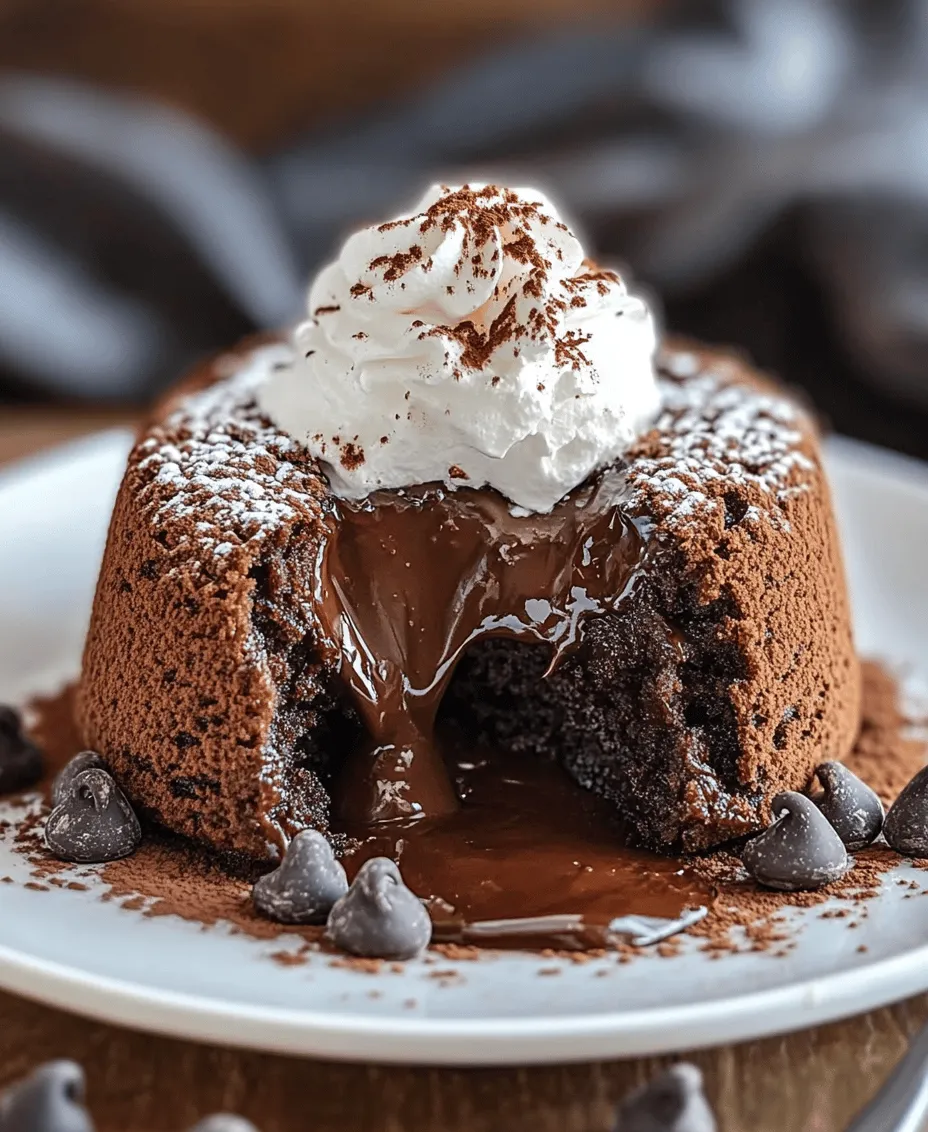
What sets the chocolate lava cake apart is its texture and flavor profile. When you cut into its delicate outer crust, a luscious, gooey chocolate filling flows out, creating a stunning visual and taste experience. The outer layer is soft yet firm enough to hold its shape, while the inner center is a velvety pool of molten chocolate that tantalizes the senses. This delightful contrast is what many refer to as “the magic” of chocolate lava cake.
This dessert shines on numerous occasions. Imagine serving it at a dinner party, where guests eagerly await the moment you present the cake. As you slice into it, the warm chocolate begins to flow, eliciting gasps of delight. It’s perfect for romantic evenings, where sharing a warm chocolate lava cake can create an intimate atmosphere. Even at family gatherings, this dessert can elevate an ordinary meal into an extraordinary experience, bringing everyone together over the shared love of chocolate.
Moreover, chocolate desserts often evoke strong emotional connections. For many, they symbolize comfort, celebration, and indulgence. The joy of enjoying a decadent chocolate lava cake can transport you back to cherished memories, whether it’s a birthday celebration, a holiday gathering, or simply a special treat after a long day. This emotional bond with chocolate desserts is what makes the chocolate lava cake not just a dessert, but an experience to savor.
Ingredients Breakdown
Creating the perfect chocolate lava cake relies on a harmonious blend of ingredients, each playing a vital role in achieving the desired texture and flavor. Below is a comprehensive list of the key ingredients you will need for this decadent dessert, along with an explanation of their functions:
– All-Purpose Flour: This ingredient provides the structure for the cake. It ensures that the outer layer has enough stability to hold the molten center.
– Granulated Sugar: Sugar adds sweetness and moisture to the cake. It not only enhances the flavor but also contributes to the cake’s soft texture.
– Unsweetened Cocoa Powder: This is crucial for delivering a rich chocolate flavor. It intensifies the chocolate experience, making every bite a delightful indulgence.
– Baking Powder: A leavening agent that helps the cake rise, creating a light texture while still maintaining the integrity of the outer layer.
– Salt: Enhances the overall flavor of the cake. A pinch of salt can elevate the sweetness and bring out the deep chocolate notes.
– Milk: Adds moisture and richness to the batter, contributing to the overall tenderness of the cake.
– Vegetable Oil: This keeps the cake moist and adds a slight richness. It also helps create a tender crumb.
– Eggs: Eggs are essential for binding the ingredients together. They also add richness and contribute to the cake’s structure.
– Vanilla Extract: A splash of vanilla adds depth of flavor, complementing the chocolate and enhancing the overall taste experience.
– Semi-Sweet Chocolate Chips: These are the stars of the show! When melted, they create the gooey, molten center that is the hallmark of a chocolate lava cake.
– Water: Water is essential for creating the unique lava effect. It helps melt the chocolate chips during baking, ensuring that the center remains liquid and luscious.
Step-by-Step Instructions
Now that we’ve covered the ingredients, let’s dive into the step-by-step instructions for making your heavenly chocolate lava cake. This process is straightforward, but precision is key to achieving that perfect molten center.
Step 1: Preheat the Oven
Begin by preheating your oven to 425°F (220°C). This high temperature is crucial for the quick baking that creates the delicate structure of the cake while keeping the center molten.
Step 2: Prepare the Ramekins
Next, prepare your ramekins by greasing them with butter and dusting them lightly with cocoa powder. This step ensures that the cakes will easily release from the ramekins once baked, allowing for a beautiful presentation.
Step 3: Melt the Chocolate and Butter
In a microwave-safe bowl, combine the semi-sweet chocolate chips and vegetable oil. Heat them in the microwave in 30-second intervals, stirring in between, until melted and smooth. Be careful not to overheat, as chocolate can seize if cooked too long.
Step 4: Mix Dry Ingredients
In a separate bowl, whisk together the all-purpose flour, granulated sugar, unsweetened cocoa powder, baking powder, and salt. This dry mixture is essential for creating the structure of the cake.
Step 5: Combine Wet Ingredients
In another bowl, mix the eggs, milk, and vanilla extract until well combined. This mixture will add richness and moisture to the cake.
Step 6: Combine Ingredients
Next, pour the melted chocolate mixture into the wet ingredients and stir until well combined. Gradually add the dry ingredients to the wet mixture, stirring gently until just combined. Be careful not to overmix, as this can affect the cake’s texture.
Step 7: Fill the Ramekins
Carefully spoon the batter into the prepared ramekins, filling each one about 2/3 full. This allows enough space for the cakes to rise while baking.
Step 8: Bake
Place the filled ramekins on a baking sheet and bake in the preheated oven for about 12-14 minutes. The edges should look firm, while the center should still look soft and slightly undercooked. This is the key to achieving that iconic molten center.
Step 9: Let Cool Briefly
Once baked, remove the cakes from the oven and let them cool in the ramekins for about 1 minute. This brief cooling period allows the cakes to set slightly, making them easier to release.
Step 10: Invert and Serve
To serve, carefully run a knife around the edges of each ramekin to loosen the cake. Invert the ramekin onto a plate and gently lift it off. The cake should release easily, revealing its beautiful shape. Serve immediately, ideally with a scoop of vanilla ice cream or a dollop of whipped cream for an extra touch of indulgence.
As you can see, making a chocolate lava cake is a straightforward yet rewarding endeavor. Each step is designed to ensure that your dessert turns out perfectly, with a delightful molten center and a rich chocolate flavor that will impress anyone who has the pleasure of tasting it. In the next section, we will delve into some helpful tips for achieving the best results with your lava cake, ensuring that it becomes a staple in your dessert repertoire.
Detailed Guide Through the Preparation Process
Mixing Dry Ingredients
To start your journey toward creating the perfect Heavenly Chocolate Lava Cake, it’s essential to focus on the foundational elements: the dry ingredients. In a large mixing bowl, combine all-purpose flour, cocoa powder, baking powder, and a pinch of salt. Properly whisking these ingredients together is crucial for uniform distribution. This step ensures that the baking powder is evenly dispersed, which is vital for the cake’s rise and texture. Use a fine whisk or a sifter to break up any clumps, especially in the cocoa powder, which can often be lumpy. By taking the time to thoroughly mix your dry ingredients, you set the stage for a light and airy lava cake.
Combining Wet Ingredients
Once your dry ingredients are well mixed, it’s time to shift focus to the wet ingredients. In a separate bowl, melt your butter and dark chocolate together, preferably using a double boiler or microwave. If using a microwave, heat the mixture in short bursts, stirring frequently to prevent burning. Once melted, let it cool slightly before whisking in the eggs and sugar. This combination should be smooth and glossy. It’s important to integrate the ingredients gently, allowing the sugar to dissolve fully. This process enhances the overall texture of your cake, making it richer and more luxurious.
Merging Wet and Dry Ingredients
With both wet and dry components prepared, it’s time to bring them together. Pour the wet mixture into the bowl containing the dry ingredients. Using a spatula or wooden spoon, gently fold the mixtures together until just combined. It’s critical to avoid overmixing at this stage. Overworking the batter can result in a dense cake, which we definitely want to avoid for our lava cake. The batter should be somewhat thick but still pourable. You might notice a few lumps; this is perfectly fine as they will bake out.
Folding in Chocolate Chips
Now, for the pièce de résistance: folding in chocolate chips. Gently add semi-sweet chocolate chips to the batter, using the same folding technique. This step not only enhances the chocolate flavor but also adds delightful pockets of gooey chocolate throughout the cake. Ensure that the chips are evenly distributed without overmixing the batter. This careful incorporation will contribute to the luxurious molten center we are aiming for.
Preparing the Slow Cooker
Before we pour the batter in, we need to prepare our slow cooker. Greasing the insert is a crucial step to prevent sticking. You can use butter or a non-stick cooking spray. For added insurance, consider lining the bottom with parchment paper, which will make removal easier once the cake is done. The unique method of cooking in a slow cooker allows for a gentle heat that will create that signature lava effect, making this dessert both simple and impressive.
Pouring Water Over the Batter
For the magical lava effect, pour a cup of hot water over the batter once it’s in the slow cooker. This step may seem strange, but it’s essential. The water creates steam during cooking, which helps the cake bake evenly while keeping the center molten. As the cake bakes, the water will evaporate, leaving the perfect gooey interior. Cover the slow cooker with its lid and let the magic happen.
Cooking Time and Checking for Doneness
Set your slow cooker to low and let the cake bake for about 1.5 to 2 hours. You’ll want to check for doneness after the first hour. The edges should be set, while the center remains slightly jiggly. A toothpick inserted into the edges should come out clean, but when inserted into the center, it should be coated with batter—this indicates the molten center you desire. Keep in mind that every slow cooker is different, so you may need to adjust the cooking time slightly.
The Art of Serving Chocolate Lava Cake
Presentation is key when it comes to serving your Heavenly Chocolate Lava Cake. As you lift the lid off the slow cooker, the rich aroma of chocolate wafts through the air, enticing everyone around. To serve, scoop out portions carefully, ensuring you capture some of that luscious molten center.
Suggestions for How to Serve the Cake
For an elegant touch, serve each slice on a dessert plate with a dusting of powdered sugar or a drizzle of chocolate sauce. The contrast between the warm, gooey interior and the cool toppings creates an irresistible experience.
Ideas for Pairing with Accompaniments
Pair your lava cake with a scoop of vanilla ice cream or freshly whipped cream. The creamy texture complements the rich chocolate perfectly, while fresh berries, such as raspberries or strawberries, add a tart balance that enhances the overall flavor. For a more decadent experience, consider serving with a homemade chocolate sauce or a sprinkle of sea salt, which can elevate the chocolate flavor beautifully.
Creative Serving Presentations
For special occasions, consider individual servings in ramekins instead of a single slow cooker presentation. This method not only looks more sophisticated, but it also allows each guest to have their own personal dessert. You can also garnish individual servings with mint leaves or use edible flowers for a touch of elegance.
Common Variations and Customizations
One of the beauties of the Heavenly Chocolate Lava Cake is its versatility. You can easily customize this recipe to suit your taste buds or dietary preferences.
Exploring Different Chocolate Types
Consider experimenting with different types of chocolate. Dark chocolate will yield a more intense and rich flavor, while milk chocolate offers a sweeter profile. You might also consider using a combination of both for a balanced taste that appeals to everyone.
Suggestions for Adding Flavors
To enhance the chocolate experience, think about incorporating additional flavors. A teaspoon of instant espresso powder can intensify the chocolate, while a hint of orange zest can add a refreshing twist. For a sophisticated touch, consider sprinkling a little sea salt on top before serving; it enhances the sweetness and elevates the overall flavor profile.
Alternative Serving Suggestions
If you prefer a more traditional presentation, you can bake the batter in individual ramekins instead of a slow cooker. Simply adjust the cooking time, as smaller portions will generally bake faster. This method allows for easier serving and a beautiful presentation that’s perfect for dinner parties.
Nutritional Information
Indulgent desserts like the Heavenly Chocolate Lava Cake are best enjoyed in moderation, but it’s helpful to understand the nutritional content. A typical serving of this cake can have around 350-400 calories, depending on the portion size and specific ingredients used.
Overview of Nutritional Content
The primary components include calories from sugar and fat, primarily from butter and chocolate. While this cake is a treat, it’s essential to consider its place in your overall diet. Desserts can be enjoyed as part of a balanced lifestyle, allowing for those moments of indulgence without compromising health goals.
Discussion on Moderation
Remember, moderation is key when it comes to enjoying sweet treats. Savoring a small slice can provide satisfaction without overindulgence. Sharing this delightful dessert with loved ones can also help keep portion sizes in check while enhancing the joy of the occasion.
Conclusion
The Heavenly Chocolate Lava Cake is not just a dessert; it’s an experience that brings joy to any occasion. From the rich, gooey center to the delightful aroma that fills your kitchen, every step of the baking process is filled with anticipation. By following the simple steps outlined, you can create a dessert that is sure to impress.
Encouragement to try making this indulgent dessert comes from the joy of baking and the satisfaction of sharing a homemade treat. Whether you’re celebrating a special occasion or simply treating yourself, this cake is a delicious way to indulge in the world of chocolate desserts. The lasting appeal of chocolate and the warmth of homemade creations make this Heavenly Chocolate Lava Cake a timeless favorite for all. So gather your ingredients, embrace the joy of baking, and let your culinary creativity shine!