Introduction to Heavenly No-Bake Berry Cheesecake
In the realm of desserts, few treats can rival the allure of a berry cheesecake. This Heavenly No-Bake Berry Cheesecake offers a delightful fusion of creamy richness and vibrant berry flavor, making it a perfect choice for any occasion. Whether you’re hosting a summer gathering, celebrating a special milestone, or simply indulging in a sweet craving, this recipe is sure to impress your guests and satisfy your taste buds. With its easy preparation and stunning presentation, this cheesecake is a must-try for both novice and experienced bakers alike.
The beauty of this no-bake cheesecake lies not only in its taste but also in its simplicity. Traditional baked cheesecakes can be cumbersome, requiring precise temperature control and lengthy baking times. In contrast, a no-bake cheesecake allows you to skip the oven while still achieving that rich, creamy texture we all love. The combination of cream cheese, heavy cream, and fresh berries creates a luscious filling that is both decadent and refreshing.
Moreover, the vibrant colors of the berries not only elevate the visual appeal of this dessert but also offer a myriad of health benefits. Berries are packed with antioxidants, vitamins, and fiber, making this cheesecake a guilt-free indulgence. They provide a perfect balance to the sweet and creamy filling, ensuring every bite is a harmonious blend of flavors.
Understanding the Appeal of No-Bake Cheesecakes
Exploring the Benefits of No-Bake Desserts
No-bake desserts have gained immense popularity among home bakers and dessert enthusiasts alike. One of the primary advantages of no-bake cheesecakes is their simplicity. They require minimal ingredients and, as the name suggests, eliminate the need for baking altogether. This makes them an ideal option for those who may be intimidated by the baking process or lack the time to spend in the kitchen.
Additionally, no-bake cheesecakes can be prepared in advance, making them perfect for entertaining. You can whip up the filling, prepare the crust, and let it chill in the refrigerator until you’re ready to serve. This not only allows you to enjoy your time with guests but also ensures that your dessert is perfectly set and ready to impress.
Delving into the Convenience of No-Bake Recipes
Another appealing factor of no-bake recipes is their versatility. You can easily customize the flavors and toppings to suit your preferences or the season. From chocolate and caramel to fruit and nut variations, the possibilities are endless. This particular berry cheesecake is a wonderful canvas for experimentation, allowing you to use whatever berries are in season or even mix them for a colorful presentation.
Moreover, no-bake recipes often require fewer kitchen tools. You won’t need to worry about mixing bowls and baking pans, which can significantly simplify the cleanup process. The straightforward nature of no-bake cheesecakes makes it easy to involve kids or guests in the preparation, turning dessert-making into a fun and collaborative activity.
Highlighting the Versatility of Cheesecake Flavors
Cheesecakes are beloved for their creamy texture and rich flavor, and the no-bake variation is no exception. While traditional cheesecakes often feature a base flavor of vanilla or lemon, a no-bake cheesecake opens the door to an array of exciting flavor combinations. For example, you could incorporate chocolate, pumpkin spice, or even matcha for a unique twist.
The flexibility of flavor possibilities extends to the toppings as well. While our recipe focuses on fresh berries, you could easily substitute them with other fruits, caramel sauce, or even a drizzle of chocolate ganache. This versatility helps ensure that your no-bake cheesecake can be tailored to suit any occasion or personal taste preference.
Ingredient Breakdown for Heavenly No-Bake Berry Cheesecake
Creating the perfect Heavenly No-Bake Berry Cheesecake starts with understanding the key ingredients that contribute to its flavor and texture. Here’s a detailed breakdown of each component.
Graham Cracker Crust
The crust is a fundamental element of any cheesecake, providing a contrasting texture and flavor profile. For this no-bake cheesecake, a graham cracker crust is the ideal choice. The sweet, crumbly nature of the graham crackers pairs beautifully with the rich cream cheese filling.
To achieve a perfect crust, start with finely crushed graham crackers. You can use a food processor for a uniform texture or place the crackers in a zip-top bag and crush them with a rolling pin. Combine the crushed graham crackers with melted butter and a sprinkle of sugar to enhance the sweetness. The butter acts as a binding agent, ensuring that the crust holds together when pressed into the pan.
Once mixed, press the graham cracker mixture firmly into the bottom of a springform pan, ensuring an even layer. This step is crucial, as a well-pressed crust will provide the structural integrity needed to support the creamy filling.
Cream Cheese Filling
The star of the show in any cheesecake is the cream cheese filling. Its creamy texture and tangy flavor form the backbone of the dessert. For the best results, use full-fat cream cheese, as it provides a rich and indulgent flavor. Make sure the cream cheese is at room temperature before you start mixing; this will help achieve a smoother consistency without lumps.
When mixing the cream cheese, it’s essential to beat it until it’s light and fluffy. This process incorporates air into the mixture, contributing to a lighter final texture. You can use a hand mixer or a stand mixer for this step, ensuring that you mix it well before adding other ingredients.
Sweetening the Cheesecake
To sweeten the filling, you have a choice between powdered sugar and granulated sugar. While both will work, powdered sugar is often preferred for cheesecakes due to its finer texture, which dissolves more easily and prevents any graininess in the final product. Additionally, adding a splash of vanilla extract enhances the flavor profile, providing a warm and aromatic note that complements the berries beautifully.
Heavy Whipping Cream
Heavy whipping cream is another critical ingredient that adds lightness and volume to the cheesecake filling. Whipping the cream to stiff peaks is essential for achieving that fluffy texture that makes no-bake cheesecakes so delightful. When whipping cream, ensure that your mixing bowl and beaters are cold; this helps the cream whip up faster and achieve a better consistency.
Start by pouring the heavy cream into your mixing bowl and beating it until soft peaks form. At this point, you can gradually add in the sweetener and continue whipping until stiff peaks are achieved. The whipped cream will be folded into the cream cheese mixture, adding air and creating a light, airy filling.
Berry Toppings
The final touch that elevates this cheesecake is the berry toppings. You can use a variety of berries such as strawberries, blueberries, raspberries, or blackberries—each bringing its unique flavor and color. When selecting berries, opt for fresh, ripe ones for the best taste. Not only do they add a burst of flavor, but berries are also packed with antioxidants, vitamins, and minerals, making this dessert a healthier option.
For an added touch, consider macerating the berries with a bit of sugar and lemon juice to enhance their natural sweetness while creating a delicious syrup that can be drizzled over the cheesecake before serving. This will add an extra layer of flavor and a beautiful glaze to your dessert.
Step-by-Step Instructions for Preparation
Now that we’ve covered the ingredients, it’s time to dive into the preparation process for our Heavenly No-Bake Berry Cheesecake. Here are the detailed steps to guide you through creating this delightful dessert.
Creating the Graham Cracker Crust
1. Prepare the Pan: Begin by greasing a 9-inch springform pan with a light coat of cooking spray or butter. This will help prevent the crust from sticking when it’s time to serve the cheesecake.
2. Crush the Graham Crackers: In a food processor, pulse the graham crackers until they are finely crushed. You should aim for a texture similar to sand. If you don’t have a food processor, you can place the crackers in a zip-top bag and crush them with a rolling pin.
3. Mix the Crust Ingredients: In a medium-sized mixing bowl, combine the crushed graham crackers, granulated sugar, and melted butter. Stir until the mixture is well combined and resembles wet sand.
4. Press the Mixture into the Pan: Transfer the crumb mixture into the prepared springform pan. Using the back of a measuring cup or your hands, firmly press the mixture into an even layer across the bottom of the pan. Ensure that it is packed tightly to create a solid foundation for the cheesecake.
5. Chill the Crust: Place the crust in the refrigerator for about 10-15 minutes to allow it to set. This step helps the butter harden, which will keep your crust intact when you add the filling.
—
This marks the beginning of your journey to crafting a Heavenly No-Bake Berry Cheesecake. The next steps will involve preparing the luscious cream cheese filling, whipping the heavy cream, and assembling your masterpiece. Stay tuned for the continuation of this delectable recipe, where we will explore every detail to ensure your cheesecake turns out perfectly every time.
Importance of Chilling the Crust
The foundation of any great cheesecake is its crust, and for our Heavenly No-Bake Berry Cheesecake, chilling the crust is crucial. A well-chilled crust not only provides structural integrity but also enhances the overall flavor profile by allowing the buttery notes of the graham cracker crust to meld beautifully with the filling. To achieve the best results, it’s recommended to chill the crust in the refrigerator for at least 30 minutes before adding the cream cheese mixture. This short chilling time helps the crust set properly, ensuring it holds together when sliced and served.
Making the Cream Cheese Mixture
The cream cheese filling is the heart of this cheesecake. To create a velvety, lump-free mixture, follow these step-by-step instructions:
1. Preparation of Ingredients: Start by ensuring that your cream cheese is at room temperature. This step is vital as it allows for easier blending and minimizes the risk of lumps. If you forget to take it out of the fridge in advance, you can soften it quickly by cutting it into smaller chunks and microwaving it for 10-15 seconds.
2. Beating the Cream Cheese: In a large mixing bowl, add the softened cream cheese. Using an electric mixer on medium speed, beat the cream cheese until it is creamy and smooth, usually about 2-3 minutes. This process incorporates air into the cream cheese, making the filling light and fluffy.
3. Adding Sweeteners and Flavorings: Gradually add in your powdered sugar and vanilla extract while continuing to beat the mixture. The powdered sugar not only sweetens but also helps to maintain a silky texture. Mix until combined and smooth.
4. Incorporating the Whipped Cream: In a separate bowl, whip the heavy cream until stiff peaks form. This step is essential for achieving a light and airy cheesecake texture. Carefully fold the whipped cream into the cream cheese mixture using a spatula. It’s important to do this gently to avoid deflating the whipped cream, which gives the cheesecake its signature fluffiness.
5. Avoiding Lumps: To ensure a smooth blend, incorporate the whipped cream in batches. Start by adding a third of the whipped cream to the cream cheese mixture and mix gently. Repeat this process, folding in the remaining whipped cream in two more additions until fully combined. This technique will help achieve a perfectly smooth filling without lumps.
Assembling the Cheesecake
Now that your cream cheese mixture is ready, it’s time to assemble your cheesecake:
1. Pouring the Filling: Carefully pour the cream cheese mixture into the chilled crust. Using a spatula, spread the filling evenly across the surface of the crust. Take your time to ensure that the mixture reaches the edges of the crust to create a visually appealing layer.
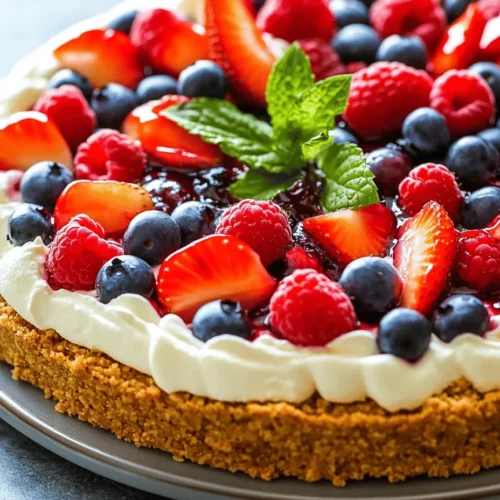
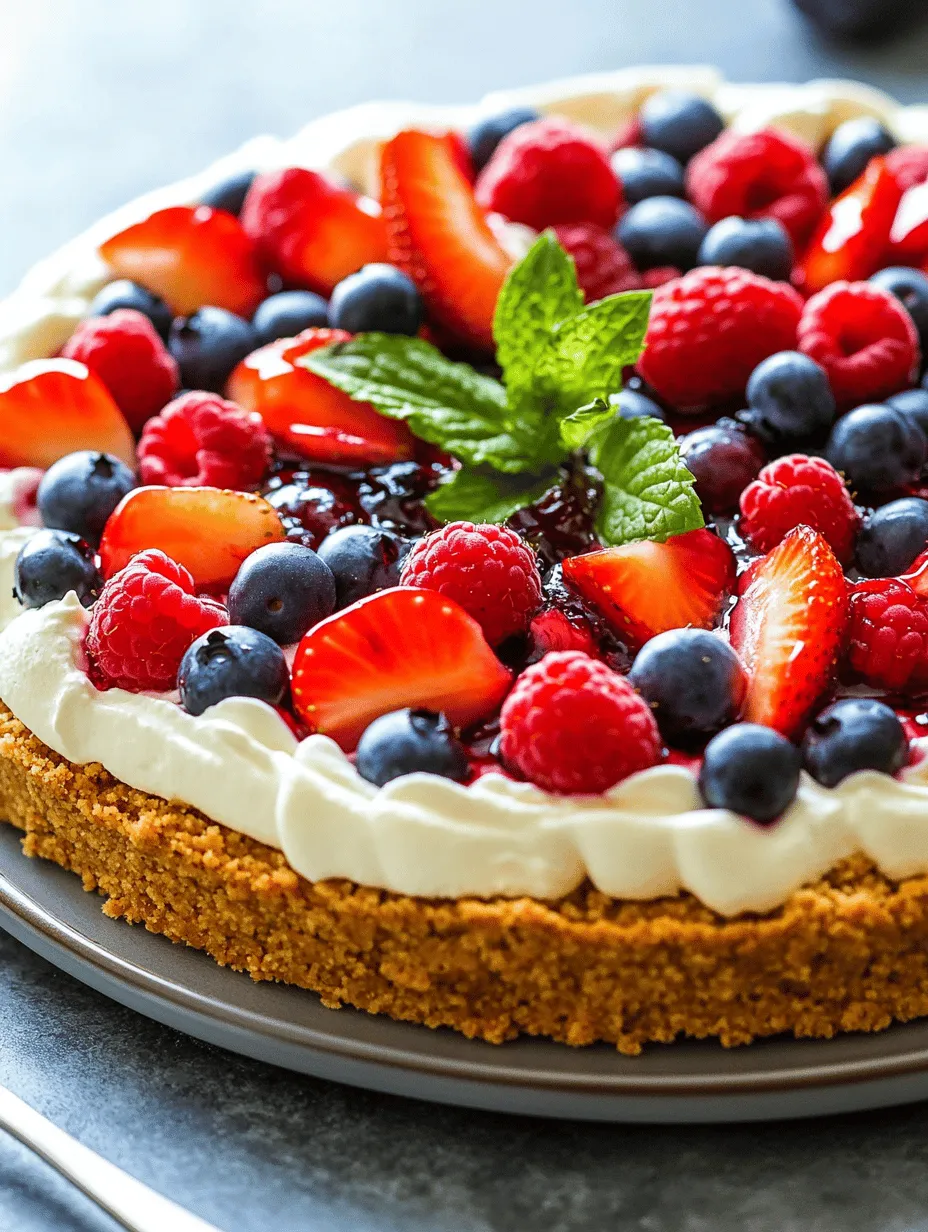
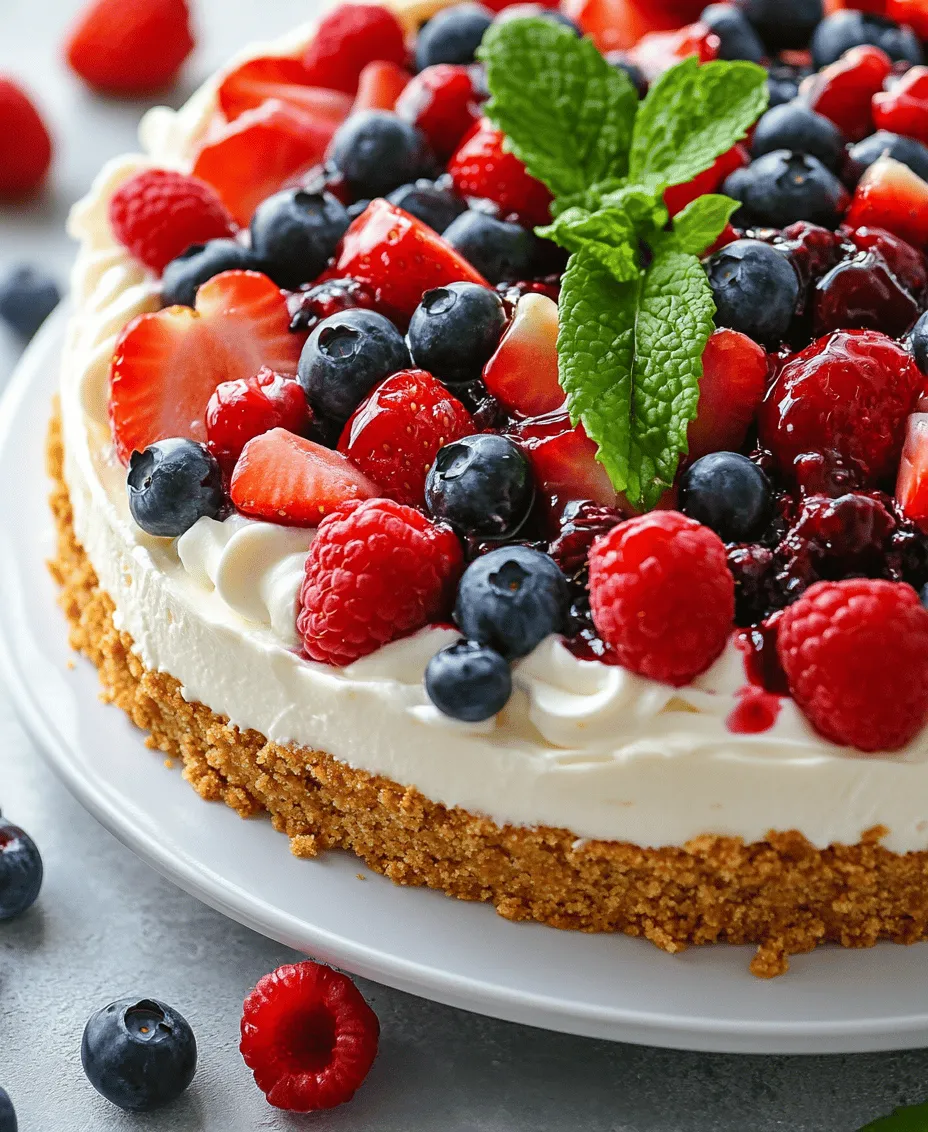
2. Arranging Berries Attractively: Before placing your cheesecake in the refrigerator to set, arrange fresh berries on top. You can use a mix of strawberries, blueberries, and raspberries for a colorful presentation. To enhance the visual appeal, create a design by clustering berries in the center or making a circular pattern around the edges. This not only looks inviting but also ensures that every slice has a taste of the fresh fruit.
Chilling and Setting the Cheesecake
Chilling the cheesecake is a crucial step that allows the filling to firm up, creating the perfect texture.
1. Chilling Time: Cover the cheesecake with plastic wrap or foil and place it in the refrigerator. Allow it to chill for at least 4 hours, but overnight is ideal. This extended chilling time ensures the cheesecake sets properly and helps the flavors meld beautifully.
2. Best Practices for Covering and Storing: When covering your cheesecake, ensure that the wrap does not touch the surface of the cheesecake to prevent condensation from forming. If you’re storing it for multiple days, consider placing a piece of parchment paper between the cheesecake and the plastic wrap for added protection.
Presentation and Serving Suggestions
Garnishing with Fresh Mint
The aesthetic presentation of your dessert can elevate the dining experience significantly. Adding fresh mint leaves not only enhances the visual appeal of your cheesecake but also adds a refreshing flavor.
– Importance of Aesthetics: A well-presented dessert invites guests to indulge. The vibrant colors of the berries contrasted with the creamy cheesecake and the bright green of mint create a feast for the eyes. Consider adding a few mint leaves on top of the cheesecake right before serving for a fresh touch.
– Flavor Enhancement: Mint leaves complement the sweetness of the berries and the richness of the cheesecake, providing a delightful contrast that enhances the overall flavor profile. A simple garnish can make a significant impact.
Serving Tips for the Perfect Slice
When it’s time to serve your Heavenly No-Bake Berry Cheesecake, presentation is key:
1. Techniques for Slicing: To achieve clean, even slices, use a sharp knife dipped in warm water. Wipe the knife with a clean cloth after each cut to maintain the integrity of the cheesecake. This technique prevents the filling from sticking to the knife and ensures that each slice looks pristine.
2. Pairing with Beverages: This cheesecake pairs wonderfully with various beverages. Consider serving it with a glass of chilled sparkling water or a light herbal tea, such as mint or chamomile, which complements the dessert’s flavors. For a more indulgent option, a light dessert wine or a fruit-forward rosé can enhance the berry notes in the cheesecake.
Nutritional Insights and Serving Size
Understanding Nutritional Value
While this cheesecake is undoubtedly a treat, it’s beneficial to understand the contributions of its ingredients:
– Cream Cheese: Provides a rich source of calcium and protein, which contributes to the creaminess of the cheesecake.
– Berries: Packed with antioxidants, vitamins, and fiber, the berries add a nutritious element to the dessert, balancing indulgence with health benefits.
– Graham Crackers: While they provide carbohydrates, they also offer some fiber, especially if you choose whole grain varieties.
Recommended Serving Sizes
When it comes to serving, portion control is key, especially with rich desserts:
– Ideal Portioning: For gatherings, cut the cheesecake into 12 slices. This size allows guests to enjoy a satisfying portion while leaving room for other treats.
– Adjusting Servings: If you’re serving a smaller group or if the cheesecake is part of a larger dessert spread, consider cutting the slices smaller. This way, guests can enjoy a taste of your cheesecake without feeling overwhelmed.
Conclusion: Embracing the Joy of No-Bake Desserts
This Heavenly No-Bake Berry Cheesecake not only provides a simple yet satisfying recipe for dessert lovers, but it also embodies the joy of culinary creativity. By combining a rich and creamy filling with the natural sweetness of berries, this cheesecake stands out as a delightful choice for any gathering. Its no-bake nature ensures that anyone can whip up this delicious treat without the need for extensive baking skills or equipment.
Enjoy the process of making and sharing this cheesecake, and let it bring a touch of sweetness to your celebrations. With its refreshing flavors, elegant presentation, and ease of preparation, this cheesecake is sure to become a beloved staple in your dessert repertoire. Indulge in the joy of no-bake desserts and create lasting memories with every slice.