

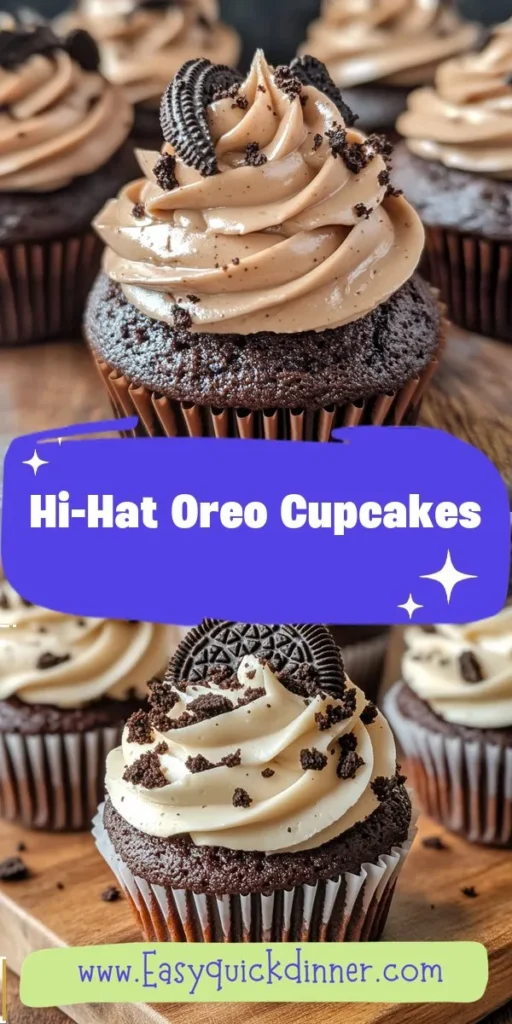
When it comes to the world of baking, few desserts capture the hearts of both chocolate lovers and cookie enthusiasts quite like Hi-Hat Oreo Cupcakes. These delightful treats are a heavenly blend of rich, moist chocolate cupcakes topped with a creamy Oreo buttercream frosting, all enveloped in a glossy chocolate coating. Imagine biting into a soft cupcake that gives way to a luscious frosting, only to be met with a smooth chocolate exterior—this is the magic of Hi-Hat Oreo Cupcakes.
Originally inspired by the classic hi-hat cupcakes that feature a meringue topping, this version elevates the experience by incorporating the beloved flavors of Oreo cookies. Whether you’re planning a birthday party, a family gathering, or simply want to indulge in a sweet treat, these cupcakes are sure to impress. They are not only visually stunning but also provide a burst of flavor that is simply irresistible.
In this post, we will delve into the ingredients that make these cupcakes extraordinary and guide you through a step-by-step process to create your own batch of Hi-Hat Oreo Cupcakes. Get ready to embark on a baking adventure that will leave your friends and family begging for seconds!
Understanding the Ingredients
To create the perfect Hi-Hat Oreo Cupcakes, it’s essential to understand how each ingredient contributes to the final product. Let’s break down the key components that will make your cupcakes a success.
All-Purpose Flour
All-purpose flour is the backbone of these cupcakes, providing the necessary structure and stability. It combines with the other dry ingredients to create a batter that can rise beautifully during baking. Be sure to measure the flour correctly—too much can lead to dense cupcakes, while too little can result in a fragile texture.
Granulated Sugar and Cocoa Powder
Granulated sugar not only sweetens the cupcakes but also helps to create a tender crumb. When combined with cocoa powder, it enhances the rich chocolate flavor that is central to this recipe. Cocoa powder brings depth and intensity, creating a chocolate experience that Oreo fans will adore. Opt for high-quality cocoa powder for the best results.
Baking Soda and Baking Powder
These two leavening agents are crucial for achieving the right texture in your cupcakes. Baking soda, a base, reacts with the acid in cocoa powder to create bubbles that help the cupcakes rise. Baking powder, which contains both an acid and a base, provides additional lift. Together, they ensure that your cupcakes are light and fluffy.
Salt
Though it may seem minor, salt plays a significant role in baking. It enhances the overall flavor of the cupcakes and balances the sweetness. Just a pinch can elevate the taste, making it richer and more complex.
Eggs, Milk, Vegetable Oil, and Vanilla Extract
These ingredients are essential for binding and moisture. Eggs provide structure and stability, while milk adds moisture to the batter. Vegetable oil contributes to a tender crumb, keeping the cupcakes moist long after baking. Finally, a splash of vanilla extract enhances the flavor profile, complementing the chocolate and Oreo components beautifully.
Oreo Cookies
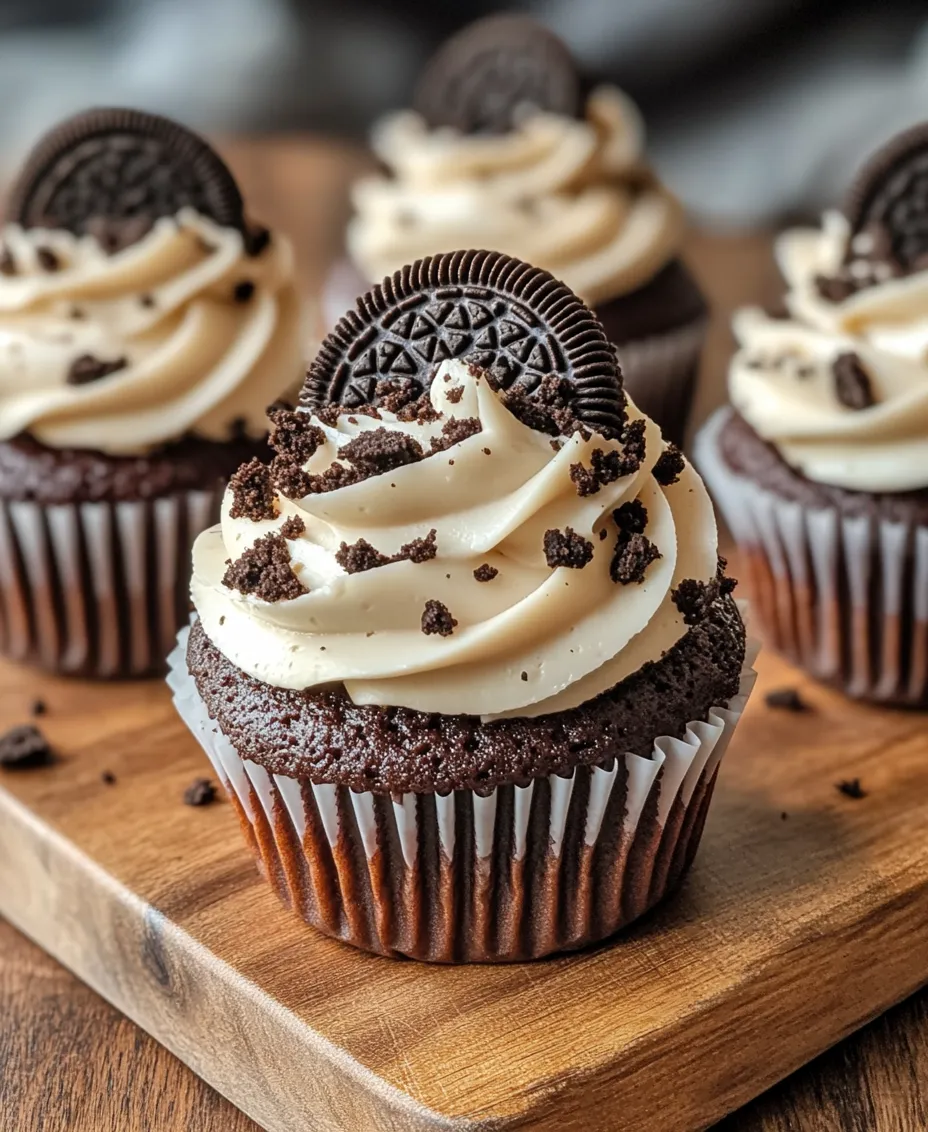
The star of the show—the Oreo cookies! Not only do they add an unmistakable flavor, but they also provide delightful texture contrasts in the cupcakes. Crushed Oreos can be mixed into the batter, while whole Oreos can be used as a decorative touch on the frosting.
Butter, Powdered Sugar, Heavy Cream for Frosting
To create a rich and creamy Oreo buttercream frosting, you’ll need butter, powdered sugar, and heavy cream. Butter provides the foundation for the frosting, while powdered sugar adds sweetness and thickness. Heavy cream helps achieve the perfect consistency, making it easy to pipe onto the cupcakes. For an extra Oreo kick, crushed Oreo cookies can be folded into the frosting.
Chocolate Chips and Coconut Oil for Coating
The glossy chocolate coating that makes these cupcakes so visually appealing is made with chocolate chips and coconut oil. The chocolate chips melt down, and the addition of coconut oil gives the coating a smooth and shiny finish. This layer not only adds flavor but also protects the frosting, keeping it intact and making the cupcakes easier to handle.
Step-by-Step Guide to Making Hi-Hat Oreo Cupcakes
Now that we’ve covered the essential ingredients, it’s time to get into the nitty-gritty of making these delightful Hi-Hat Oreo Cupcakes. Follow this detailed guide to create a batch that will impress everyone.
Prepping Your Kitchen
Before diving into the actual baking, it’s crucial to prep your kitchen. Here are some tips to get organized:
1. Gather Your Tools: Make sure you have the necessary tools on hand, including mixing bowls, measuring cups and spoons, a whisk, an electric mixer, a spatula, a cupcake tin, and cupcake liners. Having everything ready will streamline your baking process.
2. Preheat the Oven: Preheat your oven to 350°F (175°C) to ensure it’s at the right temperature when you’re ready to bake. This step is essential for achieving the perfect rise in your cupcakes.
3. Line the Cupcake Tin: Place cupcake liners into your cupcake tin. This not only makes for easy removal but also adds a decorative touch to your finished cupcakes.
Mixing the Batter
Now that your kitchen is prepped, it’s time to mix the batter. Follow these steps for a smooth and delicious cupcake base:
1. Combine Dry Ingredients: In a large mixing bowl, whisk together the all-purpose flour, granulated sugar, cocoa powder, baking soda, baking powder, and salt. Ensure there are no lumps, as this will help create a uniform batter.
2. Mix Wet Ingredients: In a separate bowl, combine the eggs, milk, vegetable oil, and vanilla extract. Whisk them together until well blended.
3. Combine Dry and Wet Mixtures: Pour the wet ingredients into the bowl containing the dry ingredients. Gently fold the mixture together using a spatula or a whisk until just combined. Be careful not to overmix, as this can lead to tough cupcakes.
4. Add Crushed Oreos: Fold in crushed Oreo cookies to the batter, allowing their flavor to permeate the mixture. This step adds a delightful surprise in each bite.
Baking the Cupcakes
With your batter ready, it’s time to bake the cupcakes:
1. Fill the Cupcake Liners: Using a scoop or spoon, fill each cupcake liner about two-thirds full with batter. This allows enough room for the cupcakes to rise without overflowing.
2. Bake: Place the cupcake tin in the preheated oven and bake for 18-20 minutes, or until a toothpick inserted into the center comes out clean. Keep an eye on them to avoid overbaking.
3. Cool the Cupcakes: Once baked, remove the cupcakes from the oven and allow them to cool in the tin for about 5 minutes. Afterward, transfer them to a wire rack to cool completely. This step is crucial as it prevents the frosting from melting when applied to warm cupcakes.
Creating the Oreo Buttercream
While the cupcakes cool, you can prepare the Oreo buttercream frosting. Follow these steps to achieve a creamy, dreamy topping:
1. Beat the Butter: In a large mixing bowl, beat softened butter with an electric mixer until creamy and light in color. This usually takes about 2-3 minutes.
2. Add Powdered Sugar: Gradually add powdered sugar, mixing on low speed until incorporated. This helps prevent a sugary cloud from forming in your kitchen.
3. Add Heavy Cream and Vanilla: Mix in heavy cream and vanilla extract, beating until the frosting reaches a smooth and spreadable consistency. If the frosting is too thick, add a little more heavy cream; if it’s too thin, add more powdered sugar.
4. Fold in Crushed Oreos: Finally, gently fold in crushed Oreo cookies to the frosting. This will give the frosting an additional layer of flavor and texture.
By following these steps, you’ll have beautifully baked cupcakes and a delicious Oreo buttercream ready to elevate your Hi-Hat Oreo Cupcakes to the next level. In the next part of this article, we will explore how to coat the cupcakes in chocolate and put the finishing touches on this decadent dessert. Stay tuned for the fun part!
Frosting the Cupcakes
Once your cupcakes have cooled completely, it’s time to add the frosting, which is a crucial step in creating your Hi-Hat Oreo Cupcakes. The frosting not only enhances the flavor but also adds to the visual appeal of the finished product. Here’s how to frost your cupcakes effectively:
1. Piping Technique: For a professional look, use a piping bag fitted with a large round or star tip. Fill the piping bag with your prepared frosting, then pipe a tall swirl on top of each cupcake, starting from the outside edge and working your way inwards. This technique adds height and gives the classic “hi-hat” look. If you don’t have a piping bag, a ziplock bag with a corner snipped off works just as well.
2. Spreading Technique: If you prefer a more rustic appearance, use a spatula or butter knife to spread the frosting on top of each cupcake. Start from the center and work your way outwards, allowing the frosting to naturally build up at the edges for a slightly domed appearance.
Regardless of the technique you choose, ensure that the frosting is smooth and evenly distributed. This not only makes your cupcakes look more appetizing but also helps in achieving an even chocolate coating later on.
Preparing the Chocolate Coating
The chocolate coating is what transforms your frosted cupcakes into the iconic Hi-Hat Oreo Cupcakes. Here’s how to prepare the chocolate coating safely and effectively:
1. Choosing the Right Chocolate: Use high-quality semi-sweet chocolate or dark chocolate for a rich flavor. Chocolate chips are convenient but can contain stabilizers that might alter melting. If you prefer a smoother finish, opt for chocolate bars.
2. Melting the Chocolate: The safest way to melt chocolate is using a double boiler or the microwave:
– Double Boiler Method: Fill a saucepan with a few inches of water and bring it to a simmer. Place a heatproof bowl over the saucepan, ensuring it doesn’t touch the water. Add your chocolate to the bowl and stir until completely melted and smooth.
– Microwave Method: Place the chocolate in a microwave-safe bowl. Heat in 30-second intervals, stirring in between, until melted. Be cautious not to overheat, as chocolate can burn easily.
3. Achieving the Right Consistency: After melting, allow the chocolate to cool slightly but ensure it remains pourable. If it’s too thick, you can add a small amount of vegetable oil or coconut oil to thin it out, which will help the chocolate coat evenly.
Coating the Cupcakes
Now that your cupcakes are frosted and your chocolate is melted, it’s time to coat the cupcakes for that perfect Hi-Hat finish:
1. Dipping the Cupcakes: Carefully hold each cupcake by the bottom and dip it straight into the melted chocolate. Ensure the frosting is completely covered. To achieve an even coat, gently rotate the cupcake while dipping.
2. Removing Excess Chocolate: After dipping, lift the cupcake out and let any excess chocolate drip back into the bowl. This step is crucial to prevent a thick layer of chocolate that can cause the cupcakes to topple over.
3. Setting the Chocolate: Place the coated cupcakes upside down on a wire rack or parchment paper. Allow them to set at room temperature until the chocolate hardens, or place them in the refrigerator for quicker results. Avoid touching the chocolate until it is completely set to maintain a smooth finish.
The Art of Presentation
Presentation can elevate your Hi-Hat Oreo Cupcakes from simple treats to stunning desserts. Here are some creative ideas to make them visually appealing:
Plating Ideas
– Decorative Platters: Arrange your cupcakes on a decorative cake stand or a tiered platter. This not only makes for an impressive display but also allows guests to serve themselves easily.
– Colorful Liners: Use vibrant cupcake liners to add a pop of color that complements the rich chocolate coating.
Garnishing Options
– Crushed Oreos: Sprinkle crushed Oreo cookies on top of the frosting or around the base of the cupcakes for added texture and flavor.
– Chocolate Drizzle: Drizzle additional melted chocolate over the top of the cupcakes for a gourmet touch.
– Edible Glitter: For a festive occasion, consider adding edible glitter or sprinkles to enhance the visual appeal.
Serving Suggestions
To create a delightful experience, consider pairing your Hi-Hat Oreo Cupcakes with complementary beverages or other desserts:
– Beverage Pairings: Serve these cupcakes with a glass of cold milk, which enhances the Oreo flavor. Alternatively, coffee or hot chocolate can create a cozy pairing.
– Dessert Platter: Include a selection of mini desserts like brownies or cookie bites alongside the cupcakes for a dessert table that offers variety.
Why Hi-Hat Oreo Cupcakes are Perfect for Any Occasion
Hi-Hat Oreo Cupcakes are not just delicious; they are incredibly versatile and suitable for various events. Here’s why they make a great choice for any occasion:
Celebrations and Parties
These cupcakes are perfect for birthdays, holidays, and festive gatherings. Their unique appearance and rich flavor profile make them a crowd favorite. You can customize them with themed decorations or colored frosting to match your event’s color scheme.
Everyday Treats
Even on a regular day, these cupcakes can bring joy. They are a delightful way to celebrate small victories, brighten up a dull afternoon, or simply indulge in a sweet treat after dinner.
Gifting
Consider packaging these cupcakes beautifully in a sturdy box with a clear lid. Add a personal note or a decorative ribbon for a thoughtful gift. They are great for sharing with friends, family, or coworkers, making them a perfect homemade gift for any occasion.
Nutritional Information and Dietary Considerations
While Hi-Hat Oreo Cupcakes are undeniably delicious, it’s essential to be aware of their nutritional content and consider dietary restrictions:
Caloric Breakdown
On average, each Hi-Hat Oreo Cupcake contains about 250-300 calories. This can vary based on the specific ingredients used, such as the type of frosting and chocolate.
Allergy Information
Common allergens in this recipe include gluten, dairy, and eggs. To accommodate those with dietary restrictions, consider the following alternatives:
– Gluten-Free: Substitute regular flour with a gluten-free blend to create gluten-free cupcakes.
– Dairy-Free: Use dairy-free chocolate and non-dairy milk alternatives to make the cupcakes and frosting suitable for lactose-intolerant individuals.
– Egg-Free: For a vegan version, replace eggs with applesauce or flaxseed meal.
Conclusion
Creating and enjoying Hi-Hat Oreo Cupcakes is a delightful experience that combines baking skill with indulgent flavor. From the first step of mixing the batter to the final touch of chocolate coating, every phase of the process brings joy and satisfaction. These cupcakes are not only visually stunning but also versatile enough to cater to various tastes and occasions. Whether you’re celebrating a special event, enjoying a treat on an ordinary day, or gifting them to loved ones, Hi-Hat Oreo Cupcakes are sure to impress. Embrace your baking journey, and relish the sweet rewards of your efforts!
