Introduction
Pizza pockets are the quintessential comfort food that have captured the hearts (and taste buds) of many. With their warm, cheesy fillings encased in a soft, inviting dough, they are perfect for a quick snack, a fun dinner, or even a party appetizer. Whether you’re a busy parent looking for a kid-friendly meal or a college student seeking a late-night snack, pizza pockets offer a convenient solution that is both satisfying and delicious.
One of the greatest advantages of making pizza pockets at home is the versatility they provide. You can customize them to suit your family’s taste preferences, dietary restrictions, or even the leftovers in your fridge. From classic cheese and pepperoni to vegetarian options packed with fresh vegetables, the possibilities are endless. This recipe is not only easy to follow but also allows you to get creative in the kitchen.
Understanding the Basics of Pizza Pockets
Before diving into the recipe, it’s essential to understand what pizza pockets are and how they have evolved over time. Pizza pockets are essentially pockets of dough filled with various pizza toppings, folded over and baked until golden brown. They offer all the flavors of a traditional pizza but in a portable, handheld form.
The concept of stuffed pizzas has a long history, with roots tracing back to various cultures that embraced the idea of encasing savory fillings in dough. However, the modern pizza pocket as we know it gained popularity in the United States in the 1980s, largely thanks to frozen versions that made their way into kitchens across the country. While store-bought pizza pockets are convenient, they often come with additives and preservatives that you may prefer to avoid.
Making pizza pockets from scratch allows you to control the ingredients, ensuring a fresher, healthier product that is free from unnecessary additives. Additionally, homemade pizza pockets can be tailored to fit specific nutritional needs, whether you’re looking to create a gluten-free version, add more vegetables, or reduce the amount of cheese.
Essential Ingredients for Homemade Pizza Pockets
Creating the perfect homemade pizza pocket starts with a well-thought-out list of ingredients. Here’s a detailed breakdown of what you’ll need to get started:
All-Purpose Flour
The foundation of your pizza pockets is the dough, which is primarily made from all-purpose flour. This versatile ingredient is essential for creating a chewy yet soft texture that holds up against the fillings. Using all-purpose flour provides the right balance of gluten, allowing the dough to stretch and rise without becoming tough.
Salt and Baking Powder
The addition of salt is crucial for enhancing the flavor of the dough. It not only contributes to the overall taste but also helps to strengthen the dough structure. Baking powder acts as a leavening agent, giving the pizza pockets a light and airy texture. Together, these two ingredients create a flavorful and enjoyable eating experience.
Olive Oil
Incorporating olive oil into the dough is a game-changer. Not only does it add a delightful richness to the flavor, but it also improves the dough’s elasticity, making it easier to roll out and shape. Moreover, olive oil is known for its health benefits, including heart-healthy fats and antioxidants.
Marinara Sauce
The flavor foundation of your pizza pockets lies in the marinara sauce. This rich tomato sauce adds moisture and a burst of flavor to the filling. You can use store-bought marinara for convenience or make your own from scratch for a fresher taste. Either way, this ingredient is essential for achieving that classic pizza flavor.
Cheese
No pizza pocket would be complete without cheese. Mozzarella is the traditional choice, known for its gooey, melty texture that pairs perfectly with the other ingredients. However, you can experiment with different cheeses, such as cheddar or provolone, depending on your taste preferences. For those with dietary restrictions, there are also excellent dairy-free cheese alternatives available today.
Toppings
The beauty of homemade pizza pockets lies in their customization. You can choose a variety of toppings to suit your taste, including pepperoni, sausage, bell peppers, mushrooms, olives, spinach, or even pineapple. This versatility allows you to create a pizza pocket that caters to everyone’s preferences, ensuring each bite is packed with flavor.
Optional Ingredients and Seasonings
To further enhance the flavor of your pizza pockets, consider adding optional ingredients and seasonings. Italian seasoning, garlic powder, or crushed red pepper flakes can elevate the taste profile and add depth to the overall dish. Additionally, you can include fresh herbs like basil or oregano for a burst of freshness.
—
Step-by-Step Guide to Making Easy Cheesy Pizza Pockets
Now that you’re familiar with the essential ingredients, let’s dive into the step-by-step process of making your homemade cheesy pizza pockets. This straightforward guide will ensure that your pizza pockets turn out perfectly every time.
Step 1: Prepare the Dough
Start by mixing your dry ingredients in a large bowl. Combine the all-purpose flour, salt, and baking powder. Once well-mixed, create a well in the center and pour in the olive oil. Gradually add water while mixing until a dough starts to form. Knead the dough on a floured surface for about 5 minutes, until it becomes smooth and elastic. Cover the dough with a clean cloth and let it rest for at least 30 minutes. This resting period is crucial as it allows the gluten to relax, making it easier to roll out later.
Step 2: Prepare the Filling
While the dough is resting, it’s time to prepare the filling. In a medium bowl, combine your choice of marinara sauce, shredded mozzarella cheese, and any additional toppings you desire. Mix everything well to ensure that the flavors meld together. For a classic approach, you might choose just cheese and pepperoni, but feel free to get creative and add your favorite ingredients.
Step 3: Roll Out the Dough
Once the dough has rested, divide it into equal portions, depending on the size of the pizza pockets you want to make. On a floured surface, roll each portion into a circle about 1/4 inch thick. The size of the circles will depend on how large you want your pizza pockets; a diameter of about 5-6 inches is a great starting point.
Step 4: Fill and Seal
Spoon a generous amount of the filling onto one half of each dough circle, being careful not to overfill. Leave a small border around the edges to ensure you can seal them properly. Fold the dough over the filling to create a half-moon shape. Press the edges together firmly to seal, and use a fork to crimp the edges for added security and a decorative touch.
Step 5: Bake the Pizza Pockets
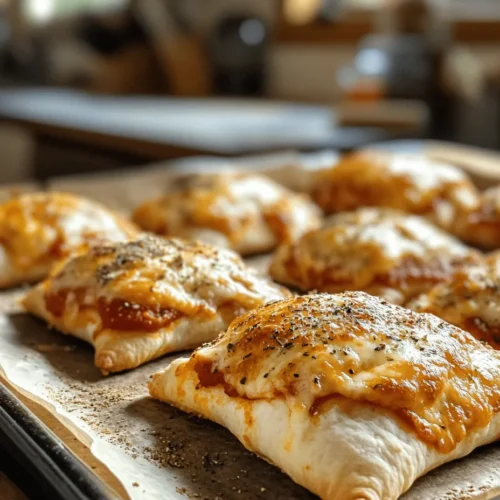
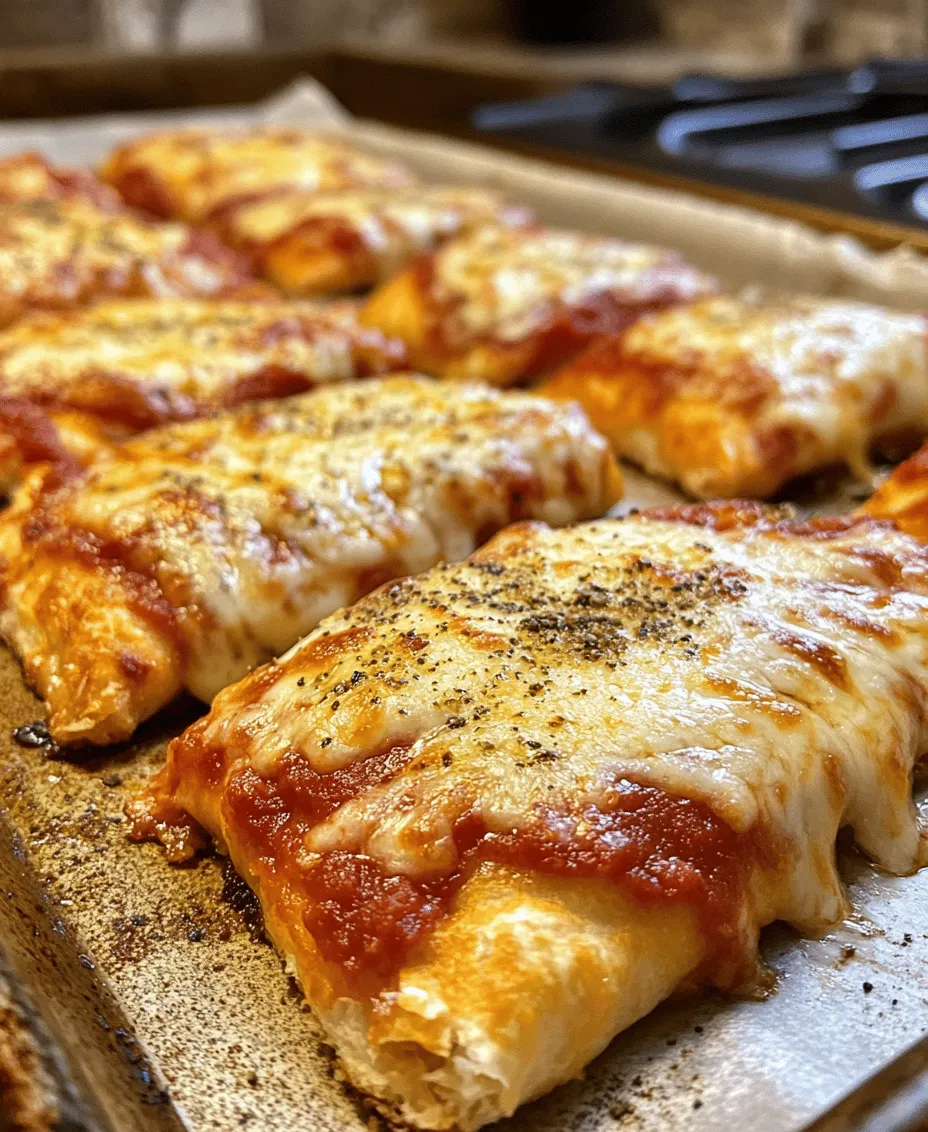
Preheat your oven to 400°F (200°C). Place the filled and sealed pizza pockets on a baking sheet lined with parchment paper. For a golden finish, brush the tops with a little olive oil and sprinkle with seasoning if desired. Bake for 15-20 minutes or until the pockets are golden brown and cooked through.
—
This step-by-step guide sets you on the path to creating homemade easy cheesy pizza pockets that are sure to impress. The combination of fresh ingredients, customizable fillings, and the warm, flaky dough will make these pizza pockets a favorite in your household. Stay tuned for more details on tips for achieving the best results, common questions, and additional ideas to expand your pizza pocket repertoire.
Making the Dough: Importance of Texture and Resting Time
The foundation of any great pizza pocket lies in the dough. For a homemade pizza pocket, achieving the right texture is crucial. A well-prepared dough should be soft, pliable, and slightly chewy, providing the perfect vessel for your fillings. When mixing your ingredients, aim for a dough that is smooth and elastic. You can achieve this by kneading it for about 5-7 minutes until it springs back when pressed.
After kneading, it’s essential to let the dough rest. This resting period, usually about 30 minutes to an hour, allows the gluten to relax, making it easier to roll out. Cover the dough with a clean kitchen towel or plastic wrap to prevent it from drying out. This step is not just about waiting; it significantly contributes to the final texture of your pizza pockets, making them tender and fluffy once baked.
Preheating the Oven: Why This Step is Crucial for Baking
While your dough is resting, preheat your oven to 425°F (220°C). Preheating is a vital step in the baking process, as it ensures that your pizza pockets start cooking immediately upon entering the oven. This immediate heat helps to create a crisp outer layer while keeping the inside moist and flavorful. If you skip this step, your pizza pockets may turn out soggy or unevenly baked, compromising their texture and taste.
Rolling Out the Dough: Techniques for Achieving the Perfect Thickness
Once your dough has rested, it’s time to roll it out. Start by lightly flouring your work surface and the rolling pin to prevent sticking. Divide the dough into equal portions based on how large you want your pizza pockets to be. For each portion, roll the dough out into a circle about ¼ inch thick. The thickness is essential; too thin, and the filling may leak out, too thick, and the dough may not cook through properly.
To ensure uniform thickness, apply even pressure while rolling. If you notice any resistance, let the dough rest for a few minutes before continuing. This will allow the gluten to relax further. Aim for a diameter of about 6 inches for each circle, which will give you enough room for filling while still being manageable to fold.
Filling the Pizza Pockets: Tips for Balancing Flavors and Avoiding Overflow
Now comes the fun part—adding the filling! When it comes to filling your pizza pockets, balance is key. You want to include a mixture of ingredients that complement each other in flavor without overpowering the dough. A classic combination is mozzarella cheese, pepperoni, and a touch of marinara sauce. Aim for about 2-3 tablespoons of filling per pocket to prevent overflow during baking.
To avoid a messy situation, make sure not to overfill your pockets. Consider using a slotted spoon if your filling contains sauce to help drain excess liquid. This step is crucial, as too much moisture can lead to soggy pockets. Additionally, feel free to add herbs or spices, such as oregano or crushed red pepper, for an extra flavor boost.
Sealing the Pockets: Best Practices for Ensuring They Don’t Open During Baking
Once filled, it’s essential to seal your pizza pockets correctly to keep the deliciousness inside. To do this, fold the dough over the filling, creating a half-moon shape. Use your fingers to press the edges together firmly. For a secure seal, you can also use a fork to crimp the edges, which not only seals them but gives a decorative finish as well.
If you’re worried about leaks, you can brush a little water on the edges before sealing, which helps them stick better. Make sure to leave a small vent on top by cutting a few slits in the dough before baking. This allows steam to escape while cooking, reducing the risk of bursting pockets.
Brushing with Egg Wash: The Effect on Color and Texture
To achieve that beautiful golden-brown finish, brush the tops of your sealed pizza pockets with an egg wash. An egg wash consists of a beaten egg mixed with a tablespoon of water or milk. This mixture enhances the color and adds a slight sheen to the crust once baked. If you prefer a vegan option, you can substitute the egg wash with a mixture of plant-based milk and a little maple syrup for a nice glaze.
Baking: How to Achieve the Perfect Golden-Brown Finish
Place your pizza pockets on a baking sheet lined with parchment paper, ensuring they are spaced apart to allow for even cooking. Bake in your preheated oven for about 15-20 minutes or until they are puffed up and golden brown. Keep an eye on them during the last few minutes to prevent over-browning.
If you’re unsure whether they’re done, you can use a toothpick to check the inside. If it comes out clean, your pizza pockets are ready to be enjoyed. Allow them to cool for a few minutes before serving, as the filling can be hot.
Creative Variations on the Classic Pizza Pocket Recipe
While the classic pizza pocket is delicious, don’t hesitate to get creative! Here are some ideas to customize your pizza pockets to suit various tastes and dietary needs:
Vegetarian Options: Suggestions for Plant-Based Alternatives
Vegetarians can enjoy pizza pockets by filling them with a variety of vegetables, cheeses, and sauces. Consider using sautéed bell peppers, mushrooms, onions, and spinach combined with mozzarella or ricotta cheese. A sprinkle of Italian seasoning can elevate the flavor profile, making these pockets just as satisfying as their meaty counterparts.
Gluten-Free Adaptations: Using Alternative Flours
For those with gluten sensitivities, gluten-free pizza pockets can be made using alternative flours like almond flour, coconut flour, or a gluten-free all-purpose blend. Be mindful of the moisture content, as gluten-free flours may require adjustments in liquid ratios. You can also use store-bought gluten-free dough if you prefer a simpler approach.
Dessert Pizza Pockets: Ideas for Sweet Fillings
Why not transform your pizza pockets into a sweet treat? Create dessert pizza pockets by filling them with Nutella, sliced bananas, or berries. Sprinkle some cinnamon sugar on top before baking for an extra touch of sweetness. These dessert pockets are perfect for satisfying a sweet tooth and can be served with whipped cream or a scoop of ice cream.
International Twists: Incorporating Flavors from Different Cuisines
Explore global flavors by incorporating different cuisines into your pizza pockets. For example, try making taco-inspired pockets filled with seasoned ground beef, cheese, and your favorite toppings like salsa or guacamole. Alternatively, you can create curry-flavored pockets using spiced chickpeas and vegetables for a unique twist.
Serving Suggestions and Accompaniments
When it comes to serving your homemade pizza pockets, consider pairing them with sides that complement their flavors. Here are some suggestions:
– Ideal Sides: A fresh green salad with a tangy vinaigrette or a side of marinara dipping sauce can elevate your meal. For added crunch, serve with vegetable sticks or a light coleslaw.
– Presentation Ideas: For gatherings or casual dinners, arrange your pizza pockets on a large platter with a small bowl of dipping sauce in the center. This not only looks appealing but also invites guests to help themselves.
– Storing Leftovers: If you have any leftover pizza pockets, store them in an airtight container in the refrigerator for up to three days. To reheat, place them in a preheated oven at 350°F (175°C) for about 10-15 minutes until warmed through. This method helps retain their crispiness.
Conclusion
Homemade pizza pockets are a delightful culinary adventure that brings joy to both the cook and the eater. With their versatile nature, they can be tailored to fit any occasion, whether it’s a family dinner, a party snack, or a fun baking project with kids. The process of making the dough, filling, and baking allows for creativity and personalization, ensuring that everyone can enjoy their perfect pocket.
As you explore this recipe, don’t hesitate to experiment with different fillings and techniques. The beauty of pizza pockets lies in their adaptability, allowing you to create something uniquely your own. So gather your ingredients, roll up your sleeves, and dive into the world of homemade pizza pockets. Your taste buds will thank you!