Introduction
In the realm of desserts, few things can compete with the allure of a beautifully crafted treat that tantalizes the taste buds. Decadent desserts have captured the hearts of many, bringing joy and indulgence to celebrations, gatherings, and quiet nights at home. Among the various confections that grace our tables, the Irresistible Caramel Brownie Cheesecake stands out as a true masterpiece, showcasing a perfect marriage of rich flavors and sumptuous textures.
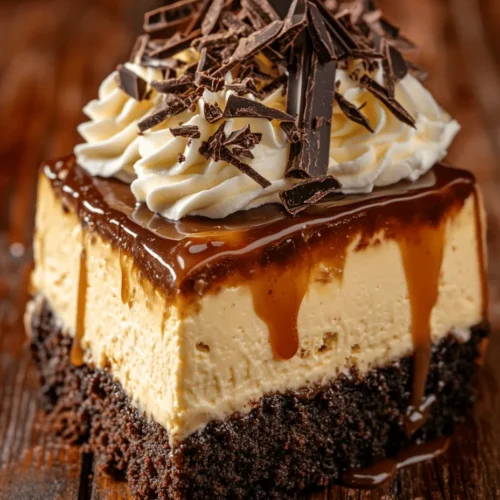
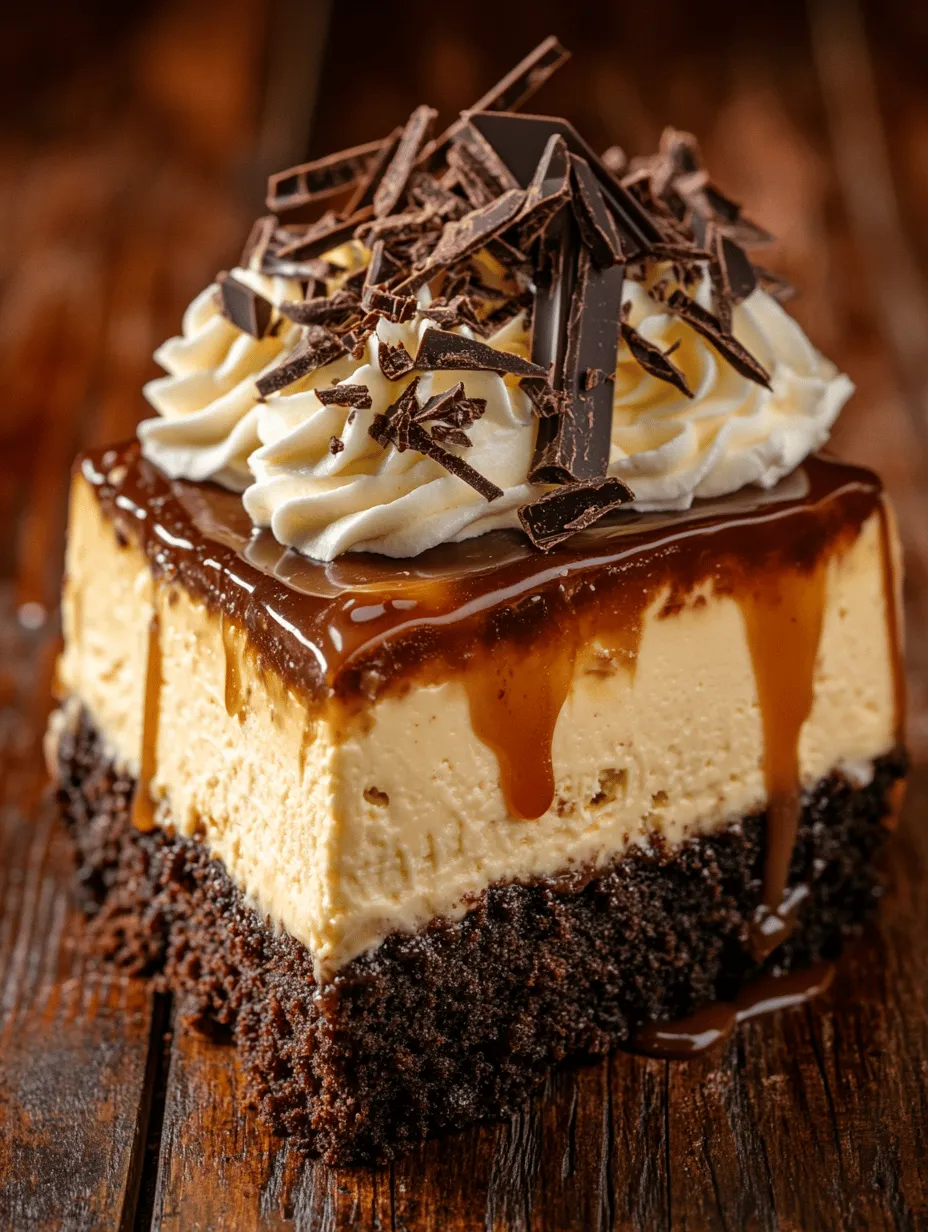
This dessert is not just a simple cake; it is a harmonious blend of three distinct layers: a fudgy brownie base, a velvety cheesecake filling, and a luscious caramel sauce that adds a delightful sweetness with a hint of saltiness. Each layer plays a crucial role in creating an unforgettable dessert experience that will leave your guests—and you—wanting more.
In this article, we will delve into the components that make up this extraordinary dessert, guiding you through the process of crafting each layer with precision and care. By the end, you will not only understand the significance of these elements but also feel confident in your ability to create this show-stopping dessert in your own kitchen.
Understanding the Components of Caramel Brownie Cheesecake
To fully appreciate the Irresistible Caramel Brownie Cheesecake, it is essential to break down its three main layers: the brownie, the cheesecake, and the caramel sauce. Each element contributes to a well-rounded dessert experience, offering a balance of flavors and textures that delights the palate.
The Brownie Layer: A Rich Foundation
The journey begins with the brownie layer, which serves as the foundation of this dessert. This layer is characterized by its dense, fudgy texture and rich chocolate flavor, making it the perfect base for the creamy cheesecake that follows.
The key ingredients for the brownie layer include:
– Unsalted Butter: Using unsalted butter allows you to control the saltiness of the dessert, ensuring that the sweet flavors shine without being overwhelmed. This ingredient is vital for achieving the rich, moist texture that brownies are known for.
– Granulated Sugar: The sugar not only sweetens the brownies but also helps retain moisture, contributing to the soft and chewy texture that makes brownies so appealing.
– Semi-Sweet Chocolate Chips: These provide an additional depth of flavor, elevating the overall richness of the brownie base. The melting chips create pockets of gooey chocolate that enhance the decadent experience.
Step-by-Step Preparation of the Brownie Layer
1. Melt the Butter: Begin by melting unsalted butter in a medium saucepan over low heat. Stir occasionally to prevent it from burning. Once melted, remove it from the heat and let it cool slightly.
2. Mix the Ingredients: In a mixing bowl, combine the melted butter with granulated sugar until well blended. This step is crucial for achieving a smooth base.
3. Add the Eggs: Whisk in eggs, one at a time, ensuring each is fully incorporated before adding the next. This helps create a rich batter with a velvety texture.
4. Incorporate the Dry Ingredients: Gradually add in all-purpose flour, unsweetened cocoa powder, and a pinch of salt. Mix until just combined to avoid overworking the batter, which can lead to tough brownies.
5. Fold in the Chocolate Chips: Finally, gently fold in semi-sweet chocolate chips for that extra indulgence.
6. Bake: Pour the brownie batter into a greased and lined baking pan, smoothing the top with a spatula. Bake in a preheated oven at 350°F (175°C) for about 20-25 minutes or until a toothpick inserted in the center comes out with a few moist crumbs. Allow the brownies to cool completely in the pan before adding the cheesecake layer.
Tips for Achieving the Perfect Brownie Texture
– Do Not Overmix: Once you add the dry ingredients, mix until just combined. Overmixing can lead to dense, dry brownies.
– Check for Doneness: Every oven is different, so start checking your brownies a few minutes before the suggested baking time. You want them to be set but still moist in the center for that fudgy texture.
– Cool Completely: Allow your brownies to cool fully before layering the cheesecake on top. This ensures that the layers adhere properly and prevents the cheesecake from melting into the brownie.
Crafting the Cheesecake Layer: Creamy and Indulgent
Once your brownie base is perfectly baked and cooled, it’s time to create the cheesecake layer, which adds a creamy, indulgent dimension to the dessert. The cheesecake layer is known for its smooth consistency and tangy flavor, making it the perfect contrast to the rich brownie base below.
Essential Ingredients for the Cheesecake Layer
– Softened Cream Cheese: This is the star ingredient of the cheesecake layer. Using softened cream cheese ensures a smooth and creamy texture, free of lumps.
– Sour Cream: The addition of sour cream gives the cheesecake a rich, tangy flavor that balances the sweetness of the brownies and the caramel sauce. It also contributes to the creamy consistency that is characteristic of a well-made cheesecake.
Step-by-Step Guide to Preparing the Cheesecake Layer
1. Prepare the Cream Cheese: In a large mixing bowl, beat the softened cream cheese until smooth and creamy. This step is essential to avoid lumps in your cheesecake.
2. Add the Sugar: Gradually add granulated sugar to the cream cheese, mixing until fully incorporated.
3. Incorporate the Eggs: Add eggs, one at a time, mixing on low speed after each addition. Be careful not to overbeat at this stage, as it can introduce air into the mixture and lead to cracks during baking.
4. Mix in the Sour Cream: Gently fold in the sour cream until well combined. This ingredient enhances the creaminess and adds a delightful tangy flavor.
5. Layer over the Brownies: Once the cheesecake mixture is ready, pour it over the cooled brownie layer, spreading it evenly with a spatula.
6. Bake: Bake the cheesecake in the oven at 325°F (160°C) for about 40-50 minutes, or until the edges are set and the center is slightly jiggly. Turn off the oven, crack the door open, and let the cheesecake cool in the oven for an hour to prevent cracks.
Tips for Mixing without Overbeating
– Use Low Speed: When mixing in eggs, use a low speed to minimize air incorporation. This helps prevent cracks in the finished cheesecake.
– Scrape the Bowl: Be sure to scrape down the sides of the mixing bowl frequently to ensure all ingredients are fully combined without over-mixing.
– Cool Gradually: Allowing the cheesecake to cool gradually in the oven after baking helps prevent sudden temperature changes that can lead to cracks.
In the next section, we will focus on creating the perfect caramel sauce that adds a sweet and salty harmony to this exquisite dessert. This final layer will elevate the Irresistible Caramel Brownie Cheesecake to new heights, making it a truly unforgettable treat.

Caramel Sauce: The Sweet Crown of Your Cake
The luscious caramel sauce is the crowning glory of the Irresistible Caramel Brownie Cheesecake, elevating its flavors and adding an indulgent richness. Made from simple ingredients, this silky sauce plays a crucial role in tying together the decadent layers of brownie, cheesecake, and the final touch of sweetness. Its warm, buttery flavor enhances the overall experience, creating a harmonious balance between the richness of the cheesecake and the sweetness of the brownie base.
Key Ingredients and Their Functions
To create that perfect caramel sauce, you will need just a few key ingredients, each serving a crucial purpose:
– Granulated Sugar: This is the foundation of your caramel. When heated, sugar undergoes a chemical transformation, melting and caramelizing to create that signature flavor and color.
– Heavy Cream: This ingredient is essential for achieving a smooth and creamy texture in your caramel. It adds richness and helps balance the sweetness of the sugar.
– Butter: A touch of unsalted butter is added to enhance the flavor profile and achieve a glossy finish.
– Salt: Adding a pinch of salt creates a delightful contrast to the sweetness, elevating the overall taste.
The Caramelization Process of Granulated Sugar
Caramelization is the process of heating sugar until it melts and turns into a deep amber liquid. This transformation involves breaking down the sugar molecules and creating complex flavors. The key to perfect caramel is to monitor the sugar closely as it melts; it can quickly go from perfectly caramelized to burnt.
Detailed Instructions for Making the Caramel Sauce
1. Prepare Ingredients: Gather your ingredients and measure them out before you start. This ensures a smooth and efficient cooking process.
2. Heat the Sugar: In a medium saucepan, add one cup of granulated sugar. Place the saucepan over medium heat, allowing the sugar to melt without stirring initially.
3. Stir Gently: As the sugar begins to melt, you can gently swirl the pan to help the sugar melt evenly. Avoid using a spoon to stir at this stage to prevent crystallization.
4. Observe the Color: Keep a close eye on the sugar as it melts. You want to achieve a deep amber color, which usually takes about 8-10 minutes. Remove it from heat as soon as it reaches this stage to avoid burning.
5. Add Heavy Cream: Carefully and slowly pour in half a cup of heavy cream while stirring continuously. The mixture will bubble vigorously, so be cautious.
6. Incorporate Butter and Salt: Once the bubbling subsides, add four tablespoons of unsalted butter and a pinch of salt. Stir until the butter is completely melted and the sauce is smooth.
7. Cool Down: Allow the caramel sauce to cool slightly before drizzling it over your cheesecake. It will thicken as it cools.
Safety Tips for Working with Hot Sugar
– Use Long-Handled Utensils: When stirring or pouring, use long-handled spoons or spatulas to keep your hands away from the hot mixture.
– Wear Protective Gear: Consider wearing an apron and oven mitts to protect yourself from splatters.
– Keep Water Away: Always ensure your utensils and surfaces are dry; water can cause the hot sugar to splatter dangerously.
Achieving the Perfect Amber Color Without Burning
To achieve that coveted amber color, patience is key. Once the sugar starts melting, keep an eye on it and do not walk away from the stove. If you notice that the edges are browning faster, gently swirl the pan to even out the heat distribution. If you accidentally burn the sugar, it’s best to discard it and start over, as burnt caramel has a distinctly bitter taste.
Baking the Cheesecake: Techniques for Success
Baking the cheesecake is a crucial step that requires attention to detail. This process will yield a creamy, velvety texture that complements the brownie and caramel layers.
Overview of the Baking Process
To bake your cheesecake, preheat your oven to 325°F (163°C). You will be using a water bath, also known as a bain-marie, to help regulate the temperature and prevent cracking. This technique involves placing your springform pan in a larger pan filled with hot water.
Importance of Baking Times and Temperatures
The temperature and time at which you bake your cheesecake play a significant role in its final texture. If the oven is too hot, the cheesecake can puff up and crack; if it’s too cool, it may not set properly. Bake your cheesecake for about 55-65 minutes.
Key Indicators for Knowing When the Cheesecake is Done
– The Jiggle Test: When the cheesecake is done, it should be firm around the edges but have a slight jiggle in the center. This indicates that the cheesecake will continue to set as it cools.
– Cracks on the Surface: A small crack or two on the surface is normal and can be covered with caramel or whipped cream later.
Cooling and Chilling Process for Optimal Flavor Development
Once the cheesecake is baked, turn off the oven and crack the door open, allowing the cheesecake to cool gradually. This helps prevent cracks from forming. Let it cool in the oven for about 1 hour, then transfer it to the refrigerator and chill for at least four hours, preferably overnight. This resting period allows the flavors to meld beautifully.
Assembling Your Caramel Brownie Cheesecake
Now that your brownie base, cheesecake filling, and caramel sauce are ready, it’s time to assemble your masterpiece.
Step-by-Step Instructions for Assembling the Dessert
1. Remove the Cheesecake from the Springform Pan: Carefully run a knife around the edge of the cheesecake to loosen it from the sides of the pan. Release the springform and gently lift the cheesecake out.
2. Layer the Brownie Base: Place the cooled brownie layer on a serving plate. If you want an extra layer of caramel, drizzle some caramel sauce over the brownie before adding the cheesecake.
3. Top with Cheesecake: Gently place the cheesecake on top of the brownie layer.
4. Drizzle with Caramel Sauce: Generously drizzle the cooled caramel sauce over the top of the cheesecake, allowing it to cascade down the sides for a beautiful presentation.
Tips for Removing the Cheesecake from the Springform Pan Without Damage
– Chill First: Ensure your cheesecake is well-chilled before attempting to remove it from the pan. This makes it firmer and easier to handle.
– Use a Hot Knife: Dip a knife in hot water, wipe it dry, and use it to cut around the edges. This helps release any stuck areas.
Suggestions for Garnishing to Enhance Presentation
– Creative Whipped Cream Decoration: Use a piping bag fitted with a star tip to create decorative swirls of whipped cream around the edges of the cheesecake.
– Chocolate Shavings and Extra Caramel: Add chocolate shavings on top along with a few more drizzles of caramel sauce for an attractive finish.
Serving Suggestions and Pairings
When it comes to serving your Irresistible Caramel Brownie Cheesecake, the possibilities are endless.
Ideas for Serving the Cheesecake, Including Portion Sizes
Cut the cheesecake into generous slices, as this decadent dessert is rich and satisfying. For smaller gatherings, you may opt for mini slices, allowing guests to enjoy multiple desserts.
Recommendations for Beverages That Complement the Dessert
– Coffee: A rich, dark roast coffee pairs beautifully with the sweetness of the cheesecake, enhancing its flavors.
– Tea: A cup of Earl Grey or chai tea can provide a nice contrast to the richness of the dessert.
– Dessert Wines: Consider serving a sweet dessert wine like a port or late-harvest riesling, which will complement the caramel and chocolate notes.
Discussing How This Dessert Fits into Various Occasions
This Irresistible Caramel Brownie Cheesecake is versatile enough to shine at any occasion, from casual family dinners to formal celebrations. Its stunning appearance and delectable flavors make it the perfect centerpiece for birthday parties, holiday gatherings, or even a simple weekend treat.
Conclusion
The Irresistible Caramel Brownie Cheesecake is a delightful fusion of flavors and textures that will have everyone reaching for seconds. With the rich layers of brownie, creamy cheesecake, and the sweet drizzle of caramel, each bite is a celebration of indulgence.
Baking this dessert not only allows you to create something extraordinary but also provides an opportunity to share sweet moments with family and friends. So gather your ingredients, follow the steps, and embark on a baking adventure that will leave you with cherished memories and a delicious treat. We encourage you to try this recipe, make it your own, and enjoy the joy of baking and sharing with your loved ones!