Introduction
Cheesy breadsticks are more than just a delicious snack; they are a comforting indulgence that has captured the hearts—and taste buds—of many. The allure of warm, freshly baked bread combined with the gooey richness of cheese is an experience that brings joy to any meal or gathering. Whether you’re hosting a party, enjoying a cozy night in, or simply looking for an irresistible side to your favorite soup or salad, these melt-in-your-mouth cheesy breadsticks are the perfect solution.
What makes this recipe stand out is its versatility. You can serve these breadsticks as an appetizer, a delightful snack, or as a side dish to complement your main course. They are incredibly easy to make, requiring minimal ingredients and time, making them accessible for both novice cooks and seasoned chefs alike. Each bite provides a satisfying crunch on the outside, revealing a soft, cheesy interior that will have everyone reaching for more.
In this article, we will explore the key ingredients that make these cheesy breadsticks so special and provide you with a detailed step-by-step guide to create this mouthwatering treat in your own kitchen.
Understanding the Ingredients
To create the perfect cheesy breadsticks, it is essential to understand the role of each ingredient used in the recipe. The combination of these ingredients not only contributes to the flavor but also to the overall texture of the breadsticks.
All-Purpose Flour
All-purpose flour serves as the foundation for our cheesy breadsticks. It provides the necessary structure that allows the dough to rise and hold its shape. The protein content in all-purpose flour helps to develop gluten, which is crucial for achieving the right texture—soft yet slightly chewy. When measuring flour, be sure to spoon it into your measuring cup and level it off for accuracy; this will ensure your breadsticks are perfectly fluffy.
Cheeses
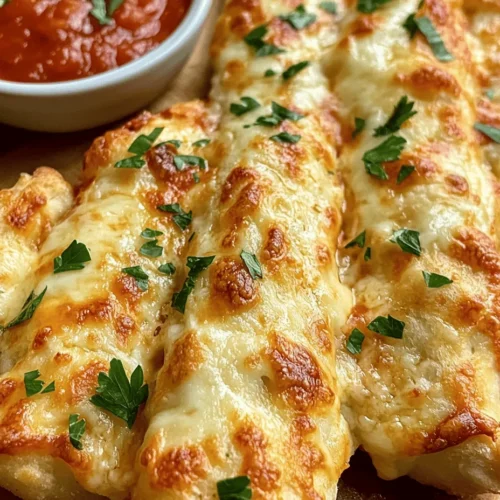
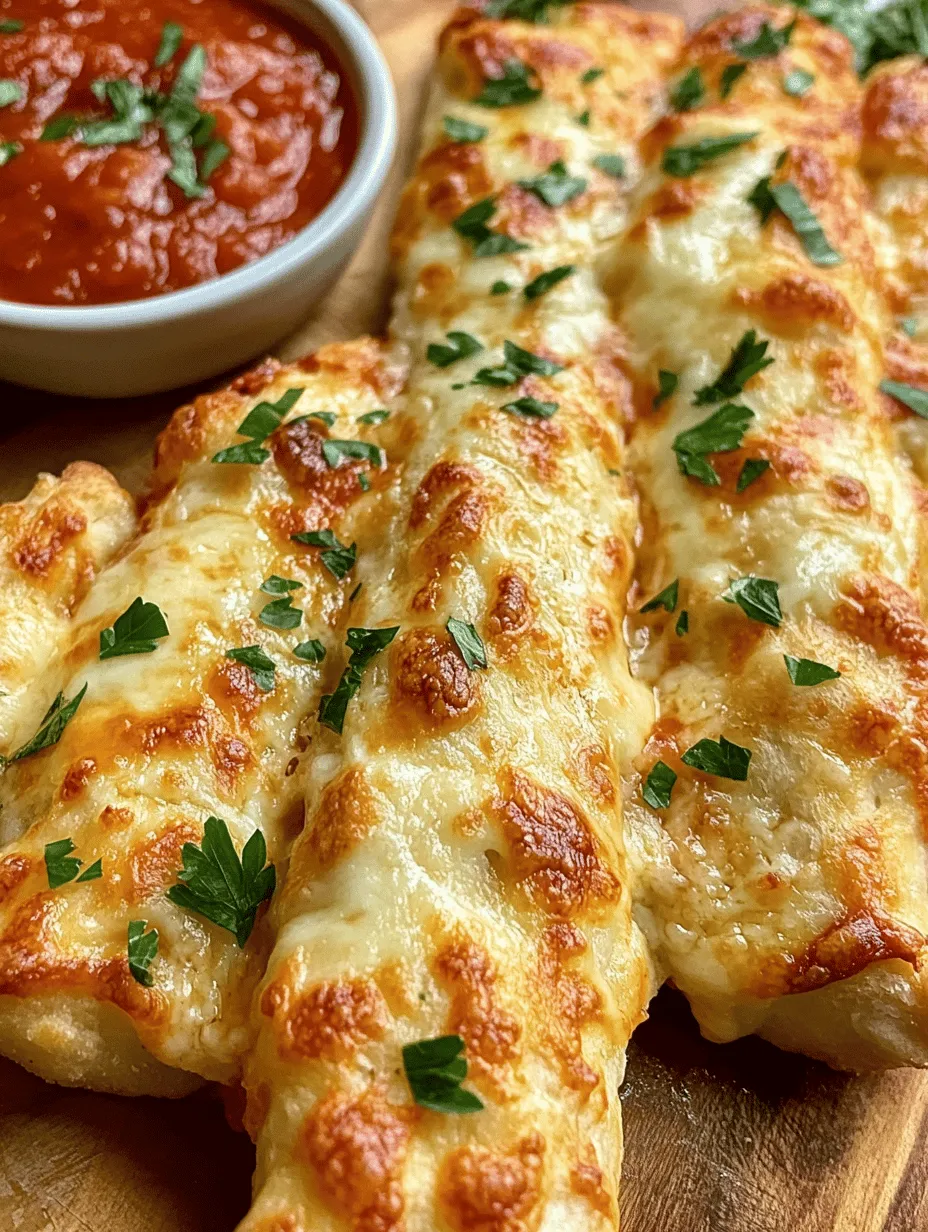
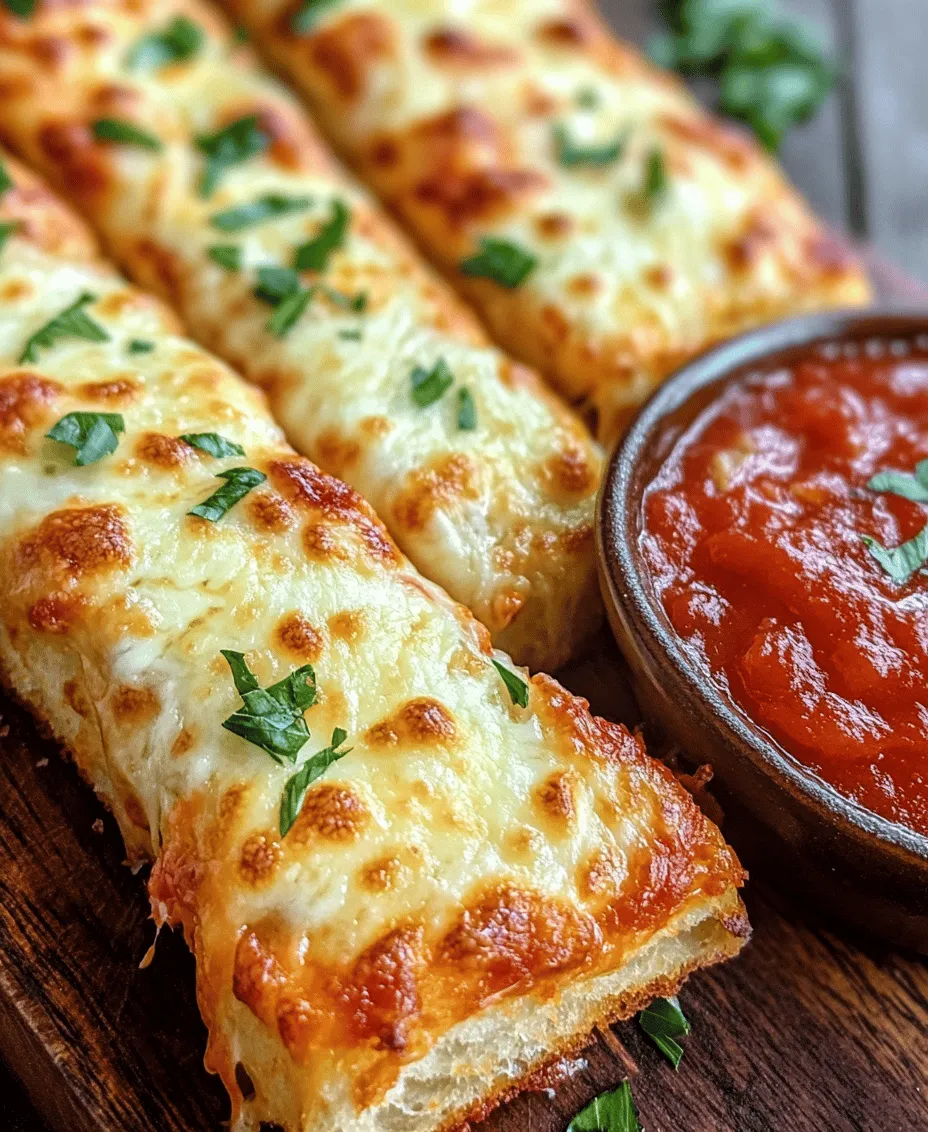
The choice of cheese is pivotal in crafting the ideal cheesy breadstick. For this recipe, we recommend using a combination of mozzarella and parmesan. Mozzarella is known for its exceptional meltability, creating that gooey, stretchy texture we all love. Meanwhile, parmesan adds a rich, nutty flavor that balances the mildness of mozzarella. Opt for freshly grated cheese whenever possible, as it melts better than pre-shredded options.
Baking Powder
Baking powder plays a crucial role in achieving the desired fluffiness of the breadsticks. As a leavening agent, it produces carbon dioxide when mixed with moisture and heat, causing the dough to rise. This ensures that your breadsticks are light and airy rather than dense. Be sure to check the expiration date on your baking powder to ensure optimal results.
Buttermilk
Buttermilk is another key ingredient that enhances the flavor and texture of the breadsticks. It adds moisture and a subtle tanginess, which elevates the overall taste. The acidity in buttermilk also helps to tenderize the dough, resulting in a softer bite. If you don’t have buttermilk on hand, you can easily make a substitute by mixing regular milk with a bit of vinegar or lemon juice and letting it sit for a few minutes before using.
Butter and Garlic Powder
Butter is a classic flavor enhancer that adds richness to the breadsticks. It also contributes to the golden-brown crust that forms during baking. For an extra punch of flavor, we incorporate garlic powder, which infuses the dough with a savory aroma. This combination not only enhances the taste but also makes your kitchen smell irresistible as the breadsticks bake.
Fresh Parsley
While fresh parsley is optional, it serves as a delightful garnish that adds a pop of color and a fresh herbaceous note to the finished product. Chopped parsley can be sprinkled on top of the breadsticks before serving, elevating their appearance and flavor.
Step-by-Step Guide to Making Cheesy Breadsticks
Now that we’ve covered the essential ingredients, let’s dive into the step-by-step process of making these cheesy breadsticks. Follow these instructions closely for the best results, and don’t hesitate to refer back to this guide as you embark on your cheesy baking adventure.
Step 1: Preheating the Oven
The first step in creating your cheesy breadsticks is to preheat your oven to 400°F (200°C). Preheating ensures that your breadsticks will bake evenly and develop that beautiful golden crust. While the oven is heating up, prepare your baking sheet by lining it with parchment paper or lightly greasing it with cooking spray. This will prevent the breadsticks from sticking and make for an easier cleanup.
Step 2: Mixing Dry Ingredients
In a large mixing bowl, combine your dry ingredients: all-purpose flour, baking powder, garlic powder, and a pinch of salt. Whisk them together until they are evenly distributed. This step is crucial; an even mix of dry ingredients ensures that your breadsticks will rise uniformly and have a consistent flavor throughout. Be sure to break up any clumps of baking powder or salt to avoid uneven seasoning.
Step 3: Incorporating Cheeses
Next, it’s time to add the cheeses to your dry mixture. Start by adding the grated mozzarella and parmesan cheese to the bowl. Using a spatula or wooden spoon, gently fold the cheeses into the dry ingredients. Be mindful not to overwork the dough at this stage; overmixing can lead to tough breadsticks. Instead, you want to create a cohesive dough that still retains the chunks of cheese for that delightful cheesy pull in every bite.
Step 4: Adding Wet Ingredients
Once the cheeses are incorporated, create a well in the center of your dry mixture. Pour in the buttermilk and melted butter. Gently mix these wet ingredients into the dry ingredients using a spatula. The dough will begin to come together, but it may be slightly sticky. This is perfectly normal; the moisture from the buttermilk and butter is what will ultimately yield a tender breadstick.
Step 5: Shaping the Dough
After the dough has formed, turn it out onto a lightly floured surface. With floured hands, knead the dough gently for about 30 seconds, just until it is smooth and holds together. Avoid over-kneading, as this can develop too much gluten and result in chewy breadsticks instead of the desired melt-in-your-mouth texture. Once kneaded, shape the dough into a rectangle about ½ inch thick.
Step 6: Cutting the Breadsticks
Using a sharp knife or a pizza cutter, slice the dough into strips to form your breadsticks. You can make them as thick or as thin as you prefer, but keep in mind that thinner breadsticks will bake more quickly. Carefully place the cut breadsticks onto your prepared baking sheet, ensuring they have a little space between them to allow for rising.
Step 7: Final Touches
Before placing the breadsticks in the oven, you can brush the tops with a mixture of melted butter and minced garlic (if desired) for an extra layer of flavor. This step enhances the buttery taste and adds a beautiful shine to the finished product.
Step 8: Baking
Finally, place the baking sheet in the preheated oven and bake for 15-20 minutes, or until the breadsticks are golden brown and cooked through. As they bake, your kitchen will be filled with an irresistible aroma that is sure to have everyone eagerly awaiting their first bite.
By following these steps, you’ll be well on your way to creating a batch of melt-in-your-mouth cheesy breadsticks that are sure to impress your family and friends. Stay tuned for the next part of this article, where we will provide tips for achieving the best results and address some common questions about this delicious recipe.
Combining Wet Ingredients
To achieve the perfect cheesy breadsticks, the wet ingredients play a crucial role in imparting moisture and flavor. In this recipe, we utilize buttermilk and melted butter. Buttermilk not only provides a tangy flavor but also helps in tenderizing the dough, resulting in a softer texture that melts in your mouth. Its acidity reacts with the baking powder, giving your breadsticks a lovely rise.
Melted butter enhances both flavor and moisture, creating a rich taste that complements the cheese in the dough. When you combine these wet ingredients, ensure that the melted butter is not too hot; if it is, it can cook the buttermilk and alter the texture of the dough. Aim for a warm but not scalding temperature. Mix the buttermilk and melted butter together in a separate bowl before adding them to the dry ingredients, ensuring an even distribution throughout the dough.
Creating the Dough
Once your wet ingredients are ready, it’s time to create the dough. In a large mixing bowl, combine your dry ingredients: flour, baking powder, salt, and cheese. Make a well in the center and pour in your buttermilk and melted butter mixture. Use a spatula or wooden spoon to gently stir the ingredients together.
The key to perfect dough is achieving the right consistency. You want a soft, slightly sticky dough that holds together but is not overly wet. If the dough feels too dry, add a splash more buttermilk; if it’s too sticky, sprinkle in a bit more flour. Be cautious not to overmix; doing so can develop the gluten too much, resulting in tough breadsticks. Mix until just combined, and then turn the dough onto a floured surface.
Shaping the Breadsticks
With your dough ready, it’s time to shape the breadsticks. Lightly flour your work surface and turn out the dough. Gently knead it a few times to bring it together, but remember, you want to keep it tender. Roll the dough out into a rectangle, about 1/2 inch thick. The thickness is important; if they are too thin, they can become crispy rather than soft and chewy.
Using a sharp knife or pizza cutter, slice the dough into strips—about 1 inch wide. This will give you the signature breadstick shape. If you prefer, you can also twist the strips for a fun visual effect. Keep the breadsticks uniform in size for even baking.
Arranging on the Baking Sheet
Now that your breadsticks are shaped, it’s time to arrange them on the baking sheet. Preheat your oven to 375°F (190°C) while you prepare. Line a baking sheet with parchment paper to prevent sticking and for easy cleanup.
Place the breadsticks on the baking sheet, ensuring there is enough space between each one. This spacing is vital; it allows the heat to circulate around them, promoting even baking. If they are too close together, they might stick or not cook properly.
Baking to Perfection
Bake your cheesy breadsticks in the preheated oven for about 15-20 minutes. Keep an eye on them as they bake; they should turn a beautiful golden brown on the edges. To determine if they are done, you can gently tap the top of a breadstick; if it sounds hollow, they are ready.
Another great indicator is the cheese. It should be bubbling and slightly browned. Once baked, remove them from the oven and allow them to cool for a few minutes before serving. This resting period allows the cheese to firm up slightly, making them easier to handle and enhancing their flavor.
Enhancing Flavor with Optional Toppings
To elevate your cheesy breadsticks, consider brushing them with melted butter and finely chopped parsley right after they come out of the oven. This simple step adds an extra layer of flavor and a lovely sheen that makes them even more appealing. The buttery finish complements the cheese while the parsley adds a fresh, herbal note.
Variations
Feel free to customize your cheesy breadsticks with various toppings. For a classic Italian flavor, sprinkle some garlic powder or Italian herbs like oregano and basil before baking. For a spicy kick, consider adding crushed red pepper flakes or a dash of cayenne pepper into the dough or on top. You can even experiment with different cheeses—Parmesan, mozzarella, or pepper jack can all bring unique flavors to your breadsticks.
Serving Suggestions and Pairings
These melt-in-your-mouth cheesy breadsticks are incredibly versatile and can be served in a variety of ways. They make an excellent appetizer, side dish, or snack. Pair them with marinara sauce, garlic butter, or ranch dressing for dipping. The rich, cheesy flavor of the breadsticks beautifully contrasts with the tangy and savory notes of the sauces.
Meal Pairings
Cheesy breadsticks pair wonderfully with numerous dishes. They complement pasta dishes like spaghetti and meatballs or lasagna perfectly. Additionally, they can be served alongside salads, providing a satisfying crunch and cheesy goodness. For a cozy family dinner or a casual gathering, these breadsticks will surely be a hit.
Occasions for Serving
Consider serving these cheesy breadsticks during family dinners, movie nights, or game day celebrations. Their easy preparation and delightful taste make them a crowd-pleaser for any occasion. Whether you are hosting a cozy gathering or simply enjoying a night in, these breadsticks will be a comforting addition to your meal.
Nutritional Information
When it comes to enjoying cheesy breadsticks, it’s helpful to know their nutritional content, especially if you are mindful of dietary preferences. On average, one serving (approximately 2 breadsticks) contains around 220 calories, 10 grams of fat, 25 grams of carbohydrates, and 8 grams of protein.
These breadsticks can fit into various dietary plans as a delicious treat or a side. They offer a good balance of carbohydrates and protein, but if you are looking for a lighter version, you can experiment with whole wheat flour or reduced-fat cheese.
Conclusion
Making your own cheesy breadsticks at home is a rewarding experience that brings comfort and joy to any meal. This simple recipe highlights the delightful combination of cheese and bread, resulting in a snack or side dish that is sure to impress. The ease of preparation and the satisfying outcome make these breadsticks a must-try for any home cook.
So gather your ingredients, embrace the process, and enjoy the deliciousness of homemade cheesy breadsticks. Whether paired with your favorite pasta, served as a snack, or enjoyed on their own, these breadsticks are bound to become a cherished recipe in your collection, bringing happiness and flavor to every occasion.