Introduction
If you’re looking for an irresistible appetizer that seamlessly combines savory flavors and creamy textures, look no further than Olive Cheese Melts. These delightful bites are more than just a snack; they are a culinary experience that brings together the distinct taste of olives and the rich flavors of various cheeses. The result is a harmonious blend that is sure to impress your guests at any gathering.
Olive Cheese Melts are versatile enough to serve at a variety of occasions, whether you’re hosting a casual get-together, a festive party, or simply enjoying a relaxing evening at home. Their appeal lies not only in their flavor but also in their simplicity. This dish is perfect for both novice cooks and seasoned culinary enthusiasts alike, offering an easy preparation method that requires minimal time yet yields maximum satisfaction.
The combination of salty olives, creamy cheeses, and aromatic herbs creates a mouthwatering appetizer that pleases even the most discerning palates. As you prepare to make Olive Cheese Melts, you’ll find that this recipe invites creativity, allowing you to customize ingredients based on your preferences.
Understanding the Ingredients
To create the perfect Olive Cheese Melts, it’s essential to understand the key ingredients and their roles in elevating the dish. Here’s a closer look at the components that make this appetizer so special.
Olives
At the heart of every Olive Cheese Melt are the olives themselves. Both green and black olives add a unique flavor profile to the dish. Green olives offer a briny, slightly tangy taste that complements the creaminess of the cheeses, while black olives provide a milder, sweeter flavor.
Nutritionally, olives are rich in healthy fats, particularly monounsaturated fats, which are known to promote heart health. They are also packed with antioxidants, vitamin E, and iron, making them a nutritious addition to your appetizer spread. Choosing a variety of olives can enhance the visual appeal and flavor complexity of your Olive Cheese Melts.
Cheeses
The cheese selection is critical to achieving the right texture and flavor balance in Olive Cheese Melts. Cream cheese serves as the creamy base, providing a smooth consistency that binds the ingredients together. Its mild flavor allows the other components to shine without overwhelming the palate.
Mozzarella is another key player in this dish, known for its exceptional meltability. When heated, it becomes stretchy and gooey, creating that satisfying cheese pull that everyone loves. Finally, a sprinkle of Parmesan cheese adds a sharp, nutty flavor that contrasts beautifully with the creaminess of the other cheeses.
These cheese selections not only enhance the flavor but also contribute essential nutrients like calcium and protein.
Herbs and Spices
To elevate the flavor profile of your Olive Cheese Melts, herbs and spices play a vital role. Dried oregano adds an earthy note that complements the olives, while garlic powder introduces a savory depth. For those who enjoy a bit of heat, red pepper flakes can be added to the mixture for a subtle kick.
Herbs and spices not only enhance flavor but also offer various health benefits, such as anti-inflammatory properties and antioxidants. Adjusting the amounts of these ingredients allows you to customize the dish to suit your taste preferences.
Ingredient Substitutions
Cooking should be accessible to everyone, and that includes accommodating dietary preferences. For those following a vegan lifestyle, consider using vegan cream cheese and dairy-free mozzarella alternatives. These substitutes maintain the creamy texture while ensuring that everyone can enjoy this delicious appetizer.
For lactose-intolerant individuals, lactose-free cheese products are widely available and can be used in place of traditional cheeses without sacrificing flavor or texture. Additionally, if you prefer a gluten-free option, simply swap out regular bread for a gluten-free variety, allowing everyone at the table to indulge in Olive Cheese Melts.
Step-by-Step Preparation
Now that you have a solid understanding of the ingredients, let’s dive into the step-by-step preparation of Olive Cheese Melts. This detailed guide will ensure that your appetizer turns out perfectly every time.
Step 1: Preheating the Oven
The first step in preparing Olive Cheese Melts is to preheat your oven. Preheating is crucial for achieving that perfect golden-brown crust and ensuring the cheeses melt evenly. Set your oven to 375°F (190°C) and allow it to heat up while you prepare the other ingredients. This step saves time and helps you achieve the best texture for your cheese melts.
Step 2: Preparing the Olive Mixture
While the oven is preheating, it’s time to prepare the olive mixture that will serve as the flavorful base for your melts. Start by finely chopping a mixture of green and black olives, depending on your taste preferences. Aim for a coarsely chopped texture to ensure that the olives maintain some bite and texture in the final dish.
In a mixing bowl, combine the chopped olives with softened cream cheese, shredded mozzarella, and grated Parmesan. Use a spatula or a fork to blend the ingredients together until you achieve a creamy consistency. Make sure the olives are evenly distributed throughout the mixture, ensuring that every bite is packed with flavor.
Step 3: Preparing the Bread
Choosing the right bread is essential for the success of Olive Cheese Melts. A sturdy bread, such as a baguette or a sourdough loaf, works best as it can hold the weight of the olive and cheese mixture without becoming soggy.
Slice the bread into thick pieces, about 1-inch thick, for optimal texture. If you prefer bite-sized pieces, you can cut the bread into smaller squares or rounds. Arrange the bread slices on a baking sheet lined with parchment paper for easy cleanup and even baking.
Step 4: Spreading the Mixture
With the olive mixture prepared and the bread sliced, it’s time to assemble your Olive Cheese Melts. Using a spoon or spatula, generously spread the olive and cheese mixture onto each slice of bread. Make sure to spread the mixture evenly, covering the entire surface to maximize flavor in every bite.
For an added touch, consider sprinkling some extra grated Parmesan on top of the melted mixture before placing it in the oven. This creates a deliciously crispy topping that adds texture and flavor.
As you prepare your Olive Cheese Melts, remember to keep the presentation in mind. Arranging the bread slices on the baking sheet with some space in between allows for even heating and ensures that each piece gets that perfect golden-brown finish.
With these initial steps complete, you’re well on your way to creating a delicious appetizer that’s sure to be a hit at your next gathering. The combination of flavors and textures will have everyone coming back for more, making Olive Cheese Melts a must-have addition to your culinary repertoire. Stay tuned for the next steps in the preparation process, where we’ll guide you through baking and serving these delightful bites.
Baking Process
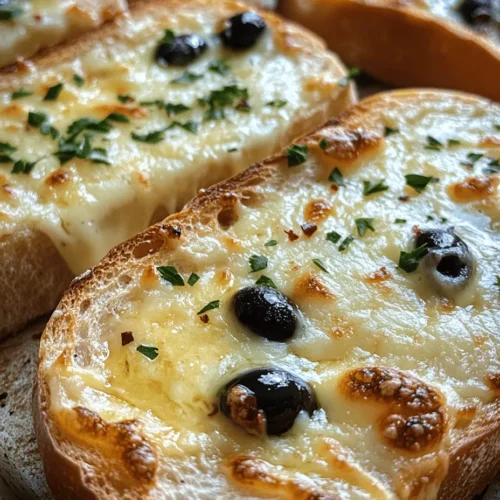
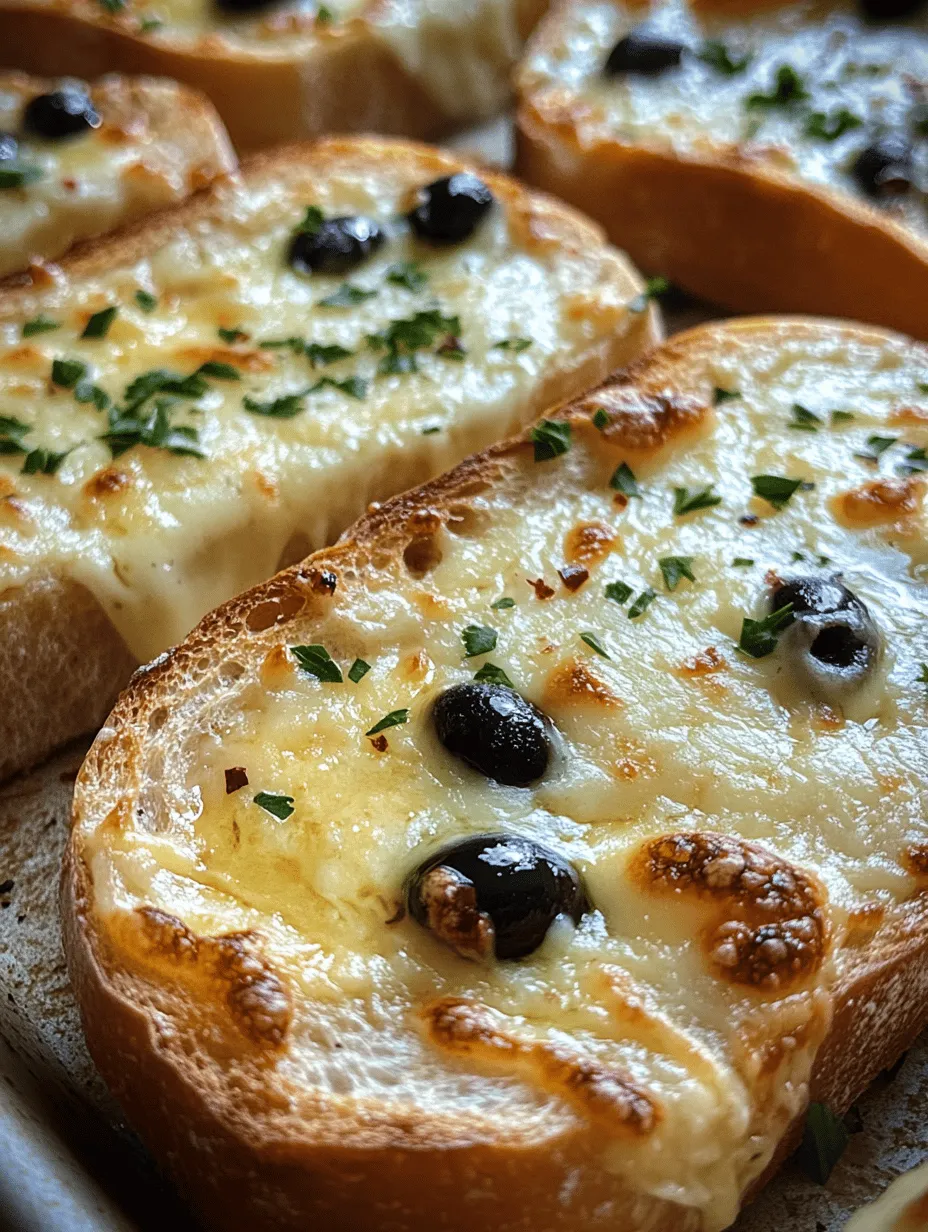
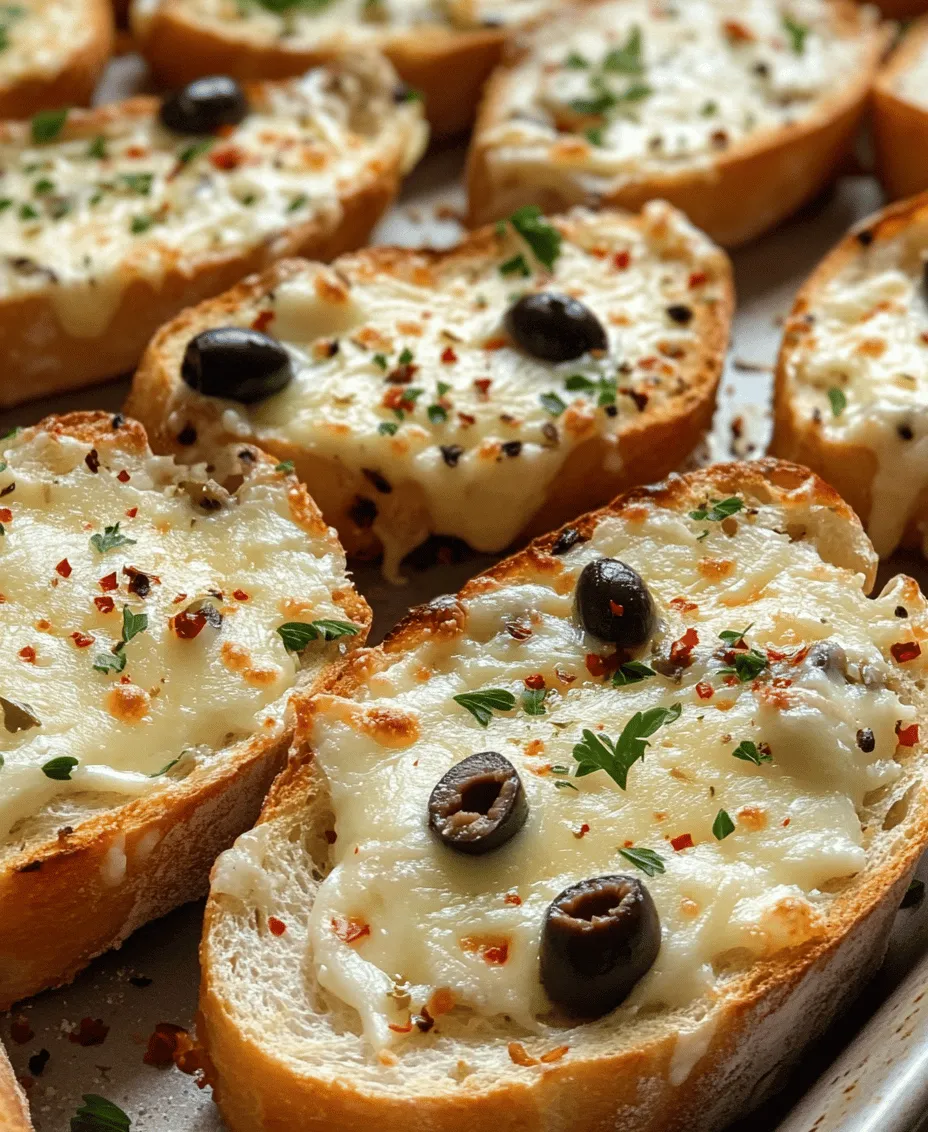
Baking your Olive Cheese Melts to perfection is crucial for achieving a delightful blend of flavors and textures. Preheat your oven to 375°F (190°C), which is the optimal temperature for ensuring even cooking. Once your Olive Cheese Melts are assembled and placed on a baking sheet lined with parchment paper, they should bake for about 15 to 20 minutes. Keep an eye on them during the last few minutes of baking: you’re looking for a golden-brown crust and bubbling cheese.
The key signs to watch for include:
– Golden Color: The edges of the bread should turn a light golden brown. This indicates that the bread is toasted and the cheese is melting beautifully.
– Bubbling Cheese: A sure sign that your Olive Cheese Melts are ready is when the cheese begins to bubble and ooze over the edges. This not only adds to the visual appeal but also enhances the flavor profile.
– Crisp Texture: If you hear a slight crunch when you touch the outer edges, your Olive Cheese Melts are perfectly baked.
Once they are done, remove them from the oven and let them cool for a few minutes. This short cooling period will make it easier to handle them and will allow the cheese to set slightly, preventing it from sliding off when served.
Garnishing
To elevate the presentation and flavor of your Olive Cheese Melts, garnishing is essential. Fresh parsley, finely chopped, adds a pop of color and a hint of freshness to the dish. Simply sprinkle the parsley over the top of your Olive Cheese Melts just before serving. Not only does this enhance the visual appeal, but it also adds a subtle herbal note that complements the rich flavors of the olives and cheese.
For an extra layer of flavor, consider adding a sprinkle of red pepper flakes for a bit of heat or a drizzle of balsamic glaze for a touch of sweetness. Remember, garnishing is all about creativity, so feel free to experiment to suit your taste!
Flavor Pairings and Serving Suggestions
When it comes to serving Olive Cheese Melts, think of them as a versatile appetizer that can stand alone or complement a variety of dishes. Here are some popular suggestions:
– Dips: Serve your Olive Cheese Melts alongside creamy dips like tzatziki, hummus, or a zesty marinara sauce. These dips can add a refreshing contrast to the rich and savory flavors of the melts.
– Charcuterie Boards: For a more elaborate presentation, include the Olive Cheese Melts on a charcuterie board. Pair them with cured meats, assorted cheeses, olives, nuts, and fresh fruits. This combination not only enhances the flavor experience but also creates an inviting spread for gatherings.
– Salads: A fresh green salad with a tangy vinaigrette can provide a crunchy and refreshing counterpoint to the warm and cheesy melts. Consider a simple arugula salad with lemon dressing or a Mediterranean salad with cucumbers and tomatoes.
Beverage Pairings
The right beverage can elevate your Olive Cheese Melts to new heights. Here are some excellent pairing ideas:
– Wines: A crisp white wine like Sauvignon Blanc or a light-bodied red wine such as Pinot Noir pairs beautifully with the flavors of the olives and cheese. If you prefer something sparkling, a dry Prosecco can also enhance the overall tasting experience.
– Cocktails: For a refreshing option, consider a gin and tonic with fresh herbs, which will complement the herbal notes of the parsley garnish. Alternatively, a light aperitif cocktail, like a spritz, can balance the richness of the melts.
Experimenting with different beverages can lead to delightful discoveries, so don’t hesitate to try various combinations to find your favorite match!
Nutritional Information
Understanding the nutritional profile of your Olive Cheese Melts can help you enjoy them mindfully. Here’s a general breakdown per serving (assuming 2 melts):
– Calories: Approximately 250-300 calories
– Fats: 15-20 grams (depending on the cheese used)
– Proteins: 10-12 grams
– Carbohydrates: 20-25 grams
Olives are a remarkable addition to this recipe due to their health benefits. They are rich in monounsaturated fats, which are heart-healthy, and they contain antioxidants that can help reduce inflammation. Cheese, while higher in calories, provides protein and calcium, making it a valuable part of a balanced diet.
Culinary Tips and Tricks
To make the most of your Olive Cheese Melts, consider these culinary tips:
– Customization: Feel free to add sun-dried tomatoes, roasted red peppers, or different herbs like oregano or thyme to the cheese mixture. These additions can create unique flavor profiles that cater to your personal preferences.
– Storage: If you have leftovers, store them in an airtight container in the refrigerator for up to three days. To reheat, place them in a preheated oven at 350°F (175°C) for about 10 minutes to maintain their crispy texture.
– Common Issues: If you find that your cheese is burning on the edges, try covering the melts loosely with aluminum foil during the last few minutes of baking. This will help the cheese melt evenly while protecting it from direct heat.
Conclusion
Preparing and savoring Olive Cheese Melts is a delightful experience that combines simplicity with gourmet flair. The recipe’s flexibility allows you to tailor it to your tastes, whether you prefer a classic approach or wish to experiment with various ingredients.
From their rich, cheesy goodness to the savory burst of olives, these melts are sure to please a diverse range of palates, making them perfect for casual snacking or entertaining guests. Encourage your friends and family to try their hand at making these delectable treats, and watch as they fall in love with the ease and flavor of Olive Cheese Melts.
So gather your ingredients, get creative, and enjoy the delicious journey of crafting this delightful dish!