Introduction
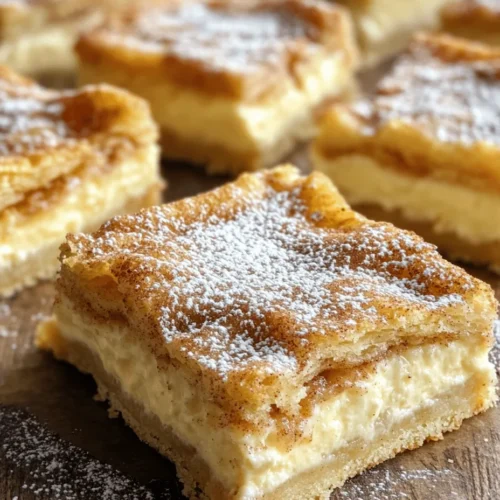
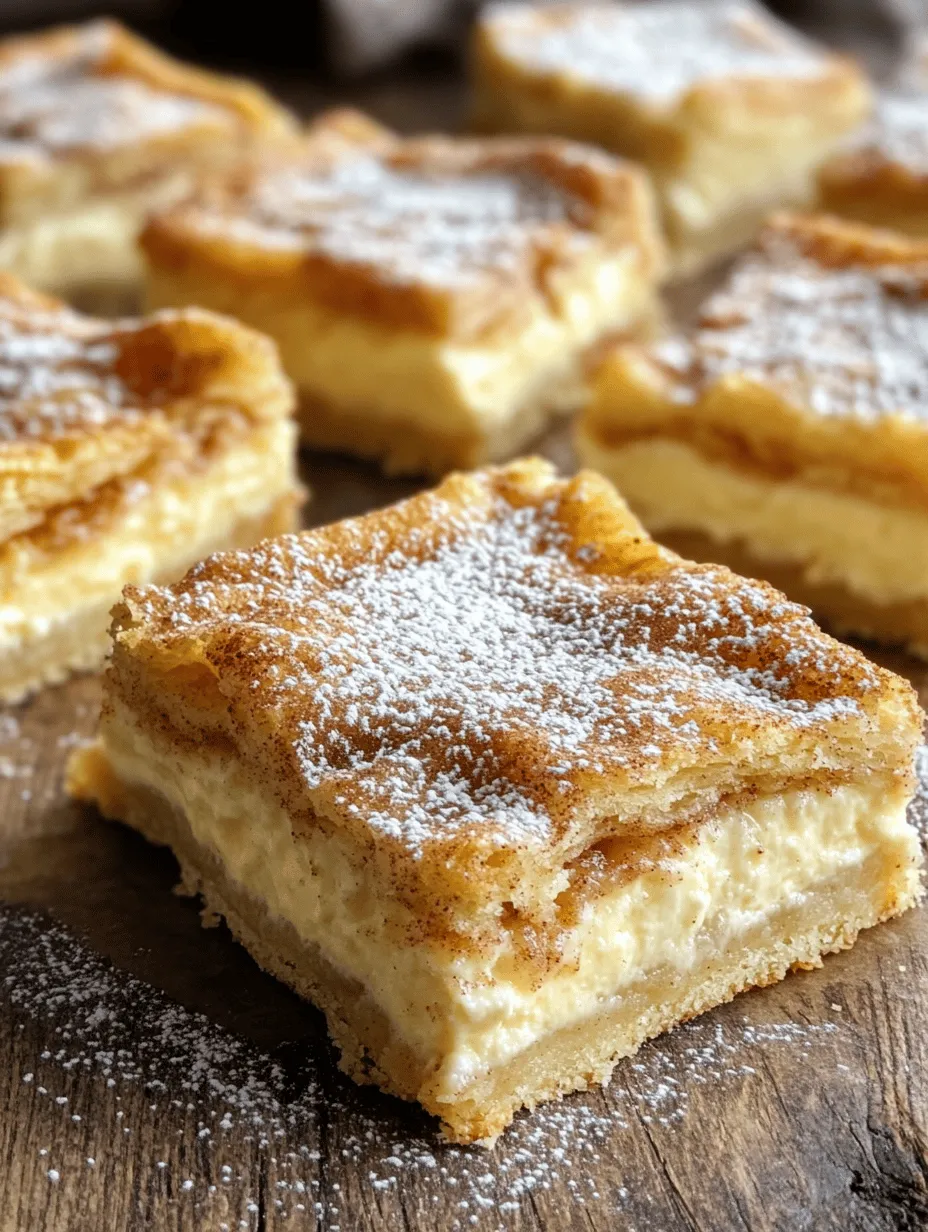
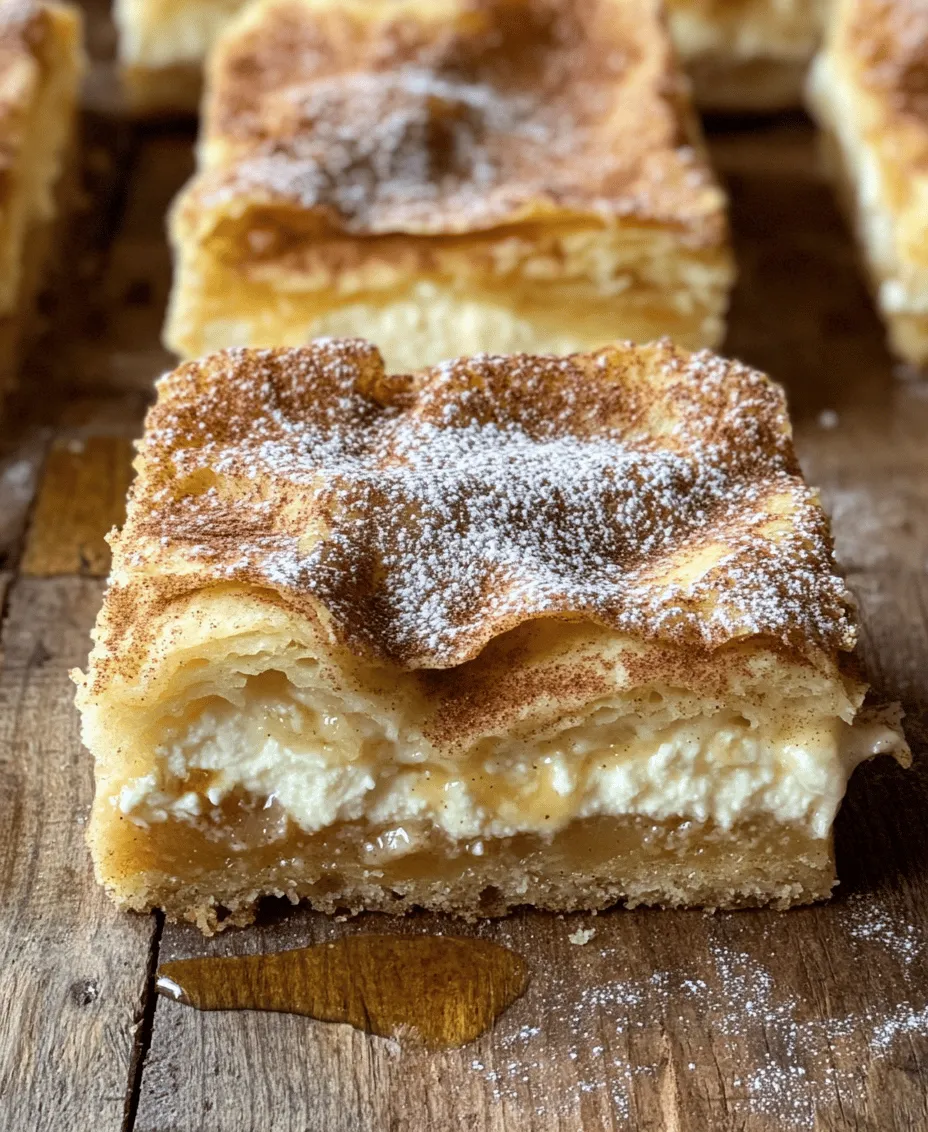
In the realm of desserts, few creations capture the essence of indulgence quite like Sopapilla Cheesecake Bars. This delightful treat is a harmonious blend of two beloved classics: the crispy, airy texture of traditional Mexican sopapillas and the smooth, rich flavor of cream cheese cheesecake. With their golden-brown crust and creamy center, these bars are not only visually appealing but also burst with flavor, making them an ideal choice for any occasion. Whether you’re hosting a festive gathering, attending a potluck, or simply satisfying a sweet tooth, Sopapilla Cheesecake Bars are sure to impress.
Originating from the vibrant culinary traditions of Mexico, sopapillas are typically deep-fried pastries served with honey. However, this innovative recipe transforms the traditional concept into a baked dessert that’s easier to prepare while retaining all the flavor and charm. The combination of flaky crescent roll dough and luscious cream cheese filling creates a texture that’s both comforting and decadent.
In this article, we will guide you through the complete preparation of Sopapilla Cheesecake Bars, from understanding the essential ingredients to the step-by-step baking process. We’ll also touch on the history behind this delightful dessert and explore various adaptations to suit different tastes. So, roll up your sleeves and get ready to dive into the sweet world of Sopapilla Cheesecake Bars!
Understanding the Ingredients
Before we embark on the journey of creating these delectable bars, it’s important to familiarize ourselves with the key ingredients that make this dessert so irresistible. Each component serves a unique purpose, contributing to the overall flavor and texture that everyone loves.
Overview of Crescent Roll Dough
Crescent roll dough is the star of the show when it comes to Sopapilla Cheesecake Bars. This pre-made dough is not only convenient but also offers a flaky and buttery texture that serves as the perfect base for the bars. When baked, the dough puffs up beautifully, creating a light and airy crust that contrasts wonderfully with the creamy filling. You can find crescent roll dough in the refrigerated section of most grocery stores, making it an accessible choice for home bakers.
The Role of Cream Cheese in the Recipe
Cream cheese is another essential ingredient that adds richness and creaminess to the Sopapilla Cheesecake Bars. It provides that signature cheesecake flavor and texture, making each bite smooth and satisfying. When blended with sugar and vanilla, cream cheese transforms into a luscious filling that perfectly complements the flaky crust. For the best results, ensure your cream cheese is at room temperature before mixing, as this will help achieve a smooth consistency without lumps.
Sweetness and Flavor: The Importance of Granulated Sugar
Granulated sugar is the sweet backbone of this recipe. It not only enhances the flavor of the cream cheese filling but also contributes to the overall sweetness of the bars. Additionally, sugar plays a crucial role in the texture, helping to create that desirable creamy consistency in the filling while also caramelizing slightly during baking, which adds to the dessert’s golden appearance. For those who prefer a less sweet option, you can adjust the sugar levels to your liking, but be aware that this may alter the final taste experience.
The Harmony of Vanilla Extract and Cinnamon
Vanilla extract and cinnamon are two key flavor enhancers that elevate the taste of Sopapilla Cheesecake Bars. Vanilla adds a warm, aromatic quality that complements the richness of the cream cheese, while cinnamon introduces a hint of spice that mirrors the flavors found in traditional sopapillas. Together, they create a harmonious balance that makes the bars truly irresistible. Using pure vanilla extract is recommended for the best flavor, while ground cinnamon can be added to both the filling and the buttery drizzle for an extra flavor punch.
The Function of Butter in Baking
Butter is a quintessential ingredient in many baking recipes, and Sopapilla Cheesecake Bars are no exception. In this recipe, melted butter is used to create a delicious cinnamon drizzle that enhances the overall flavor and adds a glossy finish to the bars. Moreover, butter contributes to the richness of the filling, helping to create that decadent mouthfeel that keeps you coming back for more. Ensure that your butter is unsalted to maintain control over the overall seasoning in your dessert.
Preparation Steps for Sopapilla Cheesecake Bars
With a solid understanding of the ingredients, we’re ready to dive into the preparation of Sopapilla Cheesecake Bars. This section outlines the essential tools and equipment you’ll need, along with a step-by-step guide to crafting this delicious dessert.
Prepping Your Kitchen: Essential Tools and Equipment
Before you start baking, it’s important to have all your tools and equipment ready. This helps streamline the process and ensures that you don’t miss any steps. Here’s what you’ll need:
– 9×13-inch baking dish: This is the perfect size for baking and serving your bars.
– Mixing bowls: Use both large and medium-sized bowls for mixing the filling and dough layers.
– Electric mixer or whisk: An electric mixer is ideal for achieving a smooth cream cheese filling, but a whisk will also work if you prefer to mix by hand.
– Spatula: A rubber spatula is great for scraping down the sides of the bowl and smoothing out the filling.
– Measuring cups and spoons: Accurate measurements are vital to the success of your recipe.
– Parchment paper (optional): Lining your baking dish with parchment paper can make it easier to remove the bars once they’re baked.
Now that your kitchen is prepped and ready, let’s move on to the first step of making the dough layer.
Step-by-Step Guide to Making the Dough Layer
1. Preheat the Oven: Begin by preheating your oven to 350°F (175°C). Preheating is crucial for achieving an even bake and ensuring your bars rise and bake properly.
2. Prepare the Crescent Roll Dough: Open the tubes of crescent roll dough and carefully unroll them. You will need to separate the dough into two rectangular sheets. Gently press the seams together to create a solid layer without any gaps.
3. Layer the Dough in the Baking Dish: Spray your 9×13-inch baking dish with non-stick cooking spray or lightly grease it with butter. Place one sheet of the crescent roll dough in the bottom of the dish, pressing it down evenly to cover the entire surface. This will be the bottom layer of your bars.
Crafting the Cream Cheese Filling: Tips for the Perfect Texture
1. Blend the Cream Cheese: In a medium-sized mixing bowl, add your softened cream cheese. Using an electric mixer, beat the cream cheese until it’s smooth and creamy, ensuring there are no lumps.
2. Add Sugar and Vanilla: Gradually add the granulated sugar and vanilla extract to the cream cheese. Continue mixing until the ingredients are well combined and the mixture is light and fluffy.
3. Incorporate any Additional Ingredients: If desired, you can add a pinch of cinnamon to the cream cheese filling for an added layer of flavor. Mix until fully incorporated.
Assembling the Layers: How to Properly Layer the Ingredients
1. Spread the Cream Cheese Filling: Once your cream cheese mixture is ready, pour it over the first layer of crescent roll dough in the baking dish. Use a spatula to evenly spread the filling across the dough, ensuring it reaches all corners.
2. Top with the Second Layer of Dough: Carefully place the second sheet of crescent roll dough over the cream cheese filling, again pressing it gently to eliminate any air pockets. This will create a delicious sandwich of dough and filling.
Drizzling with Cinnamon Butter: Adding Flavor and Texture
1. Prepare the Cinnamon Butter: In a small bowl, melt the unsalted butter in the microwave or on the stovetop. Once melted, stir in granulated sugar and ground cinnamon until well combined.
2. Drizzle Over the Bars: Using a spoon or a small whisk, drizzle the cinnamon butter mixture evenly over the top layer of crescent roll dough. This step enhances the flavor and adds a beautiful glossy finish to your bars.
With these preparation steps completed, you’re well on your way to creating mouthwatering Sopapilla Cheesecake Bars. As we move on to the baking process, you’ll learn how to achieve that perfect golden-brown finish that makes these bars so enticing. Stay tuned for the next section, where we’ll discuss the baking time, temperature, and how to know when your bars are ready to be enjoyed!
The Importance of Cooling Time: Why Patience Pays Off
After baking your Sopapilla Cheesecake Bars, the allure of slicing into them right away can be overwhelming. However, allowing the bars to cool is a critical step that shouldn’t be rushed. Cooling helps the cheesecake filling set properly, ensuring that the bars maintain their shape when cut. If you attempt to slice into them while they are still warm, you risk a gooey mess that doesn’t display the beautiful layers you worked hard to create.
Let your bars cool at room temperature for about 30 minutes before transferring them to the refrigerator for an additional hour. This time allows the flavors to meld and the texture to become firmer, resulting in a perfectly balanced treat that’s just as pleasing to the palate as it is to the eye.
Drizzling with Honey: Enhancing Flavor and Presentation
One of the simplest ways to elevate your Sopapilla Cheesecake Bars is by drizzling them with honey. The sweet, floral notes of honey complement the creamy cheesecake and the flaky dough, adding depth to every bite. To achieve a beautiful presentation, use a squeeze bottle or a spoon to drizzle the honey over each bar just before serving.
Not only does honey enhance the flavor profile, but it also adds a glossy finish that makes the bars visually appealing. For an extra touch, consider warming the honey slightly to make it easier to drizzle and to enhance its aroma. This small detail can transform your bars from ordinary to extraordinary.
Powdered Sugar Dusting: A Finishing Touch for Presentation
No dessert is truly complete without a dusting of powdered sugar. This final flourish not only adds a touch of elegance but also a subtle sweetness that balances the flavors of the Sopapilla Cheesecake Bars.
To dust powdered sugar effectively, place a small amount in a fine mesh sieve or sifter and gently shake it over the cooled bars. The result is a beautiful, snowy finish that invites your guests to indulge. This simple step can make a significant difference in presentation, making your dessert feel more special and celebratory.
Variations and Customizations
Exploring Flavor Twists: Adding Fruits or Nuts
While the classic Sopapilla Cheesecake Bars are delightful on their own, there are countless ways to customize them to suit your taste preferences. Consider adding fresh or dried fruits such as blueberries, strawberries, or peaches to the cheesecake filling. These fruits not only add vibrant color but also a refreshing burst of flavor that contrasts beautifully with the creamy texture.
Nuts, such as pecans, almonds, or walnuts, can also be incorporated into the crust or sprinkled on top for added crunch. Toasting the nuts first will enhance their flavor and give your bars an even richer taste.
Gluten-Free Options: Alternative Doughs for Dietary Restrictions
For those following a gluten-free diet, making Sopapilla Cheesecake Bars is still possible with a few adjustments. Instead of traditional crescent dough, opt for gluten-free crescent rolls or a gluten-free pie crust. Many brands offer gluten-free options that taste just as delicious as their gluten-filled counterparts.
Additionally, be sure to check that all other ingredients, such as baking powder and vanilla extract, are gluten-free to ensure your dessert is safe for those with gluten sensitivities.
Vegan Adaptations: Substituting Ingredients for a Plant-Based Recipe
If you’re looking to make a plant-based version of Sopapilla Cheesecake Bars, there are several ingredient swaps you can make. Instead of cream cheese, use a vegan cream cheese alternative or cashew cream, which can be made by soaking cashews and blending them with a bit of lemon juice and maple syrup for sweetness.
For the dough, look for vegan crescent roll options, or make your own using plant-based butter and a suitable flour blend. By substituting ingredients thoughtfully, you can create a delicious vegan version that everyone can enjoy.
The Cultural Significance of Sopapillas
A Brief History of Sopapillas in Mexican Cuisine
Sopapillas have a rich history in Mexican cuisine, traditionally served as a fried pastry that is often enjoyed with honey or powdered sugar. Their origins can be traced back to the Spanish influence on Mexican cooking, where they became a staple dessert in various regions. Over the years, these delightful pastries have evolved into various forms, varying by region and ingredients.
The Evolution of Sopapilla Cheesecake Bars
The transformation of traditional sopapillas into Sopapilla Cheesecake Bars is a creative fusion of flavors and textures, combining the beloved elements of both desserts. This innovative take has gained popularity in modern kitchens, allowing home cooks to enjoy the essence of sopapillas with the rich, creamy indulgence of cheesecake.
The bars have become a favorite at potlucks, family gatherings, and celebrations, offering a convenient way to serve a delicious dessert while maintaining the spirit of the original sopapilla.
Why This Dessert is Popular in Various Celebrations
Sopapilla Cheesecake Bars are not just a treat; they are often a centerpiece at various celebrations. Their sweet flavor and beautiful presentation make them suitable for holidays, birthdays, and family reunions. Additionally, the ease of preparation and the ability to customize them makes them an ideal choice for gatherings where you want to impress your guests without spending hours in the kitchen.
Nutritional Information
Caloric Breakdown of Sopapilla Cheesecake Bars
When indulging in Sopapilla Cheesecake Bars, it’s important to be aware of their caloric content. On average, one bar contains approximately 200-250 calories, depending on the size and specific ingredients used. This calorie count can vary, especially if you opt for additional toppings or variations.
Understanding Portion Sizes: Enjoying Responsibly
To enjoy your Sopapilla Cheesecake Bars responsibly, consider the portion size. While they are delicious, moderation is key. A standard serving is one bar, but you can easily cut them into smaller pieces for sharing or for those who want just a taste. This way, you can enjoy the flavors without overindulging.
Healthier Ingredient Alternatives: Lowering Sugar and Fat Content
If you’re looking to make your Sopapilla Cheesecake Bars a bit healthier, consider some ingredient alternatives. You can reduce the sugar in both the crust and the filling by substituting with natural sweeteners like agave or stevia. Additionally, using low-fat or fat-free cream cheese can help lower the overall fat content without compromising taste.
Storing and Reheating Your Sopapilla Cheesecake Bars
Best Practices for Storing Leftovers
To keep your Sopapilla Cheesecake Bars fresh, store any leftovers in an airtight container in the refrigerator. They will remain delicious for up to five days, allowing you to enjoy them for a few days after baking. If you notice that the bars are becoming too soft, you can place them in a single layer on a plate, cover them with plastic wrap, and refrigerate.
How to Reheat for Optimal Taste and Texture
If you prefer your Sopapilla Cheesecake Bars warm, reheating them is simple. Preheat your oven to 350°F (175°C), place the bars on a baking sheet, and heat for about 10-15 minutes, or until warmed through. This gentle reheating method will help maintain the integrity of the cheesecake filling and the flaky crust.
Freezing Options: Enjoying Your Bars Later
For longer-term storage, you can freeze your Sopapilla Cheesecake Bars. Cut them into individual portions and wrap each piece tightly in plastic wrap before placing them in a freezer-safe container. They can be frozen for up to three months. When you’re ready to enjoy them, simply thaw in the refrigerator overnight and reheat as desired.
Conclusion
Sopapilla Cheesecake Bars are not just a dessert; they are an experience that brings together flavors and traditions in a delightful way. This recipe is not only simple to follow but also flexible, allowing for personal touches and variations that can make it your own. Whether you are enjoying these bars at a family gathering or as a personal indulgence, they are sure to leave a lasting impression.
With their rich cultural background, various adaptations, and delightful taste, it’s no wonder that Sopapilla Cheesecake Bars have become a beloved treat in many households. So gather your ingredients, follow the steps, and prepare to indulge in a dessert that celebrates both tradition and creativity. Enjoy every bite of this delicious fusion, and don’t forget to share your culinary creation with friends and family!