Introduction to Strawberry Shortcake Pudding Cups
If you’re looking for a dessert that perfectly embodies the essence of summer while also being a delightful treat year-round, look no further than Strawberry Shortcake Pudding Cups. This delectable dessert combines the fresh sweetness of ripe strawberries, the smoothness of creamy pudding, and the light, airy texture of shortcake into a single, beautifully layered dish. With its vibrant colors and delightful flavors, this dessert is not only visually appealing but also incredibly satisfying to the palate.
Strawberry Shortcake Pudding Cups are suitable for a variety of occasions. Whether you’re hosting a summer picnic, celebrating a birthday, or throwing an elegant dinner party, this dessert is sure to impress your guests. One of the best features of this recipe is its simplicity. You don’t need to be a professional baker to whip up this delightful treat. The easy preparation process allows even novice cooks to create a stunning dessert that will leave everyone asking for seconds.
Understanding the Components of Strawberry Shortcake Pudding Cups
To truly appreciate the beauty of Strawberry Shortcake Pudding Cups, it’s essential to understand the individual components that come together to create this masterpiece. Each layer plays a vital role in enhancing the overall flavor and texture of the dessert.
The Importance of Fresh Ingredients
One of the secrets to achieving a mouthwatering Strawberry Shortcake Pudding Cup lies in the quality of the ingredients used. Fresh strawberries are the star of this dessert; their vibrant color and natural sweetness elevate the dish to new heights. When selecting strawberries, look for ones that are bright red, firm to the touch, and free from blemishes. Strawberries that are in season typically offer the best flavor and juiciness, making them the perfect addition to your pudding cups.
In addition to the strawberries, the quality of dairy products, such as milk and butter, is crucial when making the pudding. Using whole milk results in a richer, creamier texture, while real butter adds depth and flavor. When you prioritize fresh ingredients, you ensure that every bite of your Strawberry Shortcake Pudding Cups bursts with flavor.
Recipe Overview
Now that we’ve established the importance of quality ingredients, let’s take a closer look at the structure of the Strawberry Shortcake Pudding Cups recipe. This dessert consists of four main components:
1. Strawberry Sauce: This layer features fresh strawberries mixed with sugar and lemon juice, creating a sweet and tangy sauce that complements the pudding and shortcake.
2. Creamy Pudding: The heart of the pudding cups, this smooth and rich layer is made from whole milk, sugar, and cornstarch, creating a luscious base for the dessert.
3. Shortcake Crust: This light and fluffy layer adds texture and a buttery flavor, balancing the sweetness of the pudding and strawberries.
4. Topping: A dollop of whipped cream or a sprinkle of crushed shortcake elevates the dessert, making it visually appealing and adding a creamy finish.
Understanding the components will set the stage for the detailed exploration of each part, ensuring your Strawberry Shortcake Pudding Cups turn out perfectly.
Crafting the Strawberry Sauce
Selecting the Right Strawberries
The first step in creating your Strawberry Shortcake Pudding Cups is to prepare the strawberry sauce. The flavor of the sauce hinges on the quality of the strawberries you choose. When selecting strawberries, look for the following characteristics:
– Ripeness: Choose strawberries that are fully ripe for the best flavor. They should be deep red, indicating they have reached their peak sweetness. Strawberries that are still green or white may lack the flavor you desire.
– Color: A vibrant red color is a good indicator of freshness and ripeness. Avoid strawberries with dull or faded colors, as they may not have developed their full flavor potential.
– Firmness: Gently squeeze the strawberries to check for firmness. They should feel solid but not overly hard. Strawberries that are too soft may be overripe and could lead to a mushy sauce.
Once you’ve selected the perfect strawberries, you’re ready to move on to the next step: making the strawberry sauce.
Step-by-Step Instructions for Making Strawberry Sauce
Creating the strawberry sauce is a straightforward process that enhances the overall flavor of your pudding cups. Follow these steps:
1. Hulling and Slicing: Start by hulling the strawberries—removing the green tops and stems—and then slice them into quarters. The size of the pieces can vary depending on your preference, but smaller pieces will integrate better into your sauce.
2. Mixing Ingredients: In a medium bowl, combine the sliced strawberries with granulated sugar and a squeeze of fresh lemon juice. The sugar will help draw out the natural juices of the strawberries while the lemon juice adds a slight tang that balances the sweetness.
3. Letting the Mixture Sit: Allow the strawberry mixture to sit for about 15 to 30 minutes. This resting time is crucial as it allows the strawberries to macerate, releasing their juices and creating a flavorful syrup. The longer you let the mixture sit, the more intense the flavor will become.
4. Stirring Occasionally: During this time, occasionally stir the mixture to ensure the sugar is fully dissolved and the strawberries are evenly coated in the syrup. The resulting sauce should be thick and syrupy, perfect for layering in your pudding cups.
With the strawberry sauce ready, you can now move on to preparing the creamy pudding, the next essential layer of your Strawberry Shortcake Pudding Cups.
Preparing the Creamy Pudding
Ingredients Breakdown
The pudding layer of the Strawberry Shortcake Pudding Cups is what gives the dessert its rich, creamy texture. Here’s a breakdown of the key ingredients you’ll need:
– Whole Milk: The primary ingredient in the pudding, whole milk contributes to the creamy consistency and rich flavor. Using whole milk instead of low-fat options ensures a velvety pudding.
– Granulated Sugar: This sweetener is necessary to balance the flavors and enhance the overall taste of the pudding. You can adjust the amount of sugar to suit your sweetness preference.
– Cornstarch: This ingredient acts as a thickening agent, transforming the milk and sugar mixture into a smooth pudding. It’s essential to cook the pudding long enough for the cornstarch to activate properly.
– Butter: Adding a bit of butter at the end of the cooking process adds a luxurious richness to the pudding, making it even more decadent.
– Vanilla Extract: For flavor, a splash of pure vanilla extract elevates the pudding, adding warmth and depth that complements the strawberries beautifully.
Cooking Process Explained
Now that you have gathered your ingredients, it’s time to cook the pudding. Follow these detailed steps for a perfectly creamy pudding layer:
1. Mixing the Dry Ingredients: In a medium saucepan, whisk together the granulated sugar and cornstarch until well combined. This step helps prevent lumps in your pudding.
2. Incorporating the Milk: Gradually add the whole milk to the dry ingredients, whisking continuously to ensure a smooth mixture. This is crucial for a lump-free pudding.
3. Heating the Mixture: Place the saucepan over medium heat and continue to whisk constantly. This step is essential as it prevents the mixture from scorching on the bottom. As you heat the mixture, it will begin to thicken.
4. Recognizing When It’s Ready: Keep stirring until the pudding starts to bubble gently and is thick enough to coat the back of a spoon. This usually takes about 5 to 10 minutes. Be patient; constant stirring is key to achieving that smooth texture.
5. Finishing Touches: Once the pudding has thickened, remove it from the heat and stir in the butter and vanilla extract. The butter will melt into the warm pudding, adding richness and flavor. Make sure to mix thoroughly until the butter is fully incorporated.
6. Cooling the Pudding: Transfer the pudding to a bowl and cover it with plastic wrap, pressing the wrap directly onto the surface of the pudding to prevent a skin from forming. Allow it to cool slightly at room temperature before refrigerating it for at least an hour. Cooling the pudding helps it to set properly, making it easier to layer in your cups.
With the creamy pudding prepared and ready to chill, the next step involves creating the light and fluffy shortcake crust that will serve as the base for your Strawberry Shortcake Pudding Cups.
—
Stay tuned for the next section, where we will guide you through the process of making the light and fluffy shortcake crust, ensuring each layer of your Strawberry Shortcake Pudding Cups is as delightful as the last.

Choosing the Right Flour
When it comes to baking, the type of flour you use can significantly affect the texture and flavor of your final product. For the shortcake crust in our Strawberry Shortcake Pudding Cups, all-purpose flour is the best choice. This versatile flour strikes a balance between protein content and gluten development, ensuring that your shortcake is tender yet sturdy enough to hold the layers of cream and strawberries.
Other flours, like cake flour, have a lower protein content and produce a softer texture, which may crumble too easily for our layered dessert. On the other hand, bread flour, with its higher protein content, can lead to a denser and chewier texture, which isn’t ideal for the light and airy nature we want for our shortcake. Therefore, sticking with all-purpose flour will yield the perfect balance needed for a delightful shortcake crust that complements the creamy pudding and fresh strawberries.
Detailed Instructions for the Shortcake Crust
Now that you understand the importance of using the right flour, let’s dive into the step-by-step instructions for creating the shortcake crust.
1. Prepare Your Ingredients: Start by measuring out 2 cups of all-purpose flour, 1 tablespoon of baking powder, 1/4 cup of granulated sugar, and 1/2 teaspoon of salt. Ensure that your butter is cold, cutting it into small cubes for easier incorporation.
2. Cutting the Butter: In a large mixing bowl, combine the dry ingredients: flour, baking powder, sugar, and salt. Using a pastry cutter or two forks, cut the cold butter into the dry mixture until it resembles coarse crumbs. The goal is to incorporate the butter without melting it; this will create a flaky texture in your crust.
3. Kneading and Shaping: Once the butter is cut in, add 3/4 cup of milk and stir until the mixture is just combined. Avoid overmixing, as this can lead to a tough texture. Turn the dough out onto a lightly floured surface and gently knead it a couple of times, just until it comes together. Shape the dough into a rectangle about 1-inch thick.
4. Cutting the Shortcakes: Use a sharp knife or a biscuit cutter to cut the dough into squares or rounds. Place the cut pieces onto a baking sheet lined with parchment paper, ensuring they are spaced apart for even baking.
5. Baking: Preheat your oven to 425°F (220°C) and bake the shortcakes for about 12-15 minutes, or until they are lightly golden on top. Allow them to cool completely before crumbling them into pieces for layering in your pudding cups.
Assembling the Pudding Cups
Now that you have your shortcake crust ready, it’s time to assemble the pudding cups to create a show-stopping dessert.
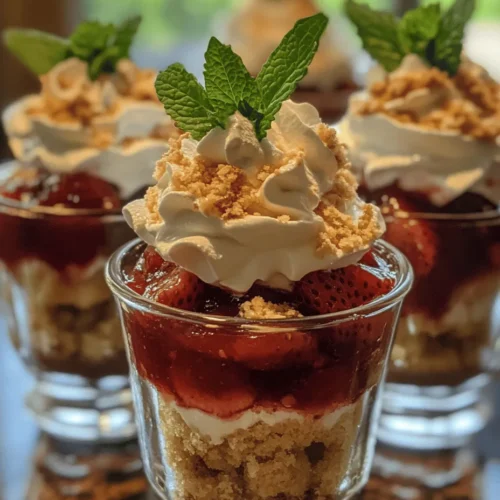
Layering Techniques for Visual Appeal
Layering is crucial for achieving a visually appealing presentation. Start by breaking the cooled shortcake into small crumbles.
1. First Layer: Begin with a layer of shortcake crumbles at the bottom of your serving cups. This layer acts as the foundation and should be thick enough to hold the pudding without collapsing.
2. Next Layer: Spoon a layer of the creamy pudding over the crumbles. Be generous; this layer is key to the dessert’s richness.
3. Strawberry Sauce: Follow with a layer of your homemade strawberry sauce, allowing its vibrant color to contrast beautifully with the white pudding.
4. Repeat: Repeat the layers until you reach the top of your serving cups, finishing with a layer of pudding or strawberry sauce for a polished look.
5. Final Touch: If desired, reserve a few crumbles of shortcake to sprinkle on top for added texture and a decorative touch.
Serving Suggestions
The choice of serving dishes can elevate your dessert’s aesthetic. Consider using clear glass cups or jars, which allow the beautiful layers to be visible and create an enticing presentation. Mason jars add a rustic charm, while elegant parfait glasses or stemless wine glasses provide a more sophisticated look.
For a more casual approach, you can use small bowls or dessert cups. The key is to choose something that complements the vibrant colors of your dessert while providing an easy way to serve.
Adding the Finishing Touches
To truly elevate your Strawberry Shortcake Pudding Cups, consider the finishing touches.
Whipped Cream Options
Whipped cream is the crowning glory of any shortcake dessert. You can choose between store-bought and homemade options. While store-bought whipped cream is convenient, making your own from scratch can add a special touch.
To make homemade whipped cream:
1. Ingredients: Use heavy whipping cream, powdered sugar, and vanilla extract. For every cup of heavy cream, add about 2 tablespoons of powdered sugar and 1 teaspoon of vanilla.
2. Whipping: In a chilled mixing bowl, beat the heavy cream with an electric mixer on medium speed until it begins to thicken. Gradually add the powdered sugar and vanilla, then continue to whip until soft peaks form. Be careful not to overwhip, or it will turn grainy.
3. Serving: Dollop a generous spoonful of whipped cream on top of each pudding cup just before serving. This not only enhances the flavor but also adds a beautiful, creamy finish.
Garnishing Ideas
Garnishing can take your dessert to the next level. Consider adding fresh mint leaves for a pop of color and a refreshing hint of flavor. Additional strawberry slices on top of the whipped cream can provide a gorgeous finishing touch, while a dusting of powdered sugar can add elegance.
You might also consider a drizzle of strawberry sauce or a sprinkle of crushed shortcake crumbs for a textural contrast. Whatever garnishes you choose, aim for a presentation that looks as delicious as it tastes.
Chilling and Serving
Importance of Chilling
Chilling your assembled pudding cups is a crucial step that should not be overlooked. Allowing the cups to chill in the refrigerator for at least 2 hours helps the flavors meld beautifully and the textures to improve. The cooling process allows the pudding to set properly, making each layer easier to scoop and enhancing the overall eating experience.
For best results, cover each cup with plastic wrap to prevent any odors from the fridge from affecting the flavor. If you can, chilling them overnight will yield even better results, allowing the flavors to fully develop.
Conclusion: The Joy of Strawberry Shortcake Pudding Cups
Creating Strawberry Shortcake Pudding Cups is not only a delightful culinary endeavor but also a rewarding experience that brings joy to any occasion. With a few simple ingredients and techniques, you can craft a layered dessert that is both visually stunning and deliciously satisfying.
The versatility of this dessert makes it ideal for summer barbecues, family gatherings, or a special treat just for yourself. Every bite offers a harmonious blend of sweet strawberries, creamy pudding, and tender shortcake that will leave you and your guests craving more.
So gather your ingredients, follow the steps outlined, and indulge in the refreshing delight of Strawberry Shortcake Pudding Cups. Enjoy every delicious bite of this homemade treat, and don’t hesitate to share this dessert with loved ones, because nothing brings people together quite like a beautifully crafted dessert.