Introduction
Soft pretzel bites have carved out a special place in the hearts of snack lovers everywhere, transcending their humble beginnings as a street food staple. Their warm, buttery goodness, combined with a slightly chewy texture, makes them an irresistible treat at sports events, family gatherings, or movie nights at home. Unlike ordinary snacks, soft pretzel bites offer a unique blend of flavors and textures that elevate any occasion. The allure of these bite-sized delights lies not only in their taste but also in their versatility; they can be paired with an array of dips, from classic mustard to rich cheese sauces, making them an ideal appetizer or snack for any palate.
What sets this recipe apart is the luxurious buttery flavor that permeates every bite, coupled with a soft, pillowy texture that is simply unmatched. Imagine pulling a warm pretzel bite apart to reveal its soft, airy interior, while the savory, slightly crispy exterior adds just the right amount of contrast. Making pretzel bites at home allows you to control every aspect of the recipe, ensuring that your snacks are not only fresh but also tailored to your taste preferences. With just a few ingredients and some patience, you can create a batch of these mouthwatering bites that will impress friends and family alike.
As we journey through this recipe, you’ll discover the joy of crafting your own pretzel bites, perfect for sharing or indulging in on a cozy night in. Whether you’re a seasoned baker or a kitchen novice, making these buttery soft pretzel bites can be a fun and rewarding experience. Let’s dive into the details and explore what makes these pretzel bites a must-try.
Understanding the Ingredients
Every great recipe begins with quality ingredients, and the best buttery soft pretzel bites are no exception. By understanding the role of each component, you can appreciate how they work together to create the perfect snack.
Warm Water
At the heart of the dough is warm water, a crucial ingredient that plays a vital role in activating the yeast. The ideal temperature for the water is between 100°F and 110°F. This warmth helps to awaken the yeast, encouraging it to start fermenting and producing carbon dioxide, which causes the dough to rise. Without the right temperature, the yeast may not activate properly, leading to dense pretzel bites instead of the light, fluffy texture we desire.
Active Dry Yeast
Active dry yeast is the star of the show when it comes to creating that airy, soft texture. This type of yeast is dried and dormant until it is mixed with warm water. As it rehydrates and activates, it begins to ferment, releasing gases that cause the dough to rise. It’s essential to use fresh yeast for the best results; expired yeast can lead to disappointing results in your baking.
Granulated Sugar
Sugar might seem like a simple ingredient, but it serves multiple purposes in this pretzel recipe. Not only does it add a touch of sweetness to balance the saltiness of the pretzels, but it also acts as food for the yeast, aiding in its activation. The sugar helps the yeast to thrive, ensuring that your dough rises beautifully and develops a delicious flavor.
All-Purpose Flour
All-purpose flour is the backbone of the dough, providing structure and stability. Its moderate protein content makes it perfect for creating a chewy texture in the pretzel bites. When combined with the other ingredients, flour helps to create the dough’s elasticity, allowing it to hold its shape during the rising and baking processes.
Kosher Salt
Salt is an essential ingredient in baking, and in this recipe, kosher salt not only enhances the flavor but also strengthens the gluten structure in the dough. This combination of flavor and texture is crucial in achieving that authentic pretzel taste. Be sure to use kosher salt, as its larger crystals dissolve more slowly, providing a delightful burst of flavor with every bite.
Unsalted Butter
Butter is what takes these pretzel bites to the next level. Using unsalted butter allows you to control the amount of salt in the recipe, ensuring a balanced flavor profile. The butter adds richness and moisture to the dough, contributing to that coveted soft texture. Brushing melted butter on the pretzel bites before serving enhances the buttery flavor and gives them a beautiful golden sheen.
Baking Soda
One of the unique steps in making pretzel bites is the boiling process, which involves baking soda. This step is what gives pretzels their characteristic flavor and texture. When the dough is boiled in a baking soda solution, it creates a slightly alkaline environment that helps to brown the pretzels during baking, resulting in that classic pretzel crust. This step also contributes to the chewy texture that makes soft pretzels so delightful.
Coarse Sea Salt
Finally, no pretzel is complete without a sprinkle of coarse sea salt. This finishing touch not only enhances the flavor but also adds a delightful crunch that contrasts beautifully with the soft interior of the pretzel bites. You can adjust the amount of salt according to your preference, but a light dusting is recommended to provide that classic pretzel experience.
Activating the Yeast: The First Step to Perfect Pretzels
The first step in creating your buttery soft pretzel bites is activating the yeast — a critical process that sets the foundation for your dough. Here’s how to do it properly:
1. Measure the Warm Water: Begin by measuring out the specified amount of warm water (typically around 1 cup) and pour it into a mixing bowl. Ensure that the temperature is between 100°F and 110°F; using a kitchen thermometer can help you achieve this accuracy.
2. Add the Sugar and Yeast: Once the water is at the right temperature, stir in the granulated sugar until it dissolves completely. Next, sprinkle the active dry yeast over the surface of the water. Allow it to sit undisturbed for about 5 to 10 minutes. During this time, the yeast will absorb the warm water and begin to activate.
3. Look for Foam: After the resting period, check the yeast mixture for a foamy texture on the surface. This frothiness is a good indication that the yeast is alive and has been activated properly. If you do not see any bubbles or foam, it’s likely that the yeast is either too old or the water temperature was incorrect. In this case, it’s best to start over with fresh yeast and properly warmed water.
4. Ready to Use: Once your yeast is activated and foamy, it’s time to proceed with the recipe. This mixture will be combined with your dry ingredients to form the dough, bringing us one step closer to those delectable pretzel bites.
Crafting the Dough: From Mixing to Kneading
Now that your yeast is activated, it’s time to bring the dough together. This process involves mixing, kneading, and ensuring that your dough reaches the perfect consistency. Here’s a step-by-step guide:
1. Combine the Dry Ingredients: In a large mixing bowl, combine the all-purpose flour and kosher salt. Mix these dry ingredients well to ensure that the salt is evenly distributed throughout the flour.
2. Mixing the Dough: Create a well in the center of the flour mixture and pour in the activated yeast mixture along with the melted unsalted butter. Using a wooden spoon or spatula, stir the ingredients together until a shaggy dough begins to form.
3. Kneading the Dough: Transfer the dough onto a lightly floured surface. Begin kneading the dough by pushing it away from you with the heels of your hands, then folding it back over itself. Repeat this motion for about 8 to 10 minutes. The goal is to develop the gluten, which gives the pretzel bites their chewy texture.
4. Checking the Dough Consistency: After kneading, your dough should be smooth and elastic. It should not be overly sticky or dry. If it feels too sticky, sprinkle a small amount of flour onto the surface and continue kneading until the consistency improves. Conversely, if the dough is too dry, you can add a little bit of water, a tablespoon at a time, until it reaches the desired texture.
5. Forming a Ball: Once you achieve the right consistency, shape the dough into a ball. This will help it retain moisture and create a more uniform rise.
The Rising Process: Letting the Dough Work Its Magic
After crafting your dough, the next crucial step is allowing it to rise. This process not only helps the dough to expand but also contributes to the pretzel bites’ texture and flavor.
1. Prepare for Rising: Lightly grease a large bowl with a bit of oil. Place your dough ball in the greased bowl, turning it once to coat it in oil. This prevents the dough from drying out as it rises.
2. Cover the Dough: Use a clean kitchen towel or plastic wrap to cover the bowl. This will create a warm, humid environment that’s ideal for the dough to rise.
3. First Rise: Allow the dough to rise in a warm place for about 1 to 1.5 hours, or until it has approximately doubled in size. An ideal spot could be near a preheating oven or in a slightly warmed oven (turned off) to maintain warmth without cooking the dough.
4. Checking the Dough: To test if the dough has risen sufficiently, gently press your finger into the dough. If the indentation remains and does not spring back, it’s ready for the next step.
By carefully following these steps, you will set the foundation for making the best buttery soft pretzel bites. With the yeast activated, dough kneaded to perfection, and rising well, you are well on your way to creating a snack that is sure to impress. Stay tuned for the next part, where we will dive into shaping the pretzel bites and preparing them for baking.
Tips on Finding the Ideal Warm Place for Dough Rising
Achieving the perfect rise for your dough is crucial in making buttery soft pretzel bites. A warm environment encourages yeast activation, leading to fluffy, airy bites. Here are several methods to find the ideal spot for your dough:
1. Oven Method: Preheat your oven to the lowest setting (typically around 200°F or 93°C), then turn it off. Place your bowl of dough inside, leaving the oven door slightly ajar. This provides a gentle warmth without cooking the dough.
2. Sunny Spot: If it’s a warm, sunny day, consider placing your dough near a window where sunlight can warm the area. Make sure it’s not too hot, as excessive heat can kill the yeast.
3. Heating Pad: For consistent warmth, use a heating pad set on low. Place the pad on a stable surface and then set your dough bowl on top, ensuring the dough remains cozy.
4. Microwave Trick: Fill a microwave-safe cup with hot water and place it in the microwave alongside your covered bowl of dough. The steam will create a warm environment conducive to rising.
Signs That the Dough Has Adequately Risen
Knowing when your dough is perfectly risen is essential for achieving the right texture. Here are the signs to look for:
– Size Increase: The dough should have doubled in size. This usually takes about 1 to 1.5 hours, depending on the warmth of the environment and the yeast activity.
– Poke Test: Gently poke the dough with your finger. If the indentation remains and doesn’t spring back, your dough has risen sufficiently.
– Smooth Surface: The dough should appear smooth and slightly puffy, indicating that air bubbles have formed and expanded within.
Creating the Pretzel Shape: Techniques for Perfect Bites
Shaping your dough into uniform pretzel bites is a vital step in creating a visually appealing and evenly cooked snack. Here’s how to do it:
1. Divide the Dough: After your dough has risen, punch it down gently to release excess air. Transfer the dough to a lightly floured surface and divide it into 8 equal pieces for larger bites or 16 pieces for smaller, snack-sized bites.
2. Roll into Strips: Take one piece of dough and roll it into a log shape about 1 inch thick. You can use your hands to gently stretch the dough while rolling to create a uniform shape.
3. Cut to Size: Once you have the log, cut it into bite-sized pieces—about 1 to 1.5 inches long. This ensures that all pretzel bites will cook evenly.
4. Shaping: For a more traditional pretzel shape, take each piece and roll it into a longer rope, then twist it into a classic pretzel knot. However, if you prefer simplicity, leave them as bite-sized logs.
5. Visualizing the Process: Imagine rolling a snake out of play dough, ensuring it’s uniform throughout. This technique helps keep the dough consistent in size, which is key to even cooking.
The Boiling Bath: A Key Step in Pretzel Making
Boiling your pretzel bites in a baking soda solution is the secret to achieving that iconic pretzel crust. Here’s why and how to do it:
Significance of Boiling
The boiling process creates the chewy exterior characteristic of pretzels. When the dough is boiled, the baking soda reacts with the dough to create a Maillard reaction, which gives pretzels their distinctive deep brown color and unique flavor.
Safety Tips
– Use Caution: Always supervise the boiling process, especially if children are present.
– Avoid Overcrowding: Boil only a few pretzel bites at a time to prevent them from sticking together and ensure even cooking.
– Protective Gear: Wear oven mitts when handling the pot and be cautious of steam when adding or removing pretzel bites.
Baking to Perfection: Achieving the Golden Brown Finish
Baking your pretzel bites to a beautiful golden brown is the final step in creating these delicious snacks. Follow these guidelines for optimal results:
1. Preheat Your Oven: Set your oven to 425°F (220°C) and allow it to fully preheat. A hot oven is crucial for achieving that perfect crust.
2. Prepare the Baking Sheet: Line your baking sheet with parchment paper to prevent sticking. This also makes cleanup easier.
3. Brush with Butter: Before baking, brush the tops of your pretzel bites with melted butter. This not only enhances flavor but also promotes browning.
4. Baking Time: Bake the pretzel bites for 12 to 15 minutes or until they are golden brown. Keep an eye on them towards the end of the baking time to prevent over-browning.
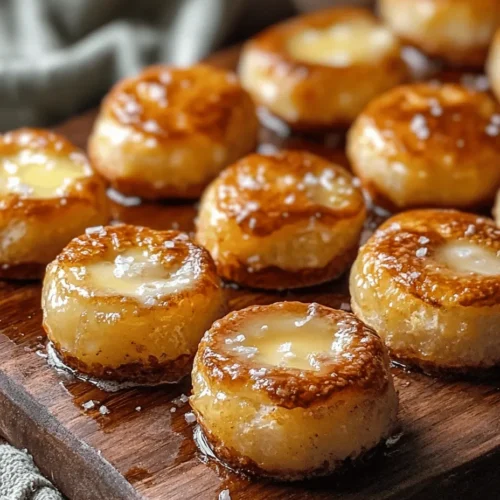
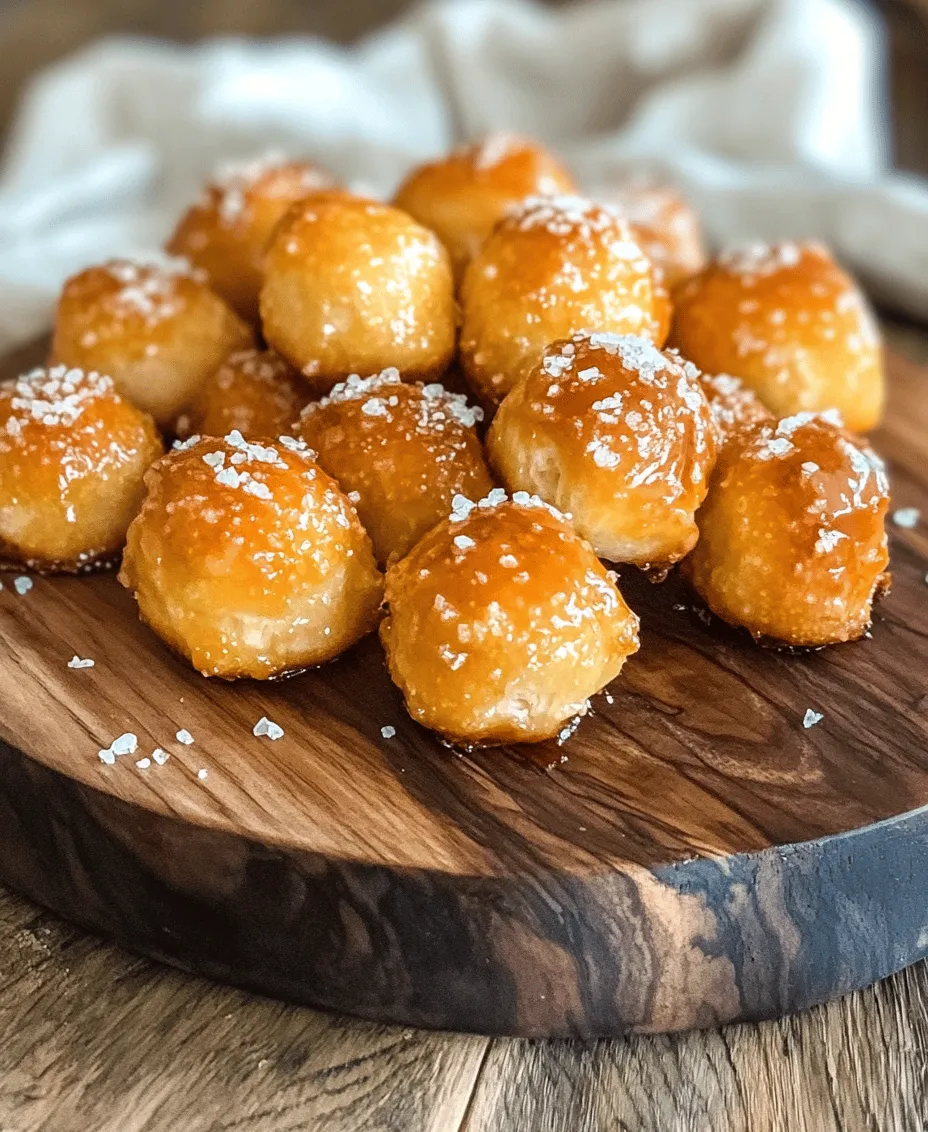
5. Color and Texture: The bites should have a rich golden color and a slightly glossy finish from the melted butter. The texture should be firm yet soft to the touch.
Serving Suggestions: Enjoying Your Buttery Soft Pretzel Bites
Buttery soft pretzel bites are incredibly versatile and can be enjoyed in various ways. Here are some delightful serving suggestions:
1. Dips and Sauces: Serve your pretzel bites with a variety of dips such as:
– Cheese Sauce: A warm, gooey cheese dip pairs perfectly with the salty flavors of pretzels.
– Mustard: Classic yellow mustard or spicy brown mustard brings a tangy kick.
– Honey Mustard: A sweet and tangy combination that complements the buttery flavor.
2. Pairings: These pretzel bites make a great addition to:
– Game Day Snacks: Perfect for parties when you need finger foods.
– Movie Nights: Enjoy them while binge-watching your favorite series.
– Casual Gatherings: Serve them at barbecues or picnics for a crowd-pleasing treat.
Nutritional Information
While buttery soft pretzel bites are a delicious treat, it’s important to be mindful of their nutritional aspects. Here’s a brief overview:
– Calories: Each pretzel bite contains roughly 80-100 calories, depending on size and the amount of butter used.
– Carbohydrates: They are primarily made up of carbs, making them a great source of quick energy.
– Dietary Considerations: If you are watching your sodium intake, be mindful of the salt in the dough and any toppings. You can adjust the salt levels to meet dietary needs.
Conclusion
Making buttery soft pretzel bites is not only a rewarding culinary experience, but it also creates an opportunity to share delicious memories with family and friends. As you knead the dough, shape the bites, and watch them rise, you’ll find joy in the process and the aroma that fills your kitchen.
Encourage your friends and family to join in on the fun and try making this recipe together. Each bite is a testament to the comforting nature of homemade snacks, reminding us of gatherings, laughter, and shared moments around the table. So, roll up your sleeves, embrace the process, and enjoy the delightful flavor of your freshly baked pretzel bites.