Introduction
When it comes to desserts, few things are as universally adored as chocolate. Its rich, velvety texture and deep, indulgent flavor have made it a staple in kitchens around the world. Among the myriad of chocolate desserts, cakes reign supreme, offering both a comforting and celebratory element to any occasion. Today, we invite you to discover a show-stopping dessert that combines the best of chocolate with the delightful crunch of candy. Introducing the Best Chocolate Snickers Cake—a decadent treat that will tantalize your taste buds and leave your guests clamoring for seconds.
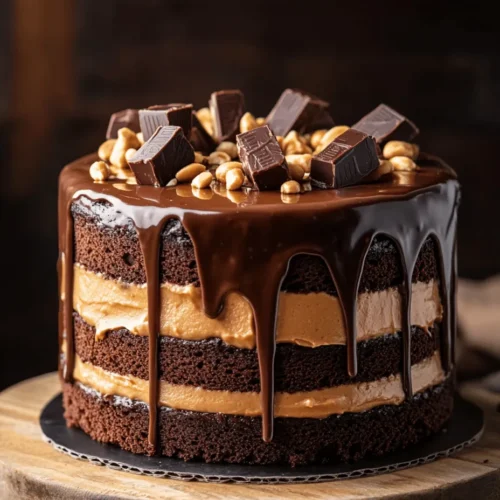
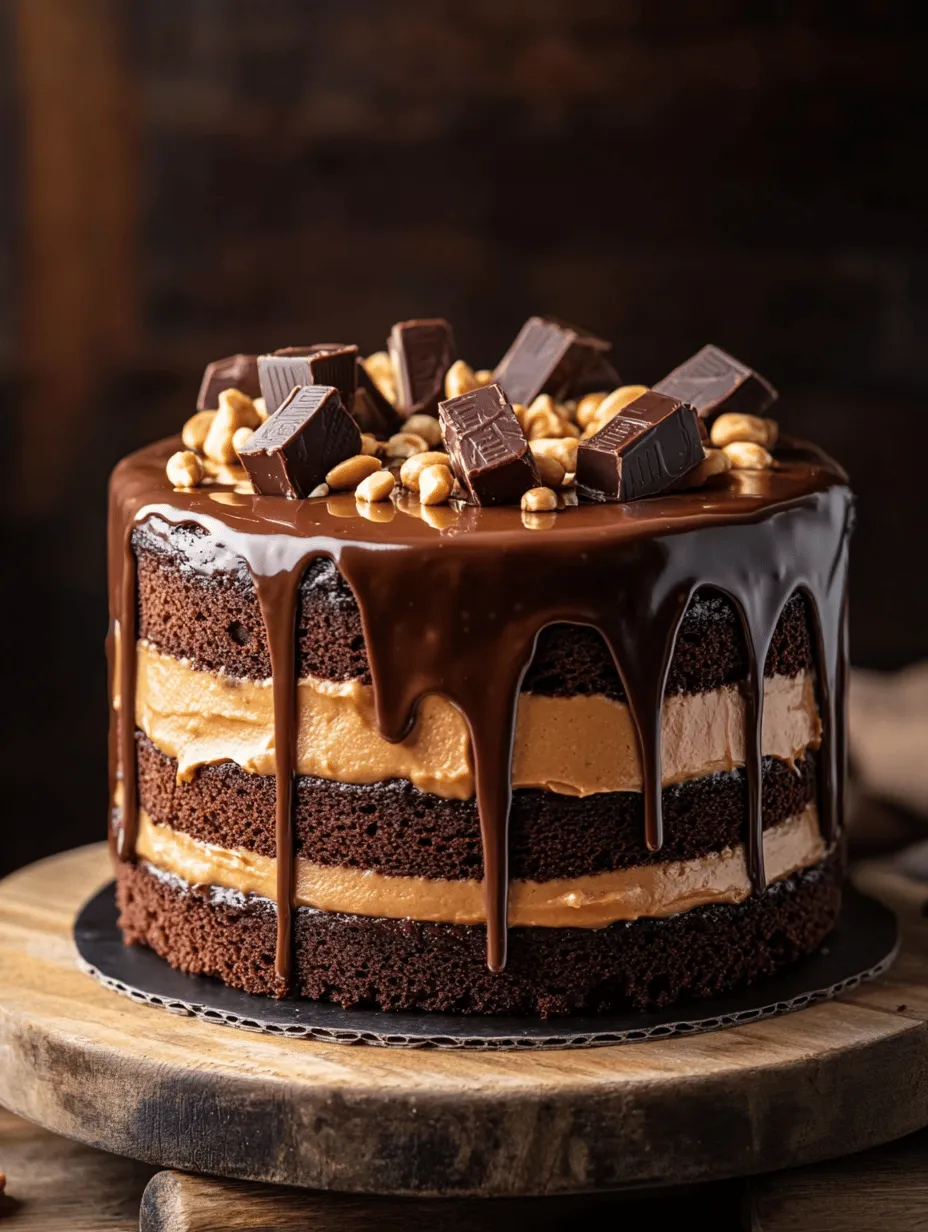
Imagine a luscious chocolate cake layered with a creamy, caramel peanut filling and topped with a silky chocolate ganache. The magic of this cake lies in the perfect blend of flavors and textures. The subtle bitterness of unsweetened cocoa powder harmonizes beautifully with the sweet, gooey caramel and the creamy, nutty essence of peanut butter. The addition of Snickers bars provides delightful chunks of nougat and peanuts, elevating the cake to new heights of deliciousness. Whether it’s a birthday celebration, an anniversary, or simply a gathering with friends, this Chocolate Snickers Cake is the ultimate indulgence that promises to impress.
In this article, we will delve deeper into the ingredients that make this cake a masterpiece and guide you through each step of the baking process. With careful attention to detail, you’ll learn how to create this stunning dessert that is perfect for any special occasion.
Understanding the Ingredients
The Chocolate Cake Base
The foundation of our Chocolate Snickers Cake is, of course, the chocolate cake itself. It’s essential to choose the right ingredients to ensure a rich and moist cake that will hold up well under the weight of the fillings and frosting.
Unsweetened Cocoa Powder: This is a crucial ingredient that contributes to the cake’s depth of flavor. Unlike sweetened cocoa, unsweetened cocoa powder is rich in chocolate flavor and provides the cake with a dark, intense taste. It also helps create a beautiful, deep color, making the cake visually appealing. When selecting cocoa powder, look for high-quality brands for the best results.
Vegetable Oil: The use of vegetable oil in this recipe is intentional and important. Unlike butter, which can solidify when cold, oil remains liquid, ensuring that the cake stays moist and tender. The fat in vegetable oil also helps create a lighter texture, making it the perfect choice for this chocolate cake.
The Caramel Peanut Filling
Once you’ve baked the chocolate cake, it’s time to prepare the star of the show—the caramel peanut filling. This layer is where we introduce a delightful combination of flavors that will take your cake to the next level.
Creamy Peanut Butter: This ingredient is essential for adding richness and a luscious mouthfeel to the filling. Creamy peanut butter not only provides a smooth texture but also balances the sweetness of the caramel sauce. While chunky peanut butter can be used for added texture, creamy peanut butter ensures that the filling is easy to spread and incorporate into the cake layers.
Caramel Sauce: The sweet, gooey caramel sauce brings a delightful contrast to the cake. It’s important to strike a balance between sweet and salty, which is where the addition of peanuts comes into play. The caramel sauce can be homemade or store-bought, depending on your time constraints and culinary confidence.
Salted Peanuts: Adding a sprinkle of salted peanuts to the filling enhances the overall flavor profile of the cake. The saltiness of the peanuts cuts through the sweetness of the caramel and adds a satisfying crunch that complements the soft cake layers.
The Chocolate Ganache
No chocolate cake would be complete without a rich chocolate ganache to top it off. This glossy, luxurious layer not only adds flavor but also creates a stunning visual element.
High-Quality Semisweet Chocolate: The choice of chocolate is paramount. Opt for high-quality semisweet chocolate that melts smoothly and has a rich flavor. This will ensure that your ganache is not only delicious but also provides a beautiful sheen when poured over the cake.
Heavy Cream and Butter: The combination of heavy cream and butter is what gives ganache its silky texture. The heavy cream must be heated gently before mixing it with the chocolate to create a smooth, luscious mixture. The addition of butter also enhances the richness of the ganache and contributes to its glossy finish.
Step-by-Step Instructions for the Chocolate Snickers Cake
Now that we understand the key ingredients that make up this Chocolate Snickers Cake, let’s dive into the preparation. Follow these detailed instructions to create a cake that is as stunning as it is delicious.
Preparing the Chocolate Cake
1. Preheat the Oven: Begin by preheating your oven to 350°F (175°C). This ensures that the cake bakes evenly and rises properly.
2. Prepare the Cake Pans: Grease and flour two 9-inch round cake pans. This step is crucial to prevent the cake from sticking, allowing for easy removal once baked. Alternatively, you can line the bottoms with parchment paper for added assurance.
3. Mix the Dry Ingredients: In a large mixing bowl, sift together 1 ¾ cups all-purpose flour, 1 ¾ cups granulated sugar, ¾ cup unsweetened cocoa powder, 1 ½ teaspoons baking powder, 1 ½ teaspoons baking soda, and 1 teaspoon salt. Sifting helps eliminate lumps and incorporates air, leading to a lighter cake.
4. Combine Wet Ingredients: In a separate bowl, whisk together 2 large eggs, 1 cup whole milk, ½ cup vegetable oil, and 2 teaspoons pure vanilla extract. These wet ingredients contribute to the cake’s moisture and flavor.
5. Combine Dry and Wet Ingredients: Gradually add the wet ingredients to the dry ingredients, mixing until just combined. Be careful not to overmix, as this can lead to a dense cake.
6. Add Boiling Water: The final step in creating the batter involves adding 1 cup of boiling water to the mixture. This might seem unusual, but boiling water helps to activate the cocoa powder, resulting in a thin batter that yields a moist cake. Mix until fully combined; the batter will be thin, but this is expected.
7. Bake the Cake: Divide the batter evenly between the prepared cake pans. Bake in the preheated oven for 30-35 minutes, or until a toothpick inserted in the center comes out clean. Once baked, allow the cakes to cool in the pans for about 10 minutes before transferring them to a wire rack to cool completely.
Creating the Caramel Peanut Filling
1. Mix the Filling Ingredients: In a medium bowl, combine 1 cup creamy peanut butter with 1 cup caramel sauce. If you’re using homemade caramel sauce, ensure it’s at a spreadable consistency. Mix until smooth and well combined.
2. Add Salted Peanuts: Fold in 1 cup of roughly chopped salted peanuts into the peanut butter and caramel mixture. The peanuts will add a satisfying crunch that complements the creamy filling.
3. Layer the Filling: Once the chocolate cakes have completely cooled, place one layer on a serving plate. Spread half of the caramel peanut filling evenly over the first layer, ensuring it reaches the edges for a beautiful presentation. Top with the second layer of chocolate cake and repeat the process with the remaining filling.
Preparing the Chocolate Ganache
1. Heat the Heavy Cream: In a small saucepan, heat 1 cup of heavy cream over medium heat until it just begins to simmer. Be careful not to let it boil, as this can affect the texture of the ganache.
2. Melt the Chocolate: Place 8 ounces of high-quality semisweet chocolate in a mixing bowl. Once the cream is hot, pour it over the chocolate and let it sit for a few minutes to allow the chocolate to melt.
3. Whisk Until Smooth: After a few minutes, use a whisk to stir the mixture until it’s completely smooth and glossy. If using, add 2 tablespoons of unsalted butter to the ganache for an extra touch of richness.
4. Cool the Ganache Slightly: Allow the ganache to cool for about 10-15 minutes before pouring it over the assembled cake. This will ensure that it doesn’t run off too quickly and allows for a beautiful finish.
Now you have all the components ready to assemble your Chocolate Snickers Cake! In the next part of this article, we will discuss how to finalize your cake with the ganache and additional finishing touches that will make it a true showstopper. Stay tuned for the delicious conclusion!

Tips for Achieving a Glossy Finish with Ganache
To create a stunningly glossy finish on your chocolate ganache, it’s essential to use high-quality ingredients and follow specific techniques. First, ensure that your heavy cream is fresh, as this will contribute to the smooth texture of your ganache. When heating the cream, do so gently until it just begins to simmer, but avoid boiling it. This helps maintain the emulsion when combined with chocolate.
Once you pour the hot cream over the chopped chocolate, let it sit for a minute before stirring. This resting time allows the chocolate to soften, making it easier to blend into a smooth mixture. Use a whisk or a spatula to mix gently, ensuring all the chocolate is melted and incorporated. If you desire an extra glossy finish, add a tablespoon of unsalted butter to the ganache after it has cooled slightly, and mix until fully combined. This will enhance the sheen and provide a luxurious mouthfeel.
Assembling the Cake
Creating the perfect Chocolate Snickers Cake isn’t just about baking; it’s also about assembling it correctly. Here’s a step-by-step guide to layering your cake for optimal flavor and presentation.
Step-by-Step Guide to Layering the Cake
1. Cool the Cake Layers Completely: Before you begin assembling, it’s crucial to allow your cake layers to cool completely on a wire rack. If you attempt to layer them while warm, the heat may cause the filling and ganache to melt, leading to a messy assembly.
2. Level the Cakes: Once cool, use a serrated knife to level the tops of your cake layers if they domed during baking. This step ensures that your layers stack evenly and your cake stands tall without wobbling.
3. Spread the Filling Evenly: Place the first cake layer on a serving platter or cake board. Using an offset spatula, spread a generous layer of your Snickers filling evenly across the top. Be careful not to overload; just enough to create a nice layer that complements the chocolate without spilling over the edges.
4. Layering: Continue stacking your cake layers, repeating the process of spreading the Snickers filling between each layer. For a cake with three layers, you should have the filling spread between each of the first two layers, leaving the top layer for your chocolate ganache.
Pouring and Drizzling the Chocolate Ganache
Once your layers are assembled, it’s time to add the finishing touch with the ganache.
1. Pouring the Ganache: Begin by pouring the cooled ganache over the center of the top cake layer. Allow it to flow naturally toward the edges. You can use a spatula to help guide the ganache if it needs a little encouragement.
2. Achieving a Beautiful Finish: To achieve that perfect drip effect around the edges, pour slightly more ganache than you need so that it can drip down the sides. You can also use a spoon to coax the ganache over the edges if necessary.
The Impact of Presentation on the Overall Dessert Experience
Presentation plays a critical role in enhancing the overall dessert experience. A well-presented cake not only looks inviting but also sets the tone for the indulgent treat that awaits. Take time to ensure that the ganache is evenly distributed, and consider smoothing out any imperfections with a spatula.
Garnishing Your Cake
Garnishing your Chocolate Snickers Cake elevates it from a simple dessert to a showstopper. Here are some creative ideas for adding that final touch:
1. Drizzling Additional Caramel Sauce: A drizzle of caramel sauce over the ganache not only enhances the flavor but also adds a delightful visual component. Use a squeeze bottle or a spoon to create artistic swirls.
2. Optional Garnishes: Chopped Snickers bars and crushed peanuts can provide a pleasing crunch and accentuate the cake’s flavor. Scatter these toppings over the ganache while it’s still slightly warm so they adhere well.
Suggestions for Serving the Cake
When it comes to serving, consider pairing your Chocolate Snickers Cake with whipped cream or a scoop of vanilla ice cream. The creamy textures complement the rich chocolate and caramel beautifully, providing a well-rounded dessert experience. For an elegant presentation, serve slices on chilled plates, garnished with a sprig of mint or a dusting of cocoa powder.
The Appeal of Chocolate Snickers Cake for Different Occasions
The Chocolate Snickers Cake is incredibly versatile and perfect for a variety of occasions. Whether you’re celebrating a birthday, a holiday, or simply enjoying a weekend treat, this cake is sure to impress.
1. Birthday Parties: The rich flavors and decadent textures make it a favorite among cake lovers. It’s a showstopper that will delight guests of all ages, making it an ideal birthday cake.
2. Holidays and Special Celebrations: During festive seasons, a Chocolate Snickers Cake adds a touch of indulgence to the dessert table. Its combination of chocolate and caramel resonates with many traditional holiday flavors.
3. Crowd-Pleaser at Gatherings: This cake is perfect for potlucks and family gatherings. With its impressive layers and rich flavors, it never fails to capture the attention of guests and is often the first dessert to disappear.
Reflecting on personal experiences, serving this cake at a recent gathering, I witnessed the joy it brought to my friends and family. The smiles on their faces as they took their first bites were priceless, as was the chorus of compliments that followed.
Storing and Preserving Your Chocolate Snickers Cake
To ensure that your Chocolate Snickers Cake remains fresh and delicious, proper storage is key.
1. Storing the Cake: If you have leftovers, store the cake in an airtight container at room temperature for up to three days. If your kitchen is particularly warm, consider refrigerating it. Just be aware that refrigeration can slightly alter the texture of the ganache.
2. Freezing and Thawing: To freeze the cake, wrap it tightly in plastic wrap and then in aluminum foil. This method prevents freezer burn and preserves the cake’s quality. When ready to enjoy, thaw the cake in the refrigerator overnight before serving.
3. Longevity of the Cake: The cake will generally last about a week in the fridge without toppings. However, once you add the ganache and filling, it’s best enjoyed within three to four days to maintain freshness and texture.
Conclusion
In conclusion, the Chocolate Snickers Cake is an enticing dessert that combines the rich flavors of chocolate, caramel, and crunchy peanuts, creating a delightful experience for anyone who indulges in a slice. With its impressive layers and glossy ganache finish, it’s not just a treat for the taste buds but also a feast for the eyes.
Baking and sharing this cake with loved ones brings immense joy, whether it’s for a special occasion or just a well-deserved treat. I encourage you to try out this recipe and experience the delicious results for yourself. The smiles and satisfaction that follow will make your efforts worthwhile, and it may just become a favorite in your baking repertoire. Happy baking!