Introduction
Valentine’s Day is a cherished occasion dedicated to celebrating love and affection among partners, friends, and family. As the holiday approaches, hearts flutter with excitement, and the search for the perfect way to express feelings intensifies. One of the most heartfelt gestures is to bake something special, a tradition that transcends generations. Baking can evoke nostalgia, warmth, and a sense of togetherness, making it an ideal way to celebrate this romantic day.
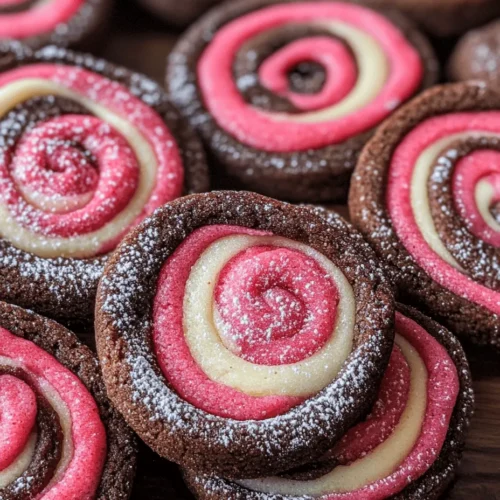
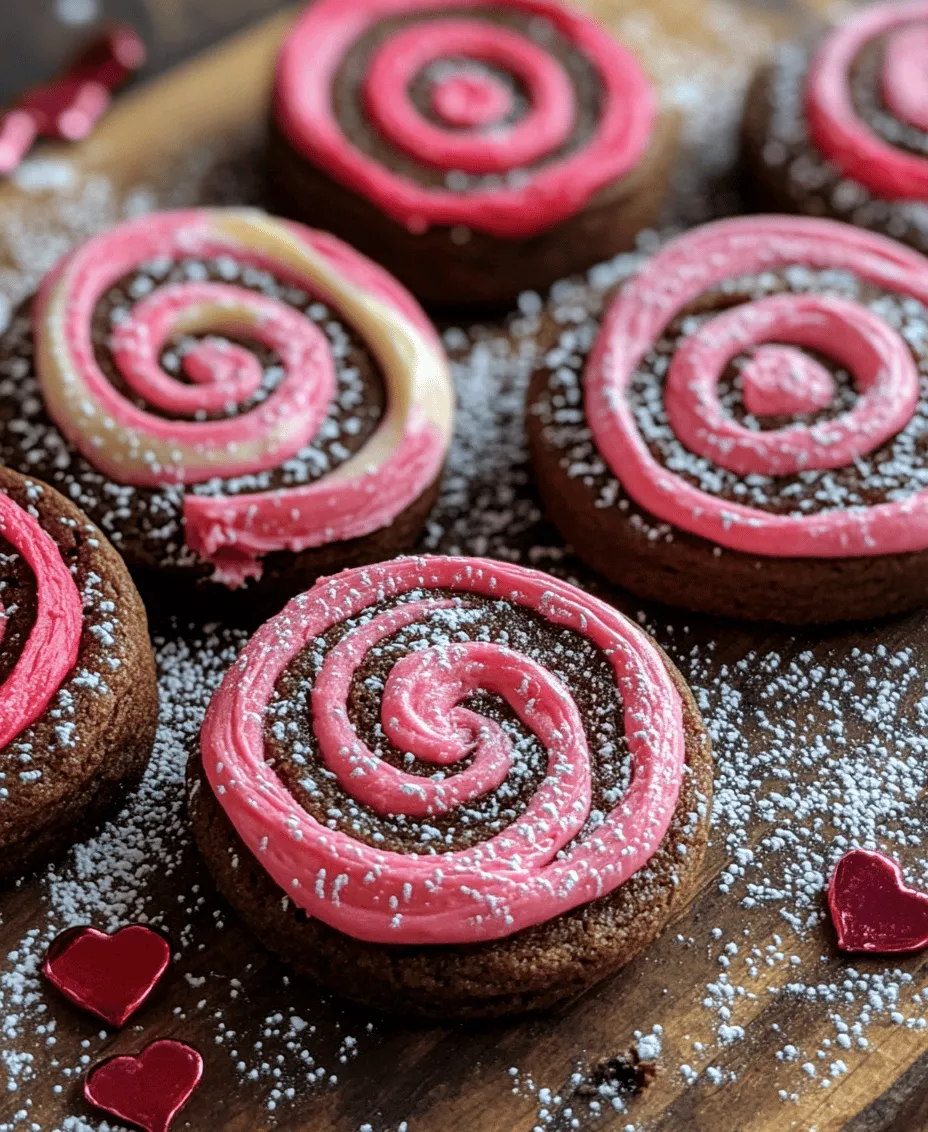
Enter Valentine’s Day Pinwheel Cookies—a delightful treat that embodies the spirit of the occasion. These cookies are not just about taste; they are a visual feast, featuring vibrant swirls of color that symbolize love and joy. Their unique presentation and delightful flavors make them a perfect addition to any Valentine’s Day celebration, whether you are sharing them with a loved one, hosting a gathering, or simply enjoying a sweet moment by yourself.
In this article, we will provide you with a comprehensive guide to making these stunning cookies—from ingredients to preparation methods and baking tips. By the end, you’ll be equipped with all the knowledge you need to create your own colorful swirls of love.
The Significance of Valentine’s Day Treats
Food has long been an integral part of celebrations, and Valentine’s Day is no exception. The tradition of giving and sharing food on this special day dates back to ancient times, where offerings of sweets symbolized affection and devotion. Whether it’s a box of chocolates, a beautifully crafted cake, or a batch of freshly baked cookies, the act of sharing food creates an emotional connection that can deepen relationships and foster intimacy.
Homemade treats carry a unique sentiment. They show thoughtfulness and effort, transforming a simple dessert into a cherished memory. By baking these Valentine’s Day Pinwheel Cookies, you are not just creating a tasty treat; you are crafting a gesture of love, care, and attention. The colorful swirls of the cookies represent the myriad emotions that accompany love, making them a fitting tribute to the holiday.
Understanding the Ingredients
Before diving into the recipe, it’s essential to understand the role of each ingredient in creating the perfect pinwheel cookies. Each component contributes to flavor, texture, and overall structure, ensuring your cookies turn out delicious and beautiful.
Unsalted Butter
Unsalted butter is a key ingredient in most cookie recipes, and for good reason. It provides rich flavor and contributes to the tender texture of the cookies. By using unsalted butter, you can control the amount of salt in your recipe, allowing for a more balanced flavor profile.
Granulated Sugar
Granulated sugar serves two primary purposes in baking: it sweetens the cookies and helps to create their structure. When creamed with butter, sugar incorporates air into the mixture, which aids in leavening and gives the cookies their light, airy texture. The right amount of sugar is essential for achieving that perfect balance between sweetness and richness.
Egg
Eggs are crucial in cookie making as they act as a binding agent, holding the ingredients together. They also add moisture, which contributes to the overall texture of the cookies. When combined with the butter and sugar, eggs help create a smooth, cohesive dough that bakes beautifully.
Vanilla Extract
Vanilla extract is the secret ingredient that elevates the flavor of your cookies. Its warm, aromatic notes enhance the overall taste, adding depth and complexity to the sweet dough. Always opt for pure vanilla extract for the best flavor; the difference is noticeable in baked goods.
All-Purpose Flour
All-purpose flour is the foundation of the cookie dough, providing structure and stability. It absorbs moisture and helps bind the other ingredients together. The right proportion of flour is vital; too much can lead to dry cookies, while too little may result in cookies that spread too much during baking.
Baking Powder
Baking powder is a leavening agent that helps your cookies rise, giving them a light and fluffy texture. It creates tiny air pockets in the dough, resulting in a more delicate cookie. Be sure to check the expiration date on your baking powder to ensure it is still effective.
Salt
While it may seem counterintuitive to add salt to sweet cookies, it is essential for balancing flavors. A pinch of salt enhances the sweetness and richness of the cookies, making every bite more satisfying.
Cocoa Powder
Cocoa powder adds a rich chocolate flavor to the dough, creating a beautiful contrast against the vibrant colors of the pinwheels. It also contributes to the overall depth of flavor, making the cookies even more indulgent.
Gel Food Coloring
To achieve the colorful swirls in your pinwheel cookies, gel food coloring is a must. Unlike liquid food coloring, gel coloring allows for more vibrant hues without altering the consistency of the dough. You can choose any color combination that resonates with you, making each batch of cookies unique.
Powdered Sugar
Powdered sugar is often used as a decorative finishing touch for cookies. It can be dusted on top after baking for an elegant touch or incorporated into icing for added sweetness and appeal.
Step-by-Step Preparation of Valentine’s Day Pinwheel Cookies
Now that you have a clear understanding of the ingredients and their significance, let’s delve into the preparation of your Valentine’s Day Pinwheel Cookies. Follow this step-by-step guide for a successful baking experience.
Preparing the Dough
The first step in creating your pinwheel cookies is preparing the dough. Start by allowing your unsalted butter to come to room temperature. This is critical for achieving the right texture. Softened butter mixes more easily with sugar, resulting in a creamy consistency that is essential for proper aeration.
Once your butter is softened, place it in a large mixing bowl and add the granulated sugar. Using an electric mixer or a whisk, cream the butter and sugar together until the mixture is light and fluffy. This process typically takes about 3-5 minutes. The incorporation of air during this stage is crucial as it will help your cookies rise and develop a soft texture.
Next, add in the egg and vanilla extract. Mix them into the creamed butter and sugar until well combined. This step is essential for achieving the right consistency. The mixture should be smooth and uniform, free of any lumps or clumps.
Combining Dry Ingredients
In a separate bowl, combine the all-purpose flour, baking powder, salt, and cocoa powder. Whisk these dry ingredients together to ensure they are well mixed. This step is crucial because it prevents clumping of the cocoa powder in the dough, which could lead to uneven coloring in your pinwheel cookies.
Gradually add the dry ingredient mixture to the wet ingredients, mixing on low speed or by hand until just combined. Be careful not to overmix, as this can lead to tough cookies. The dough should be slightly sticky but hold its shape.
Dividing and Flavoring the Dough
Once your dough is prepared, it’s time to create the colorful swirls that make these cookies so special. Begin by dividing the dough into two or more portions, depending on how many colors you want to incorporate. For a classic pinwheel effect, consider dividing the dough into two parts: one will remain plain, while the other will be colored.
Take one portion of the dough and add a few drops of gel food coloring. Knead the dough gently until the color is evenly distributed. You can adjust the intensity of the color by adding more gel food coloring as desired. Repeat this process with the second portion of the dough, using a different color for a vibrant contrast.
Now that you have your colored dough ready, it’s time to roll it out and create the swirls that will make your cookies truly stand out.
Stay tuned for the next part, where we will guide you through the rolling, cutting, and baking processes, ensuring your Valentine’s Day Pinwheel Cookies turn out perfectly every time.
How to Properly Incorporate Cocoa and Food Coloring for Uniformity
When it comes to making Valentine’s Day Pinwheel Cookies, achieving the perfect color and flavor balance is crucial. Begin by dividing your dough into two or three equal parts, depending on how many colors you want to incorporate. For the chocolate component, sift in the cocoa powder gradually. This helps to avoid clumps and allows for a more even distribution throughout the dough. Use a spatula or your hands to work the cocoa into the dough until it achieves a uniform chocolate hue.
For the colored dough, gel food coloring is your best option. It provides a vibrant color without adding excess moisture. Start with a small amount and knead the color into the dough thoroughly. You may need to add more to achieve the desired shade, but be cautious; a little goes a long way. The goal is to ensure that the colors are vibrant yet consistent, so take your time to mix and adjust as necessary.
Rolling Out the Dough
Once your dough is colored and cocoa is incorporated, it’s time to roll it out. Begin by lightly dusting your work surface and rolling pin with flour to prevent sticking. Divide each colored dough into smaller portions for easier handling. Roll each portion into a rectangle about ¼ inch thick. Here are some best practices to keep in mind while rolling out your dough:
– Avoiding Sticking: If the dough begins to stick to the surface or rolling pin, sprinkle a little more flour. However, be mindful not to incorporate too much flour into the dough, as this could change the texture of your cookies.
– Consistent Thickness: Use a ruler or guides (like dowels or chopsticks) on either side of the dough to help maintain an even thickness across all layers. This step is vital; uneven dough will lead to uneven baking and inconsistent cookie shapes.
Layering the Dough
Layering is where the magic of pinwheel cookies happens. Carefully lay your rolled-out colored dough on top of the chocolate dough. Ensure that the edges align perfectly for a seamless swirl effect. For optimal adhesion between layers, gently press the top layer into the bottom layer, ensuring that no air pockets remain. The precision of your layering impacts the final visual effect of the cookies, so take your time.
Once all layers are stacked, use a rolling pin to lightly roll over the stacked dough. This not only helps with adhesion but also prepares the dough for rolling into a log. Be cautious not to press too hard, as this could distort the layers you’ve just created.
Rolling Into a Log
The key to perfect pinwheel cookies lies in rolling the dough into a tight log. Begin at one end of the layered dough and gently but firmly start to roll it away from you, keeping the layers tight. If the dough begins to crack, don’t worry—simply pinch the cracks together as you roll. A tight roll ensures that the cookies maintain their shape during baking and results in beautiful, defined swirls.
After rolling, wrap the log in plastic wrap to help it hold its shape. Refrigerate the log for at least one hour, or until it is firm. This chilling step is crucial as it makes slicing the cookies much easier and results in cleaner cuts.
Baking the Cookies
Preheating the Oven
While your dough is chilling, preheat your oven to 350°F (175°C). Preheating is essential for even baking, as it ensures that your cookies start cooking at the right temperature from the moment they enter the oven. For baking cookies, using the conventional setting rather than convection is recommended to prevent uneven browning.
Slicing the Cookies
Once your log is firm, it’s time to slice it into cookies. Use a sharp knife to cut the log into slices approximately ½ inch thick. For even and consistent cookie sizes, it helps to use a ruler or simply cut each slice with an eye for uniformity. Be sure to space the cookies appropriately on your baking sheets—about 2 inches apart—to allow for spreading during baking.
Baking Process
Place the cookies in your preheated oven and bake for 10-12 minutes. Keep an eye on them; you’re looking for a light golden edge while the center remains slightly soft. This ensures that your cookies maintain a delightful chewy texture. To prevent overbaking, check the cookies a minute or two before the minimum baking time. Once they are ready, allow them to cool on the baking sheet for a few minutes before transferring them to a wire rack.
Finishing Touches
Cooling and Dusting
Once your cookies have cooled completely, it’s time for the finishing touches. Cooling is essential for achieving the right texture; warm cookies can be too soft and crumbly. After they are cooled, you can dust them with powdered sugar for an elegant presentation. To do this, place a small amount of powdered sugar in a fine-mesh sieve and gently tap it over the cookies, ensuring an even coating.
Serving Suggestions
Valentine’s Day Pinwheel Cookies are not just a treat; they can be a delightful part of your Valentine’s Day celebrations. Consider these serving suggestions:
– Presentation: Arrange the cookies on a decorative platter or stack them in a clear gift box lined with tissue paper. This adds a personal touch, especially if you plan to gift them.
– Beverage Pairings: These cookies pair beautifully with various beverages. Consider serving them with a robust cup of coffee, fragrant herbal tea, or a tall glass of cold milk. Each pairing enhances the flavors of the cookies and provides a delightful contrast.
– Creative Incorporations: Use these cookies as a centerpiece for your Valentine’s Day celebration. Create a dessert table featuring the cookies alongside other sweet treats. Alternatively, gift them as part of a care package to loved ones, symbolizing your affection through homemade goodness.
Conclusion
Baking Valentine’s Day Pinwheel Cookies is not just about creating a delicious treat; it’s about sharing love and affection through the art of baking. The bright colors and delightful swirls of these cookies symbolize the joy of love and the creativity that goes into crafting something special. As you embark on this baking journey, remember that the process itself is as rewarding as the finished product.
So gather your ingredients, roll up your sleeves, and enjoy the process of making these beautiful cookies. Share them with those you love and cherish the memories created in the kitchen. The joy of baking and gifting these Valentine’s Day Pinwheel Cookies will undoubtedly bring smiles and warmth to your celebrations.