Introduction
As the holiday season approaches, the air fills with a sense of joy, warmth, and togetherness. Festive gatherings and celebrations become a cherished part of our traditions, and no celebration is complete without delightful holiday treats. This year, why not impress your family and friends with a dessert that is not only delicious but also visually stunning? Enter the Blue Christmas Truffles, a unique and vibrant addition to your holiday dessert table that will leave everyone in awe.
These truffles are not only a feast for the eyes but also a treat for the taste buds. The combination of rich chocolate and creamy filling offers a delightful balance of flavors that is sure to please. What’s more, these truffles are easy to make, making them an ideal choice for anyone looking to whip up something special without spending hours in the kitchen. Whether you’re hosting a holiday party or simply want to share some festive joy with loved ones, Blue Christmas Truffles are a perfect choice to celebrate the season.
The Allure of Blue Christmas Truffles
Imagine a dessert that captures the essence of the holiday spirit with its stunning blue hue and playful appearance. Blue Christmas Truffles do just that. Their vibrant color not only catches the eye but also adds a whimsical twist to traditional holiday confections. The truffles boast a rich chocolate flavor complemented by the creamy texture, making each bite a luxurious experience.
The flavor profile of these truffles is a harmonious blend of chocolate and cream cheese, creating a balanced sweetness that is neither overpowering nor overly rich. This delightful combination ensures that the truffles are not just a pretty sight; they are also a scrumptious treat that will have everyone reaching for seconds.
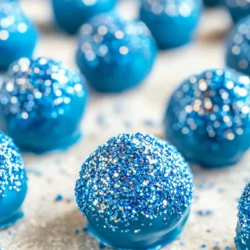
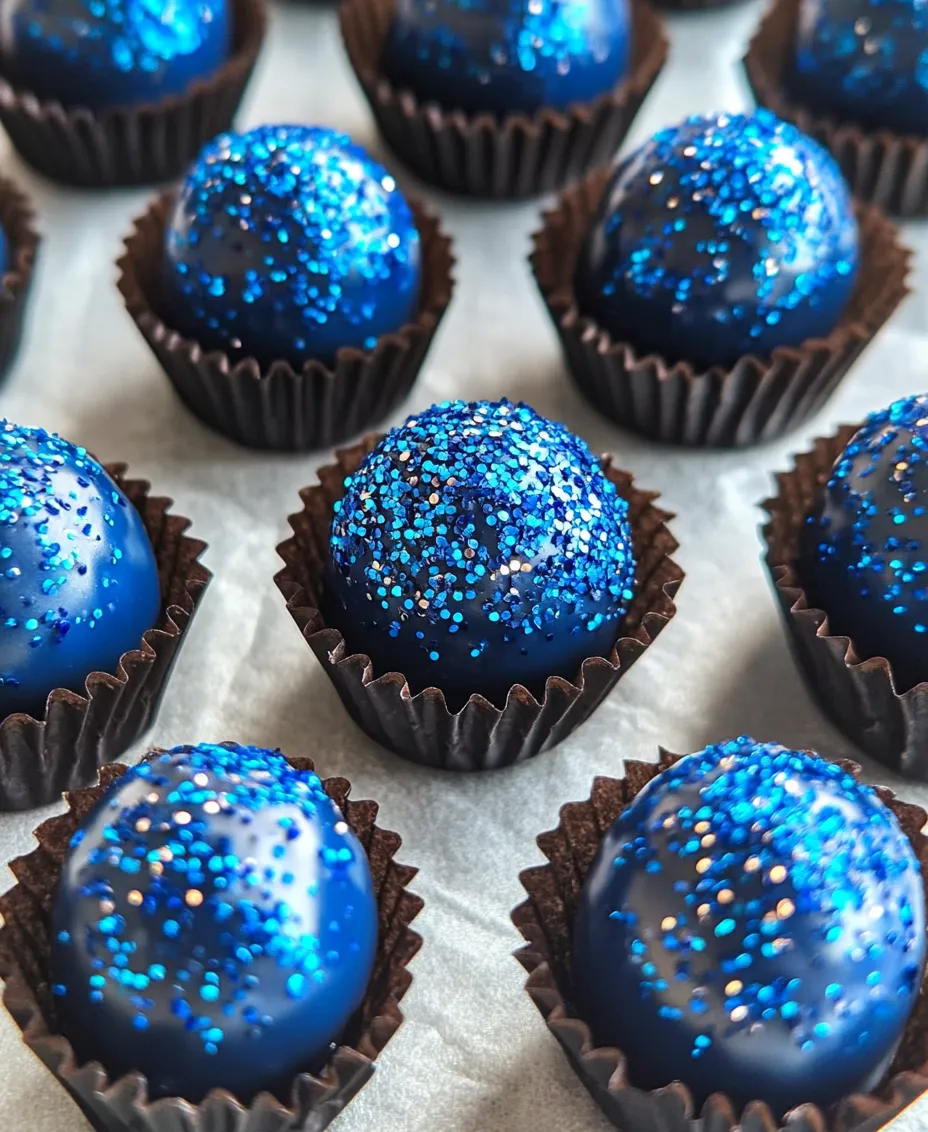
Visual appeal plays a crucial role in holiday desserts, and the Blue Christmas Truffles stand out with their unique presentation. The glossy white chocolate coating, adorned with playful blue sprinkles, gives these truffles a festive flair that will surely be the talk of the party. With their eye-catching appearance and delicious flavor, these truffles are bound to become a new holiday favorite.
Ingredients Breakdown
To create the perfect Blue Christmas Truffles, it’s essential to understand the role each ingredient plays in achieving the desired flavor and texture. Here’s a detailed breakdown of each component:
Digestive Biscuits
Digestive biscuits are the foundation of the truffle base, providing a satisfying crunch and a hint of sweetness. Their crumbly texture allows for easy blending with the cream cheese, creating a smooth and cohesive mixture. Using digestive biscuits ensures that the truffles have a delightful crunch that complements the creaminess of the filling.
Unsweetened Cocoa Powder
The addition of unsweetened cocoa powder contributes to the rich chocolate flavor that is essential for these truffles. It enhances the overall chocolatey taste without adding any extra sweetness, allowing the natural flavors of the other ingredients to shine through. The cocoa powder also helps to deepen the color and richness of the truffle filling.
Cream Cheese
Cream cheese is a crucial ingredient in this recipe, lending a creamy texture that balances the sweetness of the truffles. It adds a luscious mouthfeel and a slight tang that enhances the overall flavor profile. The cream cheese helps bind the other ingredients together, ensuring that the truffles hold their shape and have a smooth consistency.
Powdered Sugar
Powdered sugar is used to sweeten the truffle filling while providing a fine texture that blends seamlessly with the other ingredients. Its ability to dissolve easily allows for a smooth and creamy filling without any grittiness. The sweetness from the powdered sugar complements the bitterness of the cocoa powder, creating a well-rounded flavor.
Vanilla Extract
A splash of vanilla extract adds depth to the flavor of the truffles. This aromatic ingredient enhances the overall taste and provides a warm, inviting aroma that is characteristic of holiday treats. The vanilla works harmoniously with the chocolate and cream cheese, resulting in a rich and flavorful truffle.
Blue Food Coloring
The star of the show, blue food coloring, is what sets these truffles apart. It allows you to achieve the signature blue hue that makes them visually stunning. A few drops are all you need to create a vibrant color that captures the essence of the holiday spirit. The food coloring not only enhances the look of the truffles but also adds to the festive atmosphere of your celebrations.
White Chocolate Chips
White chocolate chips serve as the creamy coating for the truffles. Their sweet, smooth texture complements the rich chocolate filling and adds a beautiful contrast to the blue truffles. The glossy finish of the melted white chocolate creates an elegant appearance, elevating the truffles from simple treats to sophisticated desserts.
Blue Sprinkles
To complete the festive look, blue sprinkles are the final touch for decorating the truffles. They add a fun texture and a burst of color that enhances the visual appeal. The sprinkles not only make the truffles more attractive but also add a playful element that is perfect for holiday celebrations.
Sea Salt
A pinch of sea salt is the secret ingredient that enhances the flavors of the truffles. It balances the sweetness and intensifies the chocolate flavor, providing a sophisticated finish. The contrast between the sweet truffle filling and the salty notes from the sea salt creates a delightful flavor experience that will leave everyone wanting more.
Step-by-Step Instructions
Now that we have discussed the ingredients and their significance, it’s time to dive into the step-by-step instructions to create these scrumptious Blue Christmas Truffles. Follow these easy steps to bring your festive dessert to life:
1. Prepare the Biscuit Base: Begin by crushing the digestive biscuits into fine crumbs. You can use a food processor for a quick and easy method or place them in a zip-top bag and crush them with a rolling pin. Aim for a consistency similar to sand, ensuring there are no large chunks left.
2. Mix the Truffle Filling: In a mixing bowl, combine the crushed digestive biscuits, unsweetened cocoa powder, and cream cheese. Use a spatula or your hands to mix until the ingredients are well incorporated. The mixture should be thick and slightly sticky.
3. Sweeten the Mixture: Gradually add the powdered sugar and vanilla extract to the biscuit mixture. Continue to mix until the sugar is fully incorporated and the filling is smooth and creamy. If necessary, adjust the sweetness by adding more powdered sugar to taste.
4. Add Color: Next, add a few drops of blue food coloring to the mixture. Start with a small amount and mix well, adding more as needed to achieve your desired shade of blue. Remember, a little goes a long way, so be cautious with the coloring.
5. Chill the Mixture: Cover the bowl with plastic wrap and refrigerate the truffle mixture for about 30 minutes. Chilling will make the mixture easier to handle when forming the truffles.
6. Form the Truffles: Once the mixture is chilled, use a small cookie scoop or your hands to form small balls, about one inch in diameter. Place the formed truffles on a parchment-lined baking sheet. Continue until all the mixture is shaped into truffles.
7. Melt the White Chocolate: In a microwave-safe bowl, melt the white chocolate chips in 30-second intervals, stirring in between until smooth. Be careful not to overheat the chocolate, as it can become grainy.
8. Coat the Truffles: Dip each truffle into the melted white chocolate, ensuring they are fully coated. Use a fork to lift them out, allowing any excess chocolate to drip off before placing them back on the parchment-lined sheet.
9. Decorate with Sprinkles: While the white chocolate coating is still wet, sprinkle the blue sprinkles over the truffles. This adds the final festive touch and enhances their visual appeal.
10. Allow to Set: Let the coated truffles sit at room temperature until the chocolate is fully set, or place them in the refrigerator for quicker results.
These easy steps will guide you in creating beautiful Blue Christmas Truffles that are perfect for any holiday gathering. With their stunning appearance and delicious flavor, these truffles are sure to become a beloved tradition in your home. Stay tuned for the next part of the article, where we will explore tips for achieving the best results, along with answers to common questions about making these festive treats.
Comprehensive Guide to Making Blue Christmas Truffles
Creating the perfect Blue Christmas Truffles involves several steps that require attention to detail. This section will guide you through the process, ensuring that each stage contributes to the overall success of these delightful festive treats.
Preparing the Base: Importance of Mixing Dry Ingredients Well
Start by measuring out your dry ingredients accurately. This typically includes confectioners’ sugar, cocoa powder, and any flavoring agents like vanilla or almond extract. It’s crucial to mix these dry components thoroughly in a large bowl before adding any wet ingredients. A whisk can help break up any lumps in the cocoa powder and evenly distribute the sugar, ensuring a uniform flavor throughout your truffles. A well-mixed dry base sets the foundation for a smooth and enjoyable truffle experience.
Adding Cream Cheese: Tips for Achieving a Smooth Mixture
Next, incorporate your cream cheese into the dry mixture. For the best results, use softened cream cheese, allowing it to mix seamlessly with the dry ingredients. You can achieve this by letting the cream cheese sit at room temperature for about 30 minutes before mixing. Use a handheld electric mixer or a sturdy spatula to blend everything together until it’s creamy and free of lumps. The goal is to achieve a smooth, pliable mixture that holds its shape when formed into balls.
Coloring the Mixture: How to Achieve the Perfect Shade of Blue
To give your truffles their festive hue, you’ll need to add food coloring. Start with a few drops of blue gel food coloring—this type is more concentrated than liquid coloring, requiring less to achieve a vibrant shade. Mix thoroughly and assess the color; you can always add more if you desire a deeper blue. Keep in mind that the shade will slightly lighten once the mixture is chilled and coated. Ensuring an even distribution of color is key, so take your time during this step.
Forming Truffles: Techniques for Uniformity and Ease
Once your mixture is well-combined and colored, it’s time to form the truffles. Use a small cookie scoop or your hands to portion out the mixture. Aim for consistently sized balls, about 1 inch in diameter, for uniform baking and a professional appearance. If the mixture sticks to your hands, lightly dust them with confectioners’ sugar to make rolling easier. Place the formed balls onto a parchment-lined baking sheet, ensuring they have enough space to chill without touching.
Chilling the Truffles: Discussing the Importance of Firming for Coating
Chilling is a crucial step that helps the truffles firm up, making them easier to coat in chocolate later. Cover the baking sheet with plastic wrap or aluminum foil and place it in the refrigerator for at least 30 minutes. This resting period allows the flavors to meld and ensures that the truffles hold their shape during the coating process.
Melting Chocolate: Proper Techniques to Avoid Burning
While the truffles chill, prepare your chocolate coating. You can use either dark, milk, or white chocolate, depending on your preference. Chop the chocolate into small, even pieces to promote uniform melting. Use a double boiler or a microwave-safe bowl for melting. If using the microwave, heat the chocolate in 30-second intervals, stirring in between to prevent burning. The key is to melt the chocolate slowly until it’s completely smooth and glossy, with no lumps remaining.
Coating the Truffles: Best Practices for a Smooth Finish
To coat the truffles, use a fork or a dipping tool to submerge each one into the melted chocolate. Ensure each truffle is evenly coated, allowing any excess chocolate to drip off before placing it back on the lined baking sheet. If you’re working with white chocolate and want to maintain the blue theme, consider adding a few drops of oil-based blue food coloring to the chocolate for a cohesive look. This step adds an extra layer of color and creativity to your presentation.
Sprinkling and Garnishing: Creative Ideas for Presentation
After coating the truffles, you can elevate their appearance by sprinkling them with festive toppings. Crushed nuts, colorful sprinkles, or edible glitter can add a touch of elegance and fun. For a more sophisticated look, consider drizzling contrasting chocolate (e.g., dark chocolate over white) in a decorative pattern. Allow the truffles to set for a few minutes before adding these finishing touches for a stunning presentation.
Setting the Truffles: Optimal Conditions for Hardening
Once decorated, the truffles need time to set. Place them in the refrigerator until the coating is firm—this usually takes about 15-30 minutes. If you’re short on time, a cool room works too, but refrigeration is the best way to ensure the chocolate hardens properly, creating a delightful snap when you bite into it.
Serving and Presentation Ideas
Blue Christmas Truffles are perfect for holiday gatherings, and their vibrant color makes them a standout treat. Here are a few suggestions for serving:
1. Festive Platter: Arrange the truffles on a decorative platter or cake stand, garnished with fresh mint leaves or holly for a seasonal touch.
2. Gift Packaging: Package them in clear cellophane bags tied with a blue ribbon for a charming edible gift.
3. Dessert Table: Incorporate them into a dessert table alongside other festive treats, such as sugar cookies and peppermint bark, for a visually appealing spread.
For pairing suggestions, consider serving these truffles with hot chocolate, eggnog, or even a sweet dessert wine. Their rich flavor complements a variety of holiday beverages, making them a versatile addition to any festive occasion.
Nutritional Information
While indulging in Blue Christmas Truffles, it’s important to be mindful of their nutritional content. Each truffle contains a balance of carbohydrates from the sugar and cream cheese, along with fats from the chocolate coating. Depending on your ingredients, one truffle can range from 60 to 80 calories.
Enjoy these treats in moderation, especially during holiday celebrations, where it’s easy to overindulge. Consider savoring a couple after a meal or sharing them with family and friends to spread the joy without overdoing it.
Conclusion
In summary, Blue Christmas Truffles offer a delightful blend of flavor, texture, and festive spirit that can elevate any holiday gathering. With their simple preparation process, they are a perfect project for both novice and experienced bakers alike. Embrace your creativity in the kitchen, experimenting with colors, coatings, and presentations to make these truffles uniquely yours.
As you gather with loved ones this holiday season, these charming treats will not only satisfy your sweet tooth but also create lasting memories filled with joy and laughter. So, roll up your sleeves, gather your ingredients, and enjoy the process of making these beautiful Blue Christmas Truffles. Happy baking!