# Cheesy Delights: Mini-Quiches with Three Types of Cheese
## About This Recipe
Mini-quiches are delightful bite-sized treats that bring a gourmet touch to any meal, whether it’s breakfast, brunch, or as an appetizer for a festive gathering. Their versatility is one of the many reasons they have become a popular choice among home cooks. These little pastries are not only easy to make but also allow for a variety of fillings, making them perfect for showcasing personal tastes or using up leftover ingredients in your fridge.
In this recipe, we will focus on a cheesy medley featuring three types of cheese: sharp cheddar, tangy feta, and nutty parmesan. Each cheese contributes its unique flavor profile, resulting in a rich and satisfying bite that will leave your guests clamoring for more. Plus, the combination of cheeses elevates the flavor complexity, ensuring that each mini-quiche is a cheesy delight.
## Why You’ll Love This
There are countless reasons to fall in love with these mini-quiches:
– **Flavorful and Cheesy Goodness**: The blend of three distinct cheeses creates a deliciously rich and savory filling that is sure to please cheese lovers.
– **Customizable**: These mini-quiches can easily be tailored to your preferences. Feel free to add different vegetables or herbs to suit your taste or make use of leftover ingredients.
– **Meal Prep Friendly**: They can be made in advance, stored in the fridge, and reheated when needed, making them a perfect choice for meal prepping.
– **Quick Cooking Time**: With a total cooking time of just around 25 minutes, these mini-quiches can be whipped up in no time, even on a busy morning.
– **Kid-Friendly**: Their small size and cheesy flavor make them appealing to children, making them a great option for family meals or gatherings.
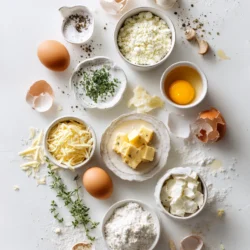
## 🥗 Ingredient Breakdown

Understanding the role of each ingredient is key to successfully making these mini-quiches. Here’s a detailed breakdown of what you’ll need:
– **Pre-Made Pie Crust or Puff Pastry**: Using a pre-made crust saves time and provides a flaky texture that envelopes the cheesy filling perfectly. If you’re feeling adventurous, you can also try making your own crust from scratch.
– **Eggs**: Eggs are the backbone of any quiche. They provide structure to the filling and are a great source of protein, making your mini-quiches more filling and nutritious.
– **Heavy Cream**: Heavy cream adds richness and a creamy texture to the filling, ensuring that your mini-quiches are indulgent and smooth. It balances the flavors and contributes to the overall mouthfeel.
– **Cheddar Cheese**: Sharp cheddar cheese delivers a bold flavor that is unmistakable. It melts beautifully and enhances the overall cheesiness of the quiches.
– **Feta Cheese**: Feta adds a tangy and creamy element that contrasts wonderfully with the sharpness of cheddar. Its crumbly texture also provides a delightful bite.
– **Parmesan Cheese**: This cheese brings a nutty and salty flavor that rounds out the other cheeses. It also adds a nice richness and depth to the filling.
– **Bell Peppers**: Bell peppers introduce vibrant color and a slight crunch to the quiches. You can choose any color you prefer, whether it’s red, yellow, or green.
– **Green Onions**: Green onions, or scallions, provide a mild onion flavor without being overpowering. They add freshness and a pop of color.
– **Salt and Pepper**: These essential seasonings enhance the flavors of all the ingredients. Adjust the amount according to your taste preferences.
– **Fresh Herbs (Optional)**: Fresh herbs like parsley, chives, or thyme can enhance flavor and add a beautiful presentation. Choose herbs that complement the cheese and other ingredients.
## Step-by-Step Preparation
Now that you’re familiar with the ingredients, let’s dive into the preparation process. Follow these steps for success:
1. **Preheat the Oven**: Start by preheating your oven to 375°F (190°C). Make sure your oven is properly calibrated; using an oven thermometer can ensure accuracy.
2. **Prepare the Pie Crust or Puff Pastry**: If you’re using pre-made pie crust, roll it out on a lightly floured surface to about 1/8-inch thickness. If you’re using puff pastry, thaw it according to package instructions and roll it out slightly for uniform thickness. Cut the dough into circles that are about 4 inches in diameter, which should fit nicely into a standard muffin tin.
3. **Place the Dough in Muffin Tins**: Gently press each dough circle into the muffin tin cups, ensuring that the dough lines the bottom and sides completely. This will form the base for your mini-quiches.
4. **Prepare the Egg and Cream Mixture**: In a mixing bowl, crack the eggs and add the heavy cream. Use a whisk to combine them thoroughly until the mixture is smooth. This step is crucial for achieving a creamy filling. Whisking well ensures that the eggs and cream are fully integrated, resulting in a uniform texture.
5. **Add the Cheeses and Vegetables**: To the egg and cream mixture, add the shredded cheddar cheese, crumbled feta cheese, and grated parmesan cheese. Toss in the diced bell peppers and chopped green onions. Season with salt and pepper to taste. Gently mix everything together until the cheeses and vegetables are evenly distributed throughout the egg mixture.
6. **Fill the Shells**: Carefully pour the filling into each dough-lined muffin cup, filling them about three-quarters full. Avoid overfilling to prevent spilling during baking.
## Component Preparation
In this section, we will detail the preparation of each component for the mini-quiches:
### Preparing the Pie Crust or Puff Pastry
– **Rolling Out the Dough**: Dust your work surface with flour to prevent sticking. Use a rolling pin to roll out the dough evenly. Aim for a thickness of about 1/8 inch for even cooking.
– **Cutting the Dough**: Use a round cutter or the rim of a glass to cut out circles from the rolled dough. Ensure that the circles are large enough to fit into the muffin tins.
– **Placing in Muffin Tins**: Gently lift each circle and place it into a muffin tin cup. Press down lightly to ensure a snug fit. If there are any cracks in the dough, you can patch them with small pieces of leftover dough.
### Mixing the Egg and Cream Base
– **Achieving Creamy Consistency**: When whisking the eggs and heavy cream, start slowly to avoid splashing. Once combined, increase your speed to ensure that the mixture is fully blended. You want a smooth, homogenous mixture without any lumps.
By following these initial steps, you’ll be well on your way to creating delicious mini-quiches that are sure to impress. Stay tuned for the next part of the article, where we will discuss the final steps of baking and serving these cheesy delights!
### Chopping and Preparing Vegetables: Best Practices for Dicing Bell Peppers and Green Onions
Before we dive into assembling the mini-quiches, let’s take a moment to prepare our vegetables. Properly chopping ingredients not only enhances the presentation of your dish but also ensures even cooking and flavor distribution.
**Dicing Bell Peppers:**
1. **Wash and Remove Seeds**: Start by washing the bell pepper thoroughly. Slice off the top and bottom, then make a vertical cut along one side. Open it up and remove the seeds and white pith.
2. **Cut into Strips**: Lay the pepper flat on your cutting board. Slice it into strips about 1/4 inch wide.
3. **Dicing**: Stack a few strips, then cut across them to create small cubes. Aim for uniform pieces to ensure even cooking.
**Chopping Green Onions:**
1. **Trim the Ends**: Rinse the green onions under cold water. Cut off the root ends and any wilting green tops.
2. **Slice Thinly**: Use a sharp knife to slice the green onions into thin rounds. You can include the green tops for added color and flavor.
With your vegetables prepared, you’re ready to assemble your mini-quiches.
### Assembly & Serving Tips
**1. Evenly Distributing the Filling:**
When it comes to assembling your mini-quiches, ensure that you evenly distribute the filling into each crust. Use a measuring spoon or a small ladle to portion out the egg mixture over the cheese, vegetables, and any other fillings in your pre-baked crusts. Aim for about 3/4 full to allow room for rising.
**2. Baking Times and Recognizing Doneness:**
Bake your mini-quiches in a preheated oven at 375°F (190°C) for 20-25 minutes, or until they are puffed and golden brown. Keep an eye on them during the last few minutes; the tops should be lightly browned, and a toothpick inserted into the center should come out clean.
**3. Cooling Tips:**
After removing the quiches from the oven, allow them to cool in the tin for about 5 minutes. This cooling period helps set the filling and makes them easier to remove. Gently run a butter knife around the edges of each quiche to loosen them before transferring them to a wire rack to cool completely.
**4. Serving Sizes and Presentation:**
Mini-quiches are perfect for sharing. Aim for serving sizes of 2-3 quiches per person, depending on the occasion. Arrange them on a beautiful platter or a tiered stand for an elegant touch.
### Presentation
Creative presentation can elevate your mini-quiches from simple snacks to stunning appetizers.
**1. Garnishing with Fresh Herbs:**
Add a pop of color and freshness by garnishing your mini-quiches with chopped fresh herbs like parsley, chives, or basil. This simple touch enhances the visual appeal and adds a burst of flavor.
**2. Serving on a Beautiful Platter:**
Use a decorative platter or a tiered stand to display your mini-quiches. This not only makes for an eye-catching centerpiece but also allows guests to easily help themselves.
**3. Accompaniment Ideas:**
Consider serving the mini-quiches alongside a light side salad or dipping sauces, such as a tangy mustard or a creamy ranch. These additions can complement the flavors of the quiches and enhance the dining experience.
### Variations
Encourage creativity in the kitchen by trying out different variations of your mini-quiches.
**1. Different Cheese Combinations:**
While the recipe suggests three types of cheese, feel free to experiment with other options. Goat cheese can add a tangy flavor, while mozzarella provides a milder, creamy texture.
**2. Incorporating Other Vegetables:**
Don’t hesitate to mix in other vegetables like sautéed spinach, mushrooms, or zucchini. These additions can boost nutrition and flavor while allowing you to use up any leftover produce.
**3. Adding Cooked Meats:**
For a heartier option, consider adding cooked meats such as crumbled bacon, diced ham, or sausage. This can transform your mini-quiches into a filling meal.
**4. Gluten-Free Options:**
If you’re catering to gluten-free diets, swap out the traditional crust for alternative options. Consider using gluten-free puff pastry or even a crust made from ground nuts or cauliflower.
### Storage Guidelines
Proper storage can extend the life of your delicious mini-quiches.
**1. Refrigerating Leftovers:**
Store any leftover mini-quiches in an airtight container in the refrigerator. They will stay fresh for up to 3 days.
**2. Reheating for Optimal Taste:**
To reheat, preheat your oven to 350°F (175°C). Place the quiches on a baking sheet and heat for about 10-15 minutes, or until warmed through. This method helps to retain their crispy crust.
**3. Freezing Options:**
For longer-term storage, you can freeze the mini-quiches. Place them in a single layer on a baking sheet to freeze individually before transferring them to an airtight container. Frozen mini-quiches can last up to 2 months. To reheat, bake directly from frozen at 375°F (190°C) for about 25-30 minutes or until heated thoroughly.
### FAQ
**1. Can I use egg substitutes in this recipe?**
Yes, you can use egg substitutes like flaxseed meal mixed with water or commercial egg replacers. However, the texture may vary slightly.
**2. How do I know when the mini-quiches are done baking?**
The mini-quiches are done when they are puffed, golden brown on top, and a toothpick inserted into the center comes out clean.
**3. Can I make these mini-quiches ahead of time?**
Absolutely! You can prepare the filling and crust ahead of time, then assemble and bake them when you’re ready to serve.
**4. What other cheeses can be used for different flavor profiles?**
Feel free to experiment with cheeses like feta for a Mediterranean twist or cheddar for a sharper flavor.
**5. Are there any tips for making these mini-quiches dairy-free?**
To make a dairy-free version, use plant-based cheeses and substitute the milk with almond milk or oat milk.
### Conclusion
In conclusion, these cheesy mini-quiches are not only easy to prepare but also offer endless opportunities for customization. Whether you’re hosting a brunch, a party, or simply looking for a delicious snack, these mini-quiches are sure to impress. Encourage yourself to experiment with different flavors and ingredients, and enjoy the delightful experience of making and sharing these cheesy delights. Your guests will thank you, and your taste buds will be forever grateful.