

About This Recipe
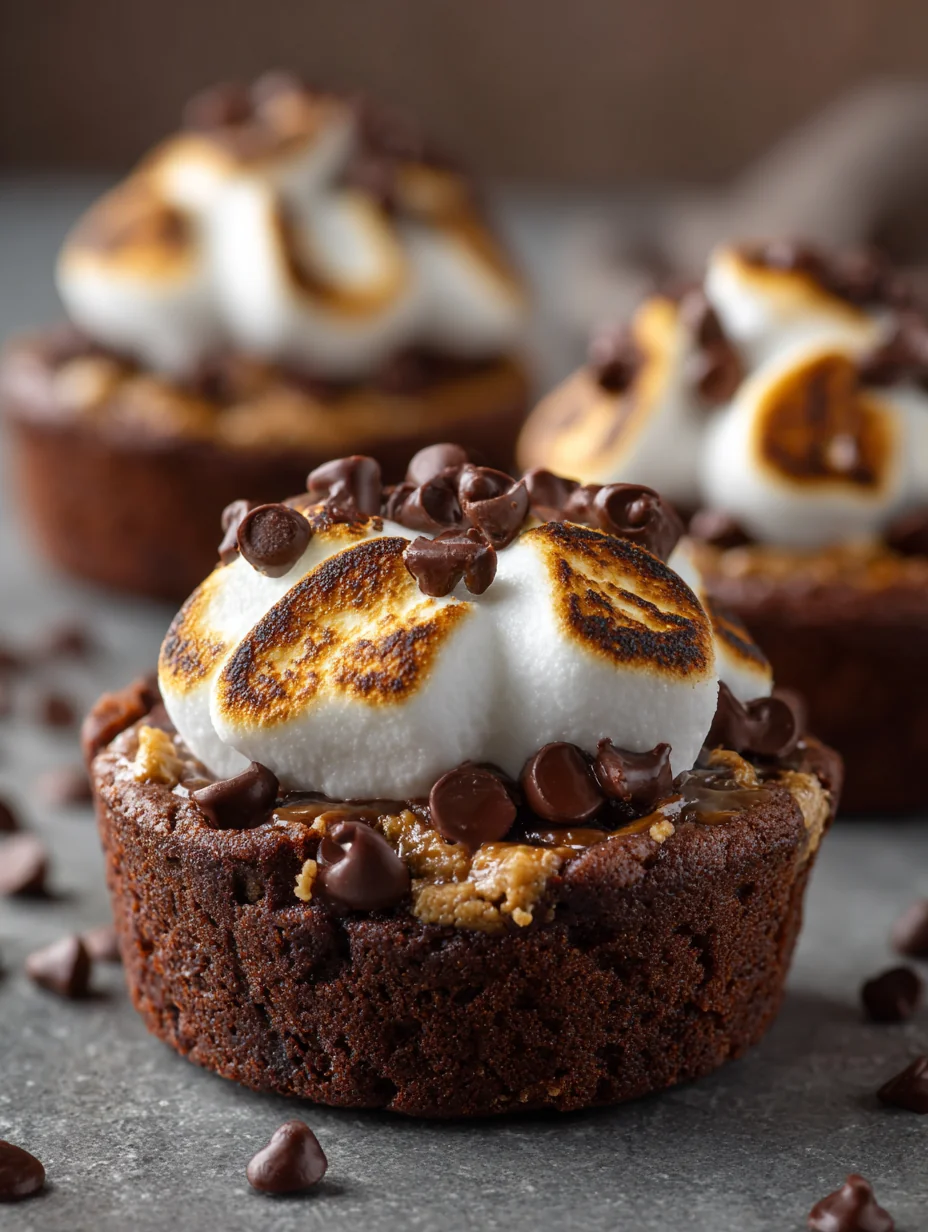
Indulge in the delightful world of Peanut Butter Chocolate Chip Brownie Cups with Gooey Marshmallow, a dessert that perfectly marries rich chocolate and creamy peanut butter. Imagine sinking your teeth into a soft, fudgy brownie cup filled with the lusciousness of peanut butter and topped with a layer of gooey marshmallows. This recipe is not only a feast for the senses but also an absolute crowd-pleaser, making it ideal for gatherings, parties, or a cozy night in with loved ones. Whether you’re a novice baker or someone with more experience in the kitchen, these brownie cups are simple to make and offer a unique twist on classic brownie flavors and textures.
Each bite is a harmonious blend of chocolate decadence and peanut butter richness, complemented by the sweet, pillowy marshmallow topping that adds an irresistible gooeyness. The individual serving size also makes these brownie cups perfect for sharing (or keeping all to yourself). With straightforward preparation steps and easily accessible ingredients, you’ll find that this recipe quickly becomes a family favorite, guaranteed to satisfy any sweet tooth.
Why You’ll Love This
There are countless reasons to love Peanut Butter Chocolate Chip Brownie Cups with Gooey Marshmallow. First and foremost, the combination of flavors is simply divine. The rich, dark chocolate flavor of the brownies is elevated by the creamy peanut butter, which adds a luxurious depth that is hard to resist. The gooey marshmallow topping not only enhances the dessert’s visual appeal but also provides a delightful texture contrast that keeps each bite interesting.
For those who appreciate both ease and creativity in baking, this recipe fits the bill. The straightforward steps make it a great choice for beginners, while the playful variations allow for personalization-whether you want to add a sprinkle of sea salt on top or incorporate a mix of different chocolate chips. Plus, the charming presentation of individual brownie cups is sure to impress guests, making them perfect for celebrations or casual get-togethers. With just a few ingredients and minimal effort, you can create a dessert that feels gourmet yet remains approachable for all skill levels.
Ingredient Breakdown
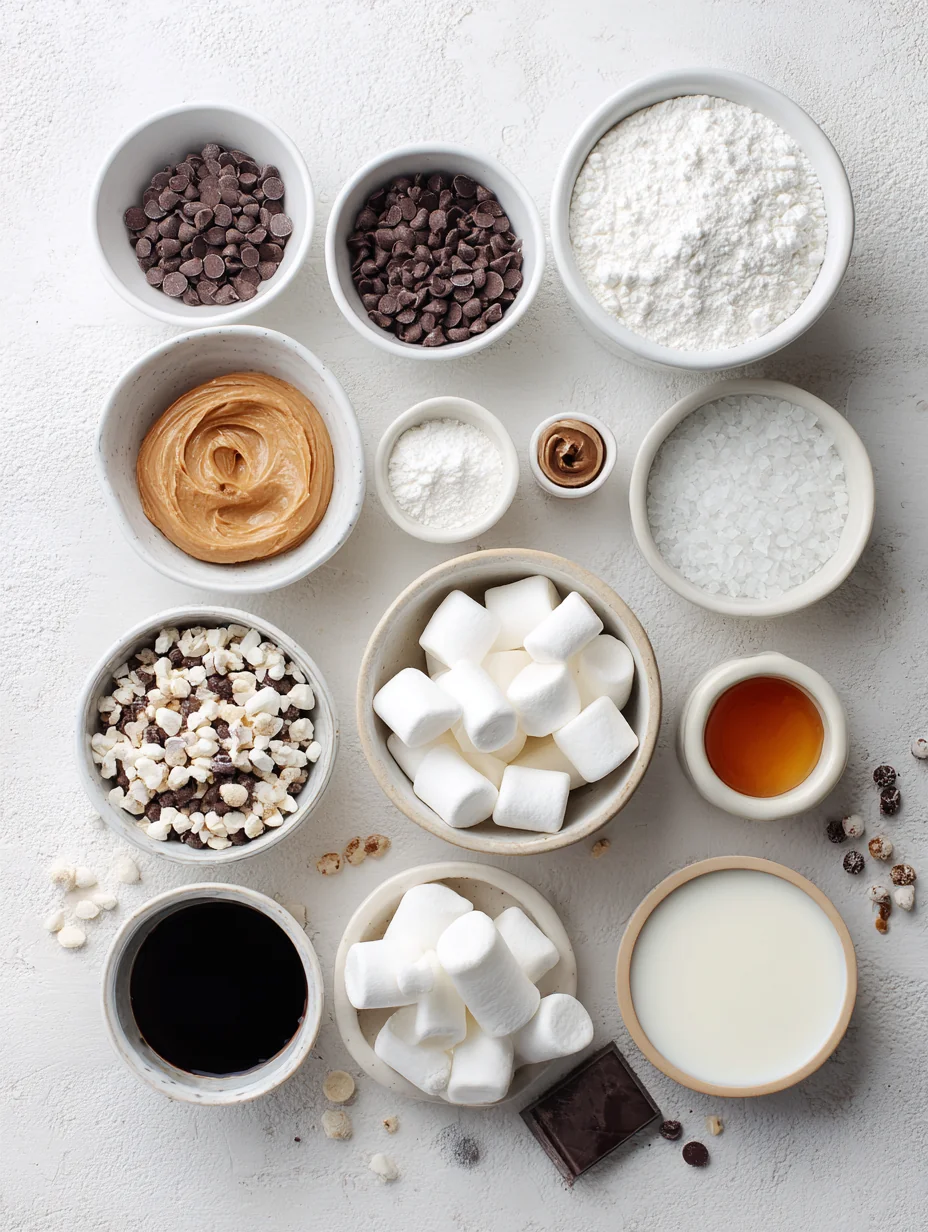
Understanding each ingredient’s role in this recipe is crucial for achieving the best results. Here’s a breakdown of what you’ll need:
- Unsalted Butter: Unsalted butter is a key ingredient that adds richness and moisture to the brownies. By using unsalted butter, you have more control over the overall saltiness of your dessert.
- Granulated Sugar & Brown Sugar: The combination of granulated sugar and brown sugar creates a balanced sweetness while contributing different textures. Granulated sugar helps to create a crispy crust, whereas brown sugar adds moisture and a slight chewiness due to its molasses content.
- Eggs: Eggs are essential for providing structure and moisture to the brownies. They help bind the ingredients together and contribute to the fudgy consistency we’re aiming for.
- Vanilla Extract: This ingredient enhances the overall flavor profile of the brownies. The aromatic qualities of vanilla complement the chocolate and peanut butter beautifully, creating a well-rounded taste.
- All-Purpose Flour, Cocoa Powder, Salt: All-purpose flour is the base of the brownie batter, providing the necessary structure. Cocoa powder delivers the rich chocolate flavor, while a pinch of salt enhances the sweetness and balances the flavors.
- Semi-Sweet Chocolate Chips: These little morsels of chocolate are crucial for adding bursts of chocolatey goodness throughout the brownie cups. They melt slightly during baking, creating pockets of melted chocolate that elevate the entire dessert.
- Creamy Peanut Butter: This is the star of the show. Creamy peanut butter adds a rich flavor and velvety texture that beautifully complements the chocolate. Ensure you use a quality brand for the best results.
- Mini Marshmallows: These fluffy treats are what make the topping irresistible. When baked, they become soft and gooey, adding a delightful sweetness to the brownie cups.
- Chopped Peanuts (optional): For those who enjoy a little crunch, chopped peanuts can be sprinkled on top. They add a nutty flavor and contrast nicely with the soft brownie and marshmallow layers.
Step-by-step Preparation
Now that you have a good understanding of the ingredients, it’s time to get started on your Peanut Butter Chocolate Chip Brownie Cups. Follow these easy steps to prepare the initial components of your dessert.
1. Preheat the Oven: Start by preheating your oven to 350 degreesF (175 degreesC). This ensures that your brownies bake evenly. While the oven heats up, prepare your muffin tin by greasing it lightly with butter or non-stick cooking spray. This will help your brownie cups come out easily once they’re baked.
2. Mix Wet Ingredients: In a medium saucepan, melt 1/2 cup (1 stick) of unsalted butter over low heat. Once melted, remove it from the heat and stir in 1 cup of granulated sugar and 1/2 cup of brown sugar until well combined. The mixture should be smooth and slightly glossy. Next, add 2 large eggs, one at a time, mixing well after each addition. This step is crucial as it helps to incorporate air into the mixture, resulting in a lighter brownie. Finally, stir in 1 teaspoon of vanilla extract to enhance the flavors.
3. Combine Dry Ingredients: In a separate bowl, whisk together 1 cup of all-purpose flour, 1/3 cup of cocoa powder, and 1/4 teaspoon of salt. Sifting the cocoa powder can help remove any lumps, ensuring a smoother brownie texture. Gradually add the dry mixture to the wet ingredients, stirring gently until just combined. Be careful not to overmix, as this can lead to tough brownies. The batter should be thick and slightly glossy.
4. Folding in Chocolate Chips: Gently fold in 1 cup of semi-sweet chocolate chips, ensuring they are evenly distributed throughout the batter. This step adds little pockets of melted chocolate, providing extra richness and texture to each brownie cup.
Component Preparation
Next, let’s delve into how to prepare each component of your Peanut Butter Chocolate Chip Brownie Cups.
- Brownie Batter: After mixing the wet and dry ingredients, the brownie batter should have a smooth and thick consistency. It should be pourable but not runny, resembling a thick cake batter. If the batter appears too thick, you can add a tablespoon of water or milk to loosen it slightly.
- Peanut Butter Preparation: For the creamy peanut butter layer, use a spoon to scoop 1/2 cup of creamy peanut butter into a separate bowl. If your peanut butter is particularly thick, you can microwave it for about 15 seconds to soften it slightly, making it easier to work with.
- Marshmallow Layer: For the gooey marshmallow topping, gather 1 cup of mini marshmallows. These will be added on top of the brownie batter just before the cups finish baking, allowing them to melt and create that gooey layer.
Assembly & Serving Tips
As you prepare to assemble your Peanut Butter Chocolate Chip Brownie Cups, keep in mind the joy of baking is not just in the final product, but in the process itself. The next steps will guide you through the assembly and baking process, ensuring your brownie cups turn out perfectly every time.
Stay tuned for the continuation of this recipe, where we’ll walk you through the final assembly and serving tips that will make your dessert a hit with family and friends.
Assembly Process for Peanut Butter Chocolate Chip Brownie Cups
Filling the Muffin Tin
To ensure your brownie cups bake evenly and share a delightful texture, proper portioning is key. Start by preheating your oven to 350 degreesF (175 degreesC) and greasing a standard muffin tin or lining it with paper liners.
1. Portioning the Batter: Using a standard ice cream scoop or a measuring cup, fill each muffin cup about two-thirds full with brownie batter. This allows enough space for the peanut butter and marshmallows without overflowing during baking.
Layering Ingredients
Once your muffin tin is filled with brownie batter, it’s time to create the gooey center that makes these brownie cups irresistible.
1. Creating the Indent: After portioning the batter, use the back of a teaspoon or your fingers to gently press down in the center of each cup, creating a small well. This will hold the peanut butter and marshmallows.
2. Adding Peanut Butter: Spoon about a teaspoon of creamy peanut butter into each indent. For an added touch, you can slightly warm the peanut butter in the microwave for 10-15 seconds, making it easier to spread.
3. Adding Marshmallows: Follow the peanut butter with a few mini marshmallows, just enough to fill the indent without spilling over the sides.
Baking Time
Bake the brownie cups in the preheated oven for 15-20 minutes. Keep an eye on them as they approach the 15-minute mark.
1. Checking for Doneness: Insert a toothpick into the edges of the brownie cup. It should come out with a few moist crumbs, indicating they are perfectly baked. If the toothpick comes out clean, be cautious, as this may mean the brownie cups are overbaked.
Presentation
Once your brownie cups are baked and cooled, it’s time to make them visually appealing for serving.
Drizzling with Chocolate
To elevate the presentation, consider drizzling melted chocolate over the top:
1. Melting the Chocolate: Use a microwave-safe bowl to melt semi-sweet or dark chocolate. Heat in 30-second intervals, stirring in between, until fully melted and smooth.
2. Drizzling Technique: Transfer the melted chocolate to a piping bag or a zip-top bag with the corner snipped off. Drizzle it over the brownie cups in a zigzag pattern for an artistic touch.
Using Chopped Peanuts
For added texture, sprinkle chopped peanuts over the drizzled chocolate:
1. Timing: Add the chopped peanuts while the chocolate is still warm to ensure they stick, enhancing the crunch factor.
Serving Suggestions
These brownie cups pair wonderfully with a variety of accompaniments:
- Ice Cream: Serve warm brownie cups with a scoop of vanilla or chocolate ice cream for a decadent dessert.
- Whipped Cream: A dollop of freshly whipped cream adds a light contrast to the rich brownie.
Variations
Feel free to get creative with this base recipe to cater to various taste preferences.
Nut-Free Version
For those with nut allergies, you can substitute peanut butter with sunflower seed butter or a soy nut butter to achieve a similar creamy consistency without the nuts.
Flavor Additions
Experiment with adding other flavors:
- Caramel Swirls: Drizzle some caramel sauce over the marshmallows before baking for a rich, gooey addition.
- Different Types of Chocolate: Incorporate white chocolate chips or dark chocolate chunks for added depth of flavor.
Gluten-Free Option
For a gluten-free version, simply swap out regular flour for a gluten-free flour blend, ensuring it measures the same as all-purpose flour in your recipe.
Storage Guidelines
To keep these brownie cups fresh and delicious, follow these storage tips:
Short-Term Storage
Store leftover brownie cups at room temperature in an airtight container for up to 3 days. This will maintain their gooey texture.
Long-Term Storage
For longer storage, consider freezing them:
1. Freezing: Individually wrap each brownie cup in plastic wrap, then place them in a freezer-safe bag or container. They can be frozen for up to 3 months.
2. Thawing: To enjoy, remove the desired number of brownie cups and let them thaw at room temperature for about 30 minutes before serving.
Best Practices
To avoid sogginess, ensure all components are cooled before sealing them in an airtight container. This allows moisture to escape and prevents the cups from becoming too soft.
FAQ
Can I use a different type of nut butter?
Yes, you can use almond butter, cashew butter, or any nut butter of your choice, depending on your preference.
What’s the best way to melt chocolate for drizzling?
Microwaving in short intervals is best. Stirring in between prevents overheating and ensures a smooth melt.
How can I make these brownie cups dairy-free?
Use dairy-free chocolate chips and alternative milk, like almond or oat milk, in the brownie batter. Ensure the peanut butter is also dairy-free.
What should I do if my brownie cups overflow?
If they overflow, remove them from the oven and let them cool slightly before gently pushing the edges back into shape with a spoon.
Can I double this recipe?
Yes, you can easily double the recipe. Just ensure to adjust the baking time accordingly, as larger batches may take longer to bake.
Conclusion
Making Peanut Butter Chocolate Chip Brownie Cups with Gooey Marshmallows is a delightful and rewarding baking experience. These treats are not only simple to prepare, but they also offer a chance to experiment with flavors and presentations. Encourage yourself to enjoy the process, share with friends and family, and savor every gooey, chocolatey bite. Happy baking!