Introduction
In recent years, no-bake desserts have surged in popularity among home bakers and dessert enthusiasts alike. These delightful treats allow for creativity without the hassle of traditional baking methods, making them perfect for every occasion. From rich chocolate mousse to refreshing fruit tarts, no-bake desserts offer a unique way to enjoy sweet flavors with minimal effort. One standout in this category is the No-Bake Funfetti Oreo Icebox Cake, a festive and easy-to-make treat that is sure to impress guests of all ages.
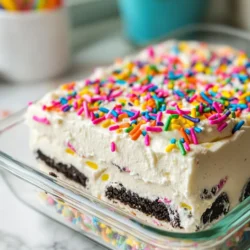
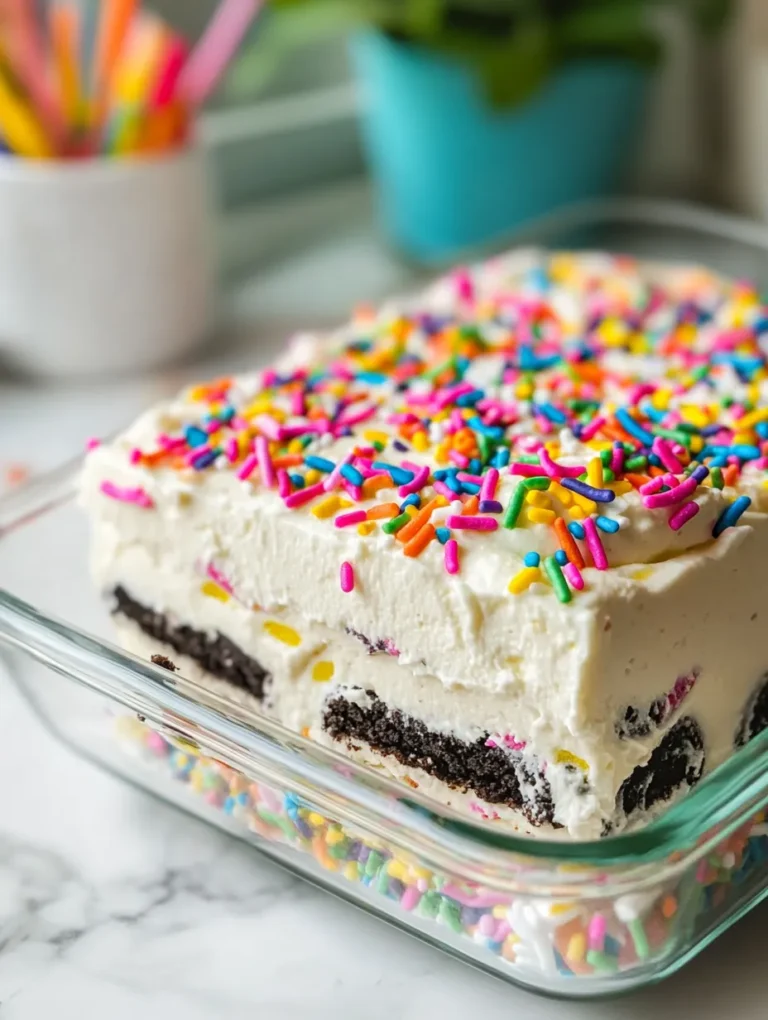
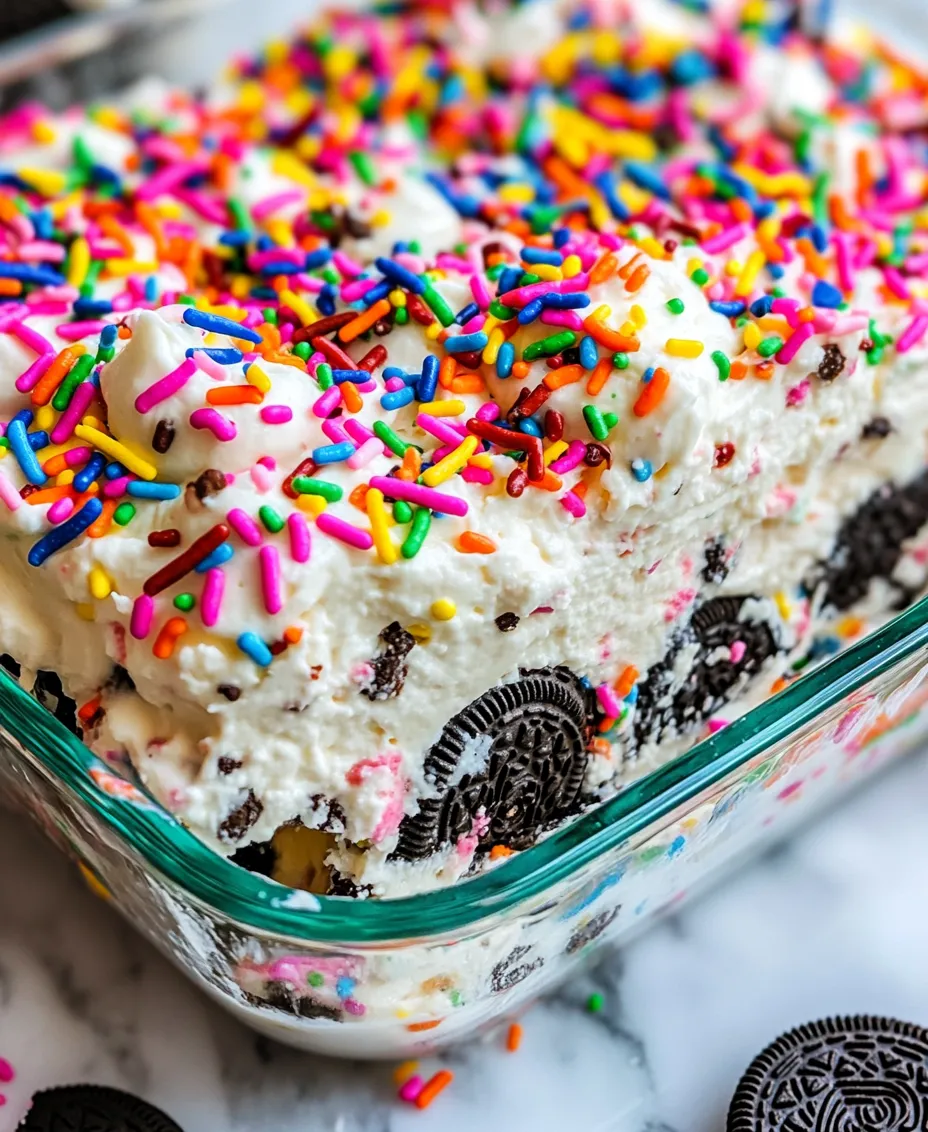
The No-Bake Funfetti Oreo Icebox Cake combines the classic flavors of cookies and cream with the vibrant celebration of Funfetti—a beloved element in many birthday cakes and special occasion desserts. This cake is not just visually appealing; it’s also a deliciously creamy treat that requires minimal time and effort to prepare. Ideal for birthday parties, holiday gatherings, or simply as a sweet indulgence on a sunny afternoon, this cake embodies the essence of easy entertaining while still delivering a decadent dessert experience.
As we delve into this recipe, we’ll explore how this delightful icebox cake can elevate your celebrations, providing a sweet centerpiece that invites smiles and satisfied taste buds.
Understanding the No-Bake Dessert Trend
No-bake desserts are defined by their simplicity: no oven required, and often no advanced baking skills needed. This trend has captivated the hearts of many, particularly those who might shy away from traditional baking due to time constraints or lack of experience. The appeal of no-bake desserts lies in their versatility and ease; they typically involve mixing ingredients, layering, and chilling to set, which can be done in a matter of minutes.
One significant benefit of choosing no-bake options is the time-saving aspect. With busy lifestyles, many people appreciate a dessert that can be prepared quickly without compromising on taste or presentation. Additionally, no-bake recipes often call for a minimal number of ingredients, making shopping and preparation less daunting. Common ingredients found in no-bake desserts include cream, cookies, and gelatins, which lend themselves to a variety of flavors and textures.
The No-Bake Funfetti Oreo Icebox Cake perfectly encapsulates this trend, providing a straightforward yet indulgent way to celebrate life’s special moments. By eliminating the need for an oven, this recipe invites everyone—from novice cooks to experienced bakers—to join in on the fun of dessert-making.
Ingredients Breakdown
To create the delightful No-Bake Funfetti Oreo Icebox Cake, you will need the following ingredients:
– Oreo Cookies: The backbone of this icebox cake, Oreos bring a rich, chocolatey flavor that complements the creamy filling. You can choose between regular Oreos or double-stuffed Oreos, depending on your preference for creaminess. Double-stuffed Oreos will create a richer texture, while regular Oreos offer a more balanced cookie-to-cream ratio.
– Heavy Whipping Cream: This ingredient is essential for achieving the right consistency in your cake. When whipped, heavy cream transforms into a light and fluffy texture that serves as the base for your filling. It’s crucial to use heavy whipping cream for the best results, as lighter creams may not whip to the desired stiffness.
– Funfetti Cake Mix: The star of this dessert, Funfetti cake mix lends both flavor and texture. Using dry cake mix in a no-bake dessert is a clever way to infuse cake-like elements without the need for baking. The flavor of the cake mix adds sweetness and a hint of vanilla that pairs perfectly with the other ingredients.
– Rainbow Sprinkles: Sprinkles are not just for decoration; they add a fun and festive touch to the cake. Their vibrant colors enhance the visual appeal and make the dessert feel celebratory. Be sure to use high-quality sprinkles, as some may bleed colors or lose their shape when mixed into the cream.
– Milk: A simple yet critical ingredient, milk is used to soften the Oreo cookies, allowing them to soak up moisture and create a harmonious texture in each layer. The milk helps to meld the flavors together, ensuring that every bite is both creamy and satisfying.
Using quality ingredients is paramount to achieving the best results in any recipe, and this icebox cake is no exception. Each component plays a significant role in flavor and texture, so choosing the right products will enhance the overall experience of this dessert.
Step-by-Step Instructions
Preparing the Cream Mixture
1. Chill Your Equipment: Before you begin, place your mixing bowl and beaters in the refrigerator for about 15 minutes. This step is crucial for whipping the cream effectively, as cold equipment helps stabilize the cream and allows it to whip up faster.
2. Whipping the Cream: In your chilled mixing bowl, pour in the heavy whipping cream. Begin beating the cream on medium speed until it starts to thicken. Gradually increase to high speed, and continue whipping until you achieve stiff peaks. Stiff peaks are reached when the cream holds its shape without collapsing. This might take anywhere from 3 to 5 minutes, depending on your equipment.
3. Enhancing Flavor: Once you’ve reached the stiff peak stage, add in a teaspoon of vanilla extract to enhance the flavor of your whipped cream. Gently fold the vanilla into the whipped cream using a spatula. Avoid over-mixing, as you want to maintain the fluffiness of the cream.
Incorporating Cake Mix and Sprinkles
4. Adding Cake Mix: With the whipped cream ready, it’s time to add the Funfetti cake mix. Carefully fold in about one cup of the dry cake mix into the whipped cream. This will give your cream a delightful cake flavor while maintaining its light texture. Make sure to fold gently to avoid deflating the whipped cream.
5. Incorporating Sprinkles: After the cake mix is fully incorporated, fold in approximately half a cup of rainbow sprinkles. This step not only adds visual appeal but also infuses pockets of fun throughout the cream mixture, making each bite a celebration of color and flavor.
With these initial steps complete, you are well on your way to creating a stunning No-Bake Funfetti Oreo Icebox Cake. The combination of rich whipped cream, crunchy cookies, and vibrant sprinkles promises a delightful dessert that reflects the joy of any gathering. Stay tuned for the next steps that will guide you through layering and assembling this delicious cake!
The Significance of Gentle Folding to Maintain Fluffiness
When it comes to creating the perfect No-Bake Funfetti Oreo Icebox Cake, the technique of folding is paramount for ensuring a light and airy texture. Gentle folding involves incorporating your whipped cream or whipped topping into the cream cheese mixture without deflating the air that has been incorporated during whipping. This technique not only maintains the fluffiness of the cake but also ensures that the layers meld beautifully, creating a harmonious blend of flavors in every bite.
To fold effectively, use a rubber spatula and scoop from the bottom of the bowl, gently lifting and turning the mixture. Continue this process until the two components are just combined, taking care not to overmix. You want to see streaks of whipped topping throughout, indicating that the mixture is light and airy, perfect for layering in your icebox cake.
Assembling the Cake
Once your cream mixture is ready and your Oreos are prepared, it’s time to assemble the cake. Start by selecting a rectangular or square dish, which will allow you to create beautiful layers. Begin with a layer of the cream mixture spread evenly across the bottom of your dish. This first layer acts as a base that will hold the cake together.
Next, take your dipped Oreos—follow the dipping technique outlined below—and place them in a single layer on top of the cream mixture. Make sure to arrange them closely but without overlapping. Repeat the process, alternating layers of the cream mixture and the cookies until you reach the top of your dish. Finish with a generous layer of the cream mixture, smoothing it out to create an appealing surface.
The Dipping Technique for Oreos: Best Practices to Avoid Sogginess
Dipping Oreos in milk is a crucial step that adds flavor while ensuring the cookies soften just enough to blend with the cream mixture. To achieve the perfect consistency without turning the cookies into mush, follow these best practices:
1. Use a Shallow Dish: Pour milk into a shallow dish to allow for easy dipping. This will give you better control over how long each cookie is submerged.
2. Quick Dips: Don’t leave the Oreos in the milk for too long—just a quick dip on each side (about 2-3 seconds) is sufficient. The goal is to moisten the cookies without making them overly soggy.
3. Drain Excess Milk: After dipping, give the Oreos a gentle shake to remove any excess milk before placing them in the dish. This will help maintain their structure and prevent the cream mixture from becoming watery.
Layering Strategies to Ensure Even Distribution of Flavors
For a beautifully balanced No-Bake Funfetti Oreo Icebox Cake, proper layering is essential. Here are some strategies to ensure that every slice is packed with flavor:
– Start with Cream: Always begin with a layer of cream mixture. This prevents the cookies from sticking to the bottom and allows for a smoother texture throughout the cake.
– Even Spacing: When placing your dipped Oreos, be mindful of spacing. Aim for a uniform distribution of cookies so that every bite contains an equal amount of cookie and cream.
– Alternating Colors: If you’re using colorful sprinkles or colored cream cheese mixtures (think food coloring), consider alternating layers with different colors for a visually striking presentation.
Chilling the Cake
Once assembled, the cake must be chilled to allow the flavors to meld and the texture to set properly. Refrigeration is key for several reasons:
– Flavor Melding: Chilling allows the flavors to combine, enriching the overall taste of the cake. The cream absorbs flavors from the Oreos, and the sprinkles add a delightful crunch.
– Setting the Layers: Chilling helps the layers firm up, making it easier to cut clean slices without disturbing the structure of the cake.
Recommended Chilling Times for Best Results
For optimal results, refrigerate your assembled No-Bake Funfetti Oreo Icebox Cake for at least 4 hours. However, for the best flavor and texture, consider chilling it overnight. This extended chilling time enhances the melding of flavors and allows the cake to set firmly, making serving a breeze.
Garnishing and Serving
Once your cake has chilled and set, it’s time to add the finishing touches and serve it in style. Here are some creative ideas for garnishing and presentation:
– Sprinkles Galore: Top the cake with a generous sprinkle of colorful funfetti sprinkles for an eye-catching look. You can also create a border around the edge of the cake with sprinkles for added flair.
– Whipped Cream Clouds: Pipe dollops of whipped cream on top or around the cake for a luxurious finish. This not only enhances the visual appeal but also adds an extra layer of creaminess.
– Chocolate Drizzle: For a decadent touch, drizzle melted chocolate over the top before serving. This adds an extra flavor dimension and elevates the dessert’s appearance.
– Slice Presentation: When ready to serve, use a sharp knife to cut clean slices. Wipe the knife between cuts for neat edges, making each piece look professionally plated.
The Joy of No-Bake Funfetti Oreo Icebox Cake
This No-Bake Funfetti Oreo Icebox Cake is more than just a dessert; it’s an experience. With its combination of textures—from the creamy filling to the crunchy Oreos and the delightful pop of sprinkles—it tantalizes the senses. Each bite offers a burst of flavor that is as visually appealing as it is delicious.
Perfect for birthdays, family gatherings, or any celebration, this cake is sure to be a crowd-pleaser. Its vibrant colors and playful nature resonate with both children and adults alike, making it the ideal centerpiece for festive occasions.
Customization Options: Ideas for Variations
One of the best aspects of this no-bake cake is its versatility. You can easily customize it to suit your tastes or to match different occasions. Consider these variations:
– Different Cookie Flavors: Swap out the classic Oreos for flavored cookies, such as mint, peanut butter, or even gluten-free options. Each variation will lend a unique taste to the cake.
– Seasonal Sprinkles: Change up the sprinkles according to the season or holiday. Red and green for Christmas, pastel colors for Easter, or vibrant colors for a summer BBQ.
– Layered Fillings: Incorporate different fillings within the layers. Try adding a layer of fruit preserves or a layer of chocolate pudding for an extra treat.
Nutritional Insights
While the No-Bake Funfetti Oreo Icebox Cake is undeniably indulgent, it’s essential to consider its nutritional aspects. A slice is sure to satisfy your sweet tooth, but moderation is key.
– Overview of Nutritional Aspects: Each slice contains a mix of carbohydrates, fats, and sugars, primarily derived from the cookies and cream cheese. It’s a dessert that provides pleasure but should be enjoyed in moderation.
– Indulgence vs. Moderation: Allowing yourself to indulge occasionally can be part of a balanced diet. This cake is rich and fulfilling, making it perfect for special occasions rather than everyday consumption.
– Dietary Considerations: Be mindful of guests with dietary restrictions. Consider offering a gluten-free version or using low-fat cream cheese for those watching their calorie intake.
Conclusion
The No-Bake Funfetti Oreo Icebox Cake is a delightful treat that embodies simplicity and joy. With its easy preparation, vibrant appearance, and rich flavor, it’s a fantastic addition to any celebration or casual gathering.
Embrace the ease of no-bake desserts and discover the joy of creating a treat that not only tastes amazing but also brings smiles to the faces of those you share it with. Whether you’re celebrating a special occasion or just enjoying a sweet moment with family, this cake is sure to be a hit. So gather your ingredients, get creative, and enjoy the delightful experience of making and sharing your No-Bake Funfetti Oreo Icebox Cake.