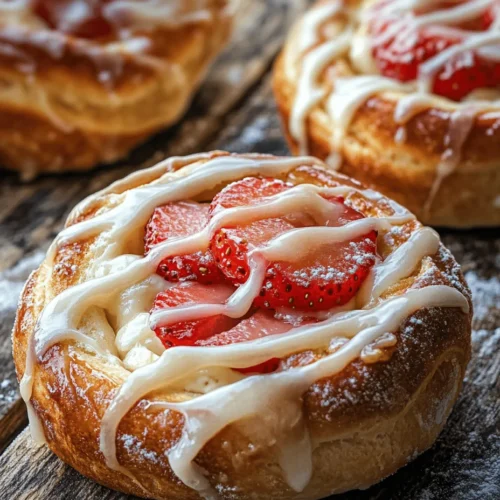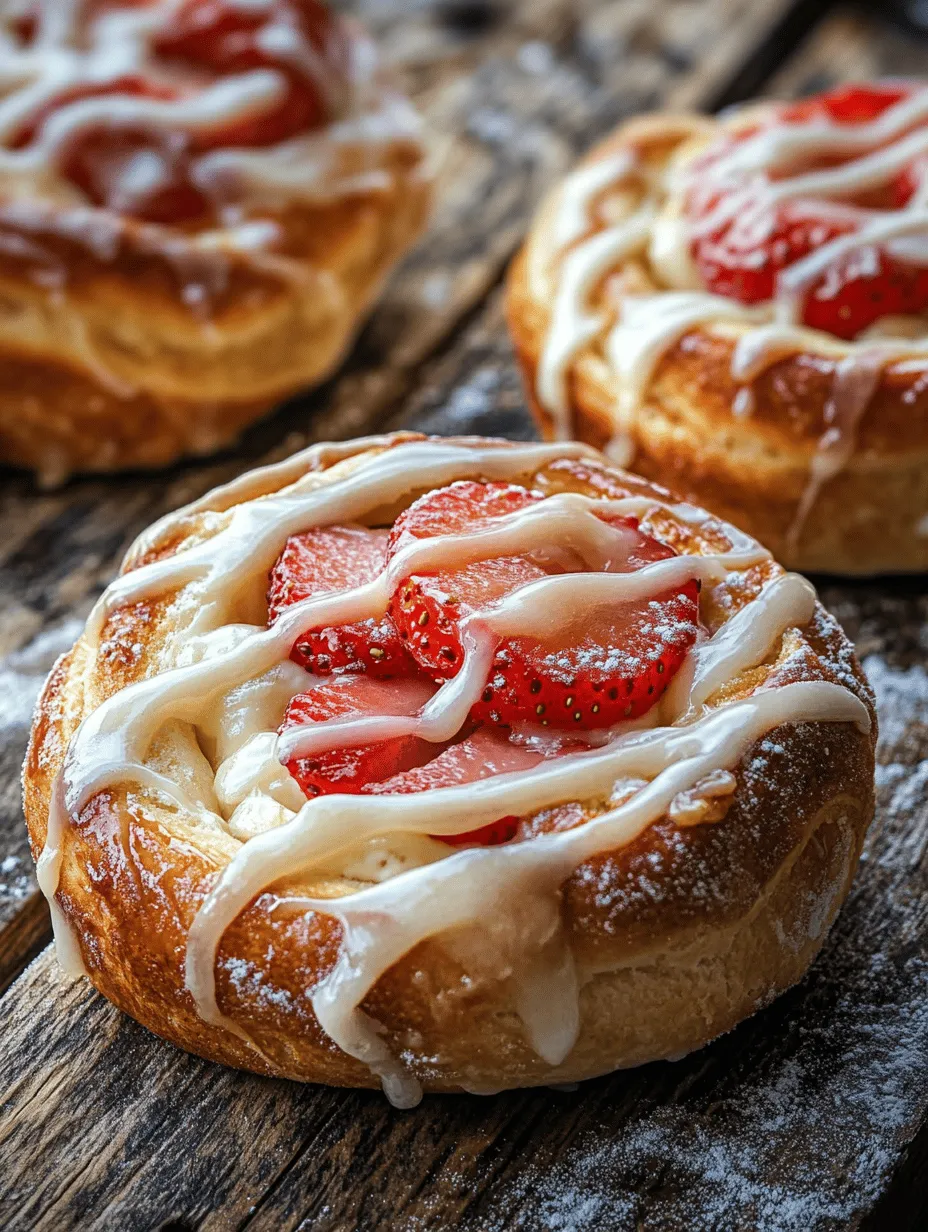
Indulging in the delightful combination of strawberry cheesecake and sweet rolls is a treat that many crave. This recipe for Strawberry Cheesecake Sweet Rolls brings together fluffy, buttery rolls filled with rich cheesecake and fresh strawberries, creating a dessert that is both comforting and indulgent. Perfect for brunch, special occasions, or simply satisfying a sweet tooth, these rolls are sure to become a favorite in your household.
When you think of comforting desserts, sweet rolls often come to mind. The soft, pillowy texture of freshly baked rolls paired with a creamy, luscious filling makes for a winning combination. Imagine biting into a warm roll, the aroma of baked bread wafting through the air, and tasting the creamy cheesecake filling with bursts of sweet strawberries. It’s a sensory experience that elevates any occasion.
In this article, we will explore the art of making these delectable rolls, breaking down each step, and providing tips to ensure your baking success. From understanding the importance of quality ingredients to a detailed step-by-step guide on preparation, you’ll be well-equipped to create a batch of Strawberry Cheesecake Sweet Rolls that will impress your family and friends alike.
Understanding the Ingredients
The Importance of Quality Ingredients
The foundation of any great recipe lies in its ingredients. For our Strawberry Cheesecake Sweet Rolls, using high-quality components is crucial to achieving the best flavor and texture. Let’s take a closer look at the primary ingredients that will elevate this recipe:
– All-Purpose Flour: The backbone of the dough, high-quality flour provides structure and texture. Opt for unbleached all-purpose flour to ensure the best results. The protein content in the flour contributes to the dough’s elasticity, which is essential for creating soft rolls.
– Fresh Strawberries: Using fresh strawberries not only enhances the flavor but also adds a vibrant color to the rolls. When selecting strawberries, look for ones that are firm, bright red, and fragrant. Frozen strawberries can be used in a pinch, but fresh strawberries will give you the best texture and taste.
– Cream Cheese: Real cream cheese is a must for the cheesecake filling. It contributes a rich, creamy texture and tangy flavor that complements the sweetness of the strawberries. For the smoothest filling, be sure to soften the cream cheese before mixing.
– Butter: Unsalted butter adds richness and flavor to the dough. It also contributes to the tender texture of the sweet rolls. Using high-quality butter ensures that your rolls will be as flavorful as possible.
– Sugar: Sugar not only sweetens the rolls but also helps to create a golden-brown crust during baking. Using granulated sugar in the dough and powdered sugar in the cream cheese filling provides the perfect balance of sweetness.
– Yeast: Active dry yeast is essential for leavening the dough. It creates the light and fluffy texture characteristic of sweet rolls. Be sure to activate your yeast properly to ensure a successful rise.
Each of these ingredients plays a vital role in the overall outcome of the Strawberry Cheesecake Sweet Rolls. By selecting the best quality ingredients, you’re setting yourself up for success in the kitchen.
Overview of Sweet Rolls
Sweet rolls are a beloved treat in many cultures, known for their soft, sweet, and often enriched dough. They can be filled with a variety of ingredients, from fruits and creams to nuts and spices. Originating from various baking traditions, sweet rolls are popular across the globe, featuring in breakfasts, desserts, and even as a special treat during holidays.
Typically, sweet rolls are made using a dough that is enriched with eggs and butter, which creates a tender crumb. They are often rolled out, filled, and then rolled up before being sliced and baked. This method allows for a delightful swirled pattern, making each bite a surprise of flavors and textures.
Whether enjoyed fresh from the oven or warmed up the next day, sweet rolls are versatile and can be customized with various fillings and toppings. The process of making sweet rolls involves several key steps, including preparing the dough, allowing it to rise, and creating the filling, which we will explore in detail.
Step-by-Step Guide to Making Strawberry Cheesecake Sweet Rolls
Preparing the Dough
To start making your Strawberry Cheesecake Sweet Rolls, the first step is preparing the dough. This process is crucial as it sets the stage for the light and fluffy rolls you desire. Here’s how to do it:
1. Heat the Milk: Begin by gently heating ¾ cup of milk in a small saucepan over medium heat until it is warm but not boiling (about 110°F or 43°C). This temperature is ideal for activating the yeast without killing it.
2. Activate the Yeast: In a mixing bowl, combine 2 ¼ teaspoons of active dry yeast with the warm milk. Let it sit for about 5-10 minutes until it becomes frothy. This indicates that the yeast is active and ready to help your dough rise.
3. Combine the Ingredients: In a large mixing bowl, whisk together 4 cups of all-purpose flour, ½ cup of granulated sugar, and 1 teaspoon of salt. Create a well in the center of the dry ingredients and add the frothy yeast mixture, along with 1 large beaten egg and ½ cup of softened unsalted butter.
4. Mix the Dough: Using a wooden spoon or a stand mixer fitted with a dough hook, mix the ingredients until they come together to form a shaggy dough.
5. Knead the Dough: Transfer the dough to a lightly floured surface and knead it by hand for about 8-10 minutes until it is smooth and elastic. If you’re using a stand mixer, knead on low speed for about 5-7 minutes. The dough should spring back when lightly touched, indicating that gluten has developed and the dough is ready.
6. Let the Dough Rise: Place the kneaded dough in a greased bowl, cover it with a clean kitchen towel or plastic wrap, and let it rise in a warm, draft-free area for about 1 to 1.5 hours, or until it has doubled in size. This rising process is critical as it develops the texture of the rolls.
Kneading and Letting the Dough Rise
Kneading is a vital step in the dough-making process. It helps to develop gluten, which gives the rolls their structure and chewiness. Here are some techniques to knead effectively:
– Use Your Body Weight: When kneading by hand, use the palms of your hands to push the dough forward, then fold it back over itself. Rotate the dough a quarter turn and repeat. This method ensures that all areas of the dough are worked evenly.
– Check for Stickiness: If the dough is too sticky, you can sprinkle a little extra flour on the surface and continue kneading. However, be cautious not to add too much flour, as it can result in dense rolls.
Once the dough has risen, it will be puffy and airy, indicating that it’s ready to be shaped. The rising process is essential for producing light and fluffy rolls, as the yeast ferments and produces carbon dioxide, causing the dough to expand.
Creating the Cheesecake Filling
While the dough is rising, you can prepare the luscious cheesecake filling that will bring the Strawberry Cheesecake Sweet Rolls to life. Here’s how to make it:
1. Soften the Cream Cheese: Start with 8 ounces of cream cheese. Allow it to sit at room temperature for about 30 minutes to soften. This step is crucial for achieving a smooth and creamy filling.
2. Mix the Filling: In a medium bowl, beat the softened cream cheese with ¼ cup of granulated sugar and 1 teaspoon of vanilla extract using an electric mixer until smooth and creamy. Scrape down the sides of the bowl to ensure all ingredients are well combined.
3. Add Fresh Strawberries: Fold in 1 cup of finely chopped fresh strawberries into the cream cheese mixture. The strawberries should be evenly distributed throughout the filling, providing bursts of flavor and texture in every bite.
4. Set Aside: Once the filling is well mixed, set it aside while you prepare the dough for rolling.
Rolling and Shaping the Sweet Rolls
Now that your dough has risen and your cheesecake filling is ready, it’s time to shape the rolls. Proper rolling and shaping techniques are essential to achieving the perfect Strawberry Cheesecake Sweet Rolls. Here’s how to do it:
1. Roll Out the Dough: After the dough has risen, punch it down gently to release any excess air. Transfer it to a lightly floured surface and roll it out into a rectangle approximately 12×18 inches in size. Aim for an even thickness of about ¼ inch.
2. Spread the Filling: Using a spatula or the back of a spoon, spread the cheesecake filling evenly over the rolled-out dough, leaving a small border around the edges. This ensures that the filling doesn’t ooze out while baking.
3. Roll it Up: Starting from one of the long edges, tightly roll the dough into a log shape. Be careful not to stretch the dough too much while rolling, as this can cause it to tear.
4. Slice the Rolls: Once you have a log, use a sharp knife or dental floss to slice the log into 12 equal pieces. Each slice should be about 1.5 inches wide. Arrange the rolls cut side up in a greased baking pan, leaving some space between each roll for rising.
As you proceed through these steps, you’ll be well on your way to creating a batch of irresistibly fluffy and delicious Strawberry Cheesecake Sweet Rolls. The combination of the rich cheesecake filling and the sweet, tender rolls is sure to delight anyone who takes a bite.
Stay tuned for the next part of this article, where we’ll delve into the baking process and share tips for achieving the best results, ensuring that your Strawberry Cheesecake Sweet Rolls are a success every time you make them.

Tips for Spreading the Filling Evenly Without Making a Mess
When it comes to making Strawberry Cheesecake Sweet Rolls, achieving a perfectly spread filling is crucial for both flavor and presentation. Here are some essential tips to help you spread the filling evenly without creating a sticky mess:
1. Room Temperature Ingredients: Start with room temperature cream cheese, butter, and any other ingredients in your filling. This allows for easier mixing and spreading. If your cream cheese is cold, it may stay lumpy and be harder to spread evenly.
2. Use an Offset Spatula: An offset spatula is a baker’s best friend for spreading any kind of filling. Its angled blade allows for greater control and can help you spread the filling smoothly across the dough without tearing it.
3. Apply in Layers: Rather than applying all of your filling at once, consider adding it in layers. Start by spreading a thin layer over the dough, then add more filling gradually, ensuring that you cover the entire surface evenly.
4. Work from the Center Outward: Begin spreading the filling from the center of the dough and work your way out towards the edges. This technique helps to keep the filling away from the very edges, which can make rolling easier.
5. Use Parchment Paper: If you’re concerned about mess, you can spread the filling on a piece of parchment paper. This can make it easier to lift the dough and transfer it to the baking dish without losing any filling.
6. Avoid Overfilling: While it may be tempting to pile on the filling, too much can lead to overflow during baking. Aim for a thin, even layer to ensure that your rolls stay intact and don’t ooze filling as they bake.
How to Properly Cut and Shape the Rolls for Even Baking
Once you have your filling in place, it’s time to cut and shape your rolls for baking. Proper technique here ensures that they bake evenly and rise beautifully.
1. Use a Sharp Knife or Pizza Cutter: A sharp knife or a pizza cutter makes clean cuts through the dough. If your knife is dull, it can squish the dough and filling, leading to uneven rolls.
2. Cut Even Segments: Depending on how large you want your rolls, cut the dough into equal segments. A good rule of thumb is to aim for 1-2 inch segments for uniformity. If your rolls are too large, they may not bake through properly.
3. Shape Gently: After cutting, gently shape each segment into a roll. Avoid excessive handling; you want to maintain the air pockets that help create a light and fluffy texture.
4. Place with Space: When placing the rolls in your baking dish, leave adequate space between each roll. This allows for expansion during the final rise and baking, which helps achieve that desirable fluffy texture.
Final Rises and Prepping for Baking
Allowing your sweet rolls to rise again before baking is essential for achieving the perfect texture. This final rise helps the gluten relax and the yeast to continue working, resulting in soft, pillowy rolls.
1. Importance of Allowing the Rolls to Rise Again: The final rise typically lasts about 30 to 45 minutes. This is crucial for activating the yeast, which will make the rolls light and airy. Skipping this step can lead to denser rolls.
2. Creating a Warm Environment: Yeast thrives in warm conditions. To create an optimal rising environment, you can preheat your oven to the lowest setting for a few minutes, then turn it off. Place the rolls in the warm oven with a damp kitchen towel over them. Alternatively, you can place the rolls in a sunny spot in your kitchen.
Baking the Rolls to Perfection
Understanding oven temperature and how it affects your baking is vital for achieving the best results.
1. Oven Temperature: Preheat your oven to 350°F (175°C). If your oven runs hot, consider reducing the temperature slightly to prevent the rolls from browning too quickly. Always use an oven thermometer if you’re unsure about your oven’s accuracy.
2. Common Mistakes to Avoid: Avoid opening the oven door too frequently while baking. This can cause temperature fluctuations and affect the rise and texture of your rolls. Additionally, ensure that your rolls are centered in the oven for even heat distribution.
3. Signs to Look For When Rolls Are Done: The rolls should be golden brown on the top and sound hollow when tapped. Additionally, you can use a toothpick inserted into the center of a roll to check for doneness; it should come out clean with no dough sticking to it.
Creating the Glaze
A delicious glaze can elevate your Strawberry Cheesecake Sweet Rolls and add a beautiful finishing touch.
1. How to Make the Perfect Glaze: Start by mixing powdered sugar with a few tablespoons of milk or cream until you achieve a smooth, pourable consistency. You can adjust the thickness by adding more sugar or liquid until you reach your desired consistency.
2. Flavors to Consider: For a unique twist, consider adding a teaspoon of lemon zest for a refreshing citrus flavor or a splash of almond extract for a nutty aroma. You can also mix in a bit of vanilla extract for that classic flavor.
Serving Suggestions
Serving Strawberry Cheesecake Sweet Rolls can be as delightful as making them. Here are some ideas to enhance your presentation:
1. Pairing Options: These rolls pair beautifully with a cup of coffee or tea. The rich sweetness of the rolls complements the bitterness of coffee, making them perfect for breakfast or brunch.
2. Garnishing: Consider garnishing your sweet rolls with additional fresh strawberries or a sprinkle of powdered sugar. For an extra touch, drizzle some of the glaze over the top just before serving to make them look even more inviting.
Storing and Reheating Leftovers
If you happen to have any Strawberry Cheesecake Sweet Rolls left over, proper storage is key to maintaining their freshness.
1. Optimal Storage Techniques: Store your rolls in an airtight container at room temperature for up to two days. If you want to keep them longer, consider refrigerating them for up to a week or freezing them for up to three months.
2. Methods for Reheating Rolls: To reheat, preheat your oven to 350°F (175°C) and place the rolls on a baking sheet. Cover them with aluminum foil to prevent drying out, and heat for about 10-15 minutes. If you’re in a hurry, you can also microwave individual rolls for about 15-20 seconds, but keep in mind that this method may affect their texture.
Conclusion
The Strawberry Cheesecake Sweet Rolls are a delightful fusion of flavors and textures that can elevate any meal or occasion. With their pillowy softness and creamy filling, these rolls make for an irresistible treat that is both easy to prepare and deeply satisfying. By following the detailed instructions provided, you can create a batch of these sweet rolls that will leave your family and friends asking for seconds. Whether enjoyed fresh out of the oven or saved for later, this recipe is sure to become a cherished addition to your baking repertoire.